
Related Manuals for Ariston NUOS FS 200


Summary of Contents for Ariston NUOS FS 200
- Page 1 Instructions for Installation, Servicing and Use External Air Source Heat Pump Water Heater NUOS FS 200 NUOS FSi 250 Country of Destination: GB/IE...
-
Page 2: Important Information
Model NUOS Weight Fittings Kit kg (max) NUOS FS 200 NUOS FSi 250 It is recommended to use a sack barrow for lifting and moving the packaged NUOS. The bottom and top of the carton has polystyrene padding to protect the unit. -
Page 3: Table Of Contents
TABLE OF CONTENTS 5.8 IEE W IMPORTANT INFORMATION..... 2 IRING EGULATIONS RITISH ......... 20 GENERAL INFORMATION ....4 TANDARDS 5.9 W ........21 1.1 G .......... 4 IRING AYOUT UARANTEE 5.10 M ......22 1.2 I ........4 AINBOARD AYOUT NTENDED 1.3 P ...... -
Page 4: General Information
This manual is an integral and essential part of the product. It should be GENERAL kept with the product. INFORMATION Please read carefully the instructions and notes about Ariston NUOS Heat Pump Water Heater contained in this manual as they provide important information regarding the safe installation of the system. WARNING Warnings emphasize that a potentially hazardous or dangerous situation could exist. -
Page 5: Ce Marking
The CE marking applied to the appliance certifies that it conforms to the 1.4 CE M ARKING essential requirements of the following European Directives:- 2006/95/EC concerning the safety of electrical equipment. 2004/108/EC concerning electromagnetic compatibility. Checks are carried out in conformity with the following technical standards:- EN 255-3;... -
Page 6: Basic
1.6 B ASIC RINCIPLES The compressor increases the pressure of the refrigerant The fan draws air through v a p o u r c a u s i n g t h e h e a t e x c h a n g e r. significantly increase in The cool refrigerant is temperature... -
Page 7: Typical Nstallations
1:8 T YPICAL NSTALLATIONS Example 1. NUOS installed in Utility Room. Inlet air from room - not ducted. Exhaust air ducted to outside. Example 2. NUOS installed in garage/outhouse. Inlet air from internal duct. Exhaust air ducted to outside from side of unit. -
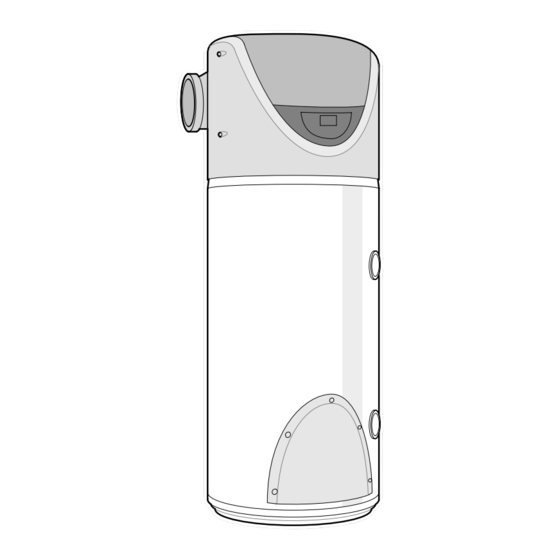
Page 8: Nuos Components
1.9 NUOS C OMPONENTS DENTIFICATION . 1.9 NUOS C OMPONENTS DENTIFICATION... -
Page 9: General Layout
1.9 NUOS C OMPONENTS DENTIFICATION CONTINUED NUOS Cylinder 13. DHW Temperature Sensor Air Fan Outlet - Side 14. Anode Air Fan Outlet - Top 15. Heat Exchanger (Condenser) Air Fan 16. Electric Heating Element and Heating Element Zone Sensors and Magnesium Ambient Air Inlet Anode Evaporator... -
Page 10: Safety
No valves must be fitted between the vessel and the PRV. No valves must be fitted between the vessel and its expansion vessel. 2.4 P When installing and servicing the appliance Ariston Thermo UK Ltd. ERSONAL ROTECTION recommend the use of suitable protective clothing (i.e. gloves). -
Page 11: User Instructions
USER INSTRUCTIONS IMPORTANT This appliance is not intended for use by persons (including children) with reduced physical, sensory or mental capabilities, or lack of experience and knowledge, unless they have been given supervision or instruction concerning use of the appliance by a person responsible for their safety. Children should be supervised to ensure that they do not play with the appliance. -
Page 12: Turning Nuos O N
Display Displays set temperature °C, mode, heat pump status and electric heater status. Heat Pump active Temperature AUTO Electric Heater active Mode - Auto, Boost, Green, Voyage P1, P2 or P1+P2 If enabled Smile Led ON indicates NUOS is heating water. Will also flash when system error is displayed, see 8.3. -
Page 13: Setting Operatingm M
The mode is set using the ‘Mode Button’ - refer to 3.1 3.5 S ETTING PERATING Auto Mode The NUOS operates giving priority to the heat pump to reach the set temperature within a set time duration as determined by parameter P9 (default 8 hours). -
Page 14: User Settingp
3.6 U ETTING ROCEDURES Set Temperature AUTO BOOST GREEN VOYAGE P1 + P2 Set Mode AUTO VOYAGE VOYAGE VOYAGE Set Voyage Days (holiday) Also ‘P2’ AUTO Set P1 °C & Time Set P2 °C & Time 3.7 S NUOS O UMMARY OF PERATION °... -
Page 15: Information Menu
The Information Menu is displayed by pressing the control knob for 5 3.8 I NFORMATION seconds. The menu displays operating function status and monitoring information. No changes can be made within the information menu (except current time L0), any other settings that can be changed are changed in the installers menu - see 4.1 Accessing Information Menu:- Press control knob for 5 seconds. -
Page 16: Installers Settings
The Installers Menu is displayed by entering the correct code when P0 is INSTALLERS displayed in the information menu. SETTINGS The menu enables the installer to set the NUOS operating parameters. 4.1 I NSTALLERS Accessing Information Menu:- Press control knob for 5 seconds. Turn control knob and go through L0 to L14 then the display will show P0 code. -
Page 17: Technical Data
TECHNICAL DATA 5.1 D IMENSIONS . 5.1 IMENSIONS... -
Page 18: Technical
5.2 T ECHNICAL Description FS 200 FSi 250 Tank Rated Capacity 200 litre 250 litre Footprint (minimum) 0.6 x 0.6m 0.6 x 0.6m Height 1.70m 1.96m Weight Empty 90kg 110kg Weight Full 290kg 360kg Minimum ceiling height required 1.75m Maximum Operating Pressure 6 bar 6 bar Condensate Drain... -
Page 19: Kit Contents
Ozone Depletion Potential (ODP) Global Warming Potential (GWP) <5 <5 5.3 K Direct kit for NUOS FS 200 pt. no. 3069418 ONTENTS Qty 1 Pressure Reducing Valve Qty 1 Security Valve (6 bar) Qty 1 Tundish Qty 1 Expansion Vessel (18 litre) Direct kit for NUOS FSi 250 pt. -
Page 20: Product Label
5.4 P RODUCT ABEL CAPACITY MODEL SERIAL NUMBER VOLTAGE / FREQUENCY MAX. TANK PRESSURE MAXIMUM POWER CONSUMPTION TYPE/QUANTITY OF REFRIGERANT WEIGHT WHEN FULL MAX PRESSURE HEAT PUMP HEAT PUMP CIRCUIT HI/LOW PRESSRE SIDE POWER CONSUMPTION HEAT PUMP HEAT RATING SYMBOLS IPX4 TANK PROTECTION POWER CONSUMPTION ELECTRIC... -
Page 21: Layout
5.9 W IRING AYOUT BLUE BLUE 35uF 400V BROWN BLACK fuse 16AT BLACK BLUE 1000W BLACK BLUE 1500W Power Supply 9. Mainboard DHW NTC Sensor 10. Compressor Condenser Interface Board 11. Compressor Electric Heater Element 12. Fan Electric Heater NTC Sensor 13. -
Page 22: Mainboard Layout
5.10 M AINBOARD AYOUT Serial Port Fan Connection A and B to 12V C Earth D and E 240V Gas Safety Pressure Switch DHW NTC Sensor Connection Electric Heater Connection Power Supply Compressor Connection Defrost Hot Gas Valve . 5.10 AINBOARD AYOUT... -
Page 23: Installation
INSTALLATION 6.1 L The following list gives guidance to locating the NUOS heat pump. OCATION OF THE PPLIANCE The NOUS must be installed in a dwelling or suitable outhouse, it must not be installed outside and/or where it could be subjected to temperatures below 1°C. -
Page 24: Exhaust
When both inlet and outlet *see note ducts are used these must terminate at least 500mm apart. For details of ducting kits available, consult Ariston. . 6.3 YPICAL UCTING XAMPLES Each duct accessory has a designated static loss value (measured in 6.4 A... -
Page 25: Installing Procedure
This gives a suggested step-by-step guide to installing the NUOS unit, 6.5 I NSTALLING ROCEDURE more detailed information is included in the following pages. Consider all topics in section 6.1, the Bathroom Zone requirements (when applicable), and then choose a location for the unit. Design pipework layout with the best position for control valves and expansion vessel. -
Page 26: Bathroom Zones
The NUOS appliance is rated @ IPX4. 6.7 B ATHROOM ONES The NUOS unit can be installed in Zone 2 and Zone 3. However, the switch/fuse unit must be installed in Zone 3. 0.75m The NUOS can be installed in a r0.6m bathroom, however, a bathroom would not be the most suitable... -
Page 27: Water Connections
6.9 W ATER ONNECTIONS Not to scale NUOS TPR Valve NUOS Hot Out Red Collar ¾” BSP M Hot Supply to Taps ¾”BSP F to ¾”BSP M Dielectric Joint (supplied) must be fitted to NUOS Hot Out Thermostat mixing valve (not supplied) Cold 22mm... -
Page 28: Onnection
The NUOS FSi 250 has an indirect coil that is intended for connection to a 6.11 FSi 250 I NDIRECT water heating system, such as a solar system as shown below. OLAR ONNECTION A manual reset overheat stat is supplied fitted to the NUOS. For solar installations this stat should be wired so that in the event of overheating from the solar system the thermostat switches the solar pump Off, thus preventing flow to the NUOS. -
Page 29: Fs I 250 Solarc
in the event of the stored water going over temperature, the heat input to the cylinder is isolated by physical means and is non self resetting. These systems should be clearly identified with reference to the approvals body. (See Note 2) Note 1 :Whilst most solar cylinders use a coil type heat exchanger other options such as external plate to plate devices , external annulars or ‘tank in tank’... -
Page 30: Onnection
The NUOS FSi 250 has an indirect coil that is intended for connection to a 6.12 FSi 250 I NDIRECT water heating system, such as a boiler as shown below. OILER ONNECTION A manual reset overheat stat is supplied fitted to the NUOS. This stat should be wired so that in the event of over temperature in the NUOS’s hot water system the thermostat breaks the electrical supply to Note:... -
Page 31: 6.13 Tprv & Prv D
The discharge from the cylinder TPRV and combination PRV must be 6.13 TPRV & PRV D ISCHARGE plumbed to the tundish and should not be used for any other purpose. The tundish must be vertical and fitted within 750mm of the pressure relief valve and must be located with the NUOS. - Page 32 length should be at least two sizes larger than the Note: An alternative approach for sizing discharge pipes nominal outlet size of the safety device; between 18 would be to follow Annex D, section D.2 of BS 6700:2006 and 27m at least 3 sizes larger, and so on; bends must Specification for design, installation, testing and be taken into account in calculating the flow resistance.
-
Page 33: Nuos Expansion
Worked Example 3.58Where a single common discharge pipe serves The example below is for a G½ 6 with a discharge pipe more than one system, it should be at least one pipe (D2) having 4 No. 22mm elbows and length of 7m from size larger than the largest individual discharge pipe (D2) the tundish to the point of discharge. -
Page 34: Supporting Floor
The floor should be capable of fully supporting the NUOS. 6.17 S UPPORTING LOOR Uneven and less sturdy floors should be bolstered using a thick exterior plywood base spanning joists. Ensure floor under NUOS is sealed against water ingress. 6.18 P Check all plumbing and cable routes are satisfactory. -
Page 35: Filling The System
Check all pipework connections have been made. 6.22 F ILLING THE YSTEM Check PRV discharge pipes and tundish are correctly fitted. Check all pipe connections are tight and no joints have been left unsoldered. Check power is off. Check wiring connections have been made. Turn all isolating valves off. -
Page 36: Commissioning System
COMMISSIONING SYSTEM The Commissioning Procedure should be carried out in 7 stages. Stage 1 Electrical Check Stage 5 Cleaning The System IMPORTANT It is the responsibility of the Stage 2 Pre-fill Check Stage 6 Setting and Testing Controls installer to ensure that the system properly Stage 3 Filling System... - Page 37 3.9 Cylinder TPRV - check its operation; with the water supply on, turn the TPRV test knob and check water discharges to tundish, ensure the valve closes after testing. 3.10 Combination Valve PRV - check its operation; with the water supply on, turn the PRV test knob and check water discharges to tundish, ensure the valve closes after testing.
-
Page 38: Maintenance
8.1 R & R EMOVING EPLACING heater has to be removed from the NUOS. LECTRIC EATER LEMENT Only replace with approved Ariston parts. For wiring see 5.9 . 8.1 LECTRIC EATER LEMENT Removal Procedure for Inspection CAUTION Refer to fig. 8.1A. -
Page 39: Routine Maintenance
The following procedure should be carried out to ensure the efficient 8.2 R OUTINE AINTENANCE operation of the NUOS. Check operation of the electric heater element. Check anode every year and replace as required depending on its Note: deterioration - see note. The inclusion of a water softener Remove top cover and brush and vacuum enclosure. -
Page 40: Error Codes
8.3 E RROR ODES i t a h t i t f f i l p y f i y t l c i l i t c . ) . i l p f f o t l i t f i , s t i t a... -
Page 41: Fault Finding
See back page for Ariston contact details. 8.4 F AULT INDING ° 5 a t l , s l y f i y t i c i f y l t a l i l i b y t i... -
Page 42: Benchmark Logbook
EXTERNAL AIR SOURCE HEAT PUMP WATER HEATER EXHAUST AIR HEAT PUMP WATER HEATER This Commissioning Checklist is to be completed in full by the competent person who commissioned the heat pump and associated equipment as a means of demonstrating compliance with the appropriate Building Regulations and then handed to the customer to keep for future reference. Failure to install and commission this equipment to the manufacturer’s instructions may invalidate the warranty but does not affect statutory rights. -
Page 44: Uarantee
Our service engineer calls as requested and the failure is a non-manufacturing defect. Failure to pay an invoice for any such occurrence will be assumed by Ariston Thermo Group that you accept that your appliance has not been installed correctly and understand that any manufacturer’s guarantee has been withdrawn.
Need help?
Do you have a question about the NUOS FS 200 and is the answer not in the manual?
Questions and answers