
Related Manuals for Extron electronics MGP Pro Series


Summary of Contents for Extron electronics MGP Pro Series
- Page 1 User Guide Signal Processors MGP Pro Series Multi-Graphic Processors 68-2469-01 Rev. A 06 13...
-
Page 2: Safety Instructions
Safety Instructions Chinese Simplified Safety Instructions • English (简体中文) 警告: 产品上的这个标志意在警告用户该产品机壳内有暴露的危险 WARNING: This symbol, , when used on the product, is intended to 电压, 有触电危险。 alert the user of the presence of uninsulated dangerous voltage within the product’s enclosure that may present a risk of electric shock. 注... - Page 3 Extron Safety and Regulatory Compliance Guide on the Extron website. Copyright © 2013 Extron Electronics. All rights reserved. Trademarks All trademarks mentioned in this guide are the properties of their respective owners. The following registered trademarks...
- Page 4 Conventions Used in this Guide Notifications The following notifications are used in this guide: ATTENTION: Attention indicates a situation that may damage or destroy the product or associated equipment. NOTE: A note draws attention to important information. Software Commands Commands are written in the fonts shown here: ^AR Merge Scene,,Op1 scene 1,1 ^B 51 ^W^C [01] R 0004 00300 00400 00800 00600 [02] 35 [17] [03] E X! *X1&* X2)* X2#* X2!
-
Page 5: Table Of Contents
Remote Configuration and Control ............1 ....41 SIS Commands ..........41 About this Guide ..........1 About the MGP Pro Series Multi-Graphic Serial Ports ........... 41 Processors ............1 Ethernet Port ..........42 Features ............. 2 Communication Software ......42 Application Diagram ........... - Page 6 Pinging for the IP Address ......107 Connecting as a Telnet Client ...... 108 Subnetting, a Primer ........110 Updating the Firmware ........111 Determining the Firmware Version ....111 Downloading the Firmware ......114 Uploading the Firmware ......114 MGP Pro Series • Contents...
-
Page 7: Introduction
• Application Diagram About this Guide This guide discusses how to install, configure, and operate the Extron MGP Pro Series and the multi-graphic processors. Throughout this guide, the terms “MGP,” “MGP Pro,” and “processor” are used interchangeably to refer to all models of the products. -
Page 8: Features
HDTV video from an HDMI or DVI source as a background. The Live Background input can be used for cascading two or three MGP Pro units to create large-scale displays with 6 to 12 windows. MGP Pro Series • Introduction... - Page 9 • Quad standard video decoding — A digital four-line adaptive comb filter decodes NTSC 3.58, NTSC 4.43, PAL, and SECAM for integration into systems worldwide. MGP Pro Series • Introduction...
-
Page 10: Application Diagram
Network RI ES O SE Local AL L P/ WI Output Extron - 240 Monitor MGP 464 Pro DI Four Window Multi-Graphic Processor Camera Projector Figure 1. Connection Diagram for an MGP 464 Pro DI MGP Pro Series • Introduction... -
Page 11: Installation
Installation This section describes the installation procedures for the MGP Pro Series Multi-Graphic Processor and the connectors on the rear panel. Topics include: Installation Overview • • Rear Panel Features Installing or Replacing Button Labels • Installation Overview The MGP Processor can be connected to as many as 19 input devices simultaneously, and up to two output devices. -
Page 12: Rear Panel Features
RGBS or S-Video Composite Component Video RGBcvS Video Video Video R/R-Y R/R-Y R/R-Y R/R-Y R/R-Y H/HV H/HV H/HV H/HV H/HV Figure 4. Connecting to RGB, Component HD, S-video, or Composite Video Inputs 1 through 4 MGP Pro Series • Installation... - Page 13 MGP Pro remotely via RS-232 or RS-422). NOTE: The MGP Pro also has an RS-232-only Config port on a 2.5 mm TRS connector on the front panel. For information on this port, see Config port page 14. MGP Pro Series • Installation...
- Page 14 "straight-through" cable because reversed) is a "crossover" cable. no pin or pair assignments are swapped. Both ends of the cable can be T568B (as shown) or T568A (not shown). Figure 7. Wiring the LAN Connector MGP Pro Series • Installation...
- Page 15 For information on attaching the LockIt brackets, see the LockIt HDMI Lacing Bracket Installation Guide card, available at www.extron.com. MGP Pro Series • Installation...
-
Page 16: Installing Or Replacing Button Labels
Remove the button assembly by inserting a small, flat-bladed screwdriver between the button base and the diffuser to gently pry the button assembly off the button plunger, as shown in the illustration at right ( MGP Pro Series • Installation... - Page 17 Gently, but firmly, press the reassembled button into place on the MGP Pro front panel. Repeat steps 1 through 7 as needed to relabel other buttons. MGP Pro Series • Installation...
-
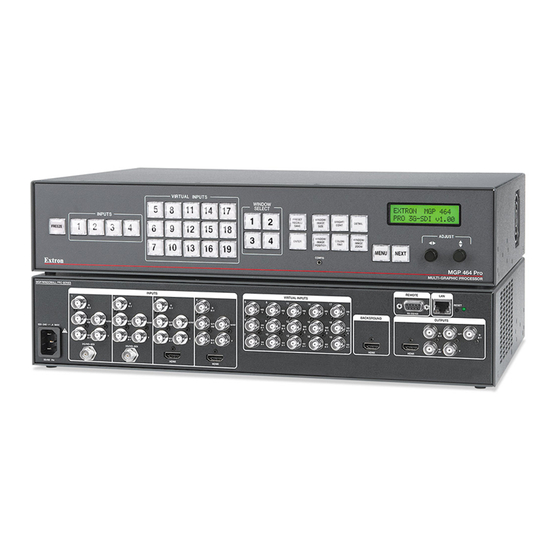
Page 18: Operation
PRESET WINDOW/ BRIGHT IMAGE DETAIL RECALL /CONT /SAVE SIZE FREEZE ADJUST WINDOW/ WINDOW/ COLOR ENTER IMAGE IMAGE /TINT POSITION ZOOM MENU NEXT CONFIG MGP 464 Pro MULTI-GRAPHIC PROCESSOR Figure 10. MGP 464 Pro Front Panel MGP Pro Series • Operation... - Page 19 If you press a button connected to an S-video source, the top two buttons in the column light. When a composite video source is selected, only one button lights. NOTE: Only one input can be selected in each column. MGP Pro Series • Operation...
- Page 20 9-pin D Connection TRS Plug Pin 2 Computer Rx line Pin 3 Computer Tx line Ring Pin 5 Computer signal ground Sleeve Figure 12. Optional 2.5 mm Connector Cable for the Front Panel Config Port MGP Pro Series • Operation...
-
Page 21: Power-Up And Default Cycle
When you select a picture control, the window whose button was previously selected is affected (see Picture Controls on page 33 for information on the available controls.) To select a window, press its Window Select button, which lights. To deselect a window, press any other Window Select button. MGP Pro Series • Operation... -
Page 22: Input Selection
LCD screen. The first Main menu option (Auto Image) is displayed on the screen. Main menu options (menus) — By repeatedly pressing the Menu button, you cycle through the Main menu options. Press the Menu button repeatedly until the desired menu is displayed. MGP Pro Series • Operation... - Page 23 (see Resetting on page 39). NOTE: The menus time out and the default cycle displays after 20 seconds of inactivity. However, any selections you made with the Adjust knobs are saved and remain in effect. MGP Pro Series • Operation...
- Page 24 Menu flow Figure 14. Main Menu Flow MGP Pro Series • Operation...
-
Page 25: Auto Image Menu
If desired, repeat steps 3 and 4 for any other windows for which you want to perform an automatic image adjustment. When finished with Auto Image, do one of the following: Select and press Next. • Press the Menu button. • Do nothing and wait for the menu to time out. • MGP Pro Series • Operation... -
Page 26: Input Configuration Menu
Figure 16. Input Configuration Menu Flow NOTE: The 15 virtual inputs (numbered 5 through 19) cannot be configured from the front panel. You must use SIS commands or the Windows-based Control software to configure them. MGP Pro Series • Operation... -
Page 27: Input Configuration Submenu Adjustments
Increase or decrease the height in lines of the active video area of the selected The height in lines of the active video input. The default width is marked with area. an asterisk ( ) on the LCD screen. MGP Pro Series • Operation... -
Page 28: Output Configuration Menu
By default, the resolution provided in the Extended Display Identification Data (EDID) is the last selected factory rate. To manually set the resolution information provided in the EDID data, see the EDID Resolution and Refresh Rate commands on page 50. MGP Pro Series • Operation... - Page 29 An HDTV 1080p rate specifically tailored to Sharp Professional displays (such as the ® G655u). When is selected as the output resolution/rate, the MGP Pro uses the LIVE BCKGD incoming HDMI background input resolution and clock as the output rate. MGP Pro Series • Operation...
-
Page 30: Window Configuration Menu
The Window Configuration menu allows you to set window front/back priority, add colored borders to the windows, select which window transition effect to use when muting (closing) and unmuting (displaying) a window, and specify the duration of the selected effect. Figure 18. Window Configuration Menu Flow MGP Pro Series • Operation... -
Page 31: Window Priority Submenu
Standard wipe — A standard wipe causes the new window to appear to unroll over the other one. The new window can roll from the top, bottom, left, or right. A standard wipe can have a soft (fuzzy) or a hard (sharp) leading edge. MGP Pro Series • Operation... -
Page 32: Effect Duration Submenu
Press the Menu button repeatedly until Window Configuration is displayed on the LCD screen. Press the Next button until is displayed. EFFECT DURATION Rotate either the horizontal Adjust ( [ ) or the vertical Adjust ( { ) knob to select an effect duration. MGP Pro Series • Operation... -
Page 33: Background Capture Menu
93 for methods of saving files under new names). If you do not want to save the image, select on the LCD screen, then press Next. The None submenu screen is displayed. Recall Background MGP Pro Series • Operation... -
Page 34: Comm./Ip Configuration Menu
Press Next repeatedly to cycle through the screens displaying the current settings for the serial port, MAC address, DHCP mode, IP address, Gateway address, and Subnet mask. Press Menu to return to the Comm./IP Configuration screen. MGP Pro Series • Operation... -
Page 35: Making Changes To The Serial Port And Ip Configuration
Set the gateway address. Set Gateway Addr: Set the subnet mask. • Set Subnet Mask: NOTE: The MAC address has no screen in this mode because it cannot be edited. Figure 20. Communication/IP Configuration Menu Flow MGP Pro Series • Operation... -
Page 36: Advanced Configuration Menu
Blue mode causes only sync and blue video signals to be passed to the display. This can aid in the setup of the color and tint of video inputs on the MGP Pro. While the blue mode submenu is displayed, rotate either Adjust knob to turn blue mode on and off. MGP Pro Series • Operation... -
Page 37: Test Pattern Submenu
For example, if a 4x3 output rate is selected, the 4x3 side-by-side crop and aspect ratio patterns appear. If a 16x9 output rate is selected, the 16x9 side-by-side crop and aspect ratio patterns appear. MGP Pro Series • Operation... - Page 38 1400 x 1050 1600 x 1200 480p 576p 720p 1080i 1080p 1280 x 800 1360 x 768 1440 x 900 1680 x 1050 Sharp 1080p 1920 x 1200 1080p CVT 2048 x 1080 Custom — — MGP Pro Series • Operation...
-
Page 39: Adding And Configuring Window Text
Repeat steps 1 through 4 for each image adjustment to be made for the selected input/ window. NOTE: The LCD screen may display in place of a number if that adjustment does not apply to the input video format. MGP Pro Series • Operation... -
Page 40: Picture Controls Summary
Min: 1/16 of the Increase/decrease the size output rate Adjust knob of the image in the selected IMAGE # ZOOM: window while keeping the Max: 2 times the nnnn nnnn aspect ratio constant. output rate MGP Pro Series • Operation... -
Page 41: Auto Memories
Set the parameters listed above as desired for windows 1, 2, 3, and 4. Press and hold the Preset Recall/Save button for at least 2 seconds. The LCD screen displays the following: WINDOW PRESET Save To #001 MGP Pro Series • Operation WINDOW PRESET... - Page 42 If you want to exit this menu without recalling a preset, repeatedly press the Preset Recall/Save button until you see the message. Press Window Preset [Enter] to Exit the Enter button to exit the Window Presets dialog. WINDOW PRESET [ENTER] TO EXIT MGP Pro Series • Operation...
-
Page 43: Default Presets
Preset #5 Preset #6 Preset #7 Window Window Window Window Window Window Window Window Preset #9 Preset #10 Background Area Window Window Window Window (solid color) Figure 24. Factory Default Presets for MGP 462 Pro Models MGP Pro Series • Operation... -
Page 44: Input Presets
However, if you wanted to use the MGP analog output to an analog sink, the green HDCP notification screen would be displayed, due to the source unnecessarily enabling encryption on its HDMI output. MGP Pro Series • Operation... -
Page 45: Locking The Front Panel (Executive Mode)
Review the reset modes carefully. Using the wrong reset mode may ATTENTION: result in unintended loss of flash memory programming, port reassignment, or processor reboot. MGP Pro Series • Operation... - Page 46 The reset modes listed in the table above close all open IP and Telnet connections and all sockets. • Each mode is a separate function, not a continuation from mode 1 to mode 5. • Reset mode 2 is not available on the MGP products. MGP Pro Series • Operation...
-
Page 47: Remote Configuration And Control
An optional 2.5 mm cable can be ordered separately and used to connect the MGP Pro to the host serial port. For connection information for this cable, see Config port page 14. MGP Pro Series • Remote Configuration and Control... -
Page 48: Ethernet Port
MGP Pro). For any program that you use, set up communication using the following protocol: Baud rate: 9600 Stop Bits: 1 Data bits: 8 Flow Control: None Parity: None MGP Pro Series • Remote Configuration and Control... -
Page 49: Host-To-Mgp Pro Communications
— Invalid for this configuration — Invalid command for signal type — Busy — Privilege violation — Maximum number of users connected has been exceeded — Invalid event number — Bad filename/File not found MGP Pro Series • Remote Configuration and Control... -
Page 50: Telnet And Web Communications
In either method, the data string (shown in braces as {data} in the command and response table is directed to the specified port, and must be encoded if it is non-alphanumeric. MGP Pro Series • Remote Configuration and Control... -
Page 51: Symbol Definitions
Patterns 10 and 11 are not available on 28 = 2048 x 1080 the MGP 462 Pro models. 99 = Custom (EDID Resolution command only) NOTE: Live background input resolution does not apply to input EDID. MGP Pro Series • Remote Configuration and Control... - Page 52 0 = HDCP encrypted data blocked 60 Hz only. 1 = HDCP encrypted data allowed Default is 1. X1& Pixel phase (0-31) Advanced picture settings value (Range is the auto-sensed value ±512 lines or pixels.) MGP Pro Series • Remote Configuration and Control...
- Page 53 0 = off (no background color) 1 = red 2 = green 3 = blue 4 = white 5 = magenta 6 = cyan 7 = yellow 8 = black 9 = translucent MGP Pro Series • Remote Configuration and Control...
- Page 54 X11# Subnet mask (nnn.nnn.nnn.nnn). Leading zeros 0 = receive are optional in setting values in each of the four fields, 1 = user and are suppressed in returned values. 2 = NVRAM MGP Pro Series • Remote Configuration and Control...
- Page 55 0 = Entry without password is placed one level below the lowest password level (0-11). The response is returned as 2 digits with a leading zero if needed. MGP Pro Series • Remote Configuration and Control...
-
Page 56: Command And Response Table For Mgp Pro Sis Commands
View EDID resolution and rate A EDID View current EDID resolution and rate Save EDID Save the EDID from the S 0EDID Edid S 0 connected output to Custom EDID location 99. MGP Pro Series • Remote Configuration and Control... - Page 57 19 = Hard wipe square in 20 = Hard wipe sq. out 21 = Hard wipe curtain in 22 = Hard wipe curt. out View effect X1@ ] View the currently selected window transition effect. MGP Pro Series • Remote Configuration and Control...
- Page 58 Increment brightness value X* ] Select next higher brightness level. Decrement brightness value X* ] Select next lower brightness – Y level. View brightness level X* ] View current brightness level setting. MGP Pro Series • Remote Configuration and Control...
- Page 59 X2! ] Decrement horizontal image – H Shift the image in window shift left. View horizontal image shift X2! ] View the current setting for amount horizontal centering of the image in window MGP Pro Series • Remote Configuration and Control...
- Page 60 Increase horizontal size of X2# ] Widen the image. image Decrease horizontal size of X2# ] Narrow the image. – : image View horizontal size of image X2# ] View the width of the image. MGP Pro Series • Remote Configuration and Control...
- Page 61 Maximum = double the active output area for 200% zoom. E X@ X2# ] View image size and position View the position and size of the image in window MGP Pro Series • Remote Configuration and Control...
- Page 62 , use: Symbols: / : – _ + " (space) Numerals: 0-9 Letters: Lowercase a-z and uppercase A-Z Read input name E X! X& ] View contents of the name label for input MGP Pro Series • Remote Configuration and Control...
- Page 63 Decrement pixel phase value X1& ] Select the next lower pixel – U phase value. X1& ] View pixel phase setting View the current pixel phase setting for the input in window MGP Pro Series • Remote Configuration and Control...
- Page 64 Decrement active lines value X1* ] Select the next lower active 13 * – # lines value View active lines setting X1* ] View the current active lines 13 * setting for input MGP Pro Series • Remote Configuration and Control...
- Page 65 = 0-4; 0 = all windows. Disable freeze Unfreeze the output image * 0 F Frz 0 View freeze status X$ ] View freeze status . For 1 = frozen. 0 = not frozen. MGP Pro Series • Remote Configuration and Control...
- Page 66 Set the output sync format. X3& 1 = RGBHV 2 = RGBS 3 = RGsB 4 = YUV bi-level 5 = YUV tri-level View output sync format X3& ] View current output sync format X3& setting MGP Pro Series • Remote Configuration and Control...
- Page 67 3 = Blue 4 = White 5 = Magenta 6 = Cyan 7 = Yellow 8 = Black X4) ] View text color View the current color of the 16 * text in window MGP Pro Series • Remote Configuration and Control...
- Page 68 22 * Set custom color values ( for red, green, and blue, in that order. = 0-255. View custom color X2% ] View the red, green, and blue values of the custom color. MGP Pro Series • Remote Configuration and Control...
- Page 69 Query output X2( ] HDCP View HDCP status of the output. With tagged response (verbose mode 2 or 3): X2( ] Hdcp O 1 * MGP Pro Series • Remote Configuration and Control...
- Page 70 7 = HDMI or 3G/HD-SDI = signal standard. For 0 = None 1 = NTSC 2 = PAL 4 = SECAM – = Not applicable = muting status. For 1 = muted 0 = unmuted MGP Pro Series • Remote Configuration and Control...
-
Page 71: Command And Response Table For Ip Sis Commands
RS-232/422 X12): port. For 0 = RS-232 1 = RS-422 NOTE: Only the rear panel RS-232/422 port can be configured. E X10! X10! X12) ] View serial mode View current port mode. MGP Pro Series • Remote Configuration and Control... - Page 72 The response includes leading zeros. • X10( X11) X11! X10( X11) The * sequence is optional. If are not specified, the defaults are used. View receive E X10! X10! X10( X11) X11% X11! ] timeout MGP Pro Series • Remote Configuration and Control...
- Page 73 Query bootstrap X10$ ] The bootstrap firmware is version not user-replaceable, but you With tagged may need this information for response – verbose troubleshooting. modes 2 and 3: X10$ ] Ver02 * MGP Pro Series • Remote Configuration and Control...
- Page 74 Pno 60-1258-nn or Pno 60-1259-nn Show unit part number. MGP 462 Pro is 60-1258-nn. MGP 464 Pro is 60-1259-nn. For nn: 01 = standard model 02 = DI model 03 = 3G-SDI model MGP Pro Series • Remote Configuration and Control...
- Page 75 X12* b = bit B = byte (8 bits) S = short (16 bits) L = long (32 bits) X13( = data element value in ASCII from event buffer (leading zeros suppressed). MGP Pro Series • Remote Configuration and Control...
- Page 76 W5 %2C jdoe %40 extron %2E xom %2C 7 %2E eml CR lpr5, jdoe@extron.com, 7.eml For e-mail event 5, send file 7.eml to jdoe@extron.com. View e-mail events X13@ X13@ X13# X13$ ] MGP Pro Series • Remote Configuration and Control...
- Page 77 X10^ ] X10^ Ipt • is the local date and date time format. The set format is MM/DD/ YY-HH:MM:SS. (The hours, minutes, and seconds can also be separated by periods.) Examples: 11/13/06-10:54:00 or 11/13/06-10.54.00 MGP Pro Series • Remote Configuration and Control...
- Page 78 0 = off, 1 = on. E X10& X10& X10& ] X10& Set IP address Ipi • Set IP address for your unit in the format nnn.nnn. nnn.nnn). Leading zeros in each of the four fields are optional. MGP Pro Series • Remote Configuration and Control...
- Page 79 (spaces or symbols) are not allowed. NOTE: A user password cannot be assigned if an administrator password does not exist. Clear user Clear the user password only • CU W %20 CU Ipu • password MGP Pro Series • Remote Configuration and Control...
- Page 80 Pmt 00000 Read Telnet port W MT {port#} Set web port {port#} MH W {port#} MH Pmh {port#} Reset web port 80MH W 80MH Pmh 00080 Disable web port W 0MH Pmh 00000 MGP Pro Series • Remote Configuration and Control...
- Page 81 {Raw unprocessed data in file up to filesize} flash memory Retrieve file from W filename SF Responds with 4 bytes of file size + raw filename SF user flash memory unprocessed data in file. MGP Pro Series • Remote Configuration and Control...
- Page 82 IP address, and the subnet mask, to the factory default values. The IP address is reset to 192.168.254.254, and the subnet mask is set to 255.255.0.0 (identical to reset mode 5). MGP Pro Series • Remote Configuration and Control...
- Page 83 IP settings, including IP address, subnet mask, gateway address, unit name, DHCP setting, and port mapping (Telnet/ web/Direct Access) are excluded in order to preserve communication with the device (recommended after a firmware update). MGP Pro Series • Remote Configuration and Control...
-
Page 84: Windows-Based Control Software
Installing the Software The MGP Pro Series configuration software is provided on a disk that is delivered with your MGP Pro unit. To use the software, you must install the program on your PC. Follow these steps: Insert the Software Products DVD into your CD or DVD drive. - Page 85 Install Figure 27. MGP Pro Series Link on the DVD Control Software Screen On the File Download window that appears, click to begin installing the program. MGP Pro Series • Remote Configuration and Control...
-
Page 86: Downloading The Mgp Pro Series Software From The Web
Windows-based control program. Downloading the MGP Pro Series Software from the Web The MGP Pro Series Windows-based control program is also available on the Extron website at www.extron.com. From this site, you can also download updates to the MGP Pro software as they become available. -
Page 87: Starting The Control Program
Starting the Control Program The MGP Pro Series software help program provides information on settings and on how to use the control program itself. To run the MGP Pro Series control program, do either of the following: Double-click on the MGP464.exe file, located on your computer at... - Page 88 : Enter your MGP Pro IP address, Telnet port (the default is 23), and a • TCP/IP password if required. : Select your computer communication port from the menu, and the • RS232 Port baud rate from the menu. All other parameters are preset. Speed (baud) MGP Pro Series • Remote Configuration and Control...
- Page 89 Click . After a few seconds, the MGP Pro Series main window opens. Figure 31. MGP Series Control Program Main Window (MGP 464 Pro) For information on configuring the MGP Pro using the Windows-based software, refer to the program help file. To access the help file, select...
-
Page 90: Html Configuration And Control
• Using the Background Page The MGP Pro series can be controlled and configured using HTML web pages that are accessed over a network or from a local PC connected to the MGP Pro LAN port. The MGP Pro has factory-installed HTML web pages that allow you to view and adjust IP settings, upload firmware and other files to the MGP Pro, and select a background image for the display. - Page 91 If not, the browser displays the System Status page, which is the MGP Pro default start page. You can select the tabs at the top of this screen to display additional screens that enable you to configure the MGP Pro. MGP Pro Series • HTML Configuration and Control...
-
Page 92: Viewing System Status
MGP Pro. Changes must be made via the Configuration web pages, the MGP Pro Series Windows-based configuration software, SIS commands, or the MGP Pro front panel. Personnel who have user access can view this page but cannot access the Configuration pages;... -
Page 93: Using The Configuration Pages
You can change this name field to any valid name, up to 24 alphanumeric characters. NOTE: The following characters are invalid in the name: + ~ , @ = ` [ ] { } < > ' " ; : | \ MGP Pro Series • HTML Configuration and Control... - Page 94 MAC Address field The Media Access Control (MAC) Address consists of six hexadecimal character pairs and is used to identify the processor hardware. This address is hard-coded in the unit and cannot be changed. MGP Pro Series • HTML Configuration and Control...
-
Page 95: Date/Time Settings Fields
Europe and Brazil. When daylight saving time is turned off, the processor does not adjust its time reference. Click the button at the bottom of the Date/Time Settings section to implement Submit your selections. MGP Pro Series • HTML Configuration and Control... -
Page 96: Passwords Page
To remove an assigned password: In the field, enter a single space. Administrator Password User Password Enter a single space in the or the Re-enter Admin Password Re-enter User field. Password Click the button. Submit MGP Pro Series • HTML Configuration and Control... -
Page 97: Firmware Upgrade Page
System Status page. The firmware version is in the System Description section. Downloading the firmware file To obtain the latest version of MGP Pro Series firmware file and install it on your computer: Go to the Extron website (www.extron.com) and click the tab. - Page 98 As an alternative method of updating the MGP Pro firmware, you can use the Firmware Loader software (see Uploading using the Firmware Loader on page 117 for information on downloading and using this software). MGP Pro Series • HTML Configuration and Control...
-
Page 99: Using The File Management Page
Files column, preceded by a slash. To add more files to the directory, click the directory name to open it, then use the Uploading files procedure. To exit the directory, click (root) (back) MGP Pro Series • HTML Configuration and Control... -
Page 100: Other File Management Activities
Image Settings Screen Selecting a Background Color To change the background color on the output display, select a color from the Background pull-down menu. The default selection, , results in a black background. Color MGP Pro Series • HTML Configuration and Control... -
Page 101: Displaying A Background Image
. This button changes to while the file is being Upload Image Uploading... loaded. When the uploading is complete, a thumbnail image of the uploaded file is displayed in the Image Index section. MGP Pro Series • HTML Configuration and Control... -
Page 102: Selecting A Background Image
In the Image Index section, click the thumbnail of the image you want to display. A larger version of the selected image appears to the right. Click to select that image for the output background. Take MGP Pro Series • HTML Configuration and Control... -
Page 103: Special Applications
Multi-Graphic Processor Projector V SY H SY Extron CrossPoint Ultra Series Matrix Switcher Video Camera Extron RGB 109xi Interface Laptop Figure 42. Application Diagram for a MGP 464 Pro Connected to a Matrix Switcher MGP Pro Series • Special Applications... -
Page 104: Setting Up The Mgp Pro To Work With A Matrix Switcher
1, 31, 61, 91, or 121. On the matrix switcher, tie input 1 to the four switcher outputs that are connected to the MGP Pro (see your matrix switcher user guide for the procedure). MGP Pro Series • Special Applications... - Page 105 Sync MGP Pro to Matrix Switcher window. Close Figure 44. Example of a Sync MGP Pro to Matrix Switcher Window for an MGP 464 Pro with Input Ties to a Switcher MGP Pro Series • Special Applications...
-
Page 106: Minimizing Synchronization Problems When Not Using The Sync To Matrix Feature
NOTE: Input presets cannot be recalled via the MGP Pro front panel. You can recall them using SIS commands (see the Remote Configuration and Control section beginning on page 41) or the for the Windows-based control software and the Preset Selector software program (see the software help file). MGP Pro Series • Special Applications... -
Page 107: Application 2: Connecting Multiple Mgp Pros In Succession (Daisy-Chaining)
The first diagram in the row shows the HDMI computer, which is the input source. • The second diagram shows the display with one MGP Pro attached. The third diagram shows the display connected to two MGPs. (On the MGP 462 Pro, this is a 4-window configuration.) MGP Pro Series • Special Applications... -
Page 108: Setting Up Mgps For Daisy-Chaining
HDMI Background connector of the second MGP Pro. If you are daisy-chaining three units, connect the HDMI output of the second MGP Pro to the HDMI Background connector of the third unit (the unit connected to the display). MGP Pro Series • Special Applications... - Page 109 Preset Selector software for both MGPs, because the Preset Selector recalls the same preset number for all MGPs that have been added to See the Windows-based control software help file for information on using the Preset Selector. MGP Pro Series • Special Applications...
-
Page 110: Reference Information
• Reliable earthing (grounding) — Maintain reliable grounding of rack-mounted equipment. Pay particular attention to supply connections other than direct connections to the branch circuit (such as the use of power strips). MGP Pro Series • Reference Information... -
Page 111: Rack Mounting Procedure
As a result, there are different classes of addresses that define the range of valid addresses and the parts of the address that are used for the network and host identifiers. MGP Pro Series • Reference Information... -
Page 112: Choosing Ip Addresses
You can perform a test from your computer to check that a device at a particular address is responding correctly or to determine its address (see Pinging for the IP Address on the next page). MGP Pro Series • Reference Information... -
Page 113: Subnet Mask
Ping statistics for 192.168.254.254: Packets: Sent = 4, Received = 4, Lost = 0 (0% loss), Approximate round trip times in milli-seconds: Minimum = 0ms, Maximum = 0ms, Average = 0ms Figure 47. Ping Response MGP Pro Series • Reference Information... -
Page 114: Connecting As A Telnet Client
IP address If the MGP Pro is not password-protected, no further prompts are displayed • until you disconnect from the unit. If the MGP Pro is password-protected, Telnet displays the password prompt. • MGP Pro Series • Reference Information... - Page 115 Closing the link to the MGP Pro To close the link to the MGP Pro, access the prompt by entering the escape Telnet sequence (<Ctrl + ] > ). At the prompt, enter Telnet close MGP Pro Series • Reference Information...
-
Page 116: Subnetting, A Primer
0 indicates that this octet will not be 255 indicates that this octet will be compared between two IP addresses. compared between two IP addresses. Typical Subnet Mask: 255.255.0.0 Octets Figure 50. Subnet Mask and Octets MGP Pro Series • Reference Information... -
Page 117: Updating The Firmware
Comparing the IP Addresses Updating the Firmware Updates to the Extron MGP Pro Series Multi-Graphic Processor firmware are made available periodically via the Extron Web site. If the need arises, you can replace the MGP Pro main firmware via an IP connection without opening the unit. -
Page 118: Using A Web Browser
If desired, select the check box to have the system input your password the next time you enter your MGP Pro IP address. Click . The System Status page or your custom start page opens. MGP Pro Series • Reference Information... - Page 119 . The following dialog box appears, providing Help About... information about the current MGP Pro version. Figure 55. About MGP Pro Series Control Program Screen When finished viewing the information, click to close the window. MGP Pro Series • Reference Information...
-
Page 120: Downloading The Firmware
Password field (a user name is not required), and click The MGP Pro web page appears. NOTE: Passwords must contain 4 to 12 alphanumeric characters. Symbols and spaces are not allowed, and the passwords are case sensitive. MGP Pro Series • Reference Information... - Page 121 The file extension must be .S19. ATTENTION: Uploading a file with an incorrect extension may cause the unit to stop working. Figure 58. Choose File to Upload Window with Firmware File Selected MGP Pro Series • Reference Information...
- Page 122 Browse to locate the firmware file that you saved to your computer. The file extension must be .S19. ATTENTION: Uploading a file with an incorrect extension may cause the unit to stop working. Figure 59. Open Window with Firmware File Selected MGP Pro Series • Reference Information...
- Page 123 > All Programs > Extron Electronics > Firmware Loader > Firmware Loader The Firmware Loader dialog box opens with the Add Device dialog box in front of it. Figure 61. Add Device Dialog Box MGP Pro Series • Reference Information...
- Page 124 When downloaded from the Extron website, by default the firmware is placed in a folder at: (Windows XP) or C:\Program Files\Extron\Firmware\MGP Pro (Windows 7). C:\Program Files (x86)\Extron\Firmware\MGP Pro On the Add Device window, the path to the new firmware file is displayed in the Path field. MGP Pro Series • Reference Information...
- Page 125 The Total Progress panel displays a progress bar with above it. • Uploading... In the Devices panel, the Progress column displays an incrementing percentage and • another progress bar. The Status column displays Uploading MGP Pro Series • Reference Information...
- Page 126 The upload is complete when the field shows , the Progress Remaining Time 00.00.00 column shows , and is displayed above the progress bar and in the 100% Completed field. Close the Firmware Loader dialog box. Status MGP Pro Series • Reference Information...
-
Page 127: Extron Warranty
Extron Electronics makes no further warranties either expressed or implied with respect to the product and its quality, performance, merchantability, or fitness for any particular use. In no event will Extron Electronics be liable for direct, indirect, or consequential damages resulting from any defect in this product even if Extron Electronics has been advised of such damage.
Need help?
Do you have a question about the MGP Pro Series and is the answer not in the manual?
Questions and answers