
Subscribe to Our Youtube Channel
Related Manuals for VPI Classic 3


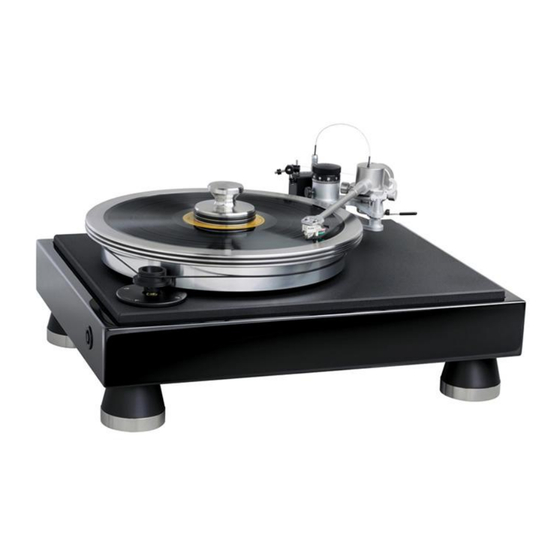
Summary of Contents for VPI Classic 3
- Page 1 VPI Classic 3 Turntable Setup and Instruction Manual VPI Industries, Inc., 77 Cliffwood Ave. #3B, Cliffwood, NJ 07721 Phone: 732-583-6895, Email: Sales@vpiindustries.com http://www.vpiindustries.com...
-
Page 2: Important: Read Before Proceeding
1. To avoid electrical shock, do not open the motor cover. 2. If the power cord provided with the Classic 3 does not reach an outlet, use a heavy-duty, grounded extension cord. 3. To avoid electrical shock, always plug the Classic 3 into a grounded outlet. -
Page 3: Unpacking The Box
Setting up the Classic 3 The Classic 3 must be placed on a flat, level surface. This will make setup easy, provide better sound quality, and put less strain on the main bearing. ... -
Page 4: Before You Begin
Verify the turntable is level by using a 9- or 12-inch bubble level front-to-back and side-to- side on the platter. If it is not level, rotate the Classic 3 feet up or down. If you must turn the Classic feet more than three full turns, level the shelf or platform the table sits on first. -
Page 5: Cartridge Mounting
The Classic 3 tone arm comes with one large dropped counterweight installed on the rear shaft of the tonearm. For most cartridges you will only need this large weight. The counterweight is held in position by a setscrew. - Page 6 Place the arm tube assembly on the lower bearing, taking care not to strain or damage the 4-color wire and Lemo connector. Place the arm in its rest. At the rear of the arm base assembly is the connector block. Plug the Lemo connector into its receptacle on top of the block.
- Page 7 Without letting the cartridge move, tighten the screws holding the cartridge to the arm head. Make it tight, but don't over do it and strip the threads or distort the cartridge body. FIG #2: THE PROPER WAY TO ALIGN A CARTRIDGE, ALIGN THE CARTRIDGE, NOT THE TONEARM HEADSHELL! C.
- Page 8 The Classic 3 arm does not have a built-in tracking force gauge, but a Shure Stylus Force Gauge is supplied with your arm. Following the gauge instructions set the tracking force to the cartridge manufacturer recommendation plus 1/10 of a gram more.
-
Page 9: Anti-Skating
VPI has a unique solution to anti-skating: the coiled wire of the JMW Memorial Tonearm acts as a spring and pushes the arm back without affecting the sound quality. - Page 10 E. ARM HEIGHT: Unlike many tone arms, the Classic 3 height is both easy and repeatable to vary. The knob next to the bearing housing bears a scale numbered from zero to ninety-nine. Below the knob there is an index mark engraved on the front of the support pillar.
-
Page 11: Playing Records
Additional Items Available from Your Dealer The VPI Synchronous Drive System power supply provides a major increase in musicality by feeding the synchronous motor a perfectly stable wave form at the frequency you choose. The SDS lets you change speed electronically. - Page 12 VPI’s option, of any part(s) found to be defective. VPI’s obligation to repair or replace defective parts is the purchaser’s sole and exclusive remedy, and VPI shall not be liable for any direct or indirect injury and/or property damage arising out of the use of the product or defect in or failure of the product.
Need help?
Do you have a question about the Classic 3 and is the answer not in the manual?
Questions and answers