
Subscribe to Our Youtube Channel
Related Manuals for VPI Classic 1


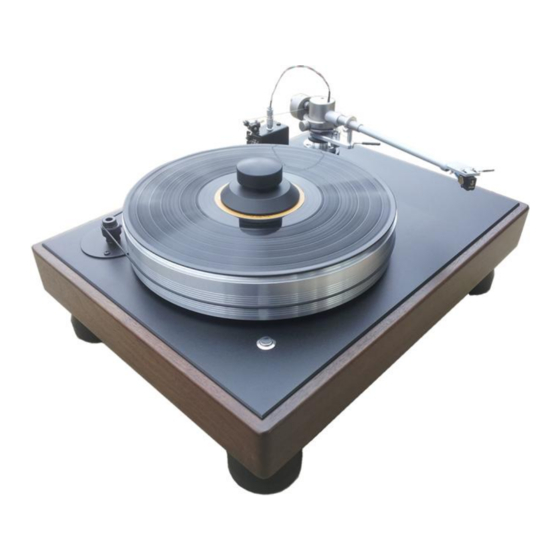
Summary of Contents for VPI Classic 1
- Page 1 The VPI Classic 1 Turntable Setup and Instruction Manual VPI Industries, Inc., 77 Cliffwood Ave. #3B, Cliffwood, NJ 07721 Phone: 732-583-6895, Email: Sales@vpiindustries.com http://www.vpiindustries.com...
- Page 2 1. To avoid electrical shock, do not open the motor cover. 2. If the power cord provided with the Classic 1 does not reach an outlet, use a heavy- duty, grounded extension cord. 3. To avoid electrical shock, always plug the Classic 1 into a grounded outlet.
- Page 3 You can get very good sound by placing the Classic 1 on a maple butcher block board about 2” thick.
-
Page 4: Cartridge Mounting
The power button is on the left side, it is recessed for protection. Turn on the Classic 1 by pushing the power button and allowing 3 seconds for the platter to get up to speed. - Page 5 THE COLOR CODE OF THE WIRE IS: RED = right hot BLACK OR WHITE = left hot GREEN = right ground BLUE = left ground IF YOUR PHONO SECTION INVERTS PHASE, THE HOT COLOR BECOMES THE GROUND COLOR Using tweezers or fine tipped pliers grip the center of the red wire's connector (do not grip the wire) and push it onto the cartridge's right hot terminal pin.
- Page 6 While the arm is in its rest, loosen the screws that hold the cartridge just enough that the cartridge can be moved back and forth. Carefully swing the arm over the grid at the far end of the jig and place the stylus as close to the dot in the center of the grid as possible.
- Page 7 FIG #2: THE PROPER WAY TO ALIGN A CARTRIDGE, ALIGN THE CARTRIDGE, NOT THE TONEARM HEADSHELL! SHOWN IN WHITE FOR CARITY. C. TRACKING FORCE AND AZIMUTH Place the arm tube assembly on the lower bearing, taking care not to strain or damage the 4-color wire and Lemo connector.
- Page 8 to the grooves than running a cartridge at a heavy setting. Make sure the damping fluid is not installed when setting this force. VERY IMPORTANT: MAKE SURE THE TONEARM IS PARALLEL TO THE PLATTER WHEN SETTING THE TRACKING FORCE. IF IT IS NOT THE END RESULT WILL BE HIGHER OR LOWER VTF THAN YOU WANTED.
-
Page 9: Anti-Skating
VPI has a unique solution to anti-skating: the coiled wire of the JMW Memorial Tonearm acts as a spring and pushes the arm back without affecting the sound quality. -
Page 10: Playing Records
Before playing a record, make sure that the two setscrews in the arm base are tight. You can use either the paper, gray urethane, or no mat at all on your Classic 1. They sound different and one may work better in your system than the other. We prefer no mat at all or the paper mat. - Page 11 .68 from the standard .5 to use the Classic 1 with the SDS. The HR-X periphery record clamp will fit the platter of the Classic 1 and provide a vacuum-like grip on the record. The clamp removes all warps and damps the record to prevent ringing.
Need help?
Do you have a question about the Classic 1 and is the answer not in the manual?
Questions and answers