Lantronix EDS4100 User Manual
4 port device server
Hide thumbs
Also See for EDS4100:
- Reference manual (68 pages) ,
- Quick start manual (6 pages) ,
- User manual (175 pages)

Subscribe to Our Youtube Channel
Related Manuals for Lantronix EDS4100


Summary of Contents for Lantronix EDS4100
-
Page 1: Port Device Server
EDS4100 4 Port Device Server User Guide Part Number 900-433 Revision A February 2006... - Page 2 Copyright & Trademark © 2006, Lantronix. All rights reserved. No part of the contents of this book may be transmitted or reproduced in any form or by any means without the written permission of Lantronix. Printed in the United States of America.
-
Page 3: Table Of Contents
User-Supplied Items ________________________________________________ 21 Identifying Hardware Components______________________________________ 22 Serial Ports____________________________________________________________ 23 Ethernet Port __________________________________________________________ 24 Terminal Block Connector ________________________________________________ 24 LEDs_________________________________________________________________ 24 Reset Button___________________________________________________________ 25 Installing the EDS4100 ______________________________________________ 25 Finding a Suitable Location _______________________________________________ 25 EDS4100 4 Port Device Server User Guide... - Page 4 FTP Page_________________________________________________________ 68 TFTP ____________________________________________________________ 69 HTTP Pages ______________________________________________________ 70 HTTP Statistics Page ____________________________________________________ 70 HTTP Configuration Page ________________________________________________ 71 HTTP Authentication Page________________________________________________ 74 HTTP RSS Page _______________________________________________________ 76 CLI Pages ________________________________________________________ 78 EDS4100 4 Port Device Server User Guide...
- Page 5 Obtaining Firmware ________________________________________________ 118 Loading New Firmware Using the Web Manager _________________________ 118 6: Networking and Security SSL ____________________________________________________________ 119 Benefits of SSL________________________________________________________ 119 How SSL Works _______________________________________________________ 120 Digital Certificates _____________________________________________________ 120 SSH ____________________________________________________________ 121 EDS4100 4 Port Device Server User Guide...
- Page 6 Importing and Exporting an XML Configuration File _______________________ 159 Best Practices ____________________________________________________ 160 Testing the XML Configuration File ________________________________________ 160 Importing and Exporting Partial Configurations _______________________________ 160 Including Passwords in the XML File _______________________________________ 161 Special XCR Groups ___________________________________________________ 162 EDS4100 4 Port Device Server User Guide...
- Page 7 CLI _____________________________________________________________ 190 Telnet _______________________________________________________________ 190 Query Port _______________________________________________________ 190 Diagnostics ______________________________________________________ 190 Ping ________________________________________________________________ 190 System __________________________________________________________ 190 D: Troubleshooting and Technical Support Technical Support _________________________________________________ 191 Compliance Information Lithium Battery Notice Warranty Index EDS4100 4 Port Device Server User Guide...
- Page 8 Contents Figures Figure 2-1. EDS4100 4 Port Device Server ..................13 Figure 3-1. Front View of the EDS4100 ....................22 Figure 3-2. Back View of the EDS4100 ....................22 Figure 3-3. RS-232 Serial Port Pins (Serial Ports 1, 2, 3, 4) ............... 23 Figure 3-4.
- Page 9 Figure 6-2. Simple XML Group Example ................... 157 Figure 6-3. XML Group Example ....................... 158 Figure 6-4. XML Example with Multiple Named Values..............158 Figure 6-5. XML Example with Multiple Items..................159 Figure 6-6. XML Example with Multiple Groups................. 159 EDS4100 4 Port Device Server User Guide...
- Page 10 Table 4-34. Diagnostics: Traceroute Page ..................111 Table 4-35. Diagnostics: DNS Lookup Page ..................112 Table 4-36. System Page........................117 Table 6-1. EDS4100 Import and Export Groups ................163 Table 6-2. EDS4100 XSR Groups and Items ..................175 EDS4100 4 Port Device Server User Guide...
-
Page 11: 1: Preface
This guide describes how to install, configure, use, and update the EDS4100 4-Port Device Server. It is intended for users who will be using the EDS4100 to network-enable their serial devices. All four serial ports on the EDS4100 support RS-232, while two serial ports support RS-422/485, making the EDS4100 suitable for use with most serial devices. -
Page 12: Additional Documentation
1: Preface Additional Documentation The following guide is available on the product CD or the Lantronix Web site: www.lantronix.com. Document Description EDS4100 Quick Provides the steps for getting the EDS4100 up and running. Start Guide Com Port Redirector Provides information on using the Windows-based utility to create a User Guide virtual com port. -
Page 13: 2: Introduction
EDS4100 over the Ethernet cable, by either an Ethernet switch or a midspan device. Being able to draw power through the Ethernet cable eliminates power supply and cord clutter. It also allows the EDS4100 to be located in areas where power is not typically available. -
Page 14: Features
(based on the configuration tools). In addition, users can load their own Web pages onto the EDS to facilitate monitoring and control of their own serial devices that are attached to the EDS4100. Command-Line Interface (CLI) Making the edge-to-enterprise vision a reality, the EDS4100 with the Evolution OS™... -
Page 15: Snmp Management
SNMP capabilities to correctly diagnose and monitor the EDS4100. XML-based Architecture and Device Control XML is a fundamental building block for the future growth of M2M network. The EDS4100 supports XML-based configuration and setup records that makes device configuration transparent to users and administrators as well as easily editable with a standard text or XML editor. -
Page 16: Troubleshooting Capabilities
View critical hardware, memory, MIB-II, buffer pool, and IP socket information. Perform ping and traceroute operations. Conduct forward or backup DNS lookup operations. View all processes currently running on the EDS4100, including CPU utilization and total stack space available. Applications... -
Page 17: Building Automation/Security
The EDS4100 can also be used to centrally manage equipment and devices over a new or existing Ethernet network to improve the safety and comfort of building occupants, while lowering heating, ventilating, air conditioning (HVAC), lighting, and overall energy operating costs through centralized management and monitoring. -
Page 18: Console Management
Traffic Management With the ubiquity of Ethernet networks, managing cities over Ethernet is now within reach. The EDS4100 provides an easy conversion from serial ports on traffic cameras, billboards, and traffic lights to Ethernet. The EDS4100 obviates the need for long-haul modems and enables the management of traffic equipment over the network. -
Page 19: Technical Specifications
Width: With mounting brackets 20.14 cm (7.93 in) Depth: 3.81 cm (1.5 in) Weight .86 Kg (1.9 lb) Temperature 0 to +55C operating temperature -40 to +70C storage temperature Relative Humidity 10 to 90%, non-condensing EDS4100 4 Port Device Server User Guide... - Page 20 UL 60950-1, CSA-22.2 No. 60950-1-03, EN60950-1, CB Report - IEC 60950-1 Product Label FCC Part 15 Statement Class A Device, ICES-003 Class A Device, Markings C-Tick, VCCI, CE Marking, UL-CUL Mark, TUV-GS Mark EDS4100 4 Port Device Server User Guide...
-
Page 21: 3: Installation
62 multi-drop devices. A serial cable for each serial device to be connected to the EDS4100. One end of the cable must have a female DB9 connector to connect to the EDS4100 serial port. The connector on the other end must be configured for your serial device. -
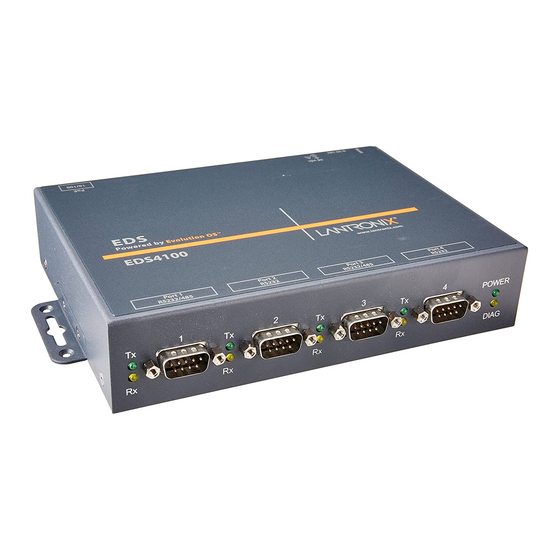
Page 22: Identifying Hardware Components
3: Installation Identifying Hardware Components Figure 3-1 shows the hardware components on the front of the EDS4100. Figure 3-2 shows the hardware components on the back of the EDS4100. Figure 3-1. Front View of the EDS4100 Figure 3-2. Back View of the EDS4100 The bottom of the EDS4100 (not shown) has a product information label. -
Page 23: Serial Ports
3: Installation Serial Ports The front of the EDS4100 has four male DB9 serial ports. These ports allow you to connect up to four standard serial devices: All four serial ports support RS-232 devices. See Figure 3-3 for pin assignments. -
Page 24: Ethernet Port
3: Installation Ethernet Port The back panel of the EDS4100 provides an RJ45 Ethernet port. This port can connect to an Ethernet (10 Mbps) or Fast Ethernet (100 Mbps) network. The Speed LED on the back of the EDS4100 shows the connection of the attached Ethernet network (see Table 3-3). -
Page 25: Reset Button
Ethernet network. Reset Button The reset button appears on the back of the EDS4100, to the left of the power connector. Pressing this button for 2-to-3 seconds reboots the EDS4100 and terminates all data activity occurring on the serial and Ethernet ports. -
Page 26: Configuration Methods
− Barrel Power connector: Insert the round end of the supplied power cord into the barrel Power connector on the back of the EDS4100. Plug the other end into an AC wall outlet. The barrel Power connector supports a power range of 9 to 30VDC. -
Page 27: Configuring From The Web Manager Interface
EDS4100 regardless of the configuration method you choose. Configuring from the Web Manager Interface With this method, you can use a Web browser to configure the EDS4100 using a Web- based graphical point-and-click interface. The advantages to this method are ease of use and location independence. -
Page 28: Starting Deviceinstaller
2. Click the EDS4100 folder. The list of Lantronix EDS4100 devices available will appear. 3. Expand the list of EDS4100 by clicking the + symbol next to the EDS4100 icon. 4. Select the EDS4100 unit by clicking on its IP address to view its configuration. - Page 29 Online Displays the EDS4100 status: Status Online = the EDS4100 is online. Offline = the EDS4100 is offline. Unreachable = the EDS4100 is on a different subnet. Busy = the EDS4100 is currently performing a task. Telnet Displays whether Telnet is enabled on this Enabled EDS4100.
-
Page 30: 4: Configuration Using The Web Manager
Explorer 5.5. and above, Mozilla Suite, Mozilla Firefox, or Opera. 2. Enter the IP address of the EDS4100 in the address bar. The EDS4100’s built-in security requires you to log in with your user name and password (see Figure 4-1). -
Page 31: Navigating Through The Web Manager
Some pages are read only, while others let you change configuration settings. Note: There may be times when you must reboot the EDS4100 for the new configuration settings to take effect. When a reboot is required, it is identified in the following sections. -
Page 32: Table 4-1. Summary Of Web Manager Pages
Displays EDS4100 product information and network, line, and Status tunneling settings. Network Lets you configure the current network interface on the EDS4100. Line Displays statistics and lets you change the current configuration and Command mode settings for the four serial lines. -
Page 33: Figure 4-3. Web Manager Menu Structure (1 Of 3)
4: Configuration Using the Web Manager Figure 4-3. Web Manager Menu Structure (1 of 3) (continued on next page) EDS4100 4 Port Device Server User Guide... -
Page 34: Figure 4-4. Web Manager Menu Structure (2 Of 3)
4: Configuration Using the Web Manager Figure 4-4. Web Manager Menu Structure (2 of 3) (continued on next page) EDS4100 4 Port Device Server User Guide... -
Page 35: Figure 4-5. Web Manager Menu Structure (3 Of 3)
4: Configuration Using the Web Manager Figure 4-5. Web Manager Menu Structure (3 of 3) EDS4100 4 Port Device Server User Guide... -
Page 36: Understanding The Web Manager Pages
The top section lets you select or enter new configuration settings. After you change settings, click the Submit button to apply the change. Some settings require the EDS4100 to be rebooted before the settings take effect. Those settings are identified in the appropriate sections in this chapter. -
Page 37: Device Status Page
The Device Status page is the first page that appears when you log into the Web Manager It also appears when you click the Status link in the menu bar. This read-only page shows the EDS4100 product information, network settings, line settings, and tunneling settings. -
Page 38: Network Configuration Page
4: Configuration Using the Web Manager Network Configuration Page Clicking the Network link in the menu bar displays the Network Configuration page. This page lets you change the following EDS4100 network configuration settings: BOOTP and DHCP client IP address, network mask, and gateway... -
Page 39: Table 4-2. Network Configuration Page Settings
Current Configuration section of this page shows the settings that will take effect the next time the EDS4100 is rebooted. Changes to the following settings require the EDS4100 to be rebooted before the new settings take effect: BOOTP Client... -
Page 40: Line Settings Pages
Changing this value may cause unexpected results. Changing this value requires the EDS4100 to be rebooted. Hostname Enter the EDS4100 host name. The host name can be up to 31 characters with no spaces. Domain Enter the EDS4100 domain name. -
Page 41: Line - Statistics Page
Statistics at the top of one of the other Line Settings pages. This read- only page shows the status and statistics for the serial line selected at the top of this page. Figure 4-9. Line – Statistics Page EDS4100 4 Port Device Server User Guide... -
Page 42: Line - Configuration Page
Configuration page appears. This page shows the configuration settings for the serial line selected at the top of the page and lets you change the settings for that serial line. Figure 4-10. Line – Configuration Page EDS4100 4 Port Device Server User Guide... -
Page 43: Table 4-3. Line - Configuration Page
Line – Description Configuration Page Settings Status Select whether the selected EDS4100 serial port is enabled. Choices are: Enabled = the selected EDS4100 serial port is enabled. Disabled = the selected EDS4100 serial port is disabled. Interface Select the serial communication interface for serial lines 1 and 3. -
Page 44: Line - Command Mode Page
Command Mode page appears. This page shows the command mode settings for the serial line selected at the top of the page and lets you change the settings for that serial line. Figure 4-11. Line – Command Mode Page EDS4100 4 Port Device Server User Guide... -
Page 45: Table 4-4. Line - Command Mode Page
Command Mode Page Settings Always Select whether the EDS4100 is always in command mode. Choices are: Yes = EDS4100 is in command mode. No = EDS4100 is not in command mode. (default) Use Serial Select whether command mode is enabled when the specified serial String string is read on the serial line during boot time. -
Page 46: Tunnel Pages
Statistics at the top of one of the other Tunnel pages. This read- only page shows the status and statistics for the tunnel currently selected at the top of this page. Figure 4-12. Tunnel - Statistics Page EDS4100 4 Port Device Server User Guide... -
Page 47: Tunnel - Serial Settings Page
This page shows the settings for the tunnel selected at the top of the page and lets you change the settings. If you change the Buffer Size value, the EDS4100 must be rebooted for the change to take effect. Changing the other values does not require a reboot. -
Page 48: Table 4-5. Tunnel - Serial Settings Page
Range = 1 to 4096 bytes. Default is 2048 bytes. Changing this value requires the EDS4100 to be rebooted. Read Timeout Enter the maximum number of milliseconds that the EDS4100 waits for incoming data on the currently selected serial line. Default is 200 milliseconds. -
Page 49: Tunnel - Start/Stop Characters Page
Start/Stop Chars page appears. This page shows the start and stop characters used for the tunnel selected at the top of the page and lets you change the settings for that tunnel. Figure 4-14. Tunnel – Start/Stop Chars Page EDS4100 4 Port Device Server User Guide... -
Page 50: Table 4-6. Tunnel - Start/Stop Chars Page
Choices are: On = echo the stop character on the selected tunnel when the serial line is read. Off = do not echo the stop character. (default) EDS4100 4 Port Device Server User Guide... -
Page 51: Tunnel - Accept Mode Page
4: Configuration Using the Web Manager Tunnel – Accept Mode Page Accept Mode determines how the EDS4100 “listens” for an incoming connection. If you click Accept Mode at the top of one of the Tunnel pages, the Tunnel – Accept Mode page appears. -
Page 52: Table 4-7. Tunnel - Accept Mode Page
Select whether incoming network data should be discarded. This setting Data is used for debugging purposes. Choices are: Enabled = discard all incoming network data on the respective interface. Disabled = do not discard all incoming network data. (default) EDS4100 4 Port Device Server User Guide... - Page 53 Specifies the number of milliseconds the EDS4100 waits during an inactive connection before checking the status of the connection. If the EDS4100 does not receive a response from the remote host, it drops that connection. EDS4100 4 Port Device Server User Guide...
-
Page 54: Tunnel - Connect Mode Page
4: Configuration Using the Web Manager Tunnel – Connect Mode Page Connect Mode determines how the EDS4100 initiates a connection to a remote host or device. If you click Connect Mode at the top of one of the Tunnel pages, the Tunnel –... -
Page 55: Table 4-8. Tunnel - Connect Mode Page
SSH = use this setting if security is a concern. This setting requires you to enter an SSH username. TCP w/AES = used for secure tunneling between two EDS4100 devices or other devices that support AES. UDP w/AES = used for secure tunneling between two EDS4100 devices or other devices that support AES. - Page 56 Specifies the number of milliseconds the EDS4100 waits during an inactive connection before checking the status of the connection. If the EDS4100 does not receive a response from the remote host, it drops that connection. EDS4100 4 Port Device Server User Guide...
-
Page 57: Tunnel - Disconnect Mode Page
Disconnect Mode page appears. This page lets you select the disconnect method for the tunnel selected at the top of the page. For more information about Disconnect mode, see Disconnect Mode on page 125. Figure 4-17. Tunnel – Disconnect Mode Page EDS4100 4 Port Device Server User Guide... -
Page 58: Table 4-9. Tunnel - Disconnect Mode Page
Select whether the serial line should be flushed when a connection is Data disconnected. Choices are: Enabled = flush the serial line when a connection is disconnected. Disabled = do not flush the serial line. (default) EDS4100 4 Port Device Server User Guide... -
Page 59: Tunnel - Packing Mode Page
This page lets you select packing settings for the tunnel selected at the top of the page. For more information about Packing mode, see Packing Mode on page 125. Figure 4-18. Tunnel – Packing Mode Page EDS4100 4 Port Device Server User Guide... -
Page 60: Table 4-10. Tunnel - Packing Mode Page
Default is <none>. Trailing Character Enter the trailing character. This character is inserted into the outgoing data stream immediately after the send character. Default is <none>. EDS4100 4 Port Device Server User Guide... -
Page 61: Tunnel - Modem Emulation Page
Tunnel – Modem Emulation page appears. This page lets you select modem emulation settings for the tunnel selected at the top of the page. For more information about modem emulation, see Modem Emulation on page 125. Figure 4-19. Tunnel – Modem Emulation Page EDS4100 4 Port Device Server User Guide... -
Page 62: Table 4-11. Tunnel - Modem Emulation Page
On = ERROR is returned for unrecognized AT commands. Off = OK is returned for unrecognized AT commands. (default) Connect String If required, enter a customized string that is sent along with the CONNECT response code. Default is <none>. EDS4100 4 Port Device Server User Guide... -
Page 63: Tunnel - Aes Keys Page
Note: Tunneling using AES encryption uses a non-standard protocol and shared keys, making it not very secure. The EDS4100 also supports SSH as an alternative method of secure tunneling. SSH tunneling has the advantage of not utilizing shared keys. -
Page 64: Table 4-12. Tunnel - Aes Keys Page
Connect Mode Enter the AES decrypt key for Connect mode. After entering a AES Keys: value, use the button to specify whether the value is text or binary. Decrypt Key Default is <none>. EDS4100 4 Port Device Server User Guide... -
Page 65: Dns Page
Enter the DNS primary server that maintains the master zone information/file for a domain. Default is <none>. Secondary Server Enter the DNS secondary server that backs up the primary DNS server for a zone. Default is <none>. EDS4100 4 Port Device Server User Guide... -
Page 66: Snmp Page
System Description have a Delete link that lets you delete these settings. If you click these links, a message asks whether you are sure you want to delete this information. Click OK to proceed or Cancel to cancel the operation. Figure 4-22. SNMP Page EDS4100 4 Port Device Server User Guide... -
Page 67: Table 4-14. Snmp Page
Off = SNMP is disabled. Read Community Enter the case-sensitive community name from which the EDS4100 will receive trap messages. Default is public. For security, the read community name appears as <Configured> to show that one is enabled. Write Community Enter the case-sensitive community name to which the EDS4100 will send trap messages. -
Page 68: Ftp Page
Username Enter the username required to gain FTP access. Default is admin. Password Enter the password associated with the username. For security reasons, each typed password character appears as a dark circle (•). EDS4100 4 Port Device Server User Guide... -
Page 69: Tftp
Allow TFTP File Select whether the TFT server can create a file if it does not Creation already exist. If you enable this feature, it exposes the EDS4100 to possible Denial-of-Service (DoS) attacks against the filesystem. Choices are: On = files can be created on the TFTP server. -
Page 70: Http Pages
The HTTP log is a scrolling log, with the last Max Log Entries cached and viewable. To change the maximum number of entries that can be viewed, go to the HTTP Configuration page (described on page 71). Figure 4-25. HTTP Statistics Page EDS4100 4 Port Device Server User Guide... -
Page 71: Http Configuration Page
View, the log appears. If you click Delete or Reset, a message asks whether you are sure you want to delete or reset this information. Click OK to proceed or Cancel to cancel the operation. Figure 4-26. HTTP Configuration Page EDS4100 4 Port Device Server User Guide... -
Page 72: Table 4-17. Http Configuration Page
On = HTTP server is enabled. (default) Off = HTTP server is disabled. HTTP Port Enter the number of the port on which the EDS4100 listens for incoming HTTP connections from a Web browser. Default is 80. HTTPS Port Enter the number of the port on which the EDS4100 listens for incoming HTTPS connections from a Web browser. - Page 73 The maximum length for each directive is 64 bytes. The exception is '%r' where each element is limited to 64 bytes (i.e. method, URL path info, and query string). The default log format string is: %h %t "%r" %s %B "%{Referer}i" "%{User-Agent}i" EDS4100 4 Port Device Server User Guide...
-
Page 74: Http Authentication Page
Under Current Configuration, URI and Users have a Delete link. If you click Delete, a message asks whether you are sure you want to delete this information. Click OK to proceed or Cancel to cancel the operation. Figure 4-27. HTTP Authentication Page EDS4100 4 Port Device Server User Guide... -
Page 75: Table 4-18. Http Authentication Page
Enter the name of the user that will participate in the authentication. Default is PASS. Password Enter the password that will be associated with the username. Default is admin. For security reasons, each typed password character appears as a dark circle (•). EDS4100 4 Port Device Server User Guide... -
Page 76: Http Rss Page
Web users. Instead of actively searching for EDS4100 configuration changes, RSS feeds allow viewing of only relevant and new information regarding changes made to the EDS4100 via an RSS publisher. The RSS feeds are also stored to the filesystem’s cfg_log.txt file. -
Page 77: Table 4-19. Http Rss Page
Each RSS feed entry is prefixed with a timestamp "[BC:HH:MM:SS]". "BC" is the Boot Cycle value and indicates the number of times the EDS4100 has rebooted since factory defaults were last loaded. The resulting "HH:MM:SS" is the time since the EDS4100 booted. -
Page 78: Cli Pages
The remote client information is displayed The number of bytes that have been sent and received is displayed. A Clear link appears, which can be used to terminate the connection. Figure 4-29. Command Line Interface Statistics Page EDS4100 4 Port Device Server User Guide... -
Page 79: Command Line Interface Configuration Page
Under Current Configuration, Password has a Delete link. If you click Delete, a message asks whether you are sure you want to delete this information. Click OK to proceed or Cancel to cancel the operation. Figure 4-30. Command Line Interface Configuration Page EDS4100 4 Port Device Server User Guide... -
Page 80: Table 4-20. Command Line Interface Configuration Page
On = Telnet access is enabled. (default) Off = Telnet access is disabled. Telnet Port Enter the number of the port on which the EDS4100 listens for incoming Telnet connections. Default is 23. SSH Access Select whether Secure Shell (SSH) access is enabled. -
Page 81: Ssh Pages
Delete links if these keys have been created. If you click View, the key appears. If you click Delete, a message asks whether you are sure you want to delete this information. Click OK to proceed or Cancel to cancel the operation. Figure 4-31. SSH Server: Host Keys Page EDS4100 4 Port Device Server User Guide... -
Page 82: Table 4-21. Ssh Server: Host Keys Page
2 minutes for a 512-bit DSA key 10 minutes for a 768-bit DSA key 15 minutes for a 1024-bit DSA key Some SSH clients require RSA host keys to be at least 1024 bits long. EDS4100 4 Port Device Server User Guide... -
Page 83: Ssh Server: Authorized Users Page
Under Current Configuration, User has a Delete User link. If you click Delete User, a message asks whether you are sure you want to delete this information. Click OK to proceed or Cancel to cancel the operation. Figure 4-32. SSH Server: Authorized Users Page EDS4100 4 Port Device Server User Guide... -
Page 84: Table 4-22. Ssh Server: Authorized Users Page
Enter the path and name of the existing public DSA key you want to use with this user or use the Browse button to select the key. If authentication is successful with the key, no password id required. EDS4100 4 Port Device Server User Guide... -
Page 85: Ssh Client: Known Hosts Page
You do not have to complete the fields on this page for communication to occur. However, completing them adds another layer of security that protects against Man-In-The-Middle (MITM) attacks. Figure 4-33. SSH Client: Known Hosts Page EDS4100 4 Port Device Server User Guide... -
Page 86: Table 4-23. Ssh Client: Known Hosts Page
Browse button to select the key. Public DSA Key Enter the path and name of the existing public DSA key you want to use with this known host or use the Browse button to select the key. EDS4100 4 Port Device Server User Guide... -
Page 87: Ssh Client: Users Page
If uploading existing keys, be sure the private key will not be compromised in transit. This implies the data is uploaded over some kind of secure private network. Figure 4-34. SSH Client: Users Page EDS4100 4 Port Device Server User Guide... -
Page 88: Table 4-24. Ssh Client: Users Page
Table 4-24. SSH Client: Users Page SSH Client: Users Description Page Settings Username Enter the name that the EDS4100 uses to connect to the SSH client user. Password Enter the password associated with the username. For security reasons, each typed password character appears as a dark circle (•). -
Page 89: Ssl Page
Certificate, there is a Delete link. If you click Delete, a message asks whether you are sure you want to delete the current certificate. Click OK to proceed or Cancel to cancel the operation. EDS4100 4 Port Device Server User Guide... -
Page 90: Figure 4-35. Ssl Page
4: Configuration Using the Web Manager Figure 4-35. SSL Page EDS4100 4 Port Device Server User Guide... -
Page 91: Table 4-25. Ssl Page
Using a larger Bit Size takes more time to generate the key. Approximate times are: 10 seconds for a 512-bit RSA key 1 minute for a 768-bit RSA key 2 minutes for a 1024-bit RSA key EDS4100 4 Port Device Server User Guide... -
Page 92: Xml Pages
XML format. The generated XML file can be imported at a later time to restore a configuration. It can also be modified and imported to update the configuration on this EDS4100 unit or another. The XML data can be exported to the browser window or to a file on the filesystem. -
Page 93: Figure 4-36. Xml Configuration Record: Export System Configuration Page
4: Configuration Using the Web Manager Figure 4-36. XML Configuration Record: Export System Configuration Page EDS4100 4 Port Device Server User Guide... -
Page 94: Table 4-26. Xml Configuration Record: Export System Configuration Page
If you select this option, enter a file name for the XML configuration record. GROUPS TO EXPORT Check the configuration groups that are to be exported to the XML configuration record. If no groups are checked, all groups will be exported. EDS4100 4 Port Device Server User Guide... -
Page 95: Xml Status Record: Export System Status
XML format. The generated XML file can be imported at a later time to restore a configuration. It can also be modified and imported to update the configuration on this EDS4100 or another. The XML data can be exported to the browser window or to a file on the filesystem. -
Page 96: Xml: Import System Configuration Page
Each group name <g> is followed by a colon and the instance value <i>. Each <g>:<i> value is separated with a semicolon. If a group has no instance, specify the group name <g> only. EDS4100 4 Port Device Server User Guide... -
Page 97: Figure 4-38. Xml: Import System Configuration Page
4: Configuration Using the Web Manager Figure 4-38. XML: Import System Configuration Page EDS4100 4 Port Device Server User Guide... -
Page 98: Table 4-28. Xml: Import System Configuration Page
If required, enter the filter string for importing specific instances of a Instances to Import group. WHOLE GROUPS Check the configuration groups that are to be imported into the XML TO IMPORT configuration record. If no groups are checked, all groups will be imported. EDS4100 4 Port Device Server User Guide... -
Page 99: Filesystem Pages
The Actions row provides Compact and Format links that allows the filesystem to be compacted or formatted. Before undertaking these tasks, be sure you know how to perform these tasks and understand their impact. Figure 4-39. Filesystem Statistics Page EDS4100 4 Port Device Server User Guide... -
Page 100: File System Browser Page
This page lets you browse and manipulate the entire filesystem. For example, you can: Browse the filesystem Create files and directories. Upload files via HTTP. Copy and move files. Transfer files to and from a TFTP server. Figure 4-40. Filesystem Browser Page EDS4100 4 Port Device Server User Guide... -
Page 101: Table 4-29. Filesystem Browser Page
(“get’) or externally (“put”). Host Enter the IP address or name of the host involved in this operation. Port Enter the number of the port involved in TFTP operations. Click Transfer to complete the TFTP transfer. EDS4100 4 Port Device Server User Guide... -
Page 102: Protocol Stack Page
If you click Clear or Remove, a message asks whether you are sure you want to perform the operation. Click OK to proceed or Cancel to cancel the operation. Figure 4-41. Protocol Stack Page EDS4100 4 Port Device Server User Guide... -
Page 103: Table 4-30. Protocol Stack Page
Enter the IP address of the entry to be added to the Address Resolution Protocol (ARP) cache. MAC Address Enter the MAC address of the entry to be added to the ARP cache. After entering an IP address and a MAC address, click Submit. EDS4100 4 Port Device Server User Guide... -
Page 104: Ip Address Filter Page
This page lets you specify the IP addresses and subnets allowed to send data to the EDS4100. All packets sent from IP addresses not on this list are ignored and discarded. By default, the IP address list is empty, so all addresses are allowed. -
Page 105: Table 4-31. Ip Address Filter Page
Description Filter Page Settings IP Address Enter the IP address that is allowed to send packets to the EDS4100. If using DHCP with BOOTP, enter the IP address of the DHCP/BOOTP server. Network Mask Enter the network mask associated with the IP address that is allowed to send packets to the EDS4100. -
Page 106: Query Port Page
The query port server is an application that only responds to auto-discovery messages on port 0x77FE. It is used when DeviceInstaller is used to automatically discover the EDS4100. Figure 4-43. Query Port Page Table 4-32. -
Page 107: Diagnostics Pages
4: Configuration Using the Web Manager Diagnostics Pages The EDS4100 has several tools for performing diagnostics. To view these diagnostic tools, click the Diagnostics link in the menu bar to display the Diagnostics: Hardware page. The available diagnostic tools appear at the top of the page. -
Page 108: Mib-Ii Network Statistics Page
Clicking MIB-II Stats from one of the Diagnostics pages displays the MIB-II Network Statistics page. This page displays the various SNMP-served Management Information Bases (MIBs) available on the EDS4100. Information about these MIBs can be found in the following Request for Comments (RFCs):... -
Page 109: Ip Sockets Page
IP Sockets Page Clicking IP Sockets from one of the Diagnostics pages displays the IP Sockets page. This read-only page lists all the network sockets on the EDS4100 that are currently open. Figure 4-45 IP Sockets Page EDS4100 4 Port Device Server User Guide... -
Page 110: Diagnostics: Ping Page
Host Enter the IP address you want the EDS4100 to ping. Count Enter the number of ping packets that the EDS4100 should try to send to the Host. Default is 3. Timeout Enter the maximum number of seconds that the EDS4100 should wait for a response from the host before timing out. -
Page 111: Diagnostics: Traceroute Page
Clicking Traceroute from one of the Diagnostics pages displays the Diagnostics: Traceroute page. This page lets you trace a packet from the EDS4100 to an Internet host, showing how many hops the packet requires to reach the host and how long each hop takes. -
Page 112: Diagnostics: Dns Lookup Page
IP address. For forward lookup to locate the corresponding IP address, enter a hostname. To look up the Mail Exchange (MX) record IP address, enter a domain name prefixed with “@”. EDS4100 4 Port Device Server User Guide... -
Page 113: Diagnostics: Memory Page
This read-only page shows the total memory and available memory (in bytes), along with the number of fragments, allocated blocks, and memory status. The Diagnostics: Memory page also shows the current amount of available memory. Figure 4-49 Diagnostics: Memory Page EDS4100 4 Port Device Server User Guide... -
Page 114: Diagnostics: Buffer Pool
Private buffer pools are used in various parts of the system to ensure deterministic memory management thus eliminating any contention for memory from the generic heap space Figure 4-50. Diagnostics: Buffer Pools Page EDS4100 4 Port Device Server User Guide... -
Page 115: Diagnostics: Processes Page
Diagnostics: Processes Page Clicking Processes from one of the diagnostics page displays a read-only screen that lists all processes running on the EDS4100. The CPU % column displays the percentage of total CPU cycles a process used in the last two seconds. -
Page 116: System Page
Clicking the System link in the menu bar displays the System page. This page lets you: Reboot the EDS4100 Restore factory defaults Upload new firmware Assign short and long names to the EDS4100 Figure 4-52. System Page EDS4100 4 Port Device Server User Guide... -
Page 117: Table 4-36. System Page
If you restore the factory default configuration, the EDS4100 reboots automatically. Upload New Lets you update the EDS4100 firmware. Do not power off or reset Firmware the EDS4100 while uploading new firmware. Once the upload has completed and the new firmware has been verified and flashed, the EDS4100 reboots automatically. -
Page 118: 5: Updating Firmware
Open. The path and filename appear to the left of the Browse button. 5. Click Upload to install the firmware on the EDS4100. The Diagnostic LED flashes slowly during this step. After the new firmware is installed, the EDS4100 reboots automatically. -
Page 119: 6: Networking And Security
Reduces the complexities associated with keeping user information confidential Works with existing Web servers and browsers Eliminates the need for additional software applications Provides high level of security Platform and O/S neutral Allows server authentication via certificates EDS4100 4 Port Device Server User Guide... -
Page 120: How Ssl Works
You can configure the EDS4100 to use an SSL certificate for the HTTP server. The certificate can be created elsewhere and uploaded to the EDS4100, or it can be automatically generated as a self-signed certificate on the EDS4100. -
Page 121: Ssh
Interception of cleartext passwords and other data by intermediate hosts. Manipulation of data by people in control of intermediate hosts. Attacks based on listening to authentication data and spoofed connections to the server. EDS4100 4 Port Device Server User Guide... -
Page 122: Tunneling
PC’s serial port and received at the remote PC. In this way, serial data that goes in one end comes out at the other end. Figure 6-1. Example of an Encrypted Tunnel EDS4100 4 Port Device Server User Guide... -
Page 123: Tunneling And The Eds4100
For AES encryption, both the encrypt key and the decrypt key must be specified. The encrypt key is used with data sent from the EDS4100, while the decrypt key is used when the EDS4100 receives data. Both keys can have the same value. -
Page 124: Accept Mode
(depending on the configured setting). Accept Mode In Accept mode, the EDS4100 waits for a connection. The configurable local port is the port the remote device connects to for this connection. There is no remote port or address. The default local port is:... -
Page 125: Disconnect Mode
The following three settings end a connection: The EDS4100 receives the stop character. The timeout period elapses and no activity is going in or out of the EDS4100. Both Accept mode and Connect mode must be idle for the time frame. -
Page 126: Command Mode
When making a connection from the EDS4100 using an ATDT or ATDP command, full or partial IP addresses can be used. If a partial IP address is used, the EDS4100 uses the remote address and port as configured in the Connect Mode settings. - Page 127 By default, the +++ characters are not passed through the connection. To pass them through the connection, enable Echo Pluses on the Tunnel - Modem Emulation page (see Tunnel – Modem Emulation Page on page 61). EDS4100 4 Port Device Server User Guide...
-
Page 128: A: Configuration Using Telnet Or Serial Port
Using a Serial Port To configure the EDS4100 locally using a serial port, connect a terminal or a PC running a terminal-emulation program to an EDS4100 serial port. Configure the terminal (or emulation) for 9600 baud, 8-bit, no parity, 1 stop bit, and no flow control. - Page 129 To exit and return to the menu one level higher, type exit. The following key combinations are allowed when configuring the EDS4100 from the CLI: Ctrl + a: place cursor at the beginning of line Ctrl + b: backspace one character...
-
Page 130: Navigating Through The Cli
A: Configuration Using Telnet or Serial Port Navigating through the CLI EDS4100 4 Port Device Server User Guide... -
Page 131: Summary Of Cli Commands
Root menu: page Enable menu: page Configure menu: page Interface 1 Level Menu: page Device menu: page DVT: page Filesystem menu: page Line menu: page SSH menu: page SSL menu: page Tunnel menu: page EDS4100 4 Port Device Server User Guide... -
Page 132: Root Menu
Displays the current EDS4100 settings. trace route <host> Determines the path taken from a computer to a specified destination. <host> = host destination. EDS4100 4 Port Device Server User Guide... -
Page 133: Enable Menu
<number> = number of the serial line to be cleared. clear query port Sets the Query Port counters to zero. counters clear ssh <session> Ends an active SSH session on the EDS4100. session number displayed by the show <session> = sessions command. clear telnet <session>... - Page 134 <group list> = name of the group list whose XML configuration you want to view. xcr export <file> Saves the current EDS4100’s configuration to a file. <file> = name of the file in which the current EDS4100 configuration will be saved. EDS4100 4 Port Device Server User Guide...
-
Page 135: Configure Menu
<group list> = name of the XML configuration to be imported. xcr import <file> Imports a local XML configuration to the EDS4100. <file> = name of the file to be imported. xcr import <file> Imports a specific XML configuration to the EDS4100. - Page 136 Description Command clear tcp counters Set the TCP counters to zero. clear telnet Ends an active Telnet session on the EDS4100. clear tftp counters Sets the TFTP counters to zero. clear udp counters Set the UDP counters to zero. clrscrn Clears the screen.
- Page 137 Sets the Telnet port that the server uses. <number> = Telnet port number. ip tftp allow file Enables the automatic creation of files by the TFTP creation server. ip tftp enable Enables the TFTP server. EDS4100 4 Port Device Server User Guide...
- Page 138 Disables the query port. no rss enable Disables the RSS feed. no rss persistent Disables RSS feed data persistence. no snmp-server Removes the SNMP read-only server community string. community ro EDS4100 4 Port Device Server User Guide...
- Page 139 Displays the SNMP server settings. show ssh Displays the IP SSH configuration. show telnet Displays the Telnet configuration. show tftp Displays the TFTP settings and statistics. show udp Display the UDP settings and statistics. EDS4100 4 Port Device Server User Guide...
- Page 140 Sets the SNMP system location. <string> <string> = SNMP system location. snmp-server name Sets the SNMP system name. <string> <string> = SNMP system name. write Stores and applies the current configuration into permanent memory. EDS4100 4 Port Device Server User Guide...
-
Page 141: Interface 1 Level Menu
<ip address> <netmask> <ip address> = IP address. <netmask> = netmask in dotted notation. show Displays the interface settings. show history Displays previously entered commands. show ip address filter Displays the IP filter table. EDS4100 4 Port Device Server User Guide... -
Page 142: Device Menu
<name> Renames the EDS4100’s long name as displayed in Command mode and the Web Manager. <name> = new long name to be assigned to the EDS4100. no cpu speed Reverts the query port counters to the last aggregate value. -
Page 143: Dvt
<line> = line (serial port) to be configured. dvt line all Configures nondestructive DVT for all lines (i.e., serial ports). dvt ram Sets nondestructive DVT of RAM. exit Exits the EVT menu and return to the Device menu. EDS4100 4 Port Device Server User Guide... -
Page 144: Filesystem Menu
A: Configuration Using Telnet or Serial Port Filesystem Menu The following commands are configurable parameters within the Filesystem menu. This level allows for the management of files in the EDS4100. Filesystem Menu Description Command cat <file> Displays the contents of a specified file. - Page 145 <source file> = name of the file to be to a remote location. <destination file> <host> <destination file> = name of the file when it is moved. <host> = name of the host where the file will be moved. EDS4100 4 Port Device Server User Guide...
-
Page 146: Line Menu
Sets the boot-up sign-on message using binary values. message binary <string> command mode wait Sets boot-up wait time for CP and serial settings. time <milliseconds> <milliseconds> = number of milliseconds for boot-up wait time and serial settings. EDS4100 4 Port Device Server User Guide... - Page 147 A: Configuration Using Telnet or Serial Port Line Menu Command Description databits 7 Set the number of EDS4100 data bits to 7. databits 8 Set the number of EDS4100 data bits to 8. exit Exits the Line menu and return to the Enable menu.
-
Page 148: Ssh Menu
Exits the SSH menu and return to the Enable menu. host Sets the RSA or DSA public (or private) keys. host <key> Sets the RSA or DSA public (or private) key. <key> = RSA or DSA key to be set. EDS4100 4 Port Device Server User Guide... - Page 149 <user> Removes the client user RSA key. <user> = name of client user whose RSA key is to be removed. no host dsa Removes DSA public and private keys. EDS4100 4 Port Device Server User Guide...
-
Page 150: Ssl Menu
Adds a SSL certificate and private key. <private> <certificate> = certificate to be added. <private> = private key associated with certificate. ssl generate Generates a new self-signed SSL certificate. write Stores and applies current configuration into permanent memory. EDS4100 4 Port Device Server User Guide... -
Page 151: Tunnel Menu
Sets the AES decryption key using ASCII format. key <string> <string> = AES decryption key to be set. connect aes decryption Sets the AES decryption key using binary format. key binary <string> <string> = AES decryption key to be set. EDS4100 4 Port Device Server User Guide... - Page 152 <milliseconds> = number of milliseconds. connect remote <host> Set the remote address in which to connect. <host> = host IP address. connect remote port Sets remote port <number> <number> = port number of remote port. EDS4100 4 Port Device Server User Guide...
- Page 153 Forwards (tunnel) serial data. no accept flush serial Do not flush serial data buffer on connection. data no accept keep alive Disables TCP keepalives. no accept port Uses a random port number as the local port. EDS4100 4 Port Device Server User Guide...
- Page 154 Sets buffers used in tunneling of data to the default. no serial wait for read Disables waiting for read timeout before returning serial timeout data. no start character Removes the start character. no stop character Removes the stop character. EDS4100 4 Port Device Server User Guide...
- Page 155 Sets the stop- character (string format: C, HEX: 0x##, Decimal: ###). tunnel n Displays the Tunnel n menu option, where n = 1, 2, 3, or 4. write Stores and applies current configuration into permanent memory. EDS4100 4 Port Device Server User Guide...
-
Page 156: B: Configuration Using Xml
For example, it might change all of the configurable parameters for an EDS4100, or it may only change the baud rate for a single serial line. In this way, using the XML interface makes it straightforward to change the configuration for EDS4100 devices. -
Page 157: Quick Syntax Tour For Xcrs
Note: In general, an empty <value> clears the value to its default setting. Exceptions are passwords and SSH/SSL certificates. A <value> element contains the configuration value that gets parsed by the EDS4100 and may take a “name” attribute. Attributes Use the “name” attribute to identify a group, item, or value. It is always a quoted string. -
Page 158: Records, Groups, Items, And Values
Figure 6-4. XML Example with Multiple Named Values <?xml version=”1.0” standalone=”yes”?> <configgroup name = "ssh server"> <configitem name = "host rsa keys"> <value name = "public key"></value> <value name = "private key"></value> </configitem> </configgroup> EDS4100 4 Port Device Server User Guide... -
Page 159: Importing And Exporting An Xml Configuration File
System Status on page 95. FTP ⎯ to export a file, execute a get on the file eds4100.xml. To import a file, execute a put on the file eds4100.xml. When you execute a get or put with this XML file, the file is intercepted by the EDS4100 and acted upon, without being placed on the filesystem. -
Page 160: Best Practices
These lines import all groups specified in the XML config record named in <file>. Any filename is valid, and the file name and extension are not important. However, the file name eds4100.xcr is not acceptable, since performing a get on that name produces the current configuration and does not get anything from the filesystem. -
Page 161: Including Passwords In The Xml File
Including Passwords in the XML File If you log in to an EDS4100 to which you will be sending an XML configuration file, you do not need to include passwords in the file, since you are already logged in to the device. -
Page 162: Special Xcr Groups
They are not used for configuration purposes. For example, the Reboot group, which causes the EDS4100 to reboot, is not a configurable setting that can be exported. However, it may be added to an XML configuration record manually to ensure the EDS4100 reboots after applying a new configuration settings. -
Page 163: Xml Groups
B: Configuration Using XML XML Groups Table 6-1 lists the EDS4100 XML import and export groups in alphabetical order. This table also indicates whether the group can be imported and/or exported. Table 6-1. EDS4100 Import and Export Groups Group Name... - Page 164 Import and Export ethernet auto enable Import and Enable = auto- negotiate Export negotiation determines the link speed and duplex. Not set to enable = speed and duplex items are exported. EDS4100 4 Port Device Server User Guide...
- Page 165 Import and Export secure port Import and Export max timeout Import and Export max bytes Import and Export logging state Import and Export icmp state enable Import and Export disable Import and Export EDS4100 4 Port Device Server User Guide...
- Page 166 XCR using the CLI capture feature. The system value specifies the root password used if the root level is password protected. Passwords are not required if the CLI is already logged in to the system level. EDS4100 4 Port Device Server User Guide...
- Page 167 Export none Import and Export xon char Import and Set the x-on Export character. Enter as a hexadecimal byte. xoff char Import and Set the x-off Export character. Enter as a hexadecimal byte. EDS4100 4 Port Device Server User Guide...
- Page 168 Import and Export disable Import and Export persist enable Import and Export disable Import and Export max entries Import and Export serial mode disable Import and command Export mode always Import and Export EDS4100 4 Port Device Server User Guide...
- Page 169 Export ssh client known host Import and Export server Import and Export public rsa key Import and Export client users username Import and Export password Import and Export remote Import and command Export EDS4100 4 Port Device Server User Guide...
- Page 170 Enter the text of Export the private key. delete certificate Import and Deletes the Export current SSL certificate. resets enable Import and Export disable Import and Export telnet state enable Import and command Export EDS4100 4 Port Device Server User Guide...
- Page 171 Import and Export block enable Import and network Export disable Import and Export tcp keep Import and alive Export tunnel aes encrypt key Import and accept Export decrypt key Import and Export EDS4100 4 Port Device Server User Guide...
- Page 172 Import and Export Import and username Export block serial enable Import and Export disable Import and Export block enable Import and network Export disable Import and Export tcp keep Import and alive Export EDS4100 4 Port Device Server User Guide...
- Page 173 Import and packing mode Export timeout Import and Export send Import and character Export timeout Import and Export threshold Import and Export send Import and character Export trailing Import and character Export EDS4100 4 Port Device Server User Guide...
- Page 174 Export tunnel start start Import and character Export echo enable Import and Export disable Import and Export tunnel stop stop Import and character Export echo enable Import and Export disable Import and Export EDS4100 4 Port Device Server User Guide...
-
Page 175: Xsr Groups And Items
The CLI command usage is identical to the XCR export, dump, and list. Table 6-2. EDS4100 XSR Groups and Items Group Name Item Name Value Name Valid Values... - Page 176 EDS4100 4 Port Device Server User Guide...
- Page 177 EDS4100 4 Port Device Server User Guide...
- Page 178 EDS4100 4 Port Device Server User Guide...
- Page 179 4 buffer headers total free used max used cluster pool cluster size total free used max used line statistics receive bytes EDS4100 4 Port Device Server User Guide...
- Page 180 EDS4100 4 Port Device Server User Guide...
- Page 181 EDS4100 4 Port Device Server User Guide...
- Page 182 EDS4100 4 Port Device Server User Guide...
- Page 183 B: Configuration Using XML EDS4100 4 Port Device Server User Guide...
-
Page 184: C: Factory Default Configuration
C: Factory Default Configuration This appendix lists the EDS4100 factory-default configuration. Network Configuration Settings Network Configuration Network Configuration Settings Parameters BOOTP Client Off (disabled) DHCP Client On (enabled) IP Address 0.0.0.0 (auto-IP if DHCP fails) Network Mask 0.0.0.0 Gateway 0.0.0.0... -
Page 185: Tunnel Settings
Local Port Port 1 = 10001 Port 2 = 10002 Port 3 = 10002 Port 4 = 10004 Protocol Flush Serial Data Disabled Block Serial Data Block Network Data TCP Keep Alives Disabled EDS4100 4 Port Device Server User Guide... -
Page 186: Connect Mode
Disconnect Mode Settings Parameters Mode Disabled Timeout 60000 milliseconds Flush Serial Data Disabled Packing Mode Packing Mode Parameters Packing Mode Settings Mode Disabled Timeout 1000 milliseconds Threshold 512 bytes Send Character None Trailing Character None EDS4100 4 Port Device Server User Guide... -
Page 187: Modem Emulation
None Accept Mode AES Keys: Decrypt None Connect Mode AES Keys: None Encrypt Key Connect Mode AES Keys: None Decrypt Key DNS Settings DNS Parameters DNS Settings Primary Server None Secondary Server None EDS4100 4 Port Device Server User Guide... -
Page 188: Snmp Settings
Primary TrapDest IP None Secondary TrapDest IP None FTP Settings FTP Parameters FTP Settings FTP Server Username admin Password PASS TFTP Settings TFTP Parameters TFTP Settings TFTP Server Allow TFTP File Disabled Creation EDS4100 4 Port Device Server User Guide... -
Page 189: Http Settings
%h %t "%r" %s %B "%{Referer}i" "%{User-Agent}i" Authentication HTTP HTTP Authentication Settings Authentication Parameters Realm Config AuthType Basic Username Admin Password PASS HTTP RSS HTTP RSS Settings Parameters RSS Feed Persistent Max Entries EDS4100 4 Port Device Server User Guide... -
Page 190: Cli
Query Port Query Port Settings Parameters Query Port Server Diagnostics Ping Diagnostics Ping Diagnostic Ping Settings Parameters Count Timeout 5 seconds System System Parameters System Settings Short Name EDS4100 Long Name Lantronix EDS4100 EDS4100 4 Port Device Server User Guide... -
Page 191: D: Troubleshooting And Technical Support
Description of the problem Debug report (stack dump), if applicable Status of the unit when the problem occurred (please try to include information on user and network activity at the time of the problem) EDS4100 4 Port Device Server User Guide... -
Page 192: Compliance Information
Manufacturer’s Name & Address: Lantronix 15353 Barranca Parkway, Irvine, CA 92618 USA Declares that the following product: Product Name Model: EDS4100 4 Port Device Server Conforms to the following standards or other normative documents: Radiated and conducted emissions Class B limits of EN 55022:1998 EN55024: 1998 + A1: 2001 Direct &... -
Page 193: Lithium Battery Notice
ACHTUNG: WIRD BEIM BATTERIEWECHSEL EINE FALSCHE BATTERIE EINGESETZT, BESTEHT EXPLOSIONSGEFAHR. SETZEN SIE NUR EINE BATTERIE DES GLEICHEN ODER EINES ENTSPRECHENDEN, VOM HERSTELLER EMPFOHLENEN TYPS EIN. ENTSORGEN SIE VERBRAUCHTE BATTERIEN GEMÄSS DEN ANWEISUNGEN DES HERSTELLERS. EDS4100 4 Port Device Server User Guide... -
Page 194: Warranty
Lantronix, freight prepaid. Upon verification of warranty, Lantronix will -- at its option -- repair or replace the product and return it to the customer freight prepaid. If the product is not under warranty, the customer may have Lantronix repair the unit on a fee basis or return it. -
Page 195: Index
Statistics, 78 page, 65 Client users,SSH server, 87 DVT menu, 143 Command Line Interface configuration, 27 EDS4100 Command mode, 126 Applications, 16 Command Mode settings, 44 configuration methods, 26 Compliance, 192 Connecting, 25 EDS4100 4 Port Device Server User Guide... - Page 196 Packing mode settings, 59 Terminal block connector, 24 Pinging an IP address, 110 Hardware diagnostics, 107 Processes diagnostics, 115 Host key settings, SSH server, 81 Properties, 27 How SSL works, 120 Protocol Stack page, 102 EDS4100 4 Port Device Server User Guide...
- Page 197 92, 159 Filesystem, 99 importing, 96, 159 FTP, 68 System page, 116 HTTP, 70 System status, exporting, 95 IP Filter Address, 104 Technical specifications, 19 Line Settings, 40 Technical support, 191 Network Configuration, 38 EDS4100 4 Port Device Server User Guide...
- Page 198 System, 116 Export system configuration record, 92, TFTP, 69 Tunnel, 46 Export system status, 95 XML, 92 Import system configuration record, 96, XML, 157 Best practices, 160 configuration, 27 Import and export groups, 175 EDS4100 4 Port Device Server User Guide...
Need help?
Do you have a question about the EDS4100 and is the answer not in the manual?
Questions and answers