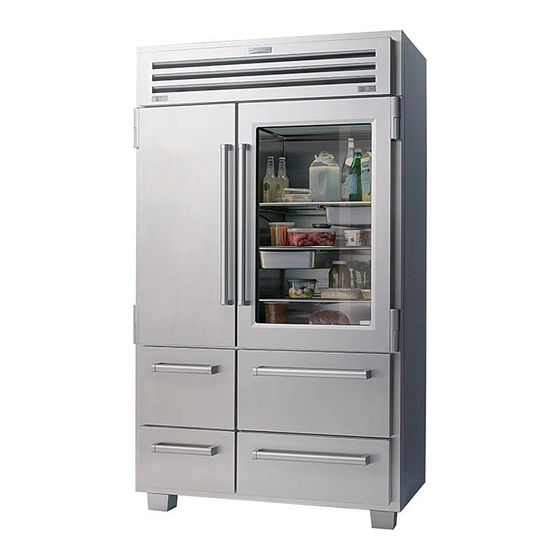
Sub-Zero PRO 48 Installation Manual
Refrigeration
Hide thumbs
Also See for PRO 48:
- Installation instructions manual (76 pages) ,
- Use & care manual (44 pages) ,
- Installation manual (20 pages)
Table of Contents
Advertisement
Available languages
Available languages
Quick Links
Advertisement
Chapters
Table of Contents

Related Manuals for Sub-Zero PRO 48


Summary of Contents for Sub-Zero PRO 48
- Page 1 PRO 48 Refrigeration Installation Guide...
-
Page 2: Table Of Contents
PRO 48 REFRIGERATION Contents Important Note PRO 48 Refrigeration To ensure this product is installed and operated as safely and efficiently as possible, take note of the following types Opening Dimensions of highlighted information throughout this guide: Electrical highlights information that is especially... -
Page 3: Pro 48 Refrigeration
If service is necessary, contact Sub-Zero factory certified service with the model and serial number. For the name • Standard socket and wrench set. of the nearest Sub-Zero factory certified service or for • 2' and 4' levels. questions regarding the installation, visit the contact & sup- port section of our website, subzero.com or call Sub-Zero... -
Page 4: Opening Dimensions
For standard built-in installations, the face frame will extend OPENING 2" beyond cabinetry. In flush installations, the face frame (51) Standard " " 24" (1206) (2127) (610) will be flush with surrounding cabinetry. Flush 48" " 26" (1219) (2137) (660) Sub-Zero Customer Care 800.222.7820... -
Page 5: Electrical
SITE PREPARATION Electrical Plumbing Installation must comply with all applicable electrical codes. Installation must comply with all applicable plumbing codes. The electrical supply should be located within the shaded The water supply line should be located within the shaded area shown in the illustration below. A separate circuit, ser- area shown in the illustration below. -
Page 6: Preparation
" pan head screws CABLE TIE "–16 x 3 " wedge anchors NETWORK CABLE #12 flat washers #8–18 x 1 " truss head screws GRILLE Nylon Zip-it ® wall anchors BOLT Grille removal. CENTERLINE LOCATING HOLES Anti-tip bracket. Sub-Zero Customer Care 800.222.7820... - Page 7 SITE PREPARATION Anti-Tip Bracket WOOD FLOOR APPLICATION CONCRETE WEDGE ANCHOR INSTALLATION: After properly locating the anti-tip bracket in the opening, Drill a " diameter hole any depth exceeding the (10) drill pilot holes " diameter maximum in the wall studs minimum embedment.
-
Page 8: Placement
If a reverse osmosis system used, it is IMPORTANT NOTE: ADJUSTMENT recommended that the water filtration system be bypassed FRONT LEVELING LEG by removing the filter. Water lines can not be exposed to IMPORTANT NOTE: Leveling. freezing temperatures. Sub-Zero Customer Care 800.222.7820... - Page 9 INSTALLATION Alignment DOOR ADJUSTMENT DRAWER ADJUSTMENT To make adjustments, remove door and door stop, then Vertical adjustment Loosen the three mounting screws. slightly loosen the two upper hinge screws. Use the Allen Refer to the illustration below. Using a " wrench, turn the wrench provided to turn adjustment screw to adjust hinge.
-
Page 10: Completion
Install leg covers. Remove paper backing and press into clockwise one-quarter turn and pull out. Refer to the position. illustration below. Turn power on by touching POWER on the control panel. WATER FILTER Open grille. Water filter removal. Kickplate installation. Sub-Zero Customer Care 800.222.7820... - Page 11 Sub-Zero, Sub-Zero & Design, Dual Refrigeration, Constant Care, The Living Kitchen, Great American Kitchens The Fine Art of Kitchen Design, and Ingredients are registered trade- marks and service marks of Sub-Zero, Inc. Wolf, Wolf & Design, Wolf Gourmet, W & Design and the color red as applied to knobs are registered trademarks and service marks of Wolf Appliance, Inc.
- Page 12 UNIDAD DE REFRIGERACIÓN PRO 48 Contenido Aviso importante Unidad de refrigeración PRO 48 Para garantizar que este producto sea instalado y operado de la forma más segura y eficiente posible, tome nota de los Dimensiones de abertura siguientes tipos de información resaltada en esta guía: Instalación eléctrica...
-
Page 13: Unidad De Refrigeración Pro 48
• Juego de llaves Allen estándar. Si necesita servicio, póngase en contacto con el centro de servicio autorizado de Sub-Zero y tenga a la mano el • Juego de llaves estándar y de vaso. modelo y número de serie de la unidad. Para obtener los •... -
Page 14: Dimensiones De Abertura
En las instalaciones empo- (51) Ancho " 48" (1206) (1219) trables, el marco frontal se instalará con los gabinetes que Altura " " (2127) (2137) lo rodean. Profundidad* 24" 26" (610) (660) Atención al cliente de Sub-Zero 800.222.7820... -
Page 15: Instalación Eléctrica
PREPARACIÓN DEL SITIO Instalación eléctrica Plomería La instalación debe cumplir con todos los códigos eléc- La instalación debe cumplir con todos los códigos de tricos vigentes. plomería vigentes. El suministro eléctrico debe colocarse dentro del área La línea del suministro de agua debe colocarse dentro del sombreada que se muestra en la siguiente ilustración. -
Page 16: Preparación
Tornillos de cabeza segmentada de #8–18 x 1 " GRILLE DE LA BOLT REJILLA Anclajes Nylon Zip-it ® para pared Extracción de la rejilla. ORIFICIOS DE UBICACIÓN CENTERLINE DE LA LÍNEA CENTRAL LOCATING HOLES Soporte antivuelco. Atención al cliente de Sub-Zero 800.222.7820... - Page 17 PREPARACIÓN DEL SITIO Soporte antivuelco APLICACIÓN EN SUELO DE MADERA INSTALACIÓN DE LAS ANCLAS DE CUÑA PARA CONCRETO: Después de ubicar apropiadamente el soporte antivuelco Haga un orificio de " de diámetro con una profun- (10) en la abertura, taladre los orificios guía con un diámetro didad superior al empotrado mínimo.
-
Page 18: Colocación
TRASERA PATA NIVELADORA FRONT DELANTERA LEVELING LEG agua mediante la extracción del filtro. Las líneas de agua no pueden quedar AVISO IMPORTANTE: Nivelación. expuestas a temperaturas de congelación. Atención al cliente de Sub-Zero 800.222.7820... - Page 19 INSTALACIÓN Alineación AJUSTE DE LA PUERTA AJUSTE DE LOS CAJONES Para realizar cualquier ajuste, retire la puerta y el tope de la Ajuste vertical Afloje los tres tornillos de montaje. Con- puerta y afloje ligeramente los dos tornillos de la bisagra sulte la siguiente ilustración.
-
Page 20: Finalización
Para encender la unidad pulse el botón de ENCENDIDO en el panel de control. FILTRO DE AGUA WATER FILTER Apertura de la rejilla. Extracción del filtro de agua. Instalación del zócalo. Atención al cliente de Sub-Zero 800.222.7820... - Page 21 Sub-Zero, Sub-Zero & Design, Dual Refrigeration, Constant Care, The Living Kitchen, Great American Kitchens The Fine Art of Kitchen Design e Ingredients son marcas comerciales registradas y marcas de servicio de Sub-Zero, Inc. Wolf, Wolf & Design, Wolf Gourmet, W & Design y el color rojo aplicado a las perillas son marcas comerciales registradas y marcas de servicio de Wolf Appliance, Inc.
-
Page 22: Remarque Importante
Alignement respectées. Achèvement REMARQUE IMPORTANTE : tout au long de ce guide, les dimensions entre parenthèses sont en millimètres à moins d’indication contraire. Service à la clientèle de Sub-Zero 800.222.7820... -
Page 23: Réfrigération Pro 48
• Ensemble de clés Allen standard. Si vous avez besoin de service, communiquez avec le • Ensemble de clés et douilles standard. service Sub-Zero certifié par l’usine et ayez les numéros de • Niveaux de 2 pi et 4 pi (601) (1 219) modèle et de série de l’unité... -
Page 24: Dimensions De L'ouverture
Largeur po 48 po (1 206) (1 219) installations à affleurement, le cadre de la façade sera à Hauteur po po (2 127) (2 137) égalité avec les armoires. Profondeur* 24 po 26 po (610) (660) Service à la clientèle de Sub-Zero 800.222.7820... -
Page 25: Électricité
PRÉPARATION DU SITE Électricité Plomberie L’installation doit se conformer à tous les codes électriques L’installation doit se conformer à tous les codes de plom- applicables. berie applicables. L’alimentation électrique doit se trouver à l’intérieur de la Le tuyau d’alimentation en eau doit se trouver à l’intérieur zone ombragée indiquée dans l’illustration ci-dessous. -
Page 26: Préparation
Vis à tête bombée n°8–18 x 1 po BOULON GRILLE Cales d’ancrage au mur à glissière en nylon Zip-it ® DE LA BOLT GRILLE Retrait de la grille. TROUS D’EMPLACEMENT CENTERLINE DE LA LIGNE CENTRALE LOCATING HOLES Support antibasculement Service à la clientèle de Sub-Zero 800.222.7820... - Page 27 PRÉPARATION DU SITE Support antibasculement APPLICATION SUR UN PLANCHER EN BOIS INSTALLATION DE LA CALE D’ANCRAGE POUR BÉTON : Après avoir correctement repéré les supports antibascule- Percez un trou de diamètre de toute pro- (10) ment dans l’ouverture préliminaire, percez des avant-trous fondeur excédant le noyage minimal.
-
Page 28: Mise En Place
PIED DE FRONT NIVELLEMENT LEVELING LEG d’eau soit contourné en retirant le filtre. AVANT les tuyaux d’alimentation en eau REMARQUE IMPORTANTE : Nivellement. ne doivent pas être exposés au gel. Service à la clientèle de Sub-Zero 800.222.7820... - Page 29 INSTALLATION Alignement RÉGLAGE DE LA PORTE RÉGLAGE DU TIROIR Pour effectuer des réglages, retirez la porte et la butée de Réglage vertical Desserrez les trois vis de montage. porte, puis desserrez légèrement les deux vis de la char- Reportez-vous à l’illustration ci-dessous. Au moyen d’une nière supérieure.
-
Page 30: Achèvement
Coupez le courant en appuyant sur la touche POWER sur le panneau de commande. FILTRE À EAU WATER FILTER Grille ouverte. Retrait du filtre à eau. Installation de la plaque de protection. Service à la clientèle de Sub-Zero 800.222.7820... - Page 31 Sub-Zero, Sub-Zero & Design, Dual Refrigeration, Constant Care, The Living Kitchen, Great American Kitchens The Fine Art of Kitchen Design et Ingredients sont des marques déposées et de service de Sub-Zero, Inc. Wolf, Wolf & Design, Wolf Gourmet, W & Design et la couleur rouge qui se trouve sur les boutons sont des marques déposées et de service de Wolf Appliance, Inc.
- Page 32 SUB-ZERO, INC. P.O. BOX 44848 MADISON, WI 53744 SUBZERO.COM 800.222.7820 7028630 REV-A 5 / 2013...
Need help?
Do you have a question about the PRO 48 and is the answer not in the manual?
Questions and answers