
Subscribe to Our Youtube Channel
Related Manuals for Kuppersbusch IKE246-0


Summary of Contents for Kuppersbusch IKE246-0
- Page 1 Gebruiks- Notice Benutzer- User manual aanwijzing d'utilisation information Koelkast Refrigerator Réfrigérateur Kühlschrank IKE246-0...
- Page 2 Inhoud Veiligheidsinformatie Reiniging en onderhoud Bediening Problemen oplossen Het eerste gebruik Technische gegevens Dagelijks gebruik Montage Nuttige aanwijzingen en tips Het milieu Wijzigingen voorbehouden Veiligheidsinformatie In het belang van uw veiligheid en om een • Als u het apparaat afdankt trek dan de correct gebruik te kunnen waarborgen is stekker uit het stopcontact, snij de voe- het van belang dat u, alvorens het apparaat...
- Page 3 – open vuur en ontstekingsbronnen ver- • Bewaar geen brandbare gassen of vloei- mijden stoffen in het apparaat, deze kunnen ont- – de ruimte waar het apparaat zich be- ploffen. vindt grondig ventileren • U dient zich strikt te houden aan de aan- •...
-
Page 4: Het Eerste Gebruik
• Verzeker u ervan dat de stekker bereik- het koelcircuit en evenmin in de isola- baar is nadat het apparaat geïnstalleerd tiematerialen. Het apparaat mag niet worden weggegooid bij het normale • Sluit het apparaat alleen aan op een huishoudelijke afval. Het isolatieschuim bevat ontvlambare gassen: het appa- drinkwaterleiding. -
Page 5: Dagelijks Gebruik
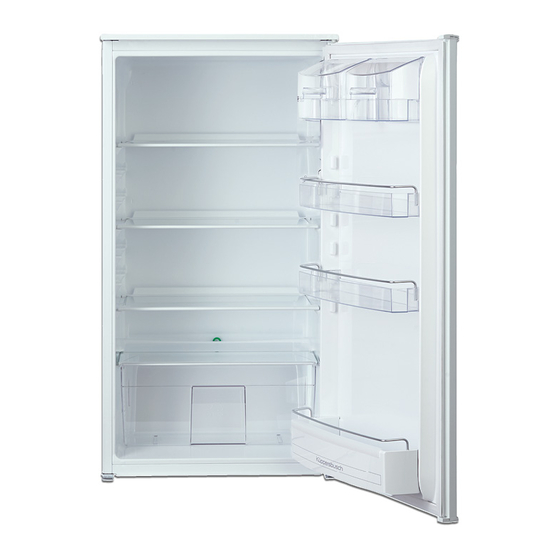
Dagelijks gebruik Verplaatsbare schappen ken, kunnen de schappen op verschillende hoogtes geplaatst worden. De wanden van de koelkast zijn voorzien Om deze aanpassingen uit te voeren, gaat van een aantal geleiders zodat de schap- u als volgt te werk: pen op de gewenste plaats gezet kunnen trek het schap geleidelijk in de richting van worden. -
Page 6: Reiniging En Onderhoud
Bananen, aardappelen, uien en knoflook, indien niet verpakt, mogen niet in de koel- kast bewaard worden. Reiniging en onderhoud Let op! Voordat u welke Het ontdooien van de koelkast onderhoudshandeling dan ook verricht, Rijp wordt elke keer als de compressormo- de stekker uit het stopcontact trekken. -
Page 7: Problemen Oplossen
Als uw apparaat aan blijft staan, vraag dan om te voorkomen dat het bewaarde voed- iemand om het zo nu en dan te controleren, sel bederft, als de stroom uitvalt. Problemen oplossen Waarschuwing! Voordat u storingen Belangrijk! Er zijn tijdens de normale opspoort, de stekker uit het werking geluiden te horen (compressor, stopcontact trekken. - Page 8 Probleem Mogelijke oorzaak Oplossing De temperatuur van het product Laat het product afkoelen tot ka- is te hoog. mertemperatuur voordat u het op- bergt. Er zijn veel producten tegelijk Berg minder producten tegelijk opgeborgen. Er is geen koude luchtcirculatie Zorg ervoor dat er koude luchtcir- in het apparaat.
-
Page 9: Technische Gegevens
Technische gegevens Afmetingen van de uitsparing Hoogte 1225 mm Breedte 560 mm Diepte 550 mm Spanning 230-240 V Frequentie 50 Hz De technische gegevens staan op het type- plaatje aan de linker binnenkant in het ap- paraat en op het energielabel. Montage Lees voor uw eigen veiligheid en Omkeerbaarheid van de deur... - Page 10 Ventilatievereisten De luchtstroom achter het apparaat moet 2. Installeer het apparaat in de nis. voldoende zijn. Duw het apparaat in de richting van de min. pijlen (1) totdat de metalen strip aan de 200 cm bovenkant van het apparaat tegen het keukenmeubel aankomt.
- Page 11 Zorg ervoor dat er een ruimte van 4 mm tussen het apparaat en de kast aanwezig is. Open de deur. Zet het afdekplaatje van het onderste scharnier op de juiste plek. 6. Bevestig de afdekkingen (C, D) aan de uitsteeksels en de gaten van de schar- nieren.
- Page 12 8. Monteer onderdeel (Ha) aan de binnen- kant van het keukenmeubel. 8 mm ca. 50 mm 90° 21 mm 90° ca. 50 mm 21 mm 11. Verwijder de haken en markeer een af- stand van 8 mm vanaf de buitenrand van de deur waar de nagel moet wor- 9.
-
Page 13: Het Milieu
Controleer goed en verzeker u ervan dat: • alle schroeven zijn aangehaald. • de magnetische afdichtstrip goed beves- tigd is aan de kast. Belangrijk! Als de omgevingstemperatuur laag is (bijv. in de winter), kan de omvang van de pakking kleiner worden. De omvang van de pakking neemt toe als de omgevingstemperatuur toeneemt. -
Page 14: Table Of Contents
Contents Safety information Care and Cleaning Operation What to do if… First use Technical data Daily use Installation Helpful hints and tips Environmental concerns Subject to change without notice Safety information In the interest of your safety and to ensure ance. - Page 15 Warning! Any electrical component • Regularly examine the drain in the refrig- (power cord, plug, compressor) must erator for defrosted water. If necessary, be replaced by a certified service agent clean the drain. If the drain is blocked, or qualified service personnel to avoid water will collect in the bottom of the ap- hazard.
-
Page 16: Operation
Environment Protection ance shall be disposed according to the applicable regulations to obtain This appliance does not contain gasses from your local authorities. Avoid dam- which could damage the ozone layer, aging the cooling unit, especially at the in either its refrigerant circuit or insula- rear near the heat exchanger. -
Page 17: Helpful Hints And Tips
gradually pull the shelf in the direction of the arrows until it comes free, then reposition as required. Positioning the door shelves To permit storage of food packages of vari- ous sizes, the door shelves can be placed at different heights. To make these adjustments proceed as fol- lows: Helpful hints and tips... -
Page 18: Care And Cleaning
Care and Cleaning Caution! Unplug the appliance before every time the motor compressor stops, carrying out any maintenance during normal use. The defrost water drains operation. out through a trough into a special contain- er at the back of the appliance, over the This appliance contains hydrocarbons motor compressor, where it evaporates. - Page 19 Important! There are some sounds during normal use (compressor, refrigerant circulation). Problem Possible cause Solution The appliance does not The appliance is switched off. Switch on the appliance. operate. The lamp does not operate. The mains plug is not connected Connect the mains plug to the to the mains socket correctly.
-
Page 20: Technical Data
Replacing the lamp 1. Disconnect the mains plug from the mains socket. 2. Remove the screw from the lamp cover. 3. Remove the lamp cover (refer to the il- lustration). 4. Replace the used lamp with a new lamp of the same power and specifically de- signed for household appliances. - Page 21 Electrical connection Before plugging in, ensure that the voltage and frequency shown on the rating plate correspond to your domestic power supply. The appliance must be earthed. The power supply cable plug is provided with a contact for this purpose. If the domestic power sup- ply socket is not earthed, connect the appli- ance to a separate earth in compliance with current regulations, consulting a qualified...
- Page 22 Open the door. Put the lower hinge cover in position. 44mm 2. Install the appliance in the niche. 4. Attach the appliance to the niche with 4 Push the appliance in the direction of screws. the arrows (1) until the upper gap cover stops against the kitchen furniture.
- Page 23 8. Install the part (Ha) on the inner side of the kitchen furniture. ca. 50 mm 90° 21 mm 90° ca. 50 mm 6. Attach the covers (C, D) to the lugs and 21 mm the hinge holes. Attach the hinge covers (E) to the hinge.
-
Page 24: Environmental Concerns
8 mm 11. Remove the brackets and mark a dis- 13. Press the part (Hd) on the part (Hb). tance of 8 mm from the outer edge of the door where the nail must be fitted (K). 8 mm Do a final check to make sure that: •... -
Page 25: Consignes De Sécurité
Sommaire Consignes de sécurité En cas d'anomalie de fonctionnement Fonctionnement Caractéristiques techniques Première utilisation Installation Utilisation quotidienne En matière de sauvegarde de Conseils utiles l'environnement Entretien et nettoyage Sous réserve de modifications Consignes de sécurité Pour votre sécurité et garantir une utilisation risques d'électrocution. - Page 26 du circuit de refroidissement n'est en- reils ménagers. Elles ne conviennent pas dommagée. à l'éclairage des pièces d'une habitation. Si tel est le cas : Utilisation quotidienne – Évitez les flammes vives (briquet) et • Ne posez pas d'éléments chauds sur les tout autre allumage (étincelles).
-
Page 27: Fonctionnement
• Assurez-vous que la prise murale reste C.F.C. contribuant ainsi à préserver accessible après l'installation de l'appa- l'environnement. L'appareil ne doit pas reil. être mis au rebut avec les ordures mé- • Branchez à l'alimentation en eau potable nagères et les déchets urbains. La mousse d'isolation contient des gaz in- uniquement. -
Page 28: Utilisation Quotidienne
Important N'utilisez pas de produits abra- sifs, poudre à récurer, éponge métallique pour ne pas abîmer la finition. Utilisation quotidienne Clayettes amovibles porte peuvent être positionnés à différentes hauteurs. Les parois du réfrigérateur sont équipées Pour les ajuster, procédez comme suit : d'une série de glissières pour que les clay- tirez progressivement dans le sens des flè- ettes puissent être placées en fonction des... -
Page 29: Entretien Et Nettoyage
La période de conservation est de 1 à 2 minium ou de polyéthylène, pour emmaga- jours au maximum. siner le moins d'air possible. Aliments cuits, plats froids, etc. : placez-les Lait en bouteille : bouchez-le et placez-le bien couverts sur une clayette. dans le balconnet de la contreporte réservé... -
Page 30: En Cas D'anomalie De Fonctionnement
En cas d'absence prolongée ou de Si, toutefois, vous n'avez pas la possibilité non-utilisation de débrancher et vider l'appareiI, faites véri- fier régulièrement son bon fonctionnement Prenez les précautions suivantes : pour éviter la détérioration des aliments en • débranchez l'appareil cas de panne de courant. - Page 31 Anomalie Cause possible Remède De l'eau s'écoule dans le La gouttière d'évacuation de Nettoyez la gouttière d'évacua- compartiment réfrigéra- l'eau de dégivrage est obstruée. tion. teur. Des produits empêchent l'eau Assurez-vous que les produits ne de s'écouler dans le réservoir touchent pas la plaque arrière.
-
Page 32: Caractéristiques Techniques
3. Si nécessaire, remplacez les joints dé- fectueux. Contactez le Service Après- vente. Caractéristiques techniques Dimensions de la niche d'en- castrement Hauteur 1225 mm Largeur 560 mm Profondeur 550 mm Tension 230-240 V Fréquence 50 Hz Les données techniques figurent sur la pla- l'intérieur de l'appareil et sur l'étiquette que signalétique située sur le côté... - Page 33 1. Serrez le pivot inférieur. 2. Installez l'entretoise. 3. Installez la porte. 4. Serrez le pivot supérieur. 2. Installez l'appareil dans le meuble d'en- castrement. Ventilation Poussez l'appareil dans le sens indiqué par les flèches (1) jusqu'à ce que le ca- La circulation d'air derrière l'appareil doit che de l'ouverture supérieure bute sur être suffisante.
- Page 34 Assurez-vous que la distance entre l'appareil et le meuble est de 4 mm. Ouvrez la porte. Mettez en place le ca- che de la charnière inférieure. 6. Fixez les caches (C, D) aux éléments de 44mm fixation et aux orifices de la charnière. Fixez les caches charnière (E) à...
- Page 35 11. Sortez les supports et plantez le clou ca. 50 mm (K) à 8 mm du bord extérieur de la por- 90° 8 mm 21 mm 90° ca. 50 mm 21 mm 9. Poussez la pièce (Hc) sur la pièce (Ha). 12.
-
Page 36: En Matière De Sauvegarde De L'environnement
Vérifiez enfin que : • Toutes les vis sont serrées. • La bande isolante magnétique est ferme- ment fixée à l'armoire. Important Si la température ambiante est trop basse (en hiver, par exemple), la dimension du joint diminue. Inversement, si la température ambiante augmente, la dimension du joint augmente également. -
Page 37: Sicherheitshinweise
Inhalt Sicherheitshinweise Reinigen und Pflegen Betrieb Was tun, wenn … Erste Inbetriebnahme Technische Daten Täglicher Gebrauch Montage Praktische Tipps und Hinweise Hinweise zum Umweltschutz Änderungen vorbehalten Sicherheitshinweise Lesen Sie zu Ihrer Sicherheit und für die op- Netzkabel (so nah wie möglich am Gerät) timale Geräteanwendung vor der Installation ab und entfernen Sie die Tür, so dass und dem Gebrauch des Gerätes die vorlie-... - Page 38 Bei einer eventuellen Beschädigung des • Lagern Sie keine feuergefährlichen Gase Kältekreislaufs: oder Flüssigkeiten in dem Gerät. Explosi- – Offene Flammen und Zündfunken ver- onsgefahr. meiden • Die Lagerempfehlungen des Gerätehers- – Den Raum, in dem das Gerät installiert tellers sind strikt einzuhalten. Halten Sie ist, gut lüften sich an die betreffenden Anweisungen.
-
Page 39: Betrieb
• Vergewissern Sie sich, dass der Netzste- genden Gase. Das Gerät darf nicht wie cker des Gerätes nach der Installation frei normaler Hausmüll entsorgt werden. zugänglich ist. Die Isolierung enthält entzündliche Ga- • Verbinden Sie das Gerät ausschließlich se: das Gerät muss gemäß den gelten- den Vorschriften entsorgt werden;... -
Page 40: Täglicher Gebrauch
Täglicher Gebrauch Verstellbare Ablagen/Einsätze Bitte nehmen Sie die Einstellungen wie folgt vor: Die Wände des Kühlschranks sind mit einer ziehen Sie den Einsatz langsam in Richtung Anzahl von Führungsschienen ausgestattet, der Pfeile soweit heraus, bis er ganz aus die verschiedene Möglichkeiten für das Ein- der Führung ist, und setzen Sie ihn dann setzen der Ablagen bieten. -
Page 41: Reinigen Und Pflegen
Butter und Käse: diese sollten stets in spe- Bananen, Kartoffeln, Zwiebeln und Knob- ziellen luftdichten Behältern verpackt sein lauch sollten nicht im Kühlschrank aufbe- oder in Aluminiumfolie bzw. in lebensmitte- wahrt werden, außer diese sind dafür spezi- lechte Tüten eingepackt werden, um so ell verpackt. -
Page 42: Was Tun, Wenn
Stillstandzeiten Bei längerem Stillstand des Gerätes müs- sen Sie folgendermaßen vorgehen: • trennen Sie das Gerät von der Netz- versorgung • entnehmen Sie alle Lebensmittel • tauen Sie das Gerät ab , Reinigen Sie das Gerät und alle Zubehörteile • lassen Sie die Türen offen/angelehnt, um das Entstehen unangenehmer Gerüche zu vermeiden. - Page 43 Störung Mögliche Ursache Abhilfe Die Raumtemperatur ist zu Senken Sie die Raumtemperatur. hoch. Wasser fließt an der Beim automatischen Abtauen Das ist normal. Rückwand des Kühl- fließt das abgetaute Wasser an schranks hinunter. der Rückwand des Kühl- schranks hinunter. Wasser fließt in den Der Wasserablauf ist verstopft.
-
Page 44: Technische Daten
3. Ersetzen Sie die defekten Türdichtun- gen, falls erforderlich. Kontaktieren Sie den Kundendienst. Technische Daten Abmessung der Aussparung Höhe 1225 mm Breite 560 mm Tiefe 550 mm Spannung 230-240 V Frequenz 50 Hz Die technischen Informationen befinden sich auf dem Typschild innen links im Gerät sowie auf der Energieplakette. - Page 45 min. 200 cm min. 200 cm Auf der gegenüberliegenden Seite: Installation des Geräts 1. Ziehen Sie den unteren Bolzen fest. Vorsicht! Vergewissern Sie sich, dass 2. Setzen Sie das Distanzstück ein. sich das Netzkabel des Gerätes frei 3. Installieren Sie die Tür. bewegen kann.
- Page 46 gegen die Seitenwand des Küchenmö- bels. 5. Entfernen Sie das korrekte Teil von der Scharnierabdeckung (E). Vergessen Sie nicht, Teil DX im Fall des rechten Scharniers oder Teil SX im entgegenge- setzten Fall abzunehmen. 3. Richten Sie das Gerät in der Einbauni- sche aus.
- Page 47 7. Lösen Sie die Teile (Ha), (Hb), (Hc) und 10. Öffnen Sie die Gerätetür und die Tür (Hd). des Küchenmöbels in einem Winkel von 90°. Setzen Sie das Führungsstück (Hb) in die Führungsschiene (Ha) ein. Bringen Sie die Gerätetür und die Kü- chenmöbeltür zusammen und markie- ren Sie die Bohrungen.
-
Page 48: Hinweise Zum Umweltschutz
13. Drücken Sie Abdeckung (Hd) auf Füh- rungsstück (Hb). 8 mm 12. Setzen Sie das Führungsstück erneut auf die Führungsschiene und schrau- ben Sie es mit den mitgelieferten Prüfen Sie alles erneut, um sicherzustellen, Schrauben fest. dass: Richten Sie die Küchenmöbeltür und •... - Page 52 222353413-A-472010...
Need help?
Do you have a question about the IKE246-0 and is the answer not in the manual?
Questions and answers