Advertisement
Quick Links
Instruction Manual
Composite and S-Video to VGA Video Converter
COMP2VGA
DE: Bedienungsanleitung - de.startech.com
FR: Guide de l'utilisateur - fr.startech.com
ES: Guía del usuario - es.startech.com
IT: Guida per l'uso - it.startech.com
NL: Gebruiksaanwijzing - nl.startech.com
PT: Guia do usuário - pt.startech.com
Packaging Contents
• 1 x COMP2VGA adapter
• 1 x 15-pin HD extension cable
• 1 x stereo audio cable
• 1 x 9V DC power supply
System Requirements
• PC monitor with 15-pin high-density (HD) port with a horizontal
signal (HS) of 31.5KHz or higher and a vertical signal (VS) of 60KHz
or higher for NTSC systems or 50KHz or higher for PAL systems
• Video and audio source (i.e., DVD, VCR, game machine, camcorder)
• Pair of speakers
Installation
This section will guide you through the installation of your device.
Please read through this section carefully and complete each step
in the order listed. Also consult the documentation that came with
your PC and video source (i.e., game console, DVD player, etc.) for
specific details.
1. Make sure that your adapter, PC, monitor, and video device are
turned off.
2. Connect the 15-pin HD cable from your computer's monitor port
to the VGA In port on the back of the adapter.
3. Plug your monitor into the Monitor port on the back of the
adapter.
4. Connect the provided audio cable from your computer's sound
card to the Line In port on the back of the adapter.
5. Connect your speakers to the SPK Out port on the back of the adapter.
For the most up-to-date information, please visit: www.startech.com
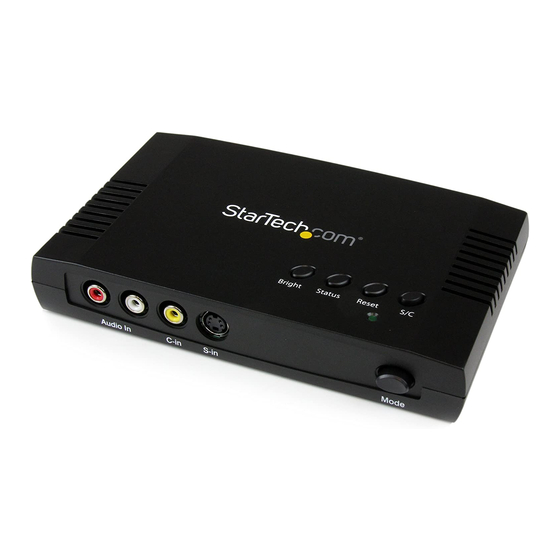
DC9V
VGA In
Connects power
Connects 15-pin
supply to external
HD cable to PC's
power source
monitor port
Adjusts screen
brightness
-
Audio In
C
in/S-in
Connects to audio
Connects to Composite
cables from
or S-Video cables on
video source
video source
*actual product may vary from photos
Monitor
Line In
SPK Out
Connects to your
Connects audio
Connects to
PC monitor
cable to PC's
external speakers
sound card
Status
Bright
Adjusts screen
Reset
position
Resets the adapter
Mode
IN: Video mode
OUT: PC mode
Manual Revision: 04/20/2012
S/C
IN: Composite
OUT: S-Video
LED (Green)
Lit when adapter
is powered
Advertisement

Subscribe to Our Youtube Channel
Related Manuals for StarTech.com COMP2VGA


Summary of Contents for StarTech.com COMP2VGA
-
Page 1: Packaging Contents
2. Connect the 15-pin HD cable from your computer’s monitor port to the VGA In port on the back of the adapter. 3. Plug your monitor into the Monitor port on the back of the adapter. IN: Composite 4. Connect the provided audio cable from your computer’s sound OUT: S-Video card to the Line In port on the back of the adapter. LED (Green) 5. Connect your speakers to the SPK Out port on the back of the adapter. Lit when adapter is powered Audio In in/S-in Connects to audio Connects to Composite Mode cables from or S-Video cables on IN: Video mode video source video source OUT: PC mode For the most up-to-date information, please visit: www.startech.com Manual Revision: 04/20/2012... -
Page 2: Fcc Compliance Statement
• Consult the dealer or an experienced radio/TV technician for help. Use of Trademarks, Registered Trademarks, and other Protected Names and Symbols This manual may make reference to trademarks, registered trademarks, and other protected names and/or symbols of third-party companies not related in any way to StarTech.com. Where they occur these references are for illustrative purposes only and do not represent an endorsement of a product or service by StarTech.com, or an endorsement of the product(s) to which this manual applies by the third-party company in question. Regardless of any direct acknowledgement elsewhere in the body of this document, StarTech.com hereby acknowledges that all trademarks, registered trademarks, service marks, and other protected names and/or symbols contained in this manual and related documents are the property of their respective holders.
Need help?
Do you have a question about the COMP2VGA and is the answer not in the manual?
Questions and answers