Table of Contents
Advertisement
Quick Links
Advertisement
Table of Contents

Related Manuals for Classic Cantabile DP-60


Summary of Contents for Classic Cantabile DP-60
- Page 1 Classic Cantabile DP-60 Users manual 00022171/00023425/00023428 Version 01/2012...
- Page 2 Important Notes Your piano will give you years of playing pleasure if you follow the simple rules given below: Location Cleaning Clean the unit with a soft dry cloth. Do not expose the unit to the following A slightly damp cloth may remove conditions to avoid deformation, stubborn grime and dirt.
-
Page 3: Voice Demo
Summarize This piano is an easy to use digital piano. It has advanced functions especially in midi controler. This piano elaborated 20 beautiful voices, you can select them directly by using 10 Direct Select Button. This piano provide with SD card function, you can choose your favorate MIDI song to play; You can also backup your recording setting to SD card. -
Page 4: Table Of Contents
Conent Set-up Guide General Guide The Connectors 10-11 - Using the AC power jack - Using Headphones - Using the AUX.OUT jack - Using the Foot Pedals - Using the MIDI IN/OUT jack - Using the USB jack Operation 12-22 - Power on &... -
Page 5: Set-Up Guide
Set-up Guide 1、 Open the package, and check whether the following parts are available: 1. Piano body 9. Left metal strip 2. Music stand 10. Right metal strip 3. Left leg component 11. Hand screws(4pcs) 4. Left front leg 12. Screws 6x45 (2pcs) 5. - Page 6 Set-up Guide 2、 Follow the illustration below and finish off the set-up procedures. A. Please use the screws( 6x45) fixed the front legs to correspond legs components, as follow guide: 6x45 1PC 6x45 1PC B. Please use the screws( 6x18) fixed the metal strips to correspond legs components, as follow guide: 6x18 2PCS 6x18 2PCS...
-
Page 7: Set-Up Guide
Set-up Guide D. Use 2 pieces the screws( 6x12) and 4 pieces the screws ( 4x15) to stable the back panel skirt onto the assembly finished in PART C. 6x12 2PCS 4x15 4PCS E. Put the piano body on the top of the finished assembly in part D. -
Page 8: General Guide
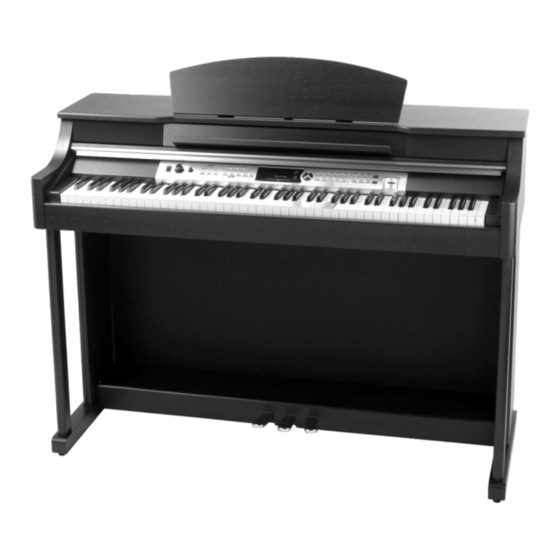
General Guide Top View Rear View Front View Control Panel Soft Pedal Pedal Jack Sostenuto Pedal MIDI IN/OUT Jack Sustain Pedal AUX. OUT Jack Music Stand Special Pedal Clog Piano Keyboard Headphones Jack USB Jack... -
Page 9: General Guide
General Guide Control Panel VOLUME - TRANSPOSE + TEMPO + / YES BRILLIANCE POWER START/STOP FILL A/FILL B ACC VOL RECORD TRACK 1 TRACK 2 PLAY / STOP METRO - / NO VOICE STYLE SONG MELLOW BRIGHT SONG BEAT MELODY OFF 10 11 12 13 17 18 VOICE... -
Page 10: The Connectors
The Connectors Using the AC power jack VOLUME POWER 1、 Ensure the piano is turned Turn the volume switch 2、 off when connecting and anti-clockwise to reach disconnectiong the power. the minimum volume level. Turn the power switch off Set volume to minimum POWER 3、... -
Page 11: Using The Foot Pedals
The connector Using the Foot Pedals Connect the plug of the foot pedal unit to the pedal jack on the rear panel. You will experience the sustain/soft/sostenuto effect. NOTE: Step on the sustain pedal ,all notes played on the keyboard have a longer sustain. Step on the sostenuto pedal, the notes played before you step on have a sustain effect. -
Page 12: Operation
Operation Power on & Master Volume POWER 1、 Turn the [POWER] switch to on. The LED display lightens up. VOICE STYLE SONG Turn the power switch on VOLUME 2、 Rotate the volume control knob to adjust the volume to your desired level. The level decreases The level increases 3、... -
Page 13: Voices And Effects
Operation 2、 SELECT a song: + / YES Use the [+/YES] or [-/NO] button to select the song you want. If you select the new song, LED will display its number at first and then display introductory beat and - / NO VOICE STYLE SONG... - Page 14 Operation VOICE DEMO VOICE REVERB/ DEMO SCALE CHORUS 1、 Each demo song demonstrate one voice which is selected. VOICE STYLE SONG Voice status In the voice/style status: 2、 DUAL SPLIT TOUCH In VOICE R1 mode, press [VOICE DEMO] button to play the demo song which is programmed with the current R1 voice.
- Page 15 Operation DUAL SPLIT TOUCH SPLIT POINT You can split the keyboard to melody and chord area VOICE STYLE SONG by this function. Display split parameter The indicator is flashing. + / YES Press the [SPLIT] button, LED displays the current split 1、...
- Page 16 Operation REVERB/CHORUS REVERB/CHORUS effect will make the keyboard VOICE REVERB/ VOICE STYLE SONG DEMO SCALE CHORUS sound much more fully and widely. When power is on, the REVERB/CHORUS indicator is on. 1、 VOICE STYLE SONG + / YES 2、 Press the [REVERB/CHORUS] button to switch the DSP response setting.
- Page 17 Operation SCALE This function allows you to experience different scales VOICE REVERB/ when you play certain genres of music that is not comp- DEMO SCALE CHORUS osed based on twelve equal interval. VOICE STYLE SONG 1、 Press [SCALE] button to enter into scale mode and the button indicator lights up;...
-
Page 18: Metronome
Operation Metronome 1、 Press the [METRO] button to turn on the metronome and RECORD TRACK 1 TRACK 2 PLAY / STOP METRO the metronome sound will be played. SONG MELODY OFF 2、 Press the button again to turn off the metronome. The LED indicator is lightened. -
Page 19: Accomp Volume
Operation FILL IN A/B Style is not playing: START/STOP FILL A/FILL B ACC VOL START/STOP FILL A/FILL B ACC VOL 1、 In NORMAL mode, press the [FILL A/FILL B] button to insert 1 measure fill and the FILL A/FILL B indicator is flashing, after one measure is over, the style enters Preset style mode is NORMAL Press and enter VARIATION... -
Page 20: Record
Operation Record NOTE: There is one user song can be recorded, include 2 The recorded data will not be lost when you turn off the Melody Tracks. power. Hold on the [+/YES] and [-/NO] button together and power on the piano, it will erase all the recorded data. RECORD SONG Enter the record mode, 1、... -
Page 21: Lesson
Operation PLAYBACK SONG RECORD TRACK 1 TRACK 2 PLAY / STOP METRO 1、 Press the [PLAY/STOP] button for the first time to playback the record data, you can choose any one track or all two SONG MELODY OFF tracks to play, the indicator is on. Then, select the track, Enter the record playback the indicator is on. -
Page 22: Sd Function
Operation SD card function 1、 PLAY/ STOP PLAY/STOP can play/stop midi file at the root directory Play/stop midi file at the root directory in SD. in SD, support format 0 and format 1. STORE STORE can save the recorded data to SD root directory Save the recorded data to SD root directory as midi file. -
Page 23: Midi
MIDI Function What is MIDI What is MIDI Musical Instrument Digital Interface. The standard interface 1、 between PC and Electronic instrument. 2、 It is equipped with standard MIDI interface, including 1 MIDI IN and 1 MIDI OUT. 3、 Connection MIDI IN/OUT It can connect with PC or other MIDI equipment. -
Page 24: Specifications
Specifications Keyboard 88 keys, 3 kinds of touch level. Voice 20 voices. Style 20 piano styles. Song 60 songs. Display LED display. Switch and Buttons POWER SWITCH, VOLUME SWITCH, REVERB/CHORUS, DUAL, TOUCH, RECORD, TRACK 1, TRACK 2, PLAY/STOP, SPLIT, METRO, TRANSPOSE +/-, TEMPO +/-, SD CONTROL, VOICE DEMO, SONG, VOICE, STYLE, BRILLIANCE, SCALE, START/STOP, ACC VOL, FILL A/FILL B Transpose... -
Page 25: Voice List
Voice List Name of Voice Name of Voice on Panel Acoustic Grand Piano GRD.PIANO Epiano1 E.PIANO1 Harpsichord HARPSICD Hammond Organ DRAWBAR Accordion ACORDION Steel Guitar ST.GUITAR String STRING Trumpet TRUMPET Folk Sax FOLK SAX Jazz Flute JZ.FLUTE Bright Acoustic Piano BRT.PIANO Epiano2 E.PIANO2... -
Page 26: Song List
Song List Name of Song Name of Song Piano Five Hundred Miles Happy New Year For Alice It`S Beginning To Look A Lot Like Christmas Habanera Jeanie With The Light Brown Hair Four Little Swans My Bonnie Moseta Dance Song Of The Pearlfisher Germanic Dance The Stage Coach Turkish March... -
Page 27: Midi Implementation Chart
MIDI Implementation Chart Transmitted Recognized Function Remarks Basic Default 1-16ch Channel Changed 1-16ch 1-16ch × Default × × Mode Messages × *********** Altered 09-120 0-127 Note Number : True voice *********** 0-127 〇 〇 9nH,V=1 -127 Velocity : Note on ×...
Need help?
Do you have a question about the DP-60 and is the answer not in the manual?
Questions and answers