
Related Manuals for ReSound VE10


Summary of Contents for ReSound VE10
- Page 1 USER GUIDE Custom models: CIC (ComPletelY-IN-CANAl) ItC (IN-the-CANAl) Ite (IN-the-eAr)
-
Page 2: Introduction
Practice and Battery size a positive attitude are important in learning to use hearing instruments. Your ReSound instru- ments have been adjusted according to your individual hearing loss and needs. Some people adjust quickly to wearing hearing instruments in their ears and hearing new sounds;... -
Page 3: Table Of Contents
CoNteNts Operation of the hearing instrument . . . . . 17 Cleaning hearing instruments . . . . . . . . . . 27 sYmbols Introduction . -
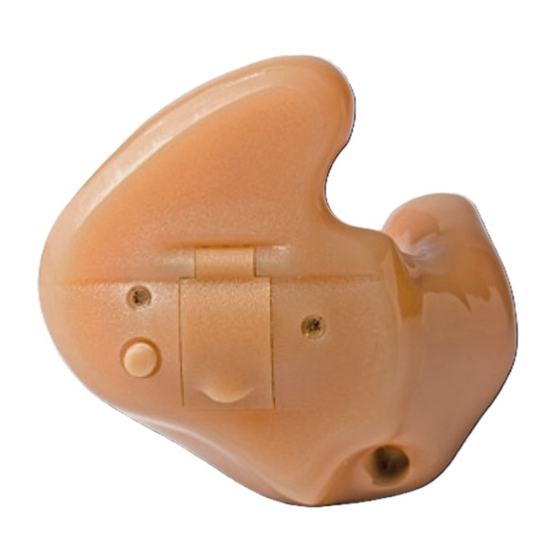
Page 4: Description Of The Hearing Instruments
Battery compartment and On/Off switch instruments: Completely-in-the-canal Removal cord (optional) Sound outlet (CIC) resound Vea™ Ve110, Ve110-P, Ve210, Ve210-P, Wax filter Ve310, Ve310-P Venting Microphone sound inlet(s) Model Manufacturer Serial number... - Page 5 In-the-canal (ItC) Programme button and In-the-ear (Ite) Battery compartment and On/Off switch Sound outlet resound Vea Ve130, Ve130-P, Ve230, Ve230-d, Wax filter Ve230-P, Ve230-dP, Ve330, Ve330-d, Venting Ve-330-P, Ve330-dP Microphone sound inlet(s) Ve150, Ve150-P, Ve250, Ve250-d, Volume control (optional) Ve250-P, Ve250-dP, Ve350, Ve350-d,...
-
Page 6: Getting Started
Getting started smartstart On/Off function Hearing instruments can be turned on once you have placed them in your ears. If you prefer to turn them on just prior to placing them in your ears, your hearing care professional can activate 1. -
Page 7: Inserting/Replacing The Battery
Inserting/replacing the battery low battery indicator 1. Open the battery door completely by using your fingernail. Your hearing care professional can set your hearing instrument to give an acoustical indication when the battery is reaching its end of life. The hearing instrument will reduce amplification and 2. -
Page 8: Inserting/Removing Hearing Instruments
Inserting/removing hearing instruments By experimenting, an easier method may be discovered. With proper insertion, hearing instru- ments should fit snugly but comfortably. If hearing instruments cause irritation of the ears, Insertion (CIC, ITC, and ITE) contact your hearing care professional. Never attempt to modify the shape of the hearing instru- 1. -
Page 9: Operation Of The Hearing Instrument
Removal (CIC) operation of the hearing instrument 1. Hold the removal cord with your thumb and index finger and pull outward. Volume control (ITC and ITE models) 2. Hold the edges of the hearing instrument with your thumb and forefinger The volume control will allow the volume of hearing instruments to be increased or decreased. - Page 10 Programme button Programme Description of when to use Depending on your experience level with hearing instruments, individual hearing needs, and the type of listening environments you experience, your hearing care professional may activate ad- ditional programmes in the hearing instrument. If additional programmes have been activated, the following list explains how they work.
-
Page 11: Telephone Use
telephone use 4. Any whistling may also be decreased by holding the telephone slightly away from the ear. Finding the optimal position for holding a tele phone may require practice for some individuals, and one or more of the following suggestions may be helpful. 5. -
Page 12: Phonenow
telecoil (optional on some ItC and Ite models) Placement of PhoneNow magnets If equipped, a telecoil can be activated by your hearing care professional and accessed through While some telephone receivers produce a magnetic field strong enough to activate the Phone one of the additional programmes. -
Page 13: Tele-Loop Systems
1. Keep magnets out of reach of pets, children and mentally challenges persons. If a magnet 2. Only use magnets supplied by GN ReSound is swallowed, please seek advice from a medical practitioner. 2. The magnet used to supplement the magnetic field of a telephone receiver may affect tele-loop systems some medical devices or electronic systems. -
Page 14: Care And Maintenance
a tele-loop system and with a telecoil programme activated, the tele-loop system may not be 5. Do not wear your instrument while showering, swimming, in heavy rain or in a moist atmos- turned on or is not operating correctly. If a facility is not equipped with a tele-loop system, sitting phere such as a steam bath or sauna. -
Page 15: Replacing Wax Filters
GN ReSound Hearing Instruments are subjected to various tests in temperature and damp 5. Flip the wax filter tool around, locate a new filter in the dial, and press the tip of the tool into heating cycling between -25C (-13F) and +70C (+158F) according to internal and industry stan- the center of the dial. -
Page 16: General Precautions
5. Use only original ReSound consumables e.g. tubes and domes. 3. Do not wear hearing instruments in mines, oil fields, or other explosive areas unless those 6. Only connect ReSound hearing instruments to ReSound accessories intended and quali- areas are certified for hearing instrument use. -
Page 17: Battery Warning Information
4. Do not allow others to use your hearing instruments. This may cause damage to the hear- battery warning information ing instruments or to the hearing of the other individual. Batteries, although very small, contain dangerous substances, and should be disposed of care- 5. -
Page 18: Troubleshooting Guide
troubleshootING GuIde SYMPTOM CAUSE POSSIBLE REMEDY No sound • Not turned on • Turn on by closing the battery door • Dead battery • Replace battery • Battery door will not close • Insert battery properly • Blocked wax filter • Replace wax filter or consult your hearing care professional... - Page 19 troubleshootING GuIde SYMPTOM CAUSE POSSIBLE REMEDY Not loud • Incorrect hearing instrument placement • Reinsert hearing instrument carefully enough • Blocked sound outlet filter • Change filter or consult your hearing care professional • Change in hearing sensitivity • Consult your hearing care professional • Excessive ear wax • Consult your physician • Volume set too low...
- Page 20 troubleshootING GuIde SYMPTOM CAUSE POSSIBLE REMEDY Excessive • Incorrect hearing instrument placement • Re-insert hearing instrument carefully whistling / feedback • Excessive ear wax • Consult your physician • Feedback control may need to be adjusted • Consult your hearing care professional • Hearing instrument settings not optimal • Consult your hearing care professional...
- Page 21 troubleshootING GuIde SYMPTOM CAUSE POSSIBLE REMEDY Sound distorted / • Weak battery • Replace battery not clear • Improper hearing instrument fit • Consult your hearing care professional • Hearing instrument damaged • Consult your hearing care professional • Hearing instrument settings not optimal • Consult your hearing care professional If there are any other problems not mentioned in this guide, please contact your hearing care professional.
-
Page 22: Technical Data
teChNICAl dAtA ITCs teChNICAl dAtA ITEs Maximum output Maximum output Hearing Instrument Model Hearing Instrument Model (2ccCoupler / IEC 60118-7) (2ccCoupler / IEC 60118-7) VE130, VE230, VE230-D, VE330, VE-330-D 114 dB SP VE150, VE250, VE250-D, VE350, VE350-D 117 dB SPL VE130-P, VE230-P, VE230-DP, VE330-P, VE330-DP 117 dB SPL VE150-P, VE250-P, VE250-DP, VE350-P, VE350-DP... -
Page 23: Warranty And Repairs
112 dB SPL pledges to secure functionality at least equivalent to the original hearing instrument. As a signa- tory to the United Nations Global Compact initiative, ReSound is committed to doing this in line VE110-P, VE210-P, VE310-P 116 dB SPL with environment-friendly best practices. - Page 24 Faceplate/Electronics by: GN ReSound A/S Any issues relating to the EU Medical Device Directive 93/42/EEC should be directed to GN ReSound A/S.
- Page 25 Worldwide Headquarters United Kingdom Australia New Zealand GN ReSound A/S GN ReSound Ltd. GN ReSound Pty. Ltd. GN ReSound (NZ) Ltd. Lautrupbjerg 7 Kirtlington Business Centre Unit R1 Regents Park Estate Ground Floor, North Entrance DK-2750 Ballerup, Denmark Portway 391 Park Road 4 Fred Thomas Drive Tel.: +45 45 75 11 11...