
Related Manuals for ReSound Magna MG90


Summary of Contents for ReSound Magna MG90
- Page 1 ReSound Vea ReSound Magna NON WIRELESS BEHIND-THE-EAR (BTE) RECEIVER-IN-THE-EAR (RIE) USER GUIDE...
-
Page 2: Introduction
Practice and a positive attitude are important in learning to use hearing instruments. Your ReSound instru- ments have been adjusted according to your individual hearing loss and needs. Some people adjust quickly to wearing hearing instruments in their ears and hearing new sounds;... - Page 3 Hearing instrument model: Model VE60 VE62 VE70 VE77 VE80 VE88 MG90 Battery size Receiver tube length: Tube type: Dome size: Left serial number: Right serial number: SYMBOLS WARNING points out a situation that could lead to serious injuries, CAUTION indicates a situation that could lead to minor and moderate injuries. Advice and tips on how to handle your hearing instrument better.
-
Page 4: Table Of Contents
CONTENTS Tele-loop systems . . . . . . . . . . . . . . . . . . . . . . 24 Introduction . - Page 5 How to apply domes . . . . . . . . . . . . . . . . . . . . 33 Temperature test, transport and storage information .
-
Page 6: Description Of The Bte
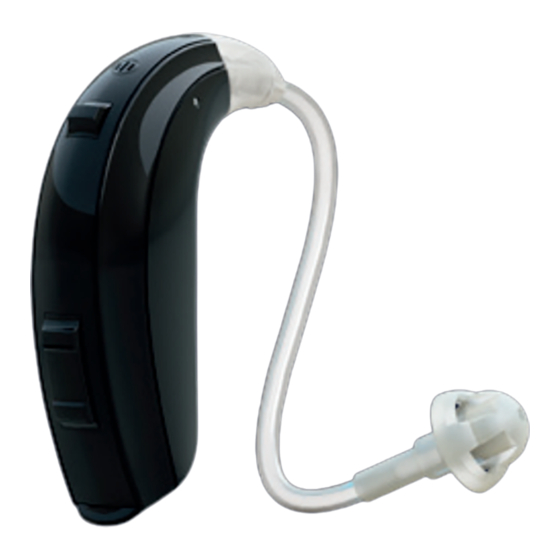
Programme button Description of the BTE hearing instruments Battery compartment & On/Off switch Sound outlet Front microphone inlet VE360-DI Back microphone inlet VE370-DVI, VE270-DVI, VE170-VI Volume control (optional) VE380-DVI, VE280-DVI, VE180-VI Direct audio input Left/Right indicator MG490-DVI, MG290-DVI (Left=Blue/Right=Red) Battery door lock 10. - Page 8 Battery lock (optional) Description of the BTE hearing instruments 10. Model 11. Manufacturer 12. Serial number VE377-DVI, VE377-DVIO,VE388-DVI 13. Earhook Programme button 14. Earmold and tubing Battery compartment & On/Off switch 15. Thin Tube Sound outlet 16. Domes/earmold Front microphone inlet a.
- Page 9 Open fitting (Thin Tube and dome) 16.a Traditional fitting (earmold and tube) 16.c 16.b...
-
Page 10: Description Of The Rie Hearing Instruments
Description of the RIE hearing instruments VE362-DVIR 1. Receiver tube 2. Receiver Open Dome 3. Receiver Tulip Dome 4. Receiver Power Dome 5. RIE mould 6. Sports lock 7. Battery compartment 8. Receiver 9. Push button 10. Volume Control (optional) 11. - Page 11 62 model (type MRIE) 9, 10...
-
Page 12: Getting Started
Getting started On/Off function 1. When the battery door is closed, the hearing instrument turns on, and the default program will be activ ated. 2. To turn off the hearing instrument, open the battery door. Many individuals can use their fingernail to pull it open. Tip: Whenever the hearing instruments are not in use, remember to turn them off to avoid unnecessary battery consumption. -
Page 13: Battery Door Lock
Battery door lock Your hearing care professional can install a Left/Right side indicator (Blue=Left, Unlock Lock Red=Right), which can be used to lock the battery door. Once locked, the instrument can only be turned off once the instrument is unlocked. To lock the battery door: 1. -
Page 14: Low Battery Indicator
Low battery indicator Your hearing care professional can set your hearing instrument to give an acoustical indica- tion when the battery is reaching its end of life. The hearing instrument will reduce amplifica- tion and emit a melody if battery power gets too low. This signal will recur every 5 minutes for VE60/62/70/77/80/88 models, and every 15 minutes for MG90, until the hearing instrument automatically switches off. - Page 15 By experimenting, an easier method may be discovered. With proper insertion, hearing instru- ments should fit snugly but comfortably. If hearing instruments cause irritation of the ears, con- tact your hearing care professional. Never attempt to modify the shape of the hearing instru- ment, earmoulds, or tubing yourself.
-
Page 16: Removal (Custom Earmolds)
Removal (custom earmolds) 1. Hold a portion of your earmould towards the back of the ear. 2. Pull the earmould outward and simultaneously rotate the earmould forward. 3. Consult your hearing care professional if you have difficulties removing the hearing instru- ment. -
Page 17: Operation Of The Hearing Instrument
Operation of the hearing instrument Volume control (in 70, 80, and 90 models) The volume wheel has numbers on it from 1 to 4, with 4 being the maximum volume setting. During the fitting of the hear- ing instrument, your hearing care practitioner will select an optimal volume setting for you. - Page 18 Sports lock The Sports lock will be applied or adjusted by your hearing care professional. Volume control (in 62, 77, 88 models) The volume control will allow the volume of hearing instruments to be increased or decreased. 1. To increase the volume, push the volume control up. 2.
- Page 19 Programme button Depending on your experience level with hearing instruments, in- dividual hearing needs, and the type of listening environments you experience, your hearing care professional may activate additional programmes. If additional programmes have been activated, the following list explains how they work. 1.
- Page 20 If necessary, your hearing care practitioner can change these settings and fill in the following table to indicate new settings Multi-function button action Default setting New setting Short press up Increases volume Short press down Decreases volume Long press up (3 seconds) Changes programs Programme Description of when to use...
-
Page 21: Telephone Use
Telephone use Finding the optimal position for holding a telephone may require practice for some individuals, and one or more of the following suggestions may be helpful. 1. Hold the telephone as you would normally. 2. Hold the telephone towards the top of the ear (closer to where the microphones are). -
Page 22: Phonenow
PhoneNow The PhoneNow function, available on some hearing instrument models, allows your hearing instrument to automatically switch to your telephone program when a telephone receiver is raised to the ear. When the telephone receiver is removed from the ear, the hearing instrument automatically returns to the previous listening program. - Page 23 PhoneNow usage Telephones can be used in a normal manner. A beep signal will indicate that the PhoneNow fea- ture has automatically switched the hearing instrument to your telephone program. Initially, you may need to move the telephone receiver slightly to find the best position for reliable PhoneNow activation and good hearing on the telephone.
-
Page 24: Tele-Loop Systems
To avoid the issue, please move the magnet to another place on the telephone receiver. 2. Only use magnets supplied by GN ReSound. Tele-loop systems Many places, such as theatres, houses of worship, and schools are equipped with tele-loop systems. -
Page 25: Connecting/Disconnecting Audio Boots
Connecting/Disconnecting audio boots Connecting audio boots 1. Align the tip of the audio boot with the groove just above the battery com- partment and below the model number. 2. Once in place, move the boot in the direction of the bat- tery compartment. -
Page 26: Care And Maintenance
Care and maintenance Please follow the following instructions to prolong the durability of your hearing instruments: 1. Keep your hearing instrument clean and dry. Wipe the case with a soft cloth or tissue after use to remove grease or moisture. Do not use water or solvents, as these can damage the hearing instrument(s). -
Page 27: Daily Maintenance
7. Remove your hearing instrument when applying such things as cosmetics, perfume, aftershave, hair spray, and suntan lotion. These might get into the instrument and cause damage. Daily maintenance It is important to keep your hearing instrument clean and dry. On a daily basis, clean the hearing instruments using a soft cloth or tissue. -
Page 28: Cleaning Earmoulds
Cleaning earmoulds 1. Remove the earmould and attached tubing from the hearing instruments prior to cleaning. 2. Clean the earmould using a mild soap, and rinse with lukewarm water. 3. After cleaning, dry earmoulds thoroughly and remove any residual water and debris from the tubing utilising an air bulb and wire loop. -
Page 29: How To Apply Domes
How to apply domes It is recommended that your hearing care professional change domes, as incorrect dome re- placement could result in injury. Standard domes 1. Push the new dome over the flanges on the thin tube. 2. Make sure that the new dome is properlyly and securely mounted. -
Page 30: Maintenance For The Rie Hearing Instruments
Maintenance for the RIE hearing instruments (in 62 models) The receiver tube The receiver tube contains the wiring to the receiver which delivers the sound to the ear canal. It is important that the receiver tube and the receiver dome/RIE mold fits correctly in your ear. If the receiver tube or the receiver dome/RIE mould irritates your ear in any way and prevents you from wearing your hear ing instrument, please contact your hearing care pro fessional. -
Page 31: Cleaning The Receiver Tubes And Domes
Cleaning the receiver tubes and domes The receiver tube and the receiver dome should be cleaned regularly. Use a damp cloth to clean the receiver tube and receiver dome on the outside. Do not use water when you are cleaning the receiver tubes or the receiver domes. -
Page 32: Changing Wax Guard For Receiver Tube
Changing wax guard for receiver tube For NP receivers: 1. Clean any debris from the old waxguard. 2. Insert the wand into the old waxguard. 3. Twist the wand with the waxguard in a clockwise direction to ensure it is attached to the wand. -
Page 33: How To Apply Domes
It is recommended that your hearing care professional change domes, as incorrect dome re- placement could result in injury. ReSound standard domes 1. Push the new dome over the receiver. 2. Make sure that the new dome is properly and securely mounted. - Page 34 ReSound tulip domes Tulip domes are mounted in a similar manner to standard domes, but a few extra steps are required. Tulip domes consist of two “petals”. It is important to note that the largest petal is the outermost petal. To ensure this: 1.
-
Page 35: Temperature Test, Transport And Storage Information
Temperature test, transport and storage information GN ReSound Hearing Instruments are subjected to various tests in temperature and damp heating cycling between -25º C (-13º F) and +70º C (+158º F) according to internal and industry standards. During transport or storage, the temperature should not exceed the limit values of -20º... -
Page 36: General Warnings
General warnings 1. If the device is broken, do not use. 2. Consult a hearing care professional if you discover a foreign object in your ear canal, if you experience skin irritation, or if excessive ear wax accumulates with the use of the hearing instrument. -
Page 37: Battery Warning Information
8. Warning to hearing care professionals: Special care should be exercised in selecting and fitting hearing instruments with maximum sound pressure level that exceeds 132dB SPL with an IEC 60711:1981 occluded ear simulator. There may be a risk of impairment of the remaining hearing. -
Page 38: Troubleshooting Guide
Troubleshooting Guide SYMPTOM CAUSE No sound • Not turned on • Dead battery • Battery door will not close • Blocked earmould or tube Not loud • Incorrect earmould placement enough • Blocked earmould or dome • Blocked sound outlet filter •... - Page 39 POSSIBLE REMEDY • Turn on by closing the battery door • Replace battery • Insert battery properly • Clean earmould or tube • Reinsert earmould • Clean earmould, replace dome, replace filter • Change filter or consult your hearing care professional •...
-
Page 40: Troubleshooting Guide
Troubleshooting Guide SYMPTOM CAUSE Excessive • Incorrect earmould placement whistling / feedback • Incorrect dome placement • Excessive ear wax • Feedback control may need adjustment • Earmould tubing worn or damaged • Thin tube connection loose • Hearing instrument settings not optimal Sound •... - Page 41 POSSIBLE REMEDY • Re-insert earmould carefully • Re-insert dome • Consult your hearing care professional • Consult your hearing care professional • Consult your hearing care professional • Change thin tube or consult your hearing care professional • Consult your hearing care professional •...
-
Page 42: Technical Data
Technical Data Hearing Instrument Maximum output Model (2ccCoupler / IEC 60118-7) VE362-DVIR NP 114 dB SPL VE362-DVIR HP 117 dB SPL BTE Standard tube VE360-DI 123 dB SPL VE370-DVI, VE270-DVI, VE170-VI 128 dB SPL VE377-DVI 127 dB SPL VE380-DVI, VE280-DVI, VE180-VI 136 dB SPL MG490-DVI, MG290-DVI 139 dB SPL... -
Page 43: Warranty And Repairs
As a signatory to the United Nations Global Compact initiative, ReSound is committed to doing this in line with environment-friendly best practices. Hearing instruments therefore, at ReSound discretion, may be replaced by new products or products manufactured from new or serviceable used parts, or repaired using new or refurbished replacement parts. - Page 44 Fax: +61 2 9743 7472 Tel.: (free) 0800 900 126 CVR no. 55082715 Fax: +44 1869 343 466 www.gnresound.com.au Fax: (free) 0800 007 695 www.gnresound.co.uk www.gnresound.co.nz Any issues relating to the EU Medical Device Directive 93/42/EEC should be directed to ReSound A/S.
Need help?
Do you have a question about the Magna MG90 and is the answer not in the manual?
Questions and answers