Table of Contents
Advertisement
Quick Links
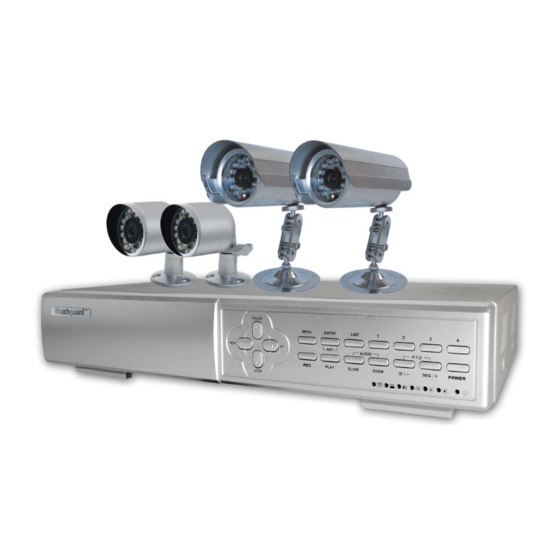
Professional Surveillance Pack
Digital Video Recorder with 4 Security Cameras
DVR
- Advanced MPEG4 Video Compression Technology
- Multiplex Operation
- Long Recording Duration
- Intelligent Video Motion Detection Recording
- Remote Network Surveillance & Backup Functions
- Easy to operate like a VCR
- System Auto recovery after power loss (blackout)
www.watchguardalarms.com.au
MODEL: DVR4ENTPACK2
'USER MANUAL'
Note: The latest version of this manual can be found at:
http://www.watchguardalarms.com.au
N517
2 x Cameras – 30m night-vision range
- High Quality CCD Image sensor
- 24 x IR LED's
- 420 TVL Resolution, 520 x 582 Pixels
2 x Cameras – 15m night-vision range
- High Quality CCD Image sensor
- 12 x IR LED's
- 420 TVL Resolution, 520 x 582 Pixels
- 1 -
Advertisement
Table of Contents

Related Manuals for Watchguard DVR4ENTPACK2


Summary of Contents for Watchguard DVR4ENTPACK2
-
Page 1: User Manual
MODEL: DVR4ENTPACK2 Professional Surveillance Pack Digital Video Recorder with 4 Security Cameras ‘USER MANUAL’ N517 2 x Cameras – 30m night-vision range - Advanced MPEG4 Video Compression Technology - High Quality CCD Image sensor - Multiplex Operation - 24 x IR LED’s... -
Page 2: Safety Warning
Safety Warning CAUTION To reduce the risk of electric shock, do not expose this machine to rain or moisture. Only operate this machine from the type of power source indicated on the label. RhinoCo Technology shall not be liable for any damages arising out of any improper use, even if we have been advised of the possibility of such damages. -
Page 3: Table Of Contents
Table of Contents Safety Warning..................................2 About This Manual ................................2 Table of Contents ................................3 Menu System ..................................4 Navigating the Menu ................................4 Menu Tree ...................................5 Record ....................................6 Timer ....................................7 Date .....................................7 Advance ....................................8 Advance > Camera ................................8 Advance > Detection ................................8 Advance > Detection > Detection Setup ..........................8 Advance >... -
Page 4: Menu System
Menu System Navigating the Menu The following buttons are used to navigate through the menu. Press “MENU” button to enter the The default admin password is 0000. (OSD) On Screen Display menu list Enter the default password by pressing “ENTER” 4 times UP=▲, (MENU) RECORD... -
Page 5: Menu Tree
Menu Tree The menu system for the DVR can be reached by pressing the MENU button. The menu system has the following structure. - 5 -... -
Page 6: Record
Record MANUAL RECORD ENABLE EVENT RECORD ENABLE TIMER RECORD ENABLE OVERWRITE RECORD IMG SIZE RECORD QUALITY MANUAL RECORD IPS EVENT RECORD IPS TIMER RECORD IPS TOTAL IPS SHARE Manual Record Enable Indicates whether the DVR has been manually set to record. If you have pressed the REC button on the front panel to start recording, then this will say YES. -
Page 7: Timer
Timer DATE START 00 : 00 00 : 00 DAILY 08 : 00 18 : 00 06 : 00 23 : 00 MON-FRI 00 : 00 00 : 00 00 : 00 00 : 00 00 : 00 00 : 00 00 : 00 00 : 00 Using the Timer menu you can setup multiple recording schedules. -
Page 8: Advance
Advance CAMERA DETECTION DISPLAY ALERT REMOTE SYSTEM NETWORK HDD INFO EVENT LOG Note: The Advance menu of the DVR is enthusiasts or experts only. Changing settings in this section of the menu can drastically alter the performance and functionality of the DVR. It is recommended you do not change anything in this section unless you know what you are doing. - Page 9 Press “ENTER” to confirm the Press ◄ or ► to choose the Press ▲ or ▼ to choose the start area width of the area height of the area, and press “ENTER” again to confirm. Press “-” to set the whole Multi-detection areas Press “+”...
-
Page 10: Advance > Detection > Detection Timer
Advance > Detection > Detection Timer DATE START 00 : 00 00 : 00 DAILY 08 : 00 18 : 00 06 : 00 23 : 00 MON-FRI 00 : 00 00 : 00 00 : 00 00 : 00 00 : 00 00 : 00 00 : 00... -
Page 11: Advance > Alert
Advance > Alert EXT. ALERT INT. BUZZER KEY BUZZER VLOSS BUZZER MOTION BUZZER ALARM BUZZER HDD BUZZER HDD NEARLY FULL (GB) ALARM DURATION (SEC) PRE-ALARM External Alert Configures whether to sound the buzzer when the external alarm is triggered. Internal Buzzer Sets the sound of the internal buzzer. -
Page 12: Advance > Remote
Advance > Remote TITLE DEVICE PROTOCOL RATE P - D 02400 CAMERA NORMAL 02400 CAMERA NORMAL 02400 CAMERA NORMAL 02400 Note: This section of the menu is for configuring the DVR to send PTZ commands to cameras. Please note that the cameras supplied with this DVR do not support this feature. -
Page 13: Advance > System
Advance > System SERIAL TYPE RS - 485 BAUD RATE 02400 HOST ID PASSWORD SETUP RESET DEFAULT RESET CLEAR HDD MASTER AUTO KEYLOCK NEVER LANGUAGE ENGLISH VERSION 1088-10-K2-04-AA-11 VIDEO FORMAT NTSC Serial Type Switches the serial type of the DVR between RS-232 and RS-485. Baud Rate Switches the baud rate of the DVR between 2400, 9600, 19200 and 57600. -
Page 14: Advance > Network
Advance > Network Note: If you do not have a thorough understanding of TCP / IP technology it is recommended that you employ the services of a network technician to help you. For more information on setting up the remote connection component, please see Section 3 of this manual. NETWORK TYPE STATIC 203 . -
Page 15: Section 2 - Network Operation
Section 2 – Network Operation Introduction There are two ways you can remotely connect to your DVR. The first method is to connect using the AP software. This must be installed on your computer. The second method is to connect using Internet Explorer. Either method requires that Windows networking has been set up correctly for the DVR prior to connection. - Page 16 AP Software – Camera Screen The AP software works by emulating the buttons on the front panel of the DVR. Anything you can do on the DVR can also be done in the AP software. Frame Rate Data Rate (bandwidth being used) Connect / Disconnect from DVR Switch display resolution between 320 x 276 and 640 x 552.
-
Page 17: Playback Operation
Playback Operation • De-interlace • De-blocking • OSD • AVI Convert • Config. Setting • Watermark • Open Previous File • Open Next File • Display information such as “Date”, “Time”, “Resolution”, “ Rewind / Forward Speed”, “Status” and “Functions”, etc. •... - Page 18 System Config > Network Press the button to enter the System Config. The network configuration allows the DVR to connect to an Ethernet or dial-up network. Enter the “server IP”, “gateway”, “net mask” and “web port”, and then press “APPLY” to confirm. Enter the “username”...
-
Page 19: System Config > Network > Dynamic Dns
> Dynamic DNS System Config > Network DDNS is a service for transforming the dynamic IP corresponding to a specific “Hostname”. Go to a website which provides free DDNS services and apply a “Hostname”. See the example below. User Name: Enter your DDNS user name. Password: Enter your DDNS password. -
Page 20: System Config > Network > Ftp
> FTP System Config > Network When the recording is triggered by an alarm or a motion, a video copy file can be captured. And the DVR will upload the captured images to the assigned FTP site. Enter the detailed FTP information. To activate the FTP notification function, please enable the function of FTP notification in the “Alarm”... -
Page 21: System Config > Detection
System Config > Detection Select the desired channel, and press “ t ” to enter the motion detection sensitivity and area setting box. Set the detection sensitivity in 4 different adjustable factors. : The sensitivity of comparing two different images. The smaller the value, the higher sensitivity for the motion detection. -
Page 22: System Config > Dvr > Network Backup
System Config > DVR > Network Backup You can backup the recorded data from the DVR directly to your PC and CD-R disk via the network. The backup file can be played directly in your PC via the supplied licensed AP, or via other media players (Ex: Windows Media Player or RealPlayer) after the file is converted to “AVI”... -
Page 23: System Config > Dvr > Search List
System Config > DVR > Search List Select one HDD (Master). Select one list type (All/ Manual/ System/ Alarm/ Motion). Maximum number of the list (128) 4CH DVR Press this button to start downloading the list. System Config > DVR > Timer Record In this menu, you can schedule 7 different sets of time for recording. -
Page 24: System Config > Dvr > Record Setting
System Config > DVR > Date In this menu, The DVR’s date can be set. Please DO NOT change the date or time when the recording function is activated. Choose the current date from “DATE” drop-down menu and enter the current time. When you click the drop-down menu, a calendar as shown below shows for you to set the current... -
Page 25: System Config > Alarm
System Config > Alarm Enable or disable Email and FTP notification function. Two notification methods — Email and / or FTP. Set MJPEG pictures (1-10 pictures). 4CH DVR Set the duration time of motion trigger recording (5 SEC, 10 SEC, 20 SEC, 40 SEC). Email Notification: Clean the alarm message “... -
Page 26: System Config > General > Account
System Config > General > Account Set up the user’s account (Max 5 accounts), password, life time, and authority level ( e ). User’s level: — — Control all the functions (“a”, “b”, “c”, “d”, “e” and “f” ). — —... -
Page 27: System Config > General > Online User Info
System Config > General > Online User Info Get all the current online users’ information list (Name, IP Address, Authority Level, Resolution and Image Quality). System Config > General > File Path Assign the route for saving the snapshot picture. Assign the route for saving the manually recorded file. -
Page 28: Troubleshooting
Troubleshooting PROBLEM SOLUTION No power Check power cord connection. Confirm that there is power from the outlet. Not working when pressing Press any key and then enter the password to exit “Key Lock” mode. any button Timer record is not working Check if the “TIMER RECORD ENABLE”... -
Page 29: Connecting Via Internet Explorer
Connecting via Internet Explorer Install Java Runtime Environment Before you can view your DVR in Internet Explorer you must have the Java Runtime Environment installed. This is supplied on the included CD. To install the Java Runtime Environment: Insert the included CD into a computer running Windows 2000 or later. Open the Start menu and press Run. - Page 30 Internet Explorer Operation Using the core elements of DVR in Internet Explorer is very similar to using the AP software. For further information, please refer to the AP software instructions - 30 -...
-
Page 31: Pin Configuration
Pin Configuration FUNCTION DESCRIPTION RS232-TX DVR can be controlled remotely by the keyboard of PC by using RS-232 serial communication signals. RS232-RX DVR can be controlled remotely by the keyboard of PC by using RS-232 serial communication signals. ALARM INPUT To connect the wire from ALARM INPUT ( PIN 3 -- 6 ) to GND ( PIN 9 ) connector, DVR will start recording and the buzzer will be on. -
Page 32: Rs-232 Protocol
RS-232 Protocol • Use PC keyboards to simulate DVR keypads. • Data: REMOTE PROTOCOL use 8 bit data, 1 start bit, 1 stop bit. FUNCTION STOP (FFH) (7FH) FUNCTION CODE ASCII FUNCTION CODE ASCII KEY_MENU 0x4D KEY_DWELL 0x65 KEY_ENTER 0x0D ENTER KEY_CH1 0x31... -
Page 33: Hard Drive Installation
Hard Drive Installation Unscrew the two screws respectively on the two sides of the upper cover. Unscrew the four screws on the back side of the upper cover. Make sure your hard drive is set to Master. Refer to the hard drive manufacturer’s website if you are unsure. Mount the hard drive in the internal bracket and attached the power and data cables. -
Page 34: Section 3 - Remote Setup Guide
Section 3 - Remote Setup Guide Introduction This guide covers how to use the remote connection functionality of your DVR in a local area network (LAN). In order to connect to your DVR over the internet you will need to configure your internet connection (i.e. a modem or router) to allow incoming connections. -
Page 35: Dvr Ip Address
Once you have activated your account, log into the http://www.dyndns.org website using the username and password you have created. From the menu on the left: Click My Services Click My Hosts Click Dynamic DNS From the page that loads: Click Add Host From the form that loads: Enter the a memorable name as the Hostname Select an appropriate Domain Name from the drop down list. -
Page 36: Port Forwarding
Port Forwarding Log into the router and click on the Advanced tab: Click on the Virtual Server menu item From the LAN IP drop down list make sure 10.1.1.50 is selected Select the User check box from the Category list on the left and wait for the page to reload Press the Add button in the bottom left When the page loads: Set the DVR as the Rule Name...
Need help?
Do you have a question about the DVR4ENTPACK2 and is the answer not in the manual?
Questions and answers