Table of Contents
Advertisement
Quick Links
Advertisement
Table of Contents

Related Manuals for Telematrix 2 Line trimline


Summary of Contents for Telematrix 2 Line trimline
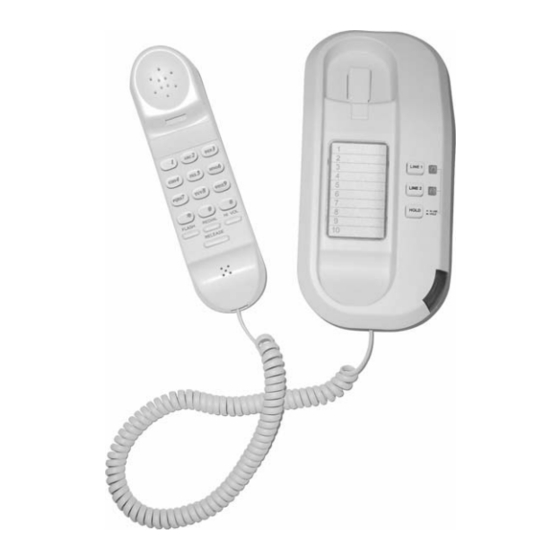
- Page 1 Copyright TeleMatrix Inc.2004 2 LINE TRIMLINE TELEPHONE USERS GUIDE...
-
Page 2: Introduction
INTRODUCTION Congratulations on the purchase of your TeleMatrix 2-line Trimline telephone. This telephone is a precision electronic device designed and manufactured with the highest quality components and work- manship that requires minimum maintenance. please be sure to read the contents in this user’s guide to become familiar with... -
Page 3: Table Of Contents
CONTENTS Table Of Contents Introduction Features Controls Definition Of Controls Installation Parts Checklist Wall Mounting Permanent Mounting Switch Setting Operation Care & Maintenance Service Warranty... -
Page 4: Features
FEATURES • Two Line Operation • Tone/Pulse Dialing (selectable) • Message Waiting Lamp (90VDC Neon) • Convenient Data Port • Hold Key • Line Status Indicators • Handset Volume Control • Flash Function (600mS) • Dial In Handset • Last Number Redial •... -
Page 5: Controls
CONTROLS... -
Page 6: Definition Of Controls
DEFINITION OF CONTROLS 1. Tone/Pulse Switch Used to select touch-tone or rotary pulse dialing. 2. Redial key Used to automatically re-dial the last number dial. 3. Flash Key Provide a 600mS time line break. 4. Message Waiting Lamp Visual indicator to tell you that a message is waiting or that the line is ringing. -
Page 7: Installation
INSTALLATION Caution • Never install telephone wring during a lightning storm. • Never install telephone jacks in wet location unless the jack is specifically designed for wet locations. • Never touch un-insulated telephone wires or terminal unless the telephone line has been disconnected at the network interface. -
Page 8: Parts Checklist
INSTALLATION Parts Checklist The following parts are packaged with your TeleMatrix Trimline Telephone: 1. 15-foot Modular telephone line cord. 5-inch Modular telephone line cord. 3. 10-foot Modular coiled handset cord. - Page 9 INSTALLATION Connecting The Line Cord Plug one end of the 15-foot modular telephone line cord into the receptacle on the bottom of the base unit. Route the cord through the cord channel provided. Plug the remaining end of the line cord into a standard telephone outlet.
- Page 10 INSTALLATION Connecting The Handset Cord Plug one end of the modular coiled handset cord into the receptacle located on the left side of the base unit. Plug the remaining end into the receptacle on the handset.
-
Page 11: Wall Mounting
INSTALLATION Wall Mounting The TeleMatrix Trimline telephone can be wall mounted to a standard telephone wall jack plate. Using the 5-inch line cord , plug one end into the receptacle on the bottom of the base unit. The remaining end will plug into the wall jack. Carefully align the slots on the bottom of the base unit with the wall mount studs on the jack plate. - Page 12 INSTALLATION Handset Retaining Clip The handset retaining clip must be activated to hold the handset when wall mounting the telephone. To activate, remove the clip, rotate it 180º and snap it back into place.
-
Page 13: Permanent Mounting
INSTALLATION Security Mounting Option The TeleMatrix Trimline base unit can be perma- nently attached to the wall using screws. This mounting option is ideal for areas requiring security. Underneath the index card are two (2) mounting holes. To locate, remove the clear plastic overlay and the paper index. -
Page 14: Switch Setting
SWITCH SETTINGS Tone/Pulse Switch The Tone/Pulse switch is located underneath a cover plate located on the handset. Use a sharp pointer to remove the switch cover plate to expose the switch. Set the switch to the proper dialing mode that is com- patible to your line service. - Page 15 SWITCH SETTINGS Ringer Volume Control Switch There are two (2) slide switches located on the left side of the base unit that is used to adjust the loudness of the ringing sound. A “low” and “high” setting are provided . Select the desired loudness by sliding the switch in the appropriate position.
- Page 16 SWITCH SETTINGS 24/48/Off Line Voltage Switches There are two (2) 3-position slide switches located on bottom of the telephone underneath a plastic cover. Remove the cover using a sharp pointer, the line voltage switches are factory set for 48-volts. If you PABX system operates at 24-volts, slide the switch to the ‘24V’...
- Page 17 SWITCH SETTINGS Message Waiting Switch This telephone is standard equipped to support eight high voltage (90VDC Neon) or low voltage (LED) Message waiting systems, A selector switch is provided underneath the faceplate for security. The options are: NEON = 90 VDC NEON LED = LOW VOLTAGE Note: The switch is factory set to the “Neon”...
-
Page 18: Operation
OPERATION A. Line Status Indicators The 2-line TrimLine is equipped with LED indicators to show the current status of the telephone lines. They are : • Ringing Line: LED is blinking red • Line In-Use: LED is steady green • Line On Hold: LED turns from green (in-use) to red (hold) on telephone that places the call on hold. -
Page 19: Care & Maintenance
CARE & MAINTENANCE Keep the telephone dry. If it gets wet on the out- side, wipe it dry immediately. Liquids might con- tain minerals that can corrode the electronic cir- cuits. Do not touch the unit if submerged in water. Call for assistance. -
Page 20: Service
TeleMatrix, Inc. Priority Care Center 5025 Galley Road Colorado Springs, Colorado 80915 TeleMatrix will pay return postage on the repaired telephone. Allow 2-3 weeks for delivery. When immediate replacement is required, see our FastLane replacement policy on our internet site. - Page 21 Company or to one of our authorized agents Ser- vice can be facilitated through our office at: TeleMatrix, Inc. 5025 Galley Road Colorado Springs, CO. 80915 800-462-9446...
-
Page 22: Warranty
WARRANTY...
Need help?
Do you have a question about the 2 Line trimline and is the answer not in the manual?
Questions and answers