Table of Contents
Advertisement
Quick Links
Advertisement
Table of Contents

Related Manuals for EV Rider SportRider


Summary of Contents for EV Rider SportRider
-
Page 2: Table Of Contents
TABLE OF CONTENTS PREFACE AND INTRODUCTION ……..…………………………………… 3 SAFETY NOTICE…………………………………………………………...…. 2.1 Before Riding 2.2 While Riding 2.3 Labeling 2.4 EMI PARTS INTRODUCTION……………………………………………..………. Parts Description OPERATION…………………………………………………………………..4.1 Control Panel 4.2 How To Operate Your Scooter BATTERY CHARGING AND CARE………………………………………..5.1 Charging The Battery 5.2 Charger 5.3 Battery INSPECTION AND MAINTENANCE……………………………………..…... -
Page 3: Preface And Introduction
1. PREFACE AND INTRODUCTION Please carefully read this user’s manual before operating your vehicle. Improper use of the vehicle could result in an accident, bodily injury or damage to private or public property. Therefore, for maximum benefit while using the vehicle, please read this owner’s manual in its entirety. ... -
Page 4: Safety Notice
Please be careful when riding your scooter in low light. It has not been designed for use at night. Never remove any of the SPORTRIDER’s safety components like the anti-tip wheels, fenders ,bumper or the emergency brake lever. ■ Practice operating your vehicle Before using the scooter in busy or potentially dangerous areas, familiarize yourself with the operation of your scooter. -
Page 5: While Riding
Do not operate your vehicle in an “S” pattern or make erratic turns. Never use the SPORTRIDER for climbing up or riding down stairs. ■ About Mobile Phones and other electrical equipment Do not use a mobile phone or other wireless communication devices while riding. - Page 6 Do not turn the main key switch to “OFF” while in motion; this is may cause abrupt and excessive deceleration which in turn may cause injury to the user and damage to the SPORTRIDER. Always re-engage the freewheel lever before use. Failure to do so may result in injury.
-
Page 7: Labeling
2 . S A F E T Y N OT I C E ■ Stopping 1. Release the speed control lever completely. The vehicle will naturally brake and stop. 2. Turn the power switch to (OFF). Then pull out the key. 2.3 LABELING Please carefully read all labels on the scooter before riding it. - Page 8 2 . S A F E T Y N OT I C E WARNING: Radio wave sources may affect Scooter or Power chair control 1.WARNING LABEL…………… Radio wave sources, such as radio stations, TV stations, amateur radio (HAM) transmitters, two-way radios, and cellular phones, can affect powered motorized scooters or power chair.
-
Page 9: Emi
Caution: It is very important that you read this information regarding the possible effects of electromagnetic interference on your SPORTRIDER. ■ ELECTROMAGNETIC INTERFERENCE (EMI) FROM RADIO WAVE SOURCES... -
Page 10: Important Information
2 . S A F E T Y N OT I C E Note: Other types of hand-held devices, such as cordless phones, laptop computers, AM/FM radios, TV sets, CD player, and cassette players, and small appliances, such as electric shavers and hair dryers, so far as we know, are not likely to cause EMI problems to your powered vehicle. -
Page 11: Parts Introduction
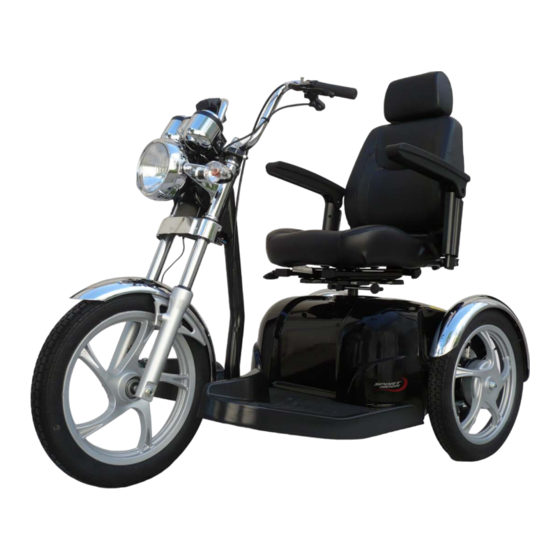
3 . PA R T S I N T R O D U C T I O N PARTS DESCRIPTION 1. Emergency Brake Lever 2. Throttle Lever 3.Front Turn Signal 4. Headlight 5. Front Fork 6. Front Fender 7. Rearview Mirror 8.Seat Backrest 9. -
Page 12: Operation
4 . O P E R AT I O N 4.1 CONTROL PARTS DESCRIPTION 1. Turn Signal Switch 2. Head Light Switch 3. Horn Button 4. Indoor / Outdoor Switch (Hi/Lo) 5. Forward / Reverse Switch 6. Hazard Lights Switch 7. - Page 13 4 . O P E R AT I O N RESET BUTTON 1. Hold down the RESET button for 2 seconds at the desired screen to be reset (i.e. trip meter). The computer will reset the TRIP, RT or MAX data from stored values to ZERO. 2.
- Page 14 4 . O P E R AT I O N THE VOLTAGE DISPLAY PANEL DESCRIPTION 1. Voltage Scale 2. Bar Voltage Display 3. Current Voltage & Max. Voltage Display 4. Clock Display 5. Status LED and Error Indicator 6. Headlight Indicator 7.
-
Page 15: How To Operate Your Scooter
The main key switch has two position (ON) : Power is supplied to the SPORTRIDER. The status/error indicator comes on and stays on after the controller has checked all systems and the scooter is ready to be ridden. (OFF) : The SPORTRIDER cannot be operated and the electromagnetic brake is applied (ON). -
Page 16: Hazard Lights
Depress the light switch to turn on the headlight and taillights. Push the button again to turn the lights off. ■ Hazard Lights The hazard switch operates all turning lights on the SPORTRIDER. Pushing the button once turns the lights ON. A second push turns them OFF. Suggestion 1. - Page 17 4 . O P E R AT I O N ■ Braking Electro-magnetic brake: Release the throttle lever completely, the controller will decelerate the scooter to a stop at which point the electromagnetic brake will be activated automatically and the motor/transaxle will be locked.
- Page 18 4 . O P E R AT I O N Warning Never operate the free-wheel lever while seated on the scooter or on an incline.! OPERATION OF THE FREE-WHEEL LEVER *Always pull the lever DOWN FIRMLY for free-wheel mode * Always pull the lever UP FIRMLY for drive mode ■...
-
Page 19: Battery Charging And Care
B AT T E RY C H A R G I N G A N D C A R E 5.1 CHARGING THE BATTERIES Follow the procedure below step by step: 1. Turn the power switch to (OFF) 2. Connect the charger’s power cord into the power outlet. 3. -
Page 20: Charger
Attention: Please follow the rules below to avoid accidents while charging. Use the SPORTRIDER charger only and recharge the battery to its full capacity every time. You may damage the battery and/or the scooter if you use a different charger. -
Page 21: Battery
If the batteries are contaminated by water, battery acid, dust or other substances, they will discharge quickly. The batteries supplied with the SPORTRIDER are sealed and as such are maintenance free with no risk of battery leakage. Please follow the steps below to clean the batteries. -
Page 22: Inspection And Maintenance
6 . I N S P E C T I O N A N D M A I N T E N A N C E Suggestions If necessary, ask for help from your dealer for advice about maintaining and replacing the batteries. ... - Page 23 7 . I N S P E C T I O N A N D M A I N T E N A N C E 6.2 REGULAR INSPECTION RECORD To make sure your scooter is correctly serviced, take it to your dealer for regular maintenance checks. This should be one month after purchase and then at 6-month intervals.
-
Page 24: Storage
6 . I N S P E C T I O N A N D M A I N T E N A N C E Attention 1. When tread depth is below 0.5mm it can easily lead to vehicle slippage, making braking distances longer, therefore, replace the tires as early as possible to prevent accidents. - Page 25 . T R O U B L E S H O OT I N G A N D S P E C I F I C AT I O N S ■ TROUBLE SHOOTING You can inspect the following before taking you scooter to the dealer. Symptom Remedy ...
-
Page 26: Trouble Shooting And Specification
8 . T R O U B L E S H O OT I N G A N D S P E C I F I C AT I O N S P E C I F I C AT I O N Model Reference SPORTRIDER Dimension 1650mm×780mm×1120mm (L x W x H mm) 65”... - Page 27 The batteries are warranted by EV Rider for 6 months after the purchase of the Unit. Service: Warranty service can be performed by EV Rider, LLC or by an authorized EV Rider, LLC service facility. Do not return faulty parts to EV Rider, LLC without prior consent. A request for a Return Authorization is required prior to returning items.
- Page 28 EV Rider, LLC 6410 Arc Way, Suite A Fort Myers, FL 33966 800-944-1997 www.evrider.com 28 of 28...
Need help?
Do you have a question about the SportRider and is the answer not in the manual?
Questions and answers