Table of Contents
Advertisement
Quick Links
I N S T A L L A T I O N I N S T R U C T I O N S
Instrucciones de instalación
Installationsanleitung
Instruções de Instalação
Istruzioni di installazione
Installatie-instructies
Instructions d´installation
Universal Tilting Wall Mount
Portuguese Product Description
Spanish Product Description
German Product Description
Italian Product Description
Dutch Product Description
French Product Description
RLT1
Advertisement
Table of Contents

Related Manuals for CHIEF RLT1


Summary of Contents for CHIEF RLT1
- Page 1 I N S T A L L A T I O N I N S T R U C T I O N S Instrucciones de instalación Istruzioni di installazione Installationsanleitung Installatie-instructies Instruções de Instalação Instructions d´installation Universal Tilting Wall Mount Spanish Product Description German Product Description Portuguese Product Description Italian Product Description Dutch Product Description French Product Description RLT1...
-
Page 2: Installation Instructions
Chief® is a registered trademark of Milestone AV Technologies. Reinforce the structure as required before installing the All rights reserved. - Page 3 Installation Instructions RLT1 LEGEND Tighten Fastener Pencil Mark Apretar elemento de fijación Marcar con lápiz Befestigungsteil festziehen Stiftmarkierung Apertar fixador Marcar com lápis Serrare il fissaggio Segno a matita Bevestiging vastdraaien Potloodmerkteken Serrez les fixations Marquage au crayon Loosen Fastener Drill Hole Aflojar elemento de fijación...
-
Page 4: Tools Required For Installation
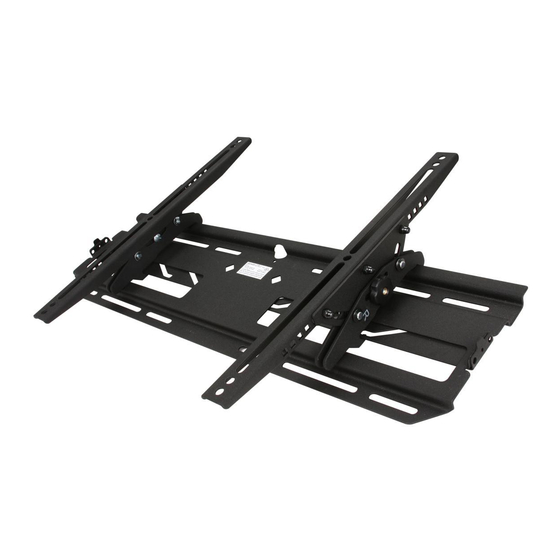
RLT1 Installation Instructions TOOLS REQUIRED FOR INSTALLATION 1/2" (12.7mm) DESCRIPTION DESCRIPTION PLATE, Wall with two latches attached SCREW, Phillips, M4 x 16 (Parts Bag D) TILT BRACKET, Interface (Rt) SCREW, Phillips, M4 x 25 (Parts Bag D) TILT BRACKET, Interface (Lft) - Page 5 Installation Instructions RLT1 PARTS...
-
Page 6: Assembly And Installation
RLT1 Installation Instructions ASSEMBLY and INSTALLATION INSPECT MOUNT BEFORE ASSEMBLY EXAMPLE CENTER HOLE OF BRACKET USED Carefully inspect the mount components for shipping AS REFERENCE POINT damage. If any damage is apparent, call your carrier claims agent and do not continue with the installation until the carrier has reviewed the damage. - Page 7 Installation Instructions RLT1 INTERFACE BRACKET TILT BRACKET SHOULDER WASHER STEEL WASHER SCREW CENTER HOLE SPACER SHOULD BE AS (IF NECESSARY) CLOSE AS POSSIBLE TO CENTER OF DISPLAY Figure 5 Figure 3 CENTERLINE OF SCREEN Figure 4 Figure 6...
-
Page 8: Wall Plate Installation
RLT1 Installation Instructions Wall Plate Installation 3.If desired, install self tapping screws (230) and/or padlocks (not provided) for additional security. (See Figure 7) Lag Bolt Installation Instructions 4.Tilt the display up or down as desired. To Install wall plate: 5.Tighten knobs to achieve the desired tension. -
Page 9: Display Removal
Installation Instructions RLT1 Display Removal To remove display: CAUTION: Disconnect power and audio/video cables before removing the display from its wall mount. WARNING: The plasma display is heavy and extremely fragile. Exercise caution when removing the display from the mount to avoid equipment damage or personal injury. - Page 10 RLT1 Installation Instructions...
- Page 11 Installation Instructions RLT1...
- Page 12 F 877.894.6918 / 952.894.6918 Europe A Fellenoord 130 5611 ZB EINDHOVEN, The Netherlands P +31 (0)40 2668620 Chief Manufacturing, a products division F +31 (0)40 2668615 of Milestone AV Technologies Asia Pacific A Room 24F, Block D, Lily YinDu International Building LuoGang, BuJi Town, Shenzhen, CHINA.
Need help?
Do you have a question about the RLT1 and is the answer not in the manual?
Questions and answers