Table of Contents
Advertisement
CORDLESS
IMPORTANT!
DO NOT DESTROY
It is the customer's responsibility to have
all operators and service personnel read
and understand this manual.
Printed in U.S.A.
© 2001 Illinois Tool Works, Inc.
901070-2
10/01
Model: IM200 F18
Part No. 901000
18 Gauge Finish Nailer
OPERATING MANUAL
www.paslode.com
19
Advertisement
Table of Contents

Related Manuals for Paslode IM200 F18


Summary of Contents for Paslode IM200 F18
- Page 1 It is the customer's responsibility to have all operators and service personnel read and understand this manual. Printed in U.S.A. © 2001 Illinois Tool Works, Inc. 901070-2 10/01 Model: IM200 F18 Part No. 901000 18 Gauge Finish Nailer OPERATING MANUAL www.paslode.com...
-
Page 2: Table Of Contents
Preparing TrimMaster 18™ Finish Nailer for Use ... 12 TrimMaster 18™ Finish Nailer Operation ... 13 Fasteners and Applications ... 14 Servicing ... 15 Troubleshooting ... 17 ® The Impulse battery charger system meets all safety requirements for power tools. is a trademark Paslode CORDLESS... -
Page 3: Introduction And Warranty
Introduction and Warranty TrimMaster 18™ Finish Nailer Operating Manual This manual is intended to acquaint you with the Paslode Cordless 18 Finish Nailer. Unlike other power fastening tools, the Cordless 18 Finish Nailer is powered by an internal combustion linear motor. In simpler terms, your Cordless 18 Finish Nailer is powered by a motor similar to the one that powers an automobile. -
Page 4: Specifications
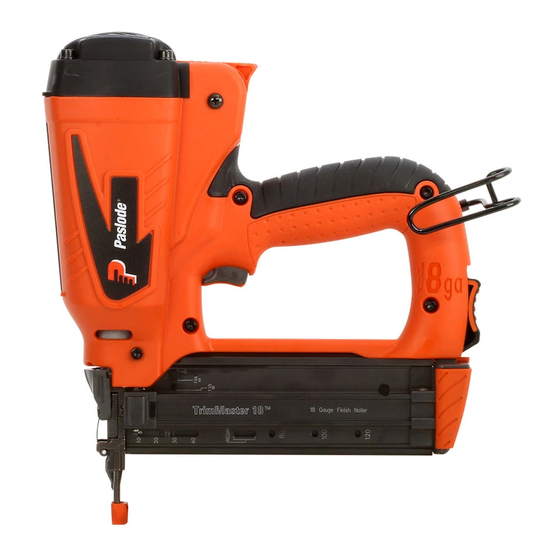
TrimMaster 18™ Finish nailer. As you can see in the illustration below, the Impulse Finish nailer is made up of three major areas: handle, motor, and magazine. As you examine the TrimMaster 18™ Finish nailer, become familiar with the three major areas and the various components located in each of them. -
Page 5: Safety Instructions
Safety Instructions The following safety instructions have been included in this booklet to provide you with basic information necessary for safe operation of the TrimMaster 18 ATTEMPT TO OPERATE THIS TOOL UNTIL YOU HAVE READ AND UNDERSTAND ALL SAFETY PRECAUTIONS AND MANUAL INSTRUCTIONS. - Page 6 Always wear EYE and EAR safety gear when working with or in the vicinity of the TrimMaster ™ 1. Eye protection must meet the requirements of ANSI Standard Z87.1 and should have side shields for increased protection. 2. NEVER ASSUME THE TOOL IS EMPTY. Never point the tool at yourself or anyone else.
- Page 7 Safety Instructions 12. NEVER DRIVE FASTENERS INTO AREAS WITH CONCEALED HAZARDS. Always check the area behind the work surface for electrical wiring, gas pipes, water pipes, sewer drains or other potential hazards. 13. ALWAYS MAINTAIN SECURE AND UNOBSTRUCTED FOOTING WHEN ON LADDERS, PLATFORMS OR OTHER HIGH LOCATIONS.
-
Page 8: Battery And Charging System
Battery and Charging System The Paslode Cordless tools come with a recharge- able battery and its own charging system. This charging system is the only one that will work with the Pasldoe batteries (either round or oval ). The first step in preparing a new tool for operation is to fully charge the battery. -
Page 9: Inserting Battery
Battery and Charging System Inserting Battery 1. Load the battery, contacts first, into the TrimMaster 18 Finish nailer. 2. Push battery fully forward into its locked position. 3. To remove battery, push down on locking tab and slide battery out. NOTE: If battery is left in tool for an extended period, the battery will discharge completely and will require recharging. -
Page 10: Fuel Cell And Metering Valve
2. When replacing fuel cell also clean the air filter for optimum tool operation. NOTE: Altitude Restriction Impulse technology is powered by an internal combustion engine and are effected by altitude. The tool may lose power or not cycle consistently at elevations of 4000 feet or greater. - Page 11 3. The valve is now completely seated onto the fuel can and can be inserted into the tool. NOTE: Impulse fuel cell are marked with expiration date on the bottom of the can. For maximum performance use fuel before expiration date.
- Page 12 Inserting Fuel Cell Inserting the metering valve/fuel cell assembly into the TrimMaster 18 ™ Finish Nailer is very simple. To begin, press up at the bottom of the actuator cover and pivot outward to open. The cover will swing out of the way. 2.
-
Page 13: Preparing Trimmaster 18™ Finish Nailer For Use
120 F (49 C). After extended periods of continuous use, it may be necessary to cool the Impulse motor by setting tool aside for 10-15 minutes or until the tool operates normally. An overheated tool may not drive nails completely or may operate erratically. -
Page 14: Trimmaster 18™ Finish Nailer Operation
Fan exhausts hot gases and cools internal components. Impulse® technology is powered by an internal combustion engine and are effected by altitude. The tool may lose power or not cycle consistently at elevations of 4000 feet or greater. When using... -
Page 15: Fasteners And Applications
Finish Nailer drives Paslode 18 Gauge finish nails. Fasteners are collated into strips of 50 for easy loading. Paslode fasteners are designed to be used in Paslode tools, use of other fasteners may cause damage to the tool or injury to the tool operator. THE IMPULSE 18 Ga. BRAD NAILER DRIVES THESE NAILS Fuel... -
Page 16: Battery Check
If the indicator light blinks red or glows red, recharge the battery. Fuel Cell Check If the Impulse indicator light is green, but the tool will not cycle or does not drive fasteners completely, check the fuel cell. With the fuel cell out of the tool, check to see if the cell still contains fuel and that the metering valve is working. - Page 17 4. Check work contacting element to ensure it is operating freely. COVER Paslode Cordless Tool Accessories A variety of accessories are available for the Impulse Ga. Brad Nailer: FILTER No-Mar Replacement Tip -Hard Tip Part No. 901048 No-Mar Replacement Tip -Soft Tip Part No. 901067 Battery - Part No.
-
Page 18: Troubleshooting
Preparing Tool for Operation - Battery/Charger Problems SYMPTOM Battery does not appear to accept charge when battery is plugged into the charger. Charger gets hot, makes excessively loud noise, or smokes during charging cycle. Charger cord or wall plug gets hot. Normal Stage of Operation SYMPTOM Fan does not run - tool indicator light is... -
Page 19: Forest Edge Drive Vernon Hills, Illinois
Use only fasteners meeting Paslode ® specifications. Check Fasteners and Applications section for fastener types and sizes recommended for use in Impulse tool. Position follower behind fastener strip and engage strip. Clear jam. Check fuel cell. Check spark plug wire. - Page 20 Model Number IM200 F18 The model number of each Paslode tool contains information about the tool and the fasteners that are used with it. The following example illustrates the information contained in this tool model number. ® IMPULSE Technology PASLODE MODEL NUMBER DESIGNATION Copyright ©...
Need help?
Do you have a question about the IM200 F18 and is the answer not in the manual?
Questions and answers