
Related Manuals for Craftmade Cortana CR52


Summary of Contents for Craftmade Cortana CR52
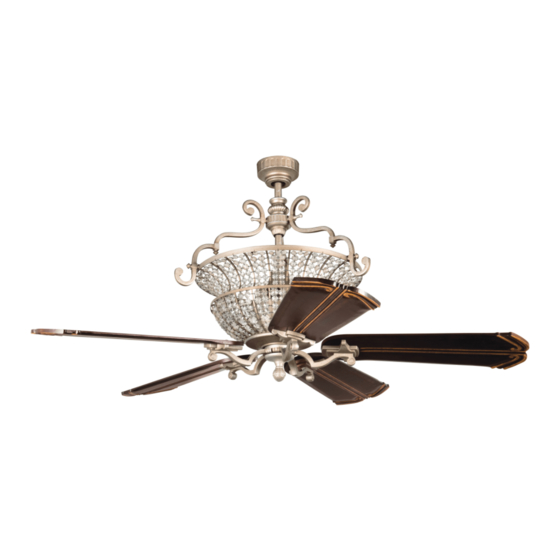
- Page 1 Cortana Ceiling Fan Installation Instructions Instrucciones de instalación Instructions d’installation...
- Page 2 Read and Save These Safety Precautions 1. Turn off electricity at main switch before wiring or servicing fan in order to avoid possible electrical shock. 2. All wiring must be in accordance with the National Electric Code (ANSI/NFPA70-1999) and local electrical codes.
-
Page 3: Before Assembly
Before Assembly 1. Make sure that the fan voltage (120) is compatible with your own electrical system. 2. Check to make sure that your carton contains all the parts mentioned in the parts list. NOTE: The box can be used as a work space to prevent any damage on the ornamental surface. - Page 4 Turn off circuit breakers and wall switch to the fan supply line leads. Important: When using an existing outlet box, be sure the box is Preparation securely attached to the building structure and can support the full weight of the fan. Failure to do so can result in serious injury or death. b.) Angle Mount IMPORTANT: If using the angle mount method, check to make sure the ceiling angle is not steeper than 35º.
-
Page 5: Installing Mounting Bracket
Installing Mounting Bracket Support Beam “J” Hook (S7) Outlet Box (A) OUTLET BOX Ceiling Mounting Bracket (1) Bracket Screws & Washers (S2) Wood Screws (S1) Wood Screws (S1) NOTE: Do not mount directly to sheet rock or ceiling tile. Prior to securing mounting bracket, screw "J" hook (S6) into ceiling outlet box as a secondary support means. - Page 6 Downrod Assembly Locate downrod assembly (#2). Loosen ball screw on black hanging ball to free lock pin. Black hanging ball will slide down. Remove ground screw and green ground wire. Remove hanging ball from downrod and save all parts. Insert fan wires through downrod.
- Page 7 Thread the downrod onto the motor housing making sure the wires don’t get twisted. Insert saftey bolt (S6) through flange & downrod and attach nut. Tighten firmly. Tighten set screw against downrod.
- Page 8 Place Flange Cover (7), Downrod Accessory Distributor (6), Upper Distributor Cover (5), Canopy Cover (4) and Canopy (3) over downrod assembly. Align and insert Decorative Screws (10) through Downrod Accessory arm (9) with the holes of the distributor. Align screws on lower downrod accessory arm with slots in the top of the fan housing (8).
- Page 9 Lift fan onto the mounting bracket (#1). Turn housing until hanging ball seats itself into ball socket (listen for click). For added security, attach safety cable from fan unit to "J" hook (S7) in outlet box. Secure by looping zip tie (S8) through safety cable and "J" hook. Tighten zip tie securely.
- Page 10 Ground 1. Connect fan wires to ceiling Wire White (Neutral) wires: white fan wire to white outlet Connectors (S6) wire, black to black. Wire Black connectors (S6 ) are provided for (Power) your convenience. Ground White (Green) 2. After connections are made, turn Black splices upward and push carefully into outlet box.
- Page 11 Loosen two screws from the hanger bracket. Align the canopy up to ceiling and over the loosened screws. Place the canopy into the keyhole and rotate canopy clockwise. Secure the canopy by tightening the previous loosened screws. Rotate the canopy cover clockwise. Attach the blades to the blade arms by using three blade screws (S3) and paper washers.
- Page 12 Install the three 50W bulbs. (Included) Take care not to touch bulb with bare fingers. Wipe bulb with clean cloth to remove oily residue. Remove two set screws on the mount- ing ring, align the keyholes of the mounting plate and the Switch Cap Mounting Plate, attach two screws previously removed and tighten screws securely.
- Page 13 Remote Control Operation Instructions ON/OFF For emergency shut off. SPEED Controls fan motor speed. To select desired speed, press CONTROL button once and release. REVERSE Controls direction of fan blades. To reverse fan blades, press once and release. FAN OFF or Turns fan motor speed off.
-
Page 14: Important! Please Read
PROPER CARE In order to maximize the appearance of your Craftmade ceiling fan, it is important that dust and debris is removed from the surface periodically. It is recommended that the motor housing be wiped down weekly using a soft, dry or damp cloth and the blades cleaned with a soft, dry or damp cloth or fan blade duster.
Need help?
Do you have a question about the Cortana CR52 and is the answer not in the manual?
Questions and answers