Hitachi C 10FCH2 Handling Instructions Manual
Compound milter saw
Hide thumbs
Also See for C 10FCH2:
- User manual ,
- Handling instructions manual (108 pages) ,
- Technical data and service manual (67 pages)
Table of Contents
Advertisement
Compound Miter Saw
Model C 10FCH2
Handling instructions
Note:
Before using this Electric Power Tool, carefully read through these
HANDLING INSTRUCTIONS to ensure efficient, safe operation. It is
recommended that these INSTRUCTIONS be kept readily available
as an important reference when using this power tool.
C 10FCE2
•
Advertisement
Table of Contents

Related Manuals for Hitachi C 10FCH2


Summary of Contents for Hitachi C 10FCH2
-
Page 1: Handling Instructions
Compound Miter Saw Model C 10FCH2 C 10FCE2 • Handling instructions Note: Before using this Electric Power Tool, carefully read through these HANDLING INSTRUCTIONS to ensure efficient, safe operation. It is recommended that these INSTRUCTIONS be kept readily available as an important reference when using this power tool. -
Page 2: General Operational Precautions
14. Maintain tools with care. Keep cutting tools sharp Use only original HITACHI replacement parts. and clean for better and safer performance. Follow 10. This tool should only be disassembled for instructions for lubrication and changing replacement of carbon brushes. -
Page 3: Specifications
37. Shut off power and wait for saw blade to stop before 23. Use only saw blades recommended by HITACHI. servicing or adjusting tool. 24. The saw blades should be from 235 mm to 255 mm 38. During a miter or bevel cut the blade should not be external diameter ranges. -
Page 4: Standard Accessories
Cutting work STANDARD ACCESSORIES Move the handle slightly so that the locking pin can be disengaged. (1) 255 mm TCT Saw blade (mounted on tool) ..... 1 Remove a 6 mm wing bolt.Turn the turn plate as Fig. (2) Dust bag ..............1 1-c, and fix it again with the 6 mm wing bolt. -
Page 5: Adjusting The Power Tool Prior To Use
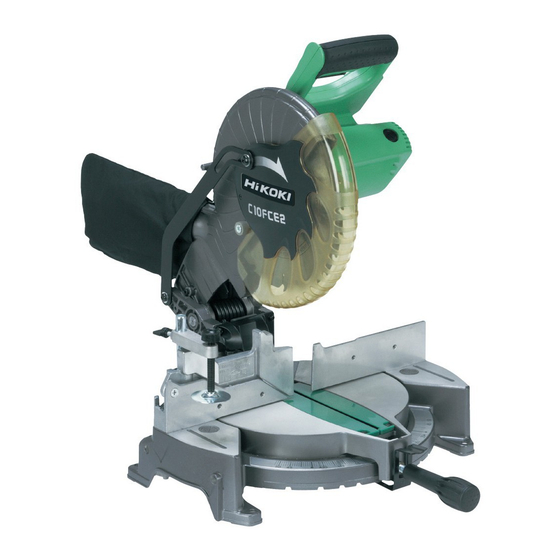
Motor Lock lever (C) (For Australia) Head Handle Gear Case Motor Dust Bag Saw Blade Laser Marker (Only C10FCH2) Lower Guard Turn Plate Indicator (B) (For bevel scale) 6 mm Wing Bolt Fence (A) Vise Assembly Table Insert Indicator (A) (For miter scale) Sub Fence (B) Lever Side Handle... - Page 6 4. Using the Vise Assembly (Standard accessory) (Fig. 7) (1) The vise assembly can be mounted on either the left fence {Fence (B)} or the right fence {Fence (A)} by loosening the 6 mm wing bolt (A). Screw Holder Knob 6 mm Wing Bolt (B) Vise Plate Fence (B)
- Page 7 WARNING (1) Light up the laser marker and make a groove of about 5 In the case of left bevel cutting, rotate the sub fence mm deep on the workpiece that is about 38 mm in height (B). Supposing it is not able to rotate it, It will contact and 89 mm in width.
- Page 8 If the switch trigger is pulled inadvertently, the saw sunlight. Under such circumstances, move to a place blade can rotate and result in unexpected accidents. that is not directly under the sunlight and engage in Do not remove the laser marker to be used for other the operation.
- Page 9 CAUTION For maximum dimensions for cutting, refer to “SPECIFICATIONS” table. Increased pressure on the handle will not increase the Indicator cutting speed. On the contrary, too much pressure (for bevel scale) may result in overload of the motor and/or decreased cutting efficiency.
- Page 10 (2) After adjustment, firmly tighten the wing nut and Position crown molding with its WALL CONTACT fasten the holder with the 6 mm knob bolt (optional EDGE against the guide fence and its CEILING accessory). If the length of Height Adjustment Bolt 6 CONTACT EDGE against the Crown molding Stoppers mm is insufficient, spread a thin plate beneath.
-
Page 11: Maintenance And Inspection
NOTE Collar (B) Saw Blade If the spindle lock cannot be easily pressed in to lock the spindle, turn the bolt with 10 mm box wrench Washer (standard accessory) while applying pressure on the Bolt spindle lock. The saw blade spindle is locked when the spindle lock is pressed inward. - Page 12 3. Inspecting the carbon brushes Clamp lever For your continued safety and electrical shock protection, carbon brush inspection and replacement Base on this tool should ONLY be performed by a Hitachi Holder (B) Authorized Service Center. 4. Replacing supply cord Fig. 28 If the supply cord of Tool is damaged, the Tool must 10.
- Page 13 Accordingly, some parts (i.e. code numbers and/or design) may be changed without prior notice. NOTE Due to HITACHI’s continuing program of research and development the specifications herein are subject to change without prior notice.
- Page 14 C10FCH2 (1/2)
- Page 15 C10FCH2 (1/2) 326-748 322-902 –––––––– 323-976 “61” M6 × 10 307-956 322-957 ”602-607” M6 × 20 M6 × 11 323-208 998-836 322-935 –––––––– 322-936 306-985 318-934 964-851 M4 × 10 322-889 304-043 M10 × 54 322-965 321-551 322-890 322-713 ”609-612” M6 ×...
- Page 16 C10FCH2 (2/2)
- Page 17 C10FCH2 (2/2) M7 × 17.5 998-335 323-990 “For Australia” 308-789 323-979 “For Australia” 308-789 877-371 M5 “For Australia” M5 × 2 “For Australia” 323-133 “104-108” 317-331 M4 × 10 990-430 323-982 “For Australia” 322-919 –––––––– 600-3VV 958-308Z 322-918 323-980 “191-195” M6 ×...
- Page 18 C10FCE2 (1/2)
- Page 19 C10FCE2 (1/2) M6 × 10 307-956 322-957 ”602-607” M6 × 20 M6 × 11 323-208 998-836 322-935 –––––––– 322-936 306-985 318-934 964-851 M4 × 10 322-889 304-043 M10 × 54 322-965 321-551 322-890 322-713 ”609-612” M6 × 15 302-518 301-806 984-528 ––––––––...
- Page 20 C10FCE2 (2/2)
- Page 21 C10FCE2 (2/2) M7 × 17.5 998-335 958-308Z 308-789 323-980 “191-195” M6 × 15 308-789 301-806 323-133 “104-108” 323-986 M4 × 10 M4 × 12 990-430 935-196 322-919 323-985 600-3VV 323-988 322-918 323-989 322-917 323-984 M5 × 16 987-512 940-543 M5 × 10 949-819 322-955 961-729...
- Page 24 Hitachi Koki Co., Ltd. Code No. C99162911 Printed in China...
Need help?
Do you have a question about the C 10FCH2 and is the answer not in the manual?
Questions and answers