
Subscribe to Our Youtube Channel
Related Manuals for Spirit 1612275


Summary of Contents for Spirit 1612275
- Page 1 Owner’s Manual Model No. 1612275 - Assembly - Operation - Adjustments - Parts - Warranty CAUTION: Read and understand this manual before operating unit Retain For Future Reference...
-
Page 2: Table Of Contents
Programmable Features……………………………………………………………………….16 Target Heart Rate……………………………………………………………………………… 19 Using a Heart Rate Transmitter………………………………………………………………. 20 Heart Rate Control Operation………………………………………………………………… 21 Folding & Transport Instructions…………..………………………………………………….22 Parts list and diagram 1612275 ..…………….……………………………………………… 23 General Maintenance.……………….………………………………………………………….27 Manufacturer’s Limited Warranty………………………………………………………………29 ATTENTION- THIS TREADMILL IS INTENDED FOR RESIDENTIAL USE ONLY AND IS WARRWNTED FOR THAT APPLICATION. -
Page 3: Product Registration
The self-addressed product registration card must be completed in full and returned to The self-addressed product registration card must be completed in full and returned to Maurice Pincoffs Canada Inc. Maurice Pincoffs Canada Inc. CUSTOMER SERVICE 1-888-707-1880 1612275 1612275 © © 2007... -
Page 4: Important Safety Instructions
35 or persons with pre-existing health problems. Read all instructions before using any fitness equipment. We assume no responsibility from personal injury or property damage sustained by or through the use of this product. CUSTOMER SERVICE 1-888-707-1880 1612275 © 2007... -
Page 5: Important Electrical Information
Adapter Grounded Outlet Tab of Grounding Metal Screw Screw CUSTOMER SERVICE 1-888-707-1880 1612275 1612275 © © Grounding Pin Grounded Outlet Box 2007 2007... -
Page 6: Safety Tether Cord
NEVER mount or dismount the treadmill while the belt is moving. Spirit treadmills start NEVER mount or dismount the treadmill while the belt is moving. Spirit treadmills start ●... -
Page 7: Hardware List
Phillips Head Bolt (6 pcs) Button Head Socket Bolt (14 pcs) #59.Lubricant (1pc) #30.Safety Key (1pc) #97. Combination M5 Allen Wrench #98..M6 Allen Wrench (1pc) & Phillips Head Screwdriver (1 pc) CUSTOMER SERVICE 1-888-707-1880 1612275 1612275 © © 2007 2007... -
Page 8: Assembly Instructions
Remove all the components from the carton. Please note the instructions on the Velcro strap. Remove all the components from the carton. Please note the instructions on the Velcro strap. Step2. Connect the Lower Computer Cable (38) to the Computer Extension Cable (37). CUSTOMER SERVICE 1-888-707-1880 1612275 1612275 © © 2007... - Page 9 5/16”x15mm Button Head Socket Bolts (94) and 2 pcs of the ψ5/16”x19x1.5T Curved Washers (95) using the Combination M5 Allen Wrench & Phillips Head Screw Driver (97). (95) using the Combination M5 Allen Wrench & Phillips Head Screw Driver (97). CUSTOMER SERVICE 1-888-707-1880 1612275 1612275 © ©...
- Page 10 Attach the Console Support (6) into the left and right Uprights (4,5). Secure with 6 pcs of the 5/16”x15mm Button Head Socket Bolts (94) and 2 pcs of the ψ5/16”x19x1.5T Curved Washers (95) using the Combination M5 Allen Wrench & Phillips Head Screw Driver (97). CUSTOMER SERVICE 1-888-707-1880 1612275 1612275 © ©...
- Page 11 Step 7. Attach the Console Assembly (39) to the Console Support (6). Secure using 6pcs of the M5x15mm Phillips Head Bolts (96) using the Combination M5 Allen Wrench & Phillips Head Screw Driver (97). CUSTOMER SERVICE 1-888-707-1880 1612275 1612275 © ©...
- Page 12 Ensure that all bolts are tightened. NOTE: CUSTOMER SERVICE 1-888-707-1880 1612275 © 2007...
-
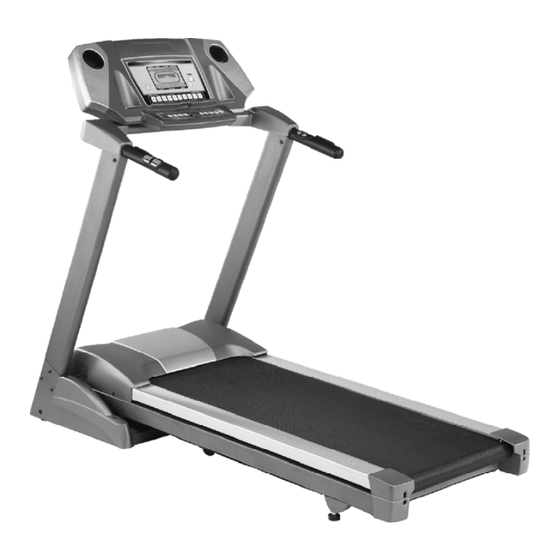
Page 13: Getting To Know Your Treadmill
GETTING TO KNOW YOUR TREADMILL GETTING TO KNOW YOUR TREADMILL Console Safety Key Speed Adjustment switch Handpulse Incline Adjustment Switch Handgrip Tube Handrail Running Belt Wheel Main frame Maximum user weight 330 lbs CUSTOMER SERVICE 1-888-707-1880 1612275 1612275 © © 2007 2007... -
Page 14: Operation Of Your New Treadmill
Distance window will show how many miles (or Kilometers if the treadmill is set to metric readings) the treadmill has gone. The treadmill will then enter idle mode, which is the starting point for operation. CUSTOMER SERVICE 1-888-707-1880 1612275 1612275 © ©... -
Page 15: Incline Feature
You may also choose a more rapid increase / decrease by selecting desired key, 2 through 10, on left hand side of console (incline). The display will indicate incline position as adjustments are made. CUSTOMER SERVICE 1-888-707-1880 1612275 © 2007... -
Page 16: Pulse Grip Feature
(about as much as your television when it is turned off). (2) Remove tether cord. (3) Turn of the main switch on the front of the treadmill, below the motor cover. CUSTOMER SERVICE 1-888-707-1880 1612275 © 2007... -
Page 17: Programmable Features
STEP 3: The Calorie window will now be blinking a bodyweight value. Enter your bodyweight and press Enter. STEP 4: The Calorie window will now be blinking an Age value. Adjust the age and press enter. CUSTOMER SERVICE 1-888-707-1880 1612275 © 2007... - Page 18 This is for the incline programming. Repeat the above process to program all segments for incline. STEP 6: Press the Start button to begin the workout and also save the program to memory CUSTOMER SERVICE 1-888-707-1880 1612275 © 2007...
- Page 19 SPEED AND INCLINE PROFILES CUSTOMER SERVICE 1-888-707-1880 1612275 © 2007...
-
Page 20: Target Heart Rate
With all Spirit Heart Rate Control treadmills, you may use the heart rate monitor feature With all Spirit Heart Rate Control treadmills, you may use the heart rate monitor feature without using the Heart Rate Control program. This function can be used during manual without using the Heart Rate Control program. -
Page 21: Using A Heart Rate Transmitter
2. Adjust the strap as tightly as possible as long as the strap is not too tight to remain comfortable. 3. Position the transmitter with the Spirit logo centered in the middle of your body facing away 3. Position the transmitter with the Spirit logo centered in the middle of your body facing away from your chest (some people must position the transmitter slightly left of center). -
Page 22: Heart Rate Control Operation
STEP 5: The Time window will now be blinking. Adjust the time and press enter. STEP 5: The Time window will now be blinking. Adjust the time and press enter. STEP 6: Press Start to begin program. STEP 6: Press Start to begin program. CUSTOMER SERVICE 1-888-707-1880 1612275 1612275 © © 2007... -
Page 23: Folding & Transport Instructions
1612275 Folding Instructions Do not attempt to move the unit unless it is in the folded and locked position. Be sure the Do not attempt to move the unit unless it is in the folded and locked position. Be sure the power cord is secured to avoid possible damage. -
Page 24: Parts List And Diagram 1612275
227537 1000m/m_Computer Extension Cable 227538 900m/m_Lower Computer Cable 227539 Console Assembly 227540 Receiver, HR Assembly 227542 Button Head End Cap 227543L Frame Base Cap (R) 227543R Frame Base Cap (L) 227544 Front Transportation Wheel CUSTOMER SERVICE 1-888-707-1880 1612275 © 2007... - Page 25 ψ6.5 x 25 x 1T _Concave Washer 227585 M5_Raised Washer 227586 4x12m/m_Self Tapping Screw 227587 5x16m/m_Tapping Screw 227588 5x19m/m_Tapping Screw 227589 5x16m/m_Tapping Screw 227590 3.5x12m/m_Self Tapping Screw 227591 4x38m/m_Self Tapping Screw 227592 3.5x16m/m_Tapping Screw 227593 ψ32 x 1.8T_Solar Cap Nut CUSTOMER SERVICE 1-888-707-1880 1612275 © 2007...
- Page 26 ψ6.5×25×50×1.5T×2.5H_Concave Washer 2275126 ψ5×ψ12×1.0T_Flat Washer 2275127 M3_Split Washer 2275128 Console Gusset 2275135 3×8mm_Self Tapping Screw 2275136 Controller Back Plate 2275137 Chest Strap 2275138 Foot Rail Back Plate 2275139 Console Ground Wire 2275140 Audio Cable CUSTOMER SERVICE 1-888-707-1880 1612275 © 2007...
- Page 27 PARTS DIAGRAM PARTS DIAGRAM CUSTOMER SERVICE 1-888-707-1880 1612275 1612275 © © 2007 2007...
-
Page 28: General Maintenance
1/4 turn at a time. DO NOT OVERTIGHTEN – Over tightening will cause belt damage and premature DO NOT OVERTIGHTEN – Over tightening will cause belt damage and premature bearing failure. bearing failure. CUSTOMER SERVICE 1-888-707-1880 1612275 1612275 © © 2007 2007... - Page 29 TENSION ADJUSTMENTS IS NOT COVERED UNDER THE SPIRIT WARRANTY. BELT / DECK LUBRICATION: Do not re-lube with other than Spirit lubricant. Spirit provides one application with this unit. See your Spirit dealer for additional purchases. The use of some other lubricants may destroy the deck surface or belt and will void warranty.
-
Page 30: Warranty
12 months from the date of purchase. All other obligations or liabilities, including liability for consequential damages are hereby excluded All of the parts for the Spirit Treadmill, shown in figure can be ordered from: MAURICE PINCOFFS CANADA INC., 6050 Don Murie Street, Niagara Falls, Ontario L2E 6X8.
Need help?
Do you have a question about the 1612275 and is the answer not in the manual?
Questions and answers