Epson PP-100II User Manual
Disc producer
Hide thumbs
Also See for PP-100II:
- Technical reference manual (102 pages) ,
- Replacement instruction (2 pages) ,
- Setup manual (2 pages)
Table of Contents
Advertisement
Advertisement
Table of Contents

Related Manuals for Epson PP-100II


Summary of Contents for Epson PP-100II
- Page 1 User’s Guide M000555-00...
-
Page 2: Copyright And Trademarks
Neither Seiko Epson Corporation nor its affiliates shall be liable to the purchaser of this product or third parties for damages, losses, costs, or expenses incurred by purchaser or third parties as a result of: accident, misuse, or abuse of this product or unauthorized modifications, repairs, or alterations to this product, or (excluding the U.S.) -
Page 3: Table Of Contents
Starting EPSON Total Disc Maker ........ - Page 4 Accessing EPSON Total Disc Maker ........
- Page 5 Using EPSON Total Disc Monitor ........
- Page 6 Before Contacting Epson ........
- Page 7 Write Speed ............141 Mechanical.
-
Page 8: Important Notice And Safety Instructions
Important Notice and Safety Instructions Important Note You may use the software to operate the EPSON PP-100II. You may use the EPSON PP-100II to copy materials onto media, including but not limited to CDs, DVDs, and BDs. You agree to respect the rights of copyright owners. EPSON shall have no liability for, and you shall hold EPSON harmless from, any copyright infringement by you or your employees, representatives, or agents. -
Page 9: Choosing A Place For The Product
❏ Do not use a damaged or frayed power cord. ❏ If you use an extension cord with the product, make sure that the total ampere rating of the devices plugged into the extension cord does not exceed the cord’s ampere rating. Also, make sure that the total ampere rating of all devices plugged into the wall outlet does not exceed the wall outlet’s ampere rating. -
Page 10: Using The Product
❏ Avoid places subject to dust, shocks, vibrations, or cigarette smoke. ❏ Leave enough room around the product to allow for sufficient ventilation. ❏ Place the product near a wall outlet where the plug can be easily unplugged. Using the Product Observe the following when using the product: ❏... -
Page 11: Notice For Cd/Dvd/Bd Discs
-Malfunction or repair -Damage due to natural disaster Epson does not hold any responsibility for lost or damaged data, due to causes not limited to those listed above, even the product is under warranty period. Important Notice and Safety Instructions... -
Page 12: Concerning Incidental Loss Arising Out Of Use Of This Product
The connection of a non-shielded interface cable to this product will invalidate the EMC standards of this device. You are cautioned that changes or modifications not expressly approved by Seiko Epson Corporation could void your authority to operate the equipment. Important Notice and Safety Instructions... -
Page 13: Fcc Compliance Statement For American Users
For Canadian Users This Class A digital apparatus complies with Canadian ICES-003. Indication of the manufacturer and the importer in accordance with requirements of directive 2011/65/EU (RoHS) Manufacturer: SEIKO EPSON CORPORATION Address: 3-5, Owa 3-chome, Suwa-shi, Nagano-ken 392-8502 Japan Telephone:... -
Page 14: Warnings, Cautions, And Notes
Warnings, Cautions, and Notes Warnings, Cautions, and Notes in this User's Guide as indicated below have the following meanings. Warnings must be followed carefully to avoid bodily injury. Cautions must be observed to avoid damage to your equipment. Notes contain important information and useful tips on the operation of the product. Important Notice and Safety Instructions... -
Page 15: Chapter 1 Using Your Software
Chapter 1 Using Your Software System Requirements Using the Product Windows requirements To use this product, you must have any of the following Windows operating systems installed. Operating system Windows XP (32bit, SP3 or later) Home Edition/Professional Windows Vista (32bit/64bit, SP2 or later) Home Basic/Home Premium/Business/Enterprise/ Ultimate Windows 7 (32bit/64bit, SP1 or later) - Page 16 Interface USB 2.0 or USB 3.0 ❏ Compatible with USB 2.0 standard ❏ Ensure Hi-Speed USB performance Display XGA (1024 x 768 pixels) or higher 65,536 colors or more Other Making music CD: Requires sound device with appropriate driver installed. Windows Media Player 6.4 or higher must be installed.
-
Page 17: Setting A Working Folder And Log
1. Select Start ( in Windows 7 or Windows Vista) - All Programs (or Programs) - EPSON Total Disc Maker - EPSON Total Disc Setup. The EPSON Total Disc Setup will start. 2. Select Common Setting for Publishing from the Tool menu. -
Page 18: Adding The Product
Adding the Product Use the EPSON Total Disc Setup to add the product (CD/DVD/BD publisher) to the computer. Note: The product must be added when the connection point (port) is set manually. However, the product does not need to be added when the connection point (port) is set automatically. -
Page 19: Setting For Notification Of Job Completion
1. Select Start ( in Windows 7 or Windows Vista) - All Programs (or Programs) - EPSON Total Disc Maker - EPSON Total Disc Setup. The EPSON Total Disc Setup will start. 2. Select Common Setting for Publishing from the Tool menu. -
Page 20: Overview Of Applications
EPSON Total Disc Setup EPSON Total Disc Setup is a utility to register the product to the computer and to set basic settings to publish CDs/DVDs/BDs, such as settings for the publish mode, stackers, and drives. -
Page 21: Getting Information Through Online Help
Getting Information through Online Help You can access online help for EPSON Total Disc Maker from the software or from the Windows Start menu. In window of EPSON Total Disc Maker, EPSON Total Disc Monitor, or EPSON Total Disc Setup, click the button to display online help for each utility. -
Page 22: Getting Information Through Online Help
Windows XP Home Edition/Windows Server 2003: Click Start, Control Panel, then click Printers and Faxes. 2. Right-click EPSON PP-100PRN, then click Printing Preferences in the menu. Getting Information through Online Help You can access online help for items in the printer driver from your application or from the Windows Start menu. -
Page 23: Uninstalling Software
3. Click Uninstall a program (Windows 7, Windows Vista, or Windows Server 2008) or double-click the Add or Remove Programs icon (Windows XP or Windows Server 2003). 4. Choose EPSON Total Disc Maker. 5. Click Uninstall/Change (Windows 7, Windows Vista, or Windows Server 2008) or click Change/Remove (Windows XP or Windows Server 2003). -
Page 24: Introduction
Chapter 2 Publishing Discs Introduction This section guides you through the procedures for creating, printing, and reading discs. Note: For information on discs, see the following section. & See “Discs” on page 135. Turning Power On/off This section describes how to turn on/off power. Turning power on 1. -
Page 25: Overview Of Publish Modes
Overview of Publish Modes Writing data to discs, printing labels that you created/edited, and reading data from discs are called “Publish” in EPSON Total Disc Maker. The product has four kinds of publish modes. Standard Mode This mode uses stacker 1 as the input stacker, and stacker 2, 3, or 4 as the output stacker. -
Page 26: Drive Settings
Batch Mode This mode uses stacker 1 and 2 as the input stackers, and stacker 2 and 3 as the output stackers. You can create up to 100 CDs/DVDs/BDs at once without refilling and taking out discs while publishing. Up to 1000 CDs/DVDs/BDs can be continuously published in a single job by refilling discs and taking out published discs. -
Page 27: Printer Settings
The Number of write retries is a setting to retry writing if a write error occurs. Setting the Number of write retries will enable the job to continue without pausing if a write error occurs. No. of read back errors allowed (only for Read Back mode) Select 0 to 9 for the No. -
Page 28: Notice For Disc Writing And Printing
3. Change the disc. ❏ Moisture on the printable surface may cause smearing. ❏ If you print on the matte label type of Epson specified discs, set Label Type to CD/DVD Premium Label. ❏ When using Epson specified discs, only [1] can be selected for Print Mode setting. -
Page 29: Error Discs
❏ Hold disc by the edge, and do not touch either surface. ❏ The completed job display of EPSON Total Disc Monitor shows the number of successes, number of failures, and number of discs printed. -
Page 30: Precautions For Duplicating Discs
If problems occur, please try using a different CD/DVD/BD source drive for copying. ❏ To copy from the drive using EPSON Total DIsc Maker, please log onto Windows as a user with administrator privileges (belonging to the administrator group). Otherwise, copying is not possible, because certain parts of the drive cannot be accessed with a limited user account. -
Page 31: Notice For Barcode Printing
Notice for Barcode Printing ❏ When printing barcodes and 2D codes, be sure to use Epson brand ink cartridges. ❏ When printing barcodes and 2D codes on discs that are not Epson specified discs, check whether the printed barcodes or 2D codes can be read correctly by a scanner. -
Page 32: Standard Mode
Standard Mode Loading Discs Follow the steps below to load discs. 1. Open the disc cover. 2. Take out stacker 1. 3. Fan a stack of discs to prevent them from sticking together. Be careful not to scratch the recording side of the discs. Publishing Discs... - Page 33 4. Load discs into stacker 1 with the printable side facing up. Caution: ❏ Do not load the discs above the dotted line marked on the stacker; otherwise, the discs or product may be damaged. ❏ Do not mix CDs/DVDs with BDs in the same stacker. Otherwise, a disc pick error can easily occur.
- Page 34 6. If you use stacker 3 for the following cases, insert stacker 3. ❏ When you select stacker 3 as the output stacker. ❏ When you select stacker 2 as the output stacker and you want to eject error discs to stacker 3.
-
Page 35: Accessing Epson Total Disc Maker
To learn how to use EPSON Total Disc Maker, go to the Help menu. Registering Data The following instructions explain how to register data to be written on discs. 1. Start EPSON Total Disc Maker and click Disc on the menu bar of EPSON Total Disc Maker. Publishing Discs... - Page 36 2. Select type of discs to be published from the list, then click Apply. Publishing Discs...
- Page 37 ❏ Clicking Auto Insert Data... enables you to set for Merge data and burn. For details, see Help for EPSON Total Disc Maker. ❏ To access Help for EPSON Total Disc Maker, select Help from the Help menu. Publishing Discs...
-
Page 38: Creating Labels
Creating Labels The following instructions explain how to create labels using templates provided with the software. 1. Click Label on the menu bar of EPSON Total Disc Maker. Publishing Discs... - Page 39 2. Click Template tab and select a label design from the list, then click Apply. Publishing Discs...
- Page 40 3. Make changes on the label as needed in the Background, Edit Item, and Layout tabs. For details, see Help for EPSON Total Disc Maker. Note: To access Help for EPSON Total Disc Maker, select Help from the Help menu. Publishing Discs...
-
Page 41: Making The Stacker Settings
Making the Stacker Settings The following instructions explain how to set stackers. 1. Click Publish on the menu bar of EPSON Total Disc Maker. 2. Click Properties on the Publish screen of EPSON Total Disc Maker or EPSON Total Disc Setup. Publishing Discs... - Page 42 3. Set Stacker Settings. ❏ Publish Mode: Select Standard mode. ❏ Stacker 1: Select the type of discs that you loaded into stacker 1. ❏ Stacker 3: If you want to eject published discs to stacker 2 and error discs to stacker 3, select Use.
-
Page 43: Publishing Discs
Publishing Discs The following instructions explain how to publish discs. 1. Make the publish settings on the Publish screen of EPSON Total Disc Maker. For details, see Help for EPSON Total Disc Maker. Note: To access Help for EPSON Total Disc Maker, select Help from the Help menu. - Page 44 Caution: ❏ Do not open the disc cover while the product is publishing discs, unless the application instructs you to add or remove discs. This may affect write quality or print quality. Also, do not put your hands inside the product while it is beeping, as arm is still moving. ❏...
-
Page 45: External Output Mode
External Output Mode Loading Discs Follow the steps below to load discs. 1. Open the disc cover. 2. Take out stacker 1. 3. Fan a stack of discs to prevent them from sticking together. Be careful not to scratch the recording side of the discs. - Page 46 4. Load discs into stacker 1 with the printable side facing up. Caution: ❏ Do not load the discs above the dotted line marked on the stacker; otherwise, the discs or product may be damaged. ❏ Do not mix CDs/DVDs with BDs in the same stacker. Otherwise, a disc pick error can easily occur.
- Page 47 6. Take out stacker 2. 7. Fan a stack of discs to prevent them from sticking together. Be careful not to scratch the recording side of the disc. 8. Load discs into stacker 2 with the printable side facing up. Caution: ❏...
- Page 48 9. Insert stacker 2. 10. If you select stacker 3 as the output stacker, insert stacker 3. Caution: ❏ Make sure that there are no discs in stackers 3 and 4. ❏ Do not pull out stacker 4. Be sure to lock the lock lever located on stacker 4. Publishing Discs...
-
Page 49: Accessing Epson Total Disc Maker
To learn how to use EPSON Total Disc Maker, go to the Help menu. Registering Data The following instructions explain how to register data to be written on discs. 1. Start EPSON Total Disc Maker and click Disc on the menu bar of EPSON Total Disc Maker. Publishing Discs... - Page 50 2. Select type of discs to be published from the list, then click Apply. Publishing Discs...
- Page 51 ❏ Clicking Auto Insert Data... enables you to set for Merge data and burn. For details, see Help for EPSON Total Disc Maker. ❏ To access Help for EPSON Total Disc Maker, select Help from the Help menu. Publishing Discs...
-
Page 52: Creating Labels
Creating Labels The following instructions explain how to create labels using templates provided with the software. 1. Click Label on the menu bar of EPSON Total Disc Maker. Publishing Discs... - Page 53 2. Click Template tab and select a label design from the list, then click Apply. Publishing Discs...
- Page 54 3. Make changes on the label as needed in the Background, Edit Item, and Layout tabs. For details, see Help for EPSON Total Disc Maker. Note: To access Help for EPSON Total Disc Maker, select Help from the Help menu. Publishing Discs...
-
Page 55: Making The Stacker Settings
Making the Stacker Settings The following instructions explain how to set stackers. 1. Click Publish on the menu bar of EPSON Total Disc Maker. 2. Click Properties on the Publish screen of EPSON Total Disc Maker or EPSON Total Disc Setup. Publishing Discs... - Page 56 3. Set Stacker Settings. ❏ Publish Mode: Select External Output mode. ❏ Stacker 1: Select the type of discs that you loaded into stacker 1. ❏ Stacker 2: Select the type of discs that you loaded into stacker 2. ❏ Stacker 3: If you want to eject published discs to stacker 3, select Output Stacker.
-
Page 57: Publishing Discs
Publishing Discs The following instructions explain how to publish discs. 1. Make the publish settings on the Publish screen of EPSON Total Disc Maker. For details, see Help for EPSON Total Disc Maker. Note: To access Help for EPSON Total Disc Maker, select Help from the Help menu. - Page 58 Caution: ❏ Do not open the disc cover while the product is publishing discs, unless the application instructs you to add or remove discs. This may affect write quality or print quality. Also, for safety reasons, do not put your hands inside the product while it is beeping, as arm is still moving.
-
Page 59: Batch Mode
Batch Mode Loading Discs Follow the steps below to load discs. 1. Open the disc cover. 2. Take out stacker 1. 3. Fan a stack of discs to prevent them from sticking together. Be careful not to scratch the recording side of the discs. Publishing Discs... - Page 60 4. Load discs into stacker 1 with the printable side facing up. Caution: ❏ Do not load the discs above the dotted line marked on the stacker; otherwise, the discs or product may be damaged. ❏ Do not mix CDs/DVDs with BDs in the same stacker. Otherwise, a disc pick error can easily occur.
- Page 61 6. Take out stacker 2. 7. Fan a stack of discs to prevent them from sticking together. Be careful not to scratch the recording side of the discs. 8. Load discs into stacker 2 with the printable side facing up. Caution: ❏...
- Page 62 9. Insert stacker 2. 10. Insert stacker 3. Caution: ❏ Make sure that there are no discs in stackers 3 and 4. ❏ Do not pull out stacker 4. Be sure to lock the lock lever located on stacker 4. Publishing Discs...
-
Page 63: Accessing Epson Total Disc Maker
11. Close the disc cover. Accessing EPSON Total Disc Maker After loading discs into the stackers, access EPSON Total Disc Maker to make settings for writing discs, and create the labels printed on the discs. Click Start ( in Windows 7 or Windows Vista), point to All Programs or Programs. -
Page 64: Registering Data
Registering Data The following instructions explain how to register data to be written on discs. 1. Start EPSON Total Disc Maker and click Disc on the menu bar of EPSON Total Disc Maker. 2. Select type of discs to be published from the list, then click Apply. - Page 65 ❏ Clicking Auto Insert Data... enables you to set for Merge data and burn. For details, see Help for EPSON Total Disc Maker. ❏ To access Help for EPSON Total Disc Maker, select Help from the Help menu. Publishing Discs...
-
Page 66: Creating Labels
Creating Labels The following instructions explain how to create labels using templates provided with the software. 1. Click Label on the menu bar of EPSON Total Disc Maker. Publishing Discs... - Page 67 2. Click Template tab and select a label design from the list, then click Apply. Publishing Discs...
- Page 68 3. Make changes on the label as needed in the Background, Edit Item, and Layout tabs. For details, see Help for EPSON Total Disc Maker. Note: To access Help for EPSON Total Disc Maker, select Help from the Help menu. Publishing Discs...
-
Page 69: Making The Stacker Settings
Making the Stacker Settings The following instructions explain how to set stackers. 1. Click Publish on the menu bar of EPSON Total Disc Maker. 2. Click Properties on the Publish screen of EPSON Total Disc Maker or EPSON Total Disc Setup. Publishing Discs... - Page 70 3. Set Stacker Settings. ❏ Publish Mode: Select Batch mode. ❏ Stacker 1: Select the type of discs that you loaded into stackers 1 and 2. 4. Click OK. Publishing Discs...
-
Page 71: Publishing Discs
Publishing Discs 1. Make the publish settings on the Publish screen of EPSON Total Disc Maker. For details, see Help for EPSON Total Disc Maker. Note: To access Help for EPSON Total Disc Maker, select Help from the Help menu. - Page 72 Caution: ❏ Do not open the covers while the product is publishing discs, unless the application instructs you to add or remove discs. This may affect write quality or print quality. Also, for safety reasons, do not put your hands inside the product while it is beeping, as arm is still moving.
-
Page 73: Read Back Mode
Read Back Mode Loading Discs Follow the steps below to load discs to be read. 1. Open the disc cover. 2. Take out stacker 1. 3. Fan a stack of discs to prevent them from sticking together. Be careful not to scratch the recording side of the discs. - Page 74 4. Load discs into stacker 1 with the printable side facing up. Caution: ❏ Do not load the discs above the dotted line marked on the stacker; otherwise, the discs or product may be damaged. ❏ Do not mix CDs/DVDs with BDs in the same stacker. Otherwise, a disc pick error can easily occur.
- Page 75 6. If you want to eject error discs to stacker 3, insert stacker 3. Caution: ❏ Make sure that there are no discs in stackers 3 and 4. ❏ Do not pull out stacker 4. Be sure to lock the lock lever located on stacker 4. 7.
-
Page 76: Accessing Epson Total Disc Maker
To learn how to use EPSON Total Disc Maker, go to the Help menu. Setting Read Back The following instructions explain how to set read back operation. 1. Start EPSON Total Disc Maker and click Disc on the menu bar of EPSON Total Disc Maker. Publishing Discs... - Page 77 2. Select Read Back from the list, then click Apply. Publishing Discs...
- Page 78 3. Make the read back settings, then click Apply. For details, see Help for EPSON Total Disc Maker. Note: To access Help for EPSON Total Disc Maker, select Help from the Help menu. Publishing Discs...
-
Page 79: Making The Stacker Settings
Making the Stacker Settings The following instructions explain how to set stackers. 1. Click Publish on the menu bar of EPSON Total Disc Maker. 2. Click Properties on the Publish screen of EPSON Total Disc Maker or EPSON Total Disc Setup. Publishing Discs... - Page 80 3. Set Stacker Settings. ❏ Publish Mode: Select Read Back mode. ❏ Stacker 3: If you want to eject error discs to stacker 3, select Error Disc Output Stacker. If you want to eject error discs to stacker 4, select Do not use. 4.
-
Page 81: Publishing Discs
Publishing Discs The following instructions explain how to publish. 1. Set the number of discs to be read for Copies on the Publish screen of EPSON Total Disc Maker. 2. Click the Publish button. Publishing Discs... - Page 82 Caution: ❏ Do not open the disc cover while the product is publishing discs, unless the application instructs you to add or remove discs. This may affect read quality. Also, do not put your hands inside the product while it is beeping, as arm is still moving. ❏...
-
Page 83: Taking Out Discs
Note: ❏ Be sure to let printed discs dry completely before using them or touching the printed surface. Allow Epson specified discs to dry for at least 1 hour and other types of discs for at least 24 hours. Publishing Discs... - Page 84 ❏ If the print position is misaligned, adjust it using the printer driver. For details, refer to the printer driver Help. ❏ If the ink smears, adjust the color saturation. For details, refer to the printer driver Help. ❏ When publishing discs using Batch mode, the number of discs output to stacker 3 is not always the same as the number of discs loaded into stacker 2.
-
Page 85: Pausing Publishing
If you need to pause publishing, follow the instructions below. When you start publishing, the screen of EPSON Total Disc Monitor appears on your computer screen. Select the job you want to pause in the Unfinished Job list, and then select Pause Job from the Job menu or click button. -
Page 86: Resuming Publishing
Resuming Publishing If you need to resume publishing, follow the instructions below. Start EPSON Total Disc Monitor. Select the job you want to resume in the Unfinished Job list, and then select Resume Job from the Job menu or click button. -
Page 87: Canceling Publishing
Canceling Publishing If you need to cancel publishing, follow the instructions below. Start EPSON Total Disc Monitor. Select the job you want to cancel in the Unfinished Job list, and then select Cancel Job from the Job menu or click button. -
Page 88: Priority Publishing
If you need to process a job before the others when more than one job is being published, follow the instructions below. Start EPSON Total Disc Monitor. Select the job you want to give priority to in the Unfinished Job list, and then select Priority Publishing from the Job menu or click button. -
Page 89: Chapter 3 Replacing Ink Cartridges
❏ Epson cannot guarantee the quality or reliability of ink not made by EPSON. ❏ When an ink cartridge is running low, the status is displayed on the EPSON Total Disc Monitor. To check the ink cartridge status, do the following: ❏... -
Page 90: Precautions On Ink Cartridge Replacement
Ink cartridges with low ink status may not be used when reinserted. ❏ Do not refill the ink cartridges. Other products not manufactured by Epson may cause damage that is not covered by Epson's warranties, and under certain circumstances, may cause erratic product behavior. -
Page 91: Replacing An Ink Cartridge
Remove the cartridge, wipe the circuit board with a soft cloth and install it again. ❏ Color adjustment of the product is based on the use of genuine Epson ink cartridges. Use of non-genuine ink cartridges may result in reduced print quality and the product performance may not be optimum. - Page 92 This table describes the status of the lights and the actions you need to take. Lights Action Ink is low. Obtain a replacement ink cartridge. The ink cartridge has reached its replacement time. Replace the used ink cartridge with a new one. : flashing : on To replace an ink cartridge, follow the steps below.
- Page 93 ❏ Do not refill the ink cartridge. Other products not manufactured by Epson may cause damage that is not covered by Epson's warranties, and under certain circumstances, may cause erratic product behavior.
- Page 94 6. Place the new ink cartridge into the slot. Then push the ink cartridge until it clicks into place. 7. When you are finished replacing cartridges, close the ink cartridge cover. Replacing Ink Cartridges...
-
Page 95: Chapter 4 Maintaining Your Product
Chapter 4 Maintaining Your Product Checking the Print Head Nozzles If you find that the printout is unexpectedly faint or that dots are missing, you may be able to identify the problem by checking the print head nozzles. You can check the print head nozzles from your computer by using the nozzle check utility. Using the Nozzle Check Utility Follow the steps below to use the nozzle check utility. -
Page 96: Cleaning The Print Head
If any segment of the printed lines is missing, as shown below, this could mean a clogged ink nozzle. & See “Cleaning the Print Head” on page 96. Cleaning the Print Head If you find that the printout is unexpectedly faint or that dots are missing, you may be able to solve these problems by cleaning the print head, which ensures that the nozzles are delivering ink properly. -
Page 97: Using The Head Cleaning Utility
Using the Head Cleaning Utility <Normal> <Clogged> Follow the steps below to clean the print head using the head cleaning utility. 1. Make sure the product is turned on. 2. Make sure no lights indicate errors and the disc cover is closed. 3. -
Page 98: Using The Product Buttons
Using the Product Buttons Follow the steps below to clean the print head using the product buttons. 1. Make sure the PC is turned on. 2. Make sure the product is turned on. 3. Make sure no lights indicate errors and the disc cover is closed. 4. -
Page 99: Correcting The Printing Position
1. Make sure an unprinted disc is inserted in stacker 1. 2. Make sure no lights indicate errors and the disc cover is closed. 3. Access the printer driver. See “Accessing the Printer Driver” on page 21. 4. Click the Utility tab, then click the Print Head Alignment button. 5. -
Page 100: Cleaning Your Product
Cleaning Your Product Cleaning the Exterior of the Product To keep your product operating at its best, clean it thoroughly several times a year by using the following procedure. Caution: ❏ Never use alcohol or thinner to clean the product. These chemicals can damage the product. -
Page 101: Cleaning The Filter
1. Make sure the product is turned off and all the lights are off, and then unplug the power cord from the electrical outlet. 2. Open the disc cover, and remove the stackers from the product. 3. Use a soft, clean cloth to carefully remove any dust or dirt from the stackers and inside of the product. -
Page 102: Getting Maintenance Information
2. Click Start ( in Windows 7 or Windows Vista), point to All Programs or Programs. Point to EPSON Total Disc Maker, and then click EPSON Total Disc Setup. 3. Select CD/DVD/BD Publisher, and then click Properties. 4. Click the Maintenance Info tab. -
Page 103: Replacing The Maintenance Box
❏ When it is almost time to replace the maintenance box, a message notifying you that it is almost time to replace it is displayed once per day when you start up EPSON Total Disc Monitor. ❏ When it is time to replace the maintenance box, all the Ink lamps flash rapidly, and a message notifying you that it is time to replace it is displayed on EPSON Total Disc Monitor. -
Page 104: Transporting Your Product
Caution: ❏ Both drive 1 and drive 2 must be installed. Otherwise the product will not operate. ❏ Do not use other drives than the Epson exclusive optional drive. & See “Consumables and Options” on page 134. ❏ Before replacing the drives, be sure to turn off the product, and then unplug the power cable from the wall outlet. - Page 105 5. Open the ink cartridge cover. Secure the ink cartridges with tape; then close the ink cartridge cover. 6. Close the disc cover and stacker 4 tray. Secure them with tape. 7. Attach the protective materials to both sides of the product. 8.
-
Page 106: Chapter 5 Troubleshooting
The information that you need to diagnose and solve most common problems is provided by Help, the control panel, and the EPSON Total Disc Monitor Utility. Refer to the appropriate section below. -
Page 107: Error Associated With Disc Transfer
: on, : off, : flashing, : flashing fast Error associated with cover Lights Stacker Conditions/Remedies Power Busy Error Disc cover or ink cartridge cover open Close covers. Job is paused because disc cover or ink car- tridge cover was opened while processing the job Wait for the job to resume. -
Page 108: Error Associated With Stacker
Lights Stacker Conditions/Remedies Power Busy Error Disc transfer error Turn off the product and remove the disc. If the same error occurs frequently, contact your dealer. Arm failed to release disc Turn off the product and remove disc. Do not remove disc from the arm by hand if arm is picking up the disc. - Page 109 Lights Stacker Conditions/Remedies Power Busy Error Stacker 3 is not correctly inserted in Batch mode or when stacker 3 is set to: ❏ Use in Standard mode ❏ Output Stacker in External Output mode ❏ Error Disc Output Stacker in Read Back mode Make sure stacker 3 is correctly inserted.
-
Page 110: Error Associated With Ink
Lights Stacker Conditions/Remedies Power Busy Error Stacker 4 is full Remove published discs from stacker 4. Stacker 4 is open Close stacker 4. Error associated with ink Lights Stacker Conditions/Remedies Power Busy Error Ink low Obtain a replacement ink cartridge. To determine which cartridge is low, check the ink cartridge status. -
Page 111: Error Associated With Printer
Error associated with printer Lights Stacker Conditions/Remedies Power Busy Error The maintenance box has reached its replacement time or it is not installed correctly. Replace the maintenance box or reinstall it. If the maintenance box is not recognized even if it is installed correctly, there may be dirt on the green circuit board. - Page 112 Disc may have a problem. Replace the disc and resume job. If there is a problem with the drive, change the drive with EPSON Total Disc Setup and resume the job. Check if the drive has reached the end of its service life.
-
Page 113: Epson Total Disc Monitor
There are three ways to access EPSON Total Disc Monitor: ❏ When you send a job to the product, EPSON Total Disc Monitor appears. ❏ In the EPSON Total Disc Maker window, click the Publish button. From the Tool menu, select Start Total Disc Monitor. - Page 114 Status Drive/Printer/ Stacker Status EPSON Total Disc Monitor provides the following information: ❏ Job List: You can check a list of jobs (up to 1000 for Unfinished Job and 50 for Finished Job) and its information, and also you can cancel, pause, and restart unfinished jobs.
-
Page 115: Disc Or The Disc Tray Does Not Feed Correctly
Disc or the Disc Tray Does Not Feed Correctly Disc Does Not Feed Remove the stack of discs and make sure of the following: ❏ The disc is not damaged. ❏ The disc is not too old. See the instructions that came with the disc for more information. -
Page 116: Multiple Disc Feeds
Multiple Disc Feeds ❏ Make sure the disc stack fits under the red line in the stacker. ❏ Make sure none of the discs are damaged. ❏ Remove the stack of discs and make sure the discs are not too thin. &... - Page 117 3. Push the printer tray. 4. Open the disc cover, remove all the discs inside, and then close the disc cover. 5. Reinstall the maintenance box and close the maintenance box cover. 6. Plug the power cable into the wall outlet and turn on the product. The printer tray automatically closes.
-
Page 118: Writing/Reading Problem
❏ The product is on a flat, stable surface that extends beyond the base in all directions. The product will not operate properly if it is tilted. Writing/Reading Problem Cannot Write to/Read from the Disc Avoid using the product where dust or smoke is abundant. It may result in write/read error. If a disc write/read error occurs frequently, check the following: ❏... -
Page 119: Print Quality Problems
Print Quality Problems If you are having a print quality problem, then compare it with the illustrations below. Click the caption under the illustration that best resembles your printout. Good sample Good sample “Horizontal Banding” on page 120 “Vertical Misalignment” on page “Horizontal Banding”... -
Page 120: Horizontal Banding
& See “Cleaning the Print Head” on page 96. ❏ Use ink cartridges within six months after opening the packages. ❏ Use genuine Epson ink cartridges. ❏ Check the H Ink light. If the light is on, replace the appropriate ink cartridge. -
Page 121: Incorrect Or Missing Colors
& See “Replacing an Ink Cartridge” on page 91. Blurry or Smeared Printout ❏ Use genuine Epson ink cartridges. ❏ Make sure the product is on a flat, stable surface that extends beyond the base in all directions. The product will not operate properly if it is tilted. -
Page 122: Miscellaneous Printout Problems
Miscellaneous Printout Problems Incorrect or Garbled Characters ❏ Clear any stalled print jobs from the Windows Spooler. ❏ Turn off the product and computer. Make sure the product’s interface cable is securely plugged in. ❏ Uninstall the printer driver, then reinstall it. &... -
Page 123: Printing Is Too Slow
❏ Uninstall the printer driver, then reinstall it. & See “Uninstalling Software” on page 23. Printing is too Slow ❏ Make sure the label type selected in the printer driver is appropriate for the type of disc loaded in the product. &... -
Page 124: Lights Came On And Then Went Out
Lights Came On and then Went Out The product’s voltage may not match the outlet rating. Turn off the product and unplug it immediately. Then check the label on the back of the product. Caution: If the voltage does not match, DO NOT PLUG YOUR PRODUCT BACK IN. Contact your dealer. -
Page 125: Maintenance Box Nearly Full Message Is Displayed By The Software
Total Disc Maker. ❏ The output device may not be recognized in an environment with Windows Media Player 7 installed. In this case, uninstall EPSON Total Disc Maker and restart the computer, then reinstall EPSON Total Disc Maker. -
Page 126: The Product Is Not Recognized
The Product is not Recognized If the product is not recognized with EPSON Total Disc Setup after if even either one of the drives is replaced, the drive may not be inserted correctly. Turn off the product, disconnect the power cable from the wall outlet, and then firmly push the replaced drive completely inside. -
Page 127: Appendix A Where To Get Help
Contacting Customer Support Before Contacting Epson If your Epson product is not operating properly and you cannot solve the problem using the troubleshooting information in your product documentation, contact customer support services for assistance. If customer support for your area is not listed below, contact the dealer where you purchased your product. -
Page 128: Help For Users In The Europe (Emea)
Help for Users in the Europe (EMEA) Contacts for information, support, and services are: Web site URL: http://www.epson-europe.com Or contact your local distributor or Epson sales company. If you need the latest drivers, FAQs, manuals, or other downloadable, access the site at: http://download.epson-biz.com/?service=dp... - Page 129 Epson Singapore Pte Ltd 1 HarbourFront Place #03-02 HarbourFront Tower 1 Singapore 098633 Helpdesk: 6586 3111 www.epson.com.sg Epson Malaysia Sdn Bhd 3rd Floor, East Tower, Wisma Consplant 1, No.2 Jalan SS 16/4, 47500 Subang Jaya, Selangor DE, Malaysia Tel: 03-5628 8288...
-
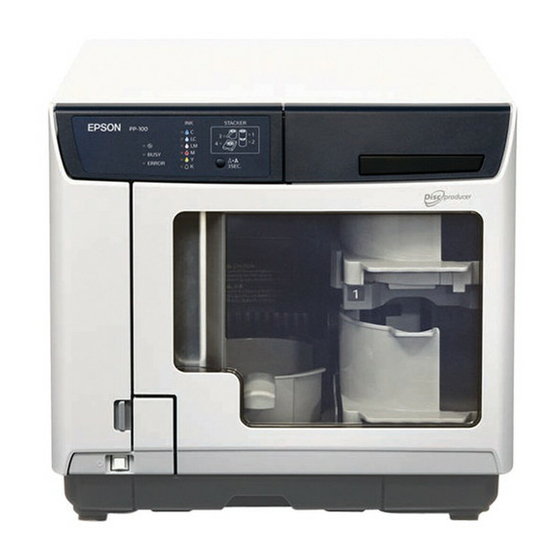
Page 130: Appendix B Product Information
Appendix B Product Information Product Parts and Control Panel Functions Product Parts a. Ink cartridge cover: Secures the ink cartridges. Open only when installing or replacing ink cartridges. b. Control panel: Use the button and monitor the lights to control your product. See the next section for details. - Page 131 e. AC inlet: Plug in the power cord. USB connector: Connects a USB cable from your computer to the product. g. Interface cable locking saddle: Use this for directing and gathering the cable. h. Air vent: Leave at least 10 cm (3.94") between the back of the product and the wall for ventilation.
- Page 132 j k l Drive 1: Writes/reads data on the recording surface of discs. k. Arm: Transports discs. Stacker 1: Use stacker 1 as a disc input stacker. Holds up to 50 discs. m. Stacker 2: Use stacker 2 as a disc input or output stacker. Holds up to about 50 discs. n.
-
Page 133: Control Panel
Control Panel Buttons Button Function Press and hold for 3 seconds to clean the print head. Cleaning Lights Light Description On when the product is on. Flashes when the product is initializing, after replacing an ink cartridge, charging ink, or cleaning the print head. Power Flashes when jobs are processed. -
Page 134: Consumables And Options
Light Magenta PJIC3(LM) C13S020449 Magenta PJIC4(M) C13S020450 Yellow PJIC5(Y) C13S020451 Black PJIC6(K) C13S020452 Maintenance box PJMB100 C13S020476 BD Drive BDR-206PBE-2 C32C891001 Epson also offers the specified CD-R, DVD-R, and BD-R discs for all your writing and printing needs. Product Information... -
Page 135: Technical Specifications
❏ Since the quality of any particular brand or type of disc may be changed by the manufacturer at any time, Epson cannot attest to the quality of any brand or type of disc. Always test samples of disc stock before purchasing large quantities or printing large jobs. - Page 136 ❏ Do not apply excess force, like pinching with a clip, or bend. ❏ Do not attach an adhesive sticker to the disc. This may result in the disc being unable to record or play. ❏ Do not use in a place where lots of dirt and dust are present. ❏...
- Page 137 Printable area The printable area is the area available for label printing. The printable area can be set from the Set Inner/Outer Diameter screen of EPSON Total Disc Maker. In the Set Inner/Outer Diameter screen, you can select Standard, Wide, or set manually.
- Page 138 Printing on sections outside the printable area may damage your CD/DVD/BD drive. ❏ The EPSON Total Disc Maker can set between an inner diameter of 18 mm and an outer diameter of 119.4 mm (0.71 to 4.70"). However, printing outside the printable area (45 to 116 mm) may result in sticking, staining of the disc tray, peeling of print, and blurring of print.
-
Page 139: Ink Cartridges
❏ Use the ink cartridge before the expiration date printed on its package. ❏ Do not refill the ink cartridge. Other products not manufactured by Epson may cause damage that is not covered by Epson's warranties, and under certain circumstances, may cause erratic behavior. -
Page 140: Job Processing
Job Processing Write and print 30 discs/hr processing When using EPSON specified CD-R, speed drive speed of 40x, writing 600 MB data, and Speed/Bidirectional printing. 15 discs/hr When using EPSON specified DVD-R, drive speed of 12x, writing 3.8 GB data, and Speed/Bidirectional printing. -
Page 141: Write Speed
*1: If you select 2.4x for DVD-R/DVD-R DL, write speed will be set to 2x. *2: If you select 2x for DVD+R/DVD+R DL, write speed will be set to 2.4x. *3: 8x write speed is possible only when Epson BDs specified for 8x write speed are used. Mechanical... -
Page 142: Environmental
Environmental Temperature Operation: 10 to 35 °C (50 to 95 °F) Storage: -20 to 40 °C (-4 to 104 °F) 1 month at 40 °C (104 °F) Humidity Operation:* 20 to 80% RH Storage:* 5 to 85% RH *1 Without condensation Standards and Approvals Safety UL60950-1... -
Page 143: Lifetime
Lifetime Maintenance box life: About 30,000 discs printed The maintenance box is estimated to need replacing after about 30,000 discs. Based on printing 3,000 discs per month, bidirectional. Actual results will vary based on such factors as images printed, print settings, media type, frequency of use, and temperature.
Need help?
Do you have a question about the PP-100II and is the answer not in the manual?
Questions and answers