Table of Contents
Advertisement
OWNER'S MANUAL & OPERATING INSTRUCTIONS
Enter the Serial Number of your new saw in the space below.
Serial Number:
CAUTION:
Read all safety and operating instructions before using this equipment
NOTE:
For your (1) one year warranty to be effective, complete the warranty card
(including the Serial Number) and mail it within 60 days or you can do so online at
www.iqpowertools.com.
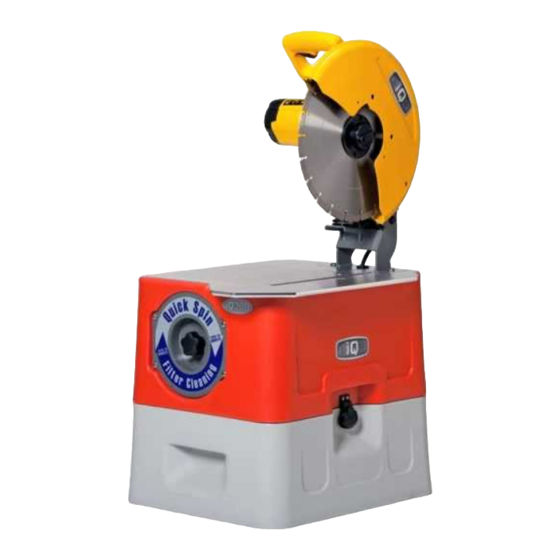
IQ 360 - Dust Control Chop Saw
Advertisement
Table of Contents
Troubleshooting

Related Manuals for IQ Power Tools IQ 360


Summary of Contents for IQ Power Tools IQ 360
- Page 1 IQ 360 - Dust Control Chop Saw OWNER’S MANUAL & OPERATING INSTRUCTIONS Enter the Serial Number of your new saw in the space below. Serial Number: CAUTION: Read all safety and operating instructions before using this equipment NOTE: For your (1) one year warranty to be effective, complete the warranty card (including the Serial Number) and mail it within 60 days or you can do so online at www.iqpowertools.com.
- Page 2 NOTES...
-
Page 3: Table Of Contents
INTRODUCTION SPECIFICATIONS: We at IQ Power Tools wants to congratulate you on select- Product Specifications ing the IQ 360 Dust Control Chop Saw. We are certain that you will be pleased with your purchase. IQ Power SAFETY: Tools takes pride in manufacturing the most innovative Safety Messages tools and equipment in the industry. -
Page 4: Product Specifications
IQ 360 Dust Control Chop Saw The IQ 360, is engineered as a 14” dry saw. This saw is capable of cutting brick and masonry up to 3-1/2” in Height; the blade has a five (5) inch cutting depth. Motor and Weight Specifications: Motor and weight specifications for the IQ 360 are listed in Table 2 below. - Page 5 SAFETY Read and follow ALL safety, operating and maintenance instructions. Failure to read and follow these instructions could result in damage and/or reduced equipment life. SAFETY MESSAGES: The messages below are to inform the user about potential hazards that could lead to injury, death and/or equipment dam- age.
- Page 6 The IQ 360 is very effective dust control saw but, your risk from these exposures varies depending on how often you do this type of work. To reduce your exposure to these chemicals, work well in a well-ventilated area, and work with...
-
Page 7: Electrical Requirements & Grounding Instructions
ELECTRICAL REQUIREMENTS & GROUNDING INSTRUCTIONS In order to prevent potential electrical shock and injury, the following electrical safety precautions and symbols should be followed at all times! WARNING In case of a malfunction or breakdown, grounding provides a path of least resistance for electric current to reduce the risk of electric shock. -
Page 8: Unpacking, Transport And Assembly
Lock the Cutting Head in the DOWN position. Due to its light construction, the IQ 360 is designed to be carried by the handles at the front & back of the saw. Simply lock (1) the spring assisted Cutting Head in position (2), grasp the lower front and rear cross members (3,4). Lift and... -
Page 9: Setup, Adjustment & Operation
If an extension cord is used, first verify it meets the re- ensure the generator meets the following quirements of TABLE 1 (page 7). Plug the IQ 360 into minimum requirements listed in Table 4: the extension cord; plug the extension cord into a Ground Fault Circuit Interrupter (GFCI). -
Page 10: Setup
SETUP, ADJUSTMENT & OPERATION Chop Saw: Features A. Lock Pin B. Blade C. Guard D. Wheel lock lever E. Depth Stop bolt F. Trigger Switch To Carry: Fold down unit to position where you can carry the saw. Push in lock pin (A) to lock arm down. Unlocking: To unlock tool and raise head, depress motor arm slightly and pull lock pin (A) out. -
Page 11: Setup
SETUP, ADJUSTMENT & OPERATION CUTTING CAPACITY: The IQ 360 provides a cutting capacity of pieces that are 3.5” Tall Maximum –12” Long Maximum. CUTTING: A Chop Cut is performed by cutting completely through an object in one pass. ... -
Page 12: Maintenance & Troubleshooting
MAINTENANCE & TROUBLESHOOTING MAITNENANCE: GENERAL MAINTENANCE: The following maintenance should be performed following each use. Use light oil, such as WD-40 or 3-in-1 when lubri- cating parts. Lubricate the Cutting Heading Torsion Spring. WARNING Turn Off and unplug the tool. Be sure the Trigger switch is in the OFF position. -
Page 13: Maintenance
MAINTENANCE & TROUBLESHOOTING MAITNENANCE: REMOVE AND REPLACE FILTER: NOTE It is HIGHLY recommended that the filter element be replaced EVERY year. Your filter is provided with a filter date and telephone number to place new order. To remove & replace filter, remove filter spin knob by turning counterclockwise while securing filter from rotation. ... -
Page 14: Troubleshooting
MAINTENANCE & TROUBLE SHOOTING TROUBLESHOOTING GUIDE: TOOL WILL NOT START: What’s wrong? What to do… 1. Tool not plugged in. 1. Plug in saw. 2. Fuse blown or circuit breaker tripped. 3. Have cord replaced by authorized service center. 3. Brushes worn out 4. -
Page 15: Exploded View & Parts List
EXPLODED VIEW AND PARTS LIST... - Page 16 EXPLODED VIEW AND PARTS LIST...
- Page 17 EXPLODED VIEW AND PARTS LIST...
- Page 18 EXPLODED VIEW AND PARTS LIST...
-
Page 19: Warranty
Warranty period specified above, and shall include proof of purchase. During said Warranty period IQ Power Tools, at its option, either replace or repair, at no charge to the original purchaser, any parts or components that are found to be defective by IQ Power Tools.
Need help?
Do you have a question about the IQ 360 and is the answer not in the manual?
Questions and answers