Table of Contents
Advertisement
Advertisement
Table of Contents

Related Manuals for Novation SL MkII


Summary of Contents for Novation SL MkII
- Page 1 SL MkII USER GUIDE – F IrM wa re V e rSIon 1.0 Rev-01...
-
Page 2: Table Of Contents
Power-UP CaLIbratIon ..............8 SL MkII SEtUP EXAMPLES ..............9 SoFtware ControL ..............9 Hardware ControL ..............9 SL MkII aS MIdI InterFaCe ............9 AUtoMAP MoDE VS ADVAnCED MoDE ..........10 AUtoMAP MoDE ................11 SeLeCtIng aUtoMaP Mode ............11 aUtoMaP Mode - SySteM bUttonS ........... 11 aUtoMaP teMPLate oVerVIew ........... - Page 3 Pot PICk-UP .................22 teMPLate keyboard ZoneS ............22 teMPLate roUtIng SUb MenU ............24 keyboard CHanneL & Port ............24 CoMMon CHanneL & Port ............24 teMPLate groUPIng SUb MenU ..........24 ControL edIt oVerVIew .............24 GLoBAL MEnU BUtton ..............25 oPtIonS SUB MEnU ................ 25 MeMory ProteCt ...............25 Pot PICk-UP .................25 dISPLay tIMe ................25...
- Page 4 ControL LabeL ................31 VaLUe range ................31 ADDItIonAL oPtIonS foR BUttonS onLy ........ 32 dISPLay tyPe ................32 bUtton tyPe:................32 norMaL ..................32 MoMentary ................32 toggLe ..................32 SteP ....................32 GEnERAL ContRoL EDIt SEttInGS ..........32 ControL edIt Port & CHanneL SettIngS ........33 CC nUM ..................33 ControL edIt Pot PICk-UP Mode ..........33 Xy PAD ContRoL EDIt ..............
-
Page 5: Introduction
Welcome to the SL MK II Guide. This guide will introduce you to the SL MkII hardware and give you information on choosing how best to use the SL MkII for your software and / or hardware studio set-up, take you through the SL MkIIs Menu system and give detailed information on creating your own templates. -
Page 6: Hardware Overwiew
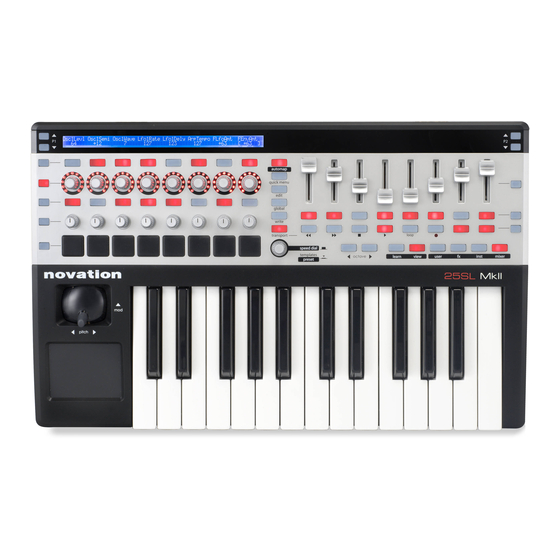
HARDWARE oVERVIEW The SL MkII 25, 49 and 61 note versions all have the same front panel controls and rear panel connections. ASSIGnABLE ContRoLS These are controls that can be assigned to parameters of the software or hardware you are controlling: 1) 8 touch sensitive endless rotary encoders with LED rings: These controls have no end points, so offer full 360˚... -
Page 7: Non-Assignable Controls
15) Speed Dial /Template/Preset knob: The Speed Dial function acts as a way of controlling the computers mouse using the SL MkII hardware. When this button is pressed down it acts as a template selector (when in Advanced mode) and as a preset selector (Automap mode). -
Page 8: Rear Panel Connections
5) Expression pedal Socket: Use to connect an expression pedal. Note that a 3 pin jack connector must be used. 6) MIDI port 2 out socket: Use to connect the SL MkII to the MIDI input of an external device using a 5pin DIN MIDI cable. -
Page 9: Sl Mkii Setup Examples
PSU (optional) MIDI To use the SL MKII with your MIDI hardware, you will need to power the SL MkII with a 9 volt 1000mAmp DC PSU - center pin positive (not supplied). Connect a MIDI Cable (5pin DIN) from the SL MkII MIDI Out 1 port to the MIDI In port on your hardware. -
Page 10: Automap Mode Vs Advanced Mode
Advanced Mode (Led off) If you are going to use your SL MkII without a computer then you must use ‘Advanced mode’. In fact, if you will only ever use your SLMkII in this way you can go straight to the Advanced Mode chapter of this user guide. -
Page 11: Automap Mode
– opens or hides the Automap HUD window • Learn - used for assigning and mapping parameters to SL MkII controls. • Group buttons - User, fx, inst and mixer allow the user to browse and load up the corresponding mappings. -
Page 12: Automap Template Overview
AUtoMAP tEMPLAtE oVERVIEW When in Automap Mode (Led On), a unique template is used. This template is separate from the built in 32 templates in advanced mode. All highlighted hardware controls displayed in the image below are available for controlling software parameters via Automap. -
Page 13: Ports
The SL MkII connects to the computer via a single USB cable, however this USB connection actually consists of 3 sub-connections called ‘ports’. Port 1 This port will be used a lot as it sends messages from the SL MkII Keyboard, Pitch / Modulation Stick and Sustain and Expression Pedals. Port 2 Is generally reserved for special templates in advanced mode, but can be also used in more complex Advanced mode set-ups. -
Page 14: Software Set-Up Examples
SoftWARE SEt-UP EXAMPLES Automap for Cubase, Nuendo, Sonar, Tracktion Port 1 MIDI/Instrument Track Port 2 DAW Mixer Automap Port Plug-in MIDI notes from the keyboard are sent on Port 1 to a MIDI / Instrument track. Automap Server controls the DAW Mixer and hosted plug-ins directly *Note other DAWs are being constantly added to this set-up configuration Automap for Pro Tools, Digital Performer, Logic Pro, Reaper Port 1... -
Page 15: Automap For Hardware Control
Before you move on to the Advanced Mode section of this guide, you should know that Automap MIDI can also be used to hardware MIDI devices by routing MIDI CC data to the SL MkII MIDI Ports (or any other MIDI interface connected to your computer). -
Page 16: Advanced Mode
Advanced mode includes 32 pre-built templates for controlling both hardware units and some software. All templates have been laid out intuitively with all controls labelled, but for full information on advanced mode templates, please check the Novation Answerbase: www.novationmusic.com/answerbase SELECtInG tEMPLAtES To switch between the 32 Advanced mode templates, press the speed dial knob. -
Page 17: Advanced Mode Template Overview
Sustain A ‘Template’ in the SL MkII is a layout of controls stored inside of the SL MkII memory. They are remembered even when you turn the unit on and off. All of the hardware controls are used to send out MIDI data of some kind with the exception of the following: Automap System Buttons –... -
Page 18: Hardware Control
HARDWARE ContRoL In Advanced mode, MIDI data can be sent to either one of the 2 MIDI output ports You can set up the templates so that all controls in the template are sent to only one or both of the MIDI output ports. SoftWARE AnD HARDWARE ContRoL Port 1 DAW/ Sequencer... -
Page 19: Special Templates For Ableton Live & Reason
Ableton Users Note: VST and AU plug-ins can be controlled using the Ableton template (as shown in the above diagram), but can also be controlled using Automap. Press the Automap Button on the SL MkII to switch between the Automap and Ableton (advanced) Template. -
Page 20: Menu Overview
The main Menus are: Global, Edit and Write nAVIGAtInG MEnUS Navigating menus and selecting menu items is done using a variety of controls on your SL MkII. To enter a menu, press the corresponding menu button. To exit a menu, press the same button again. -
Page 21: Quick Menu
QUICk MEnU The Quick menu contains mainly commonly used fucntions: Press the quick menu button and the following options will be displayed on the SL MkII LCD screen. Bank Use to output a bank change message from the template Keyboard Port... -
Page 22: Edit Menu Button
Normally the SL MkII is set so that the entire keyboard outputs on a single MIDI channel. Using Zones, the keyboard can be split in to 4 separate or overlapping regions. Each Zone can have its own MIDI channel, port, and keyboard range. - Page 23 Note that the SL MkII has a channel aftertouch mechanism (not polyphonic aftertouch) meaning that any keyboard key you press, whether it is within the zone range or not, will cause aftertouch messages to be sent using the MIDI channel and...
-
Page 24: Template Routing Sub Menu
The above controls follow the individual settings as set in Keyboard Zones menu. The settings in the Edit menu are ignored. Template Routing Sub Menu Although it is possible for the user to edit the Automap Template from the SL MkII, editing the following settings for the Automap Template should NOT be done. -
Page 25: Global Menu Button
This applies to Advanced Mode (non-Automap) templates. If this is set to ‘ON’ then the SL MkII will automatically store the value of each control when you switch away from the currently selected template and restore those values when you select that template again. If this is set to ‘OFF’ then the SL MkII will only store control values when you manually write the template. -
Page 26: Transport
USB port1 will be displayed as ’SL Mk II (port1)’ when selecting the output port from your DAW software. MIDI To - MIDITo MIDI data received at the MIDI In port on the back of the SL MkII can be routed to either USB ports and / or either MIDI Out ports. -
Page 27: Midi In To
Template, Dump The first two options on this page allow you to dump templates in sysex format from the SL MkII to your computer or another MIDI device for backing up. The first option allows you to dump a single template. Rotate the encoder to select which template you want to dump (range is Current, 1-33), then press the button above the encoder to send the template. -
Page 28: Send Globals
Press the buttons below ‘Send’ or ‘Receive’ on the left-hand display to transmit or listen for an operating system (OS) dump on the MIDI IN and OUT connectors on the back of the SL MkII. You will be asked to confirm that you want to dump or update the OS before it will transmit or accept an OS dump. -
Page 29: Aftertouch Calibration
Press the bottom and top keyboard keys at the same time. ‘Octaves’ and the number of octaves on the keyboard (2, 3 or 5) will appear on the display to show that the SL MkII has recognised the correct keyboard size. This should only need to be done if the LCD shows the incorrect number of octaves when the SL MkII is powering up. -
Page 30: Creating & Editing Advanced Mode Templates
PLEASE REMEMBER THAT ALL TEMPLATE EDITING MUST BE SAVED BEFORE YOU CHANGE TEMPLATE OR TURN OFF YOUR SL MkII OTHERWISE ANY CHANGES MAYBE LOST. When you have finished editing you should remember to press the write button. The LCD displays the option to rename the template and choose the template position. -
Page 31: Additional Options For Encoders Only
High Value will be set to the highest possible value. In this case the control will affect a parameter throughout its whole range. Adjust these settings if you want the control on the SL MkII to affect a parameter though only part of its range. -
Page 32: Additional Options For Buttons Only
ADDItIonAL oPtIonS foR BUttonS onLy DispType (Display Type): Control value displayed as either ON or OFF. The low value setting determines the ON value and the high value setting determines the OFF value. This is best suited to a bi-state parameter where you want to see whether it is in an on or off state e.g. -
Page 33: Control Edit Port & Channel Settings
MidiChan (MIDI Channel): This option sets the MIDI Channel on which the data will be transmitted. This can be set to a value between 1 and 16, or to ‘KeybCHAN’ or ‘ComnCHAN’. Like the ‘KeybPORT’ and ‘ComnPORT’ options for the Ports setting, ‘KeybCHAN’... -
Page 34: Non-Registered Parameter Number (Nrpn)
Name: This setting can be found on the second page of control settings so scroll up to access it. Here you can set the name for the control that appears on the SL MkII displays. The control name can be a maximum of 8 characters long. -
Page 35: System Exclusive (Sysex)
To edit the value of each of the non-variable bytes in the sysex message scroll up to the sysex message page. All bytes are displayed in hexadecimal format. By default the SL MkII will place an F0h at the start and F7h at the end of the message and set all other non-variable bytes to 00h. -
Page 36: Note On / Off
notE on/off (notE) The Ports, MidiChan, and Name settings are the same as for Control Change (CC) so see that section for information on these settings. Note: This sets the MIDI note value that the control will transmit (range C-2 to G8). The Note setting will be displayed as a MIDI note value by default but you can toggle the display format between note value, decimal and hexadecimal by pressing the ENCODER ROW-SELECT button. -
Page 37: Drum Pad Note
If you are recording notes into a sequencer then you will need to make sure that you are sending MIDI clock from the sequencer to the SL MkII and that the SL MkII is set to sync to incoming MIDI clock.
Need help?
Do you have a question about the SL MkII and is the answer not in the manual?
Questions and answers