Table of Contents
Advertisement
Quick Links
Advertisement
Table of Contents

Related Manuals for Novation FLkey Mini


Summary of Contents for Novation FLkey Mini
- Page 1 Version 4.0 User Guide...
-
Page 2: Table Of Contents
Contents Introduction ..........................4 Key Features ...........................5 Box Contents ..........................5 Getting Started ........................6 Connecting FLkey with a Computer ....................6 Easy Start ............................6 Updating your FLkey ........................7 Support ...........................7 Hardware Overview ........................8 Working with FL Studio ......................10 Installation ..........................10 Manual Installation ........................10 Transport controls .........................11 Preset Navigation .........................12 External Connections ......................12... - Page 3 Focusing FL Studio’s Windows .....................24 Note Repeat ...........................25 To use Note Repeat........................25 Change the Rate ..........................25 Set the Tempo ..........................26 Change the velocity of the notes/drum hits .................26 Standalone Features .......................27 Transpose ..........................27 Octave Buttons ........................28 Scale Mode ...........................29 Shift Button ...........................31 Latching Pages ........................32 Control Pages ........................32 Transpose Controls ......................32...
-
Page 4: Introduction
In this user guide, you will find all the information you need to get started with your new FLkey Mini. We’ll provide you with guides on how to set up your device with FL Studio, script features in FL Studio, and how to make the most of FLkey Mini’s standalone features. -
Page 5: Key Features
• Expression: 25 velocity-sensitive mini-keys and 16 velocity-sensitive RGB pads. • Preset browsing: Find your favourite presets from Image-Line plugins directly from FLkey Mini. • Custom Modes: Assign custom controls on FLkey Mini to tailor your music production workflow. Box Contents •... -
Page 6: Getting Started
Getting Started Connecting FLkey with a Computer FLkey is USB bus-powered, it turns on when you connect it to your computer with a USB cable. Included USB Cable Easy Start The ‘Easy Start Tool’ supplies a step-by-step guide to setting up your FLkey. This online tool guides you through FLkey’s registration process and accessing the software bundle. -
Page 7: Updating Your Flkey
Updating your FLkey Novation Components manages updates for your FLkey. To confirm you have the latest firmware and to update your FLkey: 1. Go to components.novationmusic.com 2. Click on FLkey Mini. 3. Click on the Updates tab at the top of the page. -
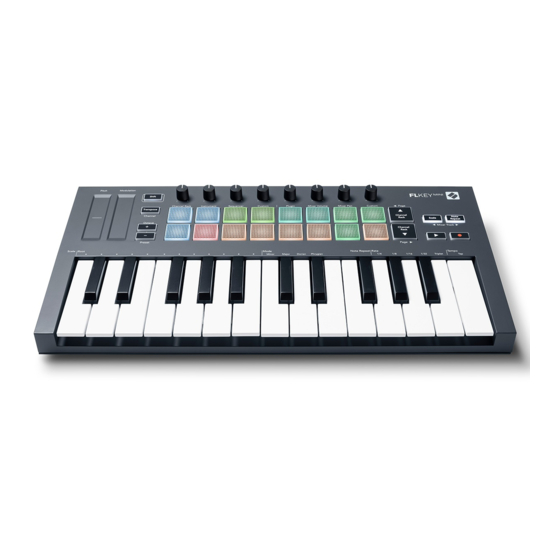
Page 8: Hardware Overview
Hardware Overview Pitch - Touch strip bends the pitch of the note Modulation - Touch strip you can map to you play. parameters in FL Studio. Transpose - This lets you transpose your keyboard Shift Button - Enables access to secondary Shift plus or minus 11 semitones. - Page 9 14 15 Sustain – 6.35mm jack input for sustain pedals. - USB Type-B port MIDI Out – MIDI Type-A 3.5mm jack connector for connecting to external MIDI hardware. See “Connecting FLkey with a Computer” on page Kensington Lock Port – Use a compatible Kensington lock to secure your FLkey to your workstation.
-
Page 10: Working With Fl Studio
Working with FL Studio We’ve designed FLkey to work seamlessly with FL Studio, offering deep integration through powerful production and performance controls. You can also change your FLkey to suit your needs with Custom Modes. Installation Before using FLkey with FL Studio make sure your FLkey is up to date, for steps on how to do this please see “Connecting FLkey with a Computer”... -
Page 11: Transport Controls
3. Select each input and assign the scripts: ○ Click on the MIDI input, click the ‘controller type’ drop down and choose ‘FLkey Mini MIDI’. ○ Click on the DAW input, click the ‘controller type’ drop down and choose ‘FLkey Mini DAW’. -
Page 12: Preset Navigation
Preset Navigation You can use the FLkey to scroll through presets. Select an instrument or plugin and press the Shift + [+] OR [-] buttons to select the next/previous preset. Use the keys/pads to audition the preset. External Connections MIDI Out with External MIDI Instruments To use the MIDI output on your FLkey without a computer power the FLkey with a standard USB power supply (5V DC, minimum 500mA). -
Page 13: Pad Modes
Pad Modes The FLkey Mini has 16 pads to control various elements inside FL Studio depending on the pad mode. To access pad modes: 8. Hold or double press Shift to enter shift mode. The top row of pads lights up. The orange pads 1 –... -
Page 14: Channel Rack
Channel Rack The Channel Rack pad mode lets you play up to 16 Channel Rack channels at once. Each pad represents a single channel you can trigger using a C5 note. The pads light the channel colour for the channel the pad is assigned to. When you press a pad, FL Studio selects the channel and triggers audio. -
Page 15: Instrument Pad Mode
Instrument Pad Mode You can control Channel Rack plugins from your FLkey in instrument mode. To enter instrument mode, hold shift and press the pad below ‘Instrument’ on the hardware. You can input MIDI note data via pads, adapting special instrument layouts: •... -
Page 16: Fpc
In Instrument mode, when you add the FPC plugin to a Channel Rack track, you can control the FPC drum pads from FLkey. When you select a channel with the FPC plugin: • The leftmost 4 x 2 pads control the bottom half of FPC pads. •... -
Page 17: Sequencer
Sequencer In Sequencer mode, you control the sequencer grid in the FL studio Channel Rack. You can place and change steps inside the selected instrument and pattern. To use Sequencer mode, hold or double press Shift + Sequencer. The upper row of pads shows steps 1-8, the lower row steps 9-16 In sequencer mode the pads display the steps for the selected Channel Rack track, active steps appear in bright track colour, inactive steps in dim track colour. -
Page 18: Channel Rack Graph Editor
Press the Play button again to stop the sequence. The sequencer always starts from step one when using the FLkey Mini’s transport section. You can move the start position using the mouse, the FLkey Mini will use that as the start point. -
Page 19: Pot Modes
Pot Modes The FLkey has eight pots to control various parameters inside FL Studio depending on the pot mode. To access pot modes: 1. Hold or double press Shift to enter shift mode. The top row of pads lights up. The turquoise pads 5 - 8 represent the pot modes. -
Page 20: Plugin
Plugin In Plugin mode, you can use the FLkey’s pots to control eight parameters in the plugin you have in focus. Most native FL Studio instrument plugins support FLkey’s pot mode. Note: The parameters the FLkey maps to in FL Studio’s plugins are fixed preset mappings. For third-party plug-ins you can use the Custom pot mode to create your own mappings. -
Page 21: Mixer Pan
Mixer Pan In Mixer Pan mode, the FLkey’s eight pots map to the pan controls in FL Studio’s mixer. You can control the mixer track’s panning in groups of eight. Banking When you’re in the pot modes for the Mixer Volume and Mixer Pan you can bank in groups of eight. Press Shift + Scale or Note Repeat to move the selection to the previous/next group of eight tracks. -
Page 22: Custom
This pot mode gives you freedom over whichever parameters you wish to control and up to eight at the same time. You can edit the messages the pots send out in Custom Mode using Novation Components. To map most parameters in FL Studio to the Pots on the FLkey: 1. -
Page 23: View Channel Rack Selections
View Channel Rack Selections Hold Shift in any pad layout mode while the FL Studio Channel Rack is visible to see the current selection. This applies to Channel Bank Selection, Channel Rack Pot Control and Channel Selection. If you select a Mixer Pot Mode this displays the selected mixer bank. Loop Record (on first boot) You can’t toggle Loop Record from FLkey, it’s set to ON the first time you connect the FLkey to FL Studio. -
Page 24: Focusing Fl Studio's Windows
Focusing FL Studio’s Windows Some interactions with FLkey affect the focussed window in FL Studio. The following actions focus the Channel Rack: • Pad Modes ○ Channel Rack ○ Sequencer • Paging left or right on the Sequencer • Selecting a channel in the Channel Rack The following actions focus the Mixer: •... -
Page 25: Note Repeat
Note Repeat Note Repeat applies to the pads and allows you to play notes (especially drum hits) at various Rates, locked to a set Tempo. When connected to FL Studio, Note Repeat always follows the DAW tempo regardless of playback state. -
Page 26: Set The Tempo
Set the Tempo Hold or latch Note Repeat and tap the highest key at the desired tempo. Change the velocity of the notes/drum hits You can use pad pressure to control the velocity of the Note Repeat hits. The initial velocity is set as you press the pad. -
Page 27: Standalone Features
Standalone Features Transpose Transpose shifts the FLkey Mini’s notes on the keys in semitone increments from 1 – 11 semitones. This allows you to play in different keys or transpose ideas easily. To transpose the keyboard, hold the Transpose button, or double-tap to latch, and four pads light white. -
Page 28: Octave Buttons
Octave Buttons Pressing the Octave buttons increments and decrements the keyboard octave by 1. The available octaves range from C-2 to C7. To reset the keyboard octave to 0, press the Octave +/- buttons at the same time. To reset the keyboard transposition to 0 shift, press the Octave +/- buttons at the same time or press any of the pads 12-16. -
Page 29: Scale Mode
Scale Mode Scale mode allows you to set the entire keyboard to only play notes in a scale you select. This allows you to play the keyboard without ever hitting a wrong note! Press the “Scale” button to activate this mode, the button lights to show the mode is active. - Page 30 To change the Scale Mode, hold the Scale button (or double-tap to latch) and press the key under one of the Modes, the four modes available are: • Minor • Major • Dorian • Phrygian...
-
Page 31: Shift Button
Shift Button The Shift button allows you to access the features printed on the FLkey’s front panel. When you hold the shift button (Or “Latching Pages” on page 32) The following options are available: • Channel (Transpose Button) – To change the FLkey’s MIDI channel use the Shift button and hold Channel (or Latch). -
Page 32: Latching Pages
Latching Pages You can latch control pages open and access the controls for those modes. This feature gives single- hand access to control pages including: • Scale, Note Repeat controls • Transpose setting • Note Repeat • Shift functions - such as rotary control select and MIDI Channel. Control Pages Double press the Control Page button and the controls appear and remain accessible on the pads and rotary controls. -
Page 33: Custom Modes And Components
Novation Account page. Custom Modes You can configure the FLkey’s pots and pads to send custom messages using Novation Components. We refer to these custom message configurations as Custom Modes. To access the custom modes, press Shift and the Custom Mode Pad buttons. -
Page 34: Settings
Settings To access the settings page, hold the Shift button whilst powering up the FLkey Mini. Once you have made changes in settings, you press the play ▶ ︎ button to the FLkey’s main controls. The FLkey keeps any setting changes through power cycles. The settings page on FLkey Mini appears with the following pad arrangement. -
Page 35: Easy Start
Easy Start You can toggle Easy Start mode on and off. This is on when you first use the FLkey. The Easy Start process tells you when to switch this off. To use all the FLkey’s functions ensure this pad is dimly lit. Weight &... - Page 36 Novation has taken all steps to ensure the information given here is both correct and complete. In no event can Novation accept any liability or responsibility for any loss or damage to the owner of the equipment, any third party, or any equipment which may result from the use of this manual or the equipment which it describes.
Need help?
Do you have a question about the FLkey Mini and is the answer not in the manual?
Questions and answers