Table of Contents
Advertisement
Quick Links
Advertisement
Table of Contents
Troubleshooting

Related Manuals for Novation FLkey 49


Summary of Contents for Novation FLkey 49
- Page 1 English User Guide FLkey 49 and 61...
-
Page 2: Table Of Contents
Getting Started ........................6 Connecting FLkey with a Computer ................. 6 Easy Start ........................6 Updating your FLkey ...................... 7 FLkey 49/61 Hardware Overview .................... 8 Working with FL Studio ......................11 Installation ........................11 Manual Installation ....................11 Transport Controls ....................... 12 Preset Navigation ...................... - Page 3 Pot Custom Mode ......................44 FLkey Settings ........................45 Vegas Mode ........................ 45 Easy Start ........................45 Weights and Dimensions ...................... 46 Novation Notices ......................... 47 Troubleshooting ......................47 Trade Marks ........................ 47 Disclaimer ........................47 Copyright and Legal Notices ..................47...
-
Page 4: Introduction
FLkey User Guide Introduction FLkey is Novation’s range of MIDI keyboards for making music in FL Studio. Combining hands-on control of the most important FL Studio features with our best keys to date, FLkey puts production and connection with your music in your control. -
Page 5: Key Features
• Velocity-sensitive keys and 16 velocity-sensitive RGB pads. • Preset browsing: Find your favourite presets from Image-Line plugins directly from FLkey 49/61. • Custom Modes: Assign custom controls on FLkey 49/61 to tailor your music production workflow. Box Contents • FLkey 49/61 •... -
Page 6: Getting Started
FLkey User Guide Getting Started Connecting FLkey with a Computer FLkey is USB bus-powered, it turns on when you connect it to your computer with a USB cable. When you connect FLkey to a Mac, it may show the Keyboard Setup Assistant. This is because FLkey also functions as a computer keyboard to enable the Navigate functionality. -
Page 7: Updating Your Flkey
FLkey User Guide Updating your FLkey Novation Components manages updates for your FLkey. To confirm you have the latest firmware and to update your FLkey: 1. Go to components.novationmusic.com 2. Click on FLkey. 3. Click on the Updates tab at the top of the page. -
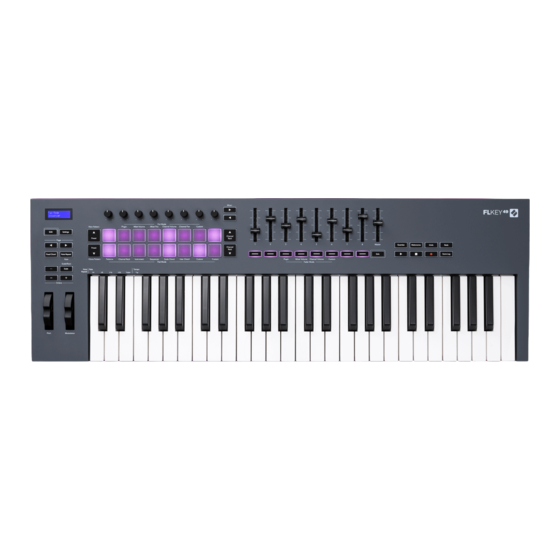
Page 8: Flkey 49/61 Hardware Overview
FLkey User Guide FLkey 49/61 Hardware Overview 1. LCD Display - Shows the device status, and parameter values, and lets you navigate through menus. 2. Shift & Settings buttons - Enable access to secondary shift functions, shown in text on the front panel and open the Settings menu on the screen. - Page 9 FLkey User Guide 11. Mixer ◄ ► Buttons – Move left and right in the FL Studio Mixer section. 12. Faders 1-8 and Master - Control various parameters using the available modes. The 9th fader controls main volume in your DAW (excluding HUI). 13.
- Page 10 FLkey User Guide 25. Sustain – 6.35mm jack input for sustain pedals. - USB Type-B port. 27. MIDI Out – 5-Pin MIDI Din connector for connecting to external MIDI hardware [14]. - Kensington Lock Port, use a compatible Kensington lock to secure your FLkey to your workstation.
-
Page 11: Working With Fl Studio
FLkey User Guide Working with FL Studio We’ve designed FLkey to work seamlessly with FL Studio, offering deep integration through powerful production and performance controls. You can also change your FLkey to suit your needs with Custom Modes [44]. Installation Before using FLkey with FL Studio make sure your FLkey is up to date, for steps on how to do this please see Updating your FLkey... -
Page 12: Transport Controls
• Choose different port numbers for the MIDI and DAW ports Select each input and assign the scripts: • Click on the MIDI input, click the ‘Controller type’ drop down and choose: ‘Novation FLkey MIDI’. • Click on the DAW input, click the ‘Controller type’ drop down and choose: ‘Novation FLkey DAW’. -
Page 13: Preset Navigation
FLkey User Guide Preset Navigation You can use the FLkey to scroll through presets. Select an instrument or plugin and press the Preset ▲ or Preset ▼ buttons to select the next/previous preset. You can use the keys/pads to audition the preset. -
Page 14: External Connections
FLkey User Guide External Connections Connecting FLkey MIDI Out with External MIDI Instruments To use the 5-pin DIN socket for MIDI output on your FLkey without a computer, you can power the unit with a standard USB power supply (5V DC, minimum 500mA). 5-Pin MIDI DIN Sustain Input You can connect any standard sustain pedal via the TS jack input. -
Page 15: Pot Modes
FLkey User Guide Pot Modes The FLkey has eight pots to control various parameters inside FL Studio depending on the pot mode. To access pot modes: 1. Hold (or double press to latch) Shift to enter shift mode. The pads light up. The top row of pads represents the pot modes. -
Page 16: Pot Mode: Plugin
FLkey User Guide Pot Mode: Plugin In Plugin mode, you can use the FLkey’s pots to control eight parameters in the plugin you have in focus. Most native FL Studio plugins support FLkey’s pot mode. NOTE The parameters the FLkey maps to in FL Studio’s plugins are fixed preset mappings. For third-party plugins, you can use the Custom pot mode to create your own mappings. -
Page 17: Pot Mode: Channel Volume
Pot Mode: Custom This pot mode gives you freedom over whichever parameters you wish to control and up to eight simultaneously. Using Novation Components, you can edit the messages the pots and fader buttons send out in Custom Mode components.novationmusic.com. - Page 18 FLkey User Guide To map most parameters in FL Studio to the Pots on the FLkey: 1. Right-click a parameter in FL Studio. 2. Select one of two remote control modes (explained below). 3. Move a pot to map the parameter to the pot you moved. Remote control modes: •...
-
Page 19: Pad Modes
FLkey User Guide Pad Modes Depending on the pad mode, the FLkey has 16 pads to control various elements inside FL Studio. To access pad modes: Hold (or double press to latch) Shift to enter shift mode. The pads light up. The bottom row of pads represents the pad modes. - Page 20 FLkey User Guide The pad layout is left to right, bottom to top, in two rows of eight. The channels in the lower row align with the Channel Rack Pan/Volume pot layout. Pad Mode: Channel Rack Banking You can use Channel Rack ▼ or Channel Rack ▲ to bank the selection to the previous/next group of eight.
-
Page 21: Pad Mode: Instrument
FLkey User Guide Pad Mode: Instrument You can control Channel Rack plugins from your FLkey in instrument mode. To enter instrument mode, hold shift and press the pad above ‘Instrument’ on the hardware. You can input MIDI note data via pads, adapting special instrument layouts: •... -
Page 22: Pad Mode: Sequencer
FLkey User Guide Fruity Slicer You can play back slices using the FLkey pads while in instrument mode when you select a Channel Rack channel with this plugin. You can press the Page ◀ left or Page ▶ right page left or page right to get to the next 16 slices to be able to trigger them with the FLkey pads. - Page 23 FLkey User Guide While the transport is playing, the currently playing step (Step 6) is lit in bright white. When you pause the sequencer, the playing step’s pad stays white, but it doesn’t show when you stop the transport. Use the Page ◀ and ▶ buttons under the ‘Page’ label to shift the selection to the previous/next group of 16 steps.
-
Page 24: Scale Chord Mode
FLkey User Guide The moment you move a pot, the graph editor appears in FL Studio and disappears when you release the step. To exit quick edit mode release all held steps. To edit steps with more parameters, hold the step on the pads and then turn the pot. Pot/Knob Graph Function Pot 1... -
Page 25: User Chord Mode
FLkey User Guide Visible on screen Page 1 Top: Triads (Light blue) (Shown above) Bottom: 7ths (Dark Blue) Page 2 Top: 7ths (Dark Blue) Bottom: 9ths (Purple) Page 3 Top: 9ths (Purple) (Shown below) Bottom: 6/9s (Pink) When you press a pad, it lights green and returns to its original colour when released. To change the chord’s octave, hold Shift and press the Page ◄... -
Page 26: Custom Pad Mode
The Page ◄ ► buttons transpose the chord bank in semitones between -12 and +12, the FLkey’s screen displays any changes you make. Custom Pad Mode This pad mode gives you freedom over whichever parameters you wish to control. Using Novation Components, you can edit the messages the pots send out in Custom Mode. -
Page 27: Patterns Pad Mode
FLkey User Guide Patterns Pad Mode Add or select new patterns using FLkey's pads. To enter pattern mode, press and hold shift and press the Patterns pad. The pads are lit in the respective pattern colours from FL Studio. The selected pattern will be lit white on the pads. - Page 28 FLkey User Guide Pressing a pad selects a pattern, you can edit the pattern, for example using the Sequencer pad mode [22]. To add a new pattern, hold Shift and press the New Pattern (Preset ▲ pad). To clone a pattern, select the pattern you want to clone, hold Shift and press Clone Pattern (Preset ▼ pad).
-
Page 29: Fader Modes
FLkey User Guide Fader Modes The FLkey has nine faders to control various elements inside FL Studio depending on the fader mode. By default, Mixer Volume is selected. To access the different fader modes: Hold the Shift button. Press the respective fader Mode button. In this example, the Fader Mode: Plugin is selected so the Pot mode: Plugin lights amber to show you can't select both simultaneously. -
Page 30: Fader Banking
In Plugin mode, you can use the FLkey’s faders to control eight parameters in the plugin you have in focus. Most native FL Studio plugins support FLkey’s fader mode. When you move a fader your FLkey 49/61's screen temporarily shows the plugin parameter's name and new value. -
Page 31: Fader Mode: Mixer Volume
FLkey User Guide Fader Mode: Mixer Volume In Mixer Volume mode, the FLkey’s faders map to the mixer faders in FL Studio. You can control the mixer track volumes in the current bank in groups of eight with faders 1- 8. When you select the Mixer Volume layout, the FL Studio mixer window is brought to the front. -
Page 32: Fader Mode: Channel Volume
FLkey User Guide Fader Mode: Channel Volume In Channel Volume mode, FLkey’s eight faders map to the Channel Volume control in groups of eight. When you select the Channel Volume layout, the FL Studio Channel Rack window is brought to the front. -
Page 33: Fader Mode: Custom
Fader Mode: Custom This fader mode gives you freedom over whichever parameters you wish to control and up to nine simultaneously. Using Novation Components, you can edit the messages the faders and fader buttons send in Custom Mode. To map most parameters in FL Studio to the Faders or buttons on the FLkey: Right-click a parameter in FL Studio. -
Page 34: Fader Buttons
FLkey User Guide Fader Buttons The row of buttons below the faders can control the Mute/Solo states of Mixer Tracks or Channels. When you select the Fader mode Channel Volume the fader buttons Mute or Solo FL Studio Channels. When you select the Fader Mode Mixer Volume the fader buttons Mute or Solo FL Studio Mixer Tracks. - Page 35 FLkey User Guide Solo Mode To turn on Solo mode, press the Solo button, the Solo button lights and the fader buttons start dimly lit. • Pressing a dimly lit fader button Solos that track/channel, (equivalent to CTRL + left-clicking a mute button in FL Studio) the fader button lights to show a Soloed track/channel.
-
Page 36: Fader Pickup
FLkey User Guide Fader Pickup When you connect FLkey to FL Studio it follows the Pickup (takeover mode) setting in FL Studio’s Settings. When you move a fader and it’s not yet picked up the value, the screen displays the saved value until you’ve moved it to the pick-up point. -
Page 37: Score Log
FLkey User Guide Score Log The Score Log button allows you to insert all MIDI notes received by FL Studio in the last five minutes into the selected pattern. If note data is already in the pattern, a popup asks you to confirm to overwrite the notes. -
Page 38: Focussing Fl Studio's Windows
FLkey User Guide Focussing FL Studio's Windows Some interactions with FLkey affect the focussed window in FL Studio. The following actions focus the Channel Rack: FLkey 49/61FLkey 49/61 • Pad Modes • Channel Rack • Sequencer • Pot Modes • Channel Volume •... -
Page 39: Standalone Features
FLkey User Guide Standalone Features Navigation Mode - ([…] Button) Pressing the “…” button enters FLkey into navigation mode for browsing samples and presets. The pads light up as shown below. The four blue pads form a left, right, up, and down keypad which replicates a computer keyboard’s cursor keys. -
Page 40: Scale Mode
FLkey User Guide Scale Mode In Scale mode, you can set the entire keyboard, or the pads in instrument mode, to only play notes in a scale you select. Press the “Scale” button to activate this mode, and the button lights to show the mode is active. -
Page 41: Octave Buttons
FLkey User Guide Octave Buttons Pressing the Octave buttons increments and decrements the keyboard octave by ±1. The available octaves range from C0 to G10 in FL Studio (C-2 – G8 with other software). Shift-pressing the Octave buttons transposes the keyboard up or down by one semitone. After you change the octave, the screen displays the current Octave range for five seconds. -
Page 42: Note Repeat
FLkey User Guide Major chords now sound on whatever key you press. For example, you can now press F to hear an F Major chord (shown below), or Ab to hear an Ab Major chord, etc. Note Repeat Note Repeat applies to the pads and allows you to play notes (especially drum hits) at various Rates, locked to a set Tempo. -
Page 43: Set The Tempo
FLkey User Guide Set the Tempo In Note Repeat settings mode, repeatedly press the key labelled Tap Tempo until you’ve set the desired tempo. With Master Sync enabled in FL Studio (this is by default), the screen reads ‘Tempo External’– tap tempo is changing the DAW tempo. -
Page 44: Custom Modes And Components
Account page. Custom Modes You can configure the FLkey’s pots and pads to send custom messages using Novation Components. We refer to these custom message configurations as Custom Modes. To access the custom modes, press Shift and the Custom Mode Pad buttons. -
Page 45: Flkey Settings
FLkey User Guide FLkey Settings Pressing the Settings button shows the settings menu on the screen. You can scroll through the Settings list using the Preset ▲▼ buttons. To adjust the settings’ value, use the pads or the Page ◄ ► buttons. -
Page 46: Weights And Dimensions
FLkey User Guide Weights and Dimensions FLkey 49 FLkey 61 Weight 3.03kg (6.68 lbs) 3.43kg (7.56 lbs) Height 62mm (77mm/3.03” including knob caps) 62mm (77mm/3.03” including knob caps) Width 789mm (31.06”) 952mm (37.48”) Depth 258mm (10.16”) 258mm (10.16”) -
Page 47: Novation Notices
Disclaimer Novation has taken all steps to ensure the information given here is correct and complete. In no event can Novation accept any liability or responsibility for any loss or damage to the owner of the equipment, any third party, or any equipment which may result from this manual or the equipment it describes.