Table of Contents
Advertisement
Quick Links
Advertisement
Table of Contents

Related Manuals for Novation Launchkey Series


Summary of Contents for Novation Launchkey Series
- Page 2 Novation has taken all possible steps to ensure that the information given here is both correct and complete. In no event can Novation accept any liability or responsibility for any loss or damage to the owner of the equipment, any third party, or any equipment which may result from use of this manual or the equipment which it describes.
-
Page 3: Table Of Contents
Contents 1.0 Introduction ........................5 1.1 Key Features ..........................5 1.2 Box Contents ..........................6 1.3 Getting Started ........................6 1.4 Support ............................7 1.5 Model Specific Features ......................7 1.6 Hardware Overview ........................7 1.7 Getting Connected ........................10 1.7.1 Connecting Launchkey with a Computer .................10 1.7.2 Connecting Launchkey with External MIDI Enabled Instruments ........10 2.0 Working with Ableton Live ....................11 2.0.1 Installation ........................11 2.0.2 Setup ..........................11... - Page 4 3.4 Custom Modes ........................29 3.4.1 Pads ..........................30 3.4.2 Pots ..........................30 3.4.3 Faders (49 and 61 key models only) ..................30 3.5 Arpeggiator ..........................30 3.5.1 Arpeggiator Rotary Pots ....................31 3.5.2 Arp Modes ........................31 3.5.3 Arp Rates .........................32 3.5.4 Arp Octaves ........................33 3.5.5 Arp Rhythms ........................33 3.5.6 Latch ..........................34 3.5.7 Arp Control Lock ......................34...
-
Page 5: Introduction
1.0 Introduction Launchkey [MK3] is Novation’s intuitive and fully integrated MIDI keyboard controller for making tracks in Ableton Live, designed to give you everything you need to create and play your music. Made for creators of all abilities, Launchkey gives you inspirational tools to expand your musical vocabulary. -
Page 6: Box Contents
1.2 Box Contents • Launchkey 25, 37, 49 or 61 • USB Type-A to B cable (1.5 meters) • Safety Instructions 1.3 Getting Started The ‘Easy Start Tool’ provides a step-by-step guide to setting up your Launchkey. This simple online tool will guide you through the process of registering the device and accessing the software bundle. -
Page 7: Support
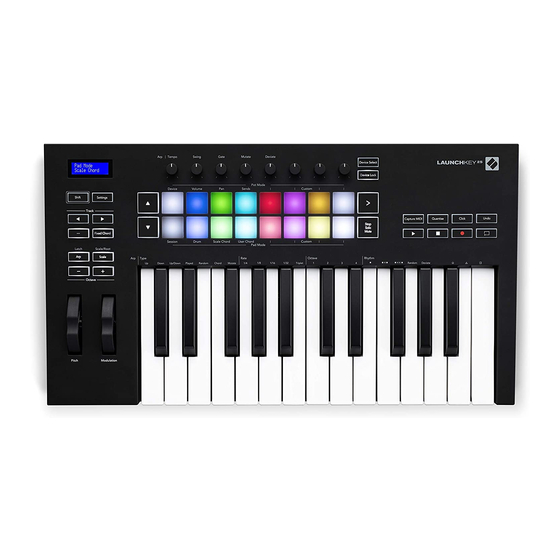
1.4 Support For additional information and support visit the Novation Help Centre. 1.5 Model Specific Features There are 25, 37, 49 and 61 key versions of Launchkey. The differences between the devices are outlined below and model specific features are noted throughout this guide. - Page 8 LCD Display Shows the device status, parameter values, and lets you navigate through menus. Shift Button Enables access to secondary Shift functions which are shown in grey text on the hardware. Settings Button Opens the settings menu on the screen. reference table of Settings options can be found in section 3.7)
- Page 9 Pots Controls various parameters using 8 available modes: Device, Volume, Pan, Sends and four Custom Modes. The first five pots also control parameters as secondary functions. Pads Triggers clips and play drum racks in Ableton Live using Session Drum Modes. Send custom MIDI messages using four available Custom Modes.
-
Page 10: Getting Connected
Capture Midi Capture any recently played MIDI notes in your DAW (supported by Ableton Live and Logic). Quantise Triggers the quantise function in Ableton Live and Logic, to snap notes to the grid. Click Toggles Logic and Live’s metronome on and off. Undo Triggers Logic and Live’s undo function. -
Page 11: Working With Ableton Live
2.0 Working with Ableton Live Your Launchkey is designed to work seamlessly with Ableton Live, offering deep integration through powerful production and performance controls right out of the box. In addition, you can modify your Launchkey to suit your needs with Custom Modes. - Page 12 Windows: Options > Preferences > Link/MIDI Mac: Live > Preferences > Link/MIDI In the Link/MIDI tab you’ll need to copy the settings shown above. First, select your Launchkey MK3 from the Control Surface menu. Then, under Input select “Launchkey MK3 [...] (LKMK3 DAW OUT)” or Launchkey MK3 MIDI IN2 (Windows) for output select “Launchkey MK3 [...] (LKMK3 DAW IN)”.
-
Page 13: Session Mode
2.1 Session Mode Session mode is designed to control Ableton Live’s Session View. To access Session mode on your Launchkey hold Shift and press the “Session” pad (bottom left pad). The Session pad should brighten like this: Session View is a grid that consists of clips, tracks and scenes (shown below). Track Scene Clip... - Page 14 Launchkey’s Session mode provides an 8x2 grid of the clips in your Session View. Example of Launchkey’s pads in Session mode: Clips are typically loops that contain MIDI Tracks represent virtual instruments or audio notes or audio. tracks. MIDI clips placed on instrument tracks will play back on the instrument that is assigned to that track.
-
Page 15: Launching Clips
Any changes you make to clip position or colour within Ableton Live will be represented in the Session mode of Launchkey. Unlit pads indicate empty clip slots. You can navigate around Session View by pressing the ▲▼and the track ◄ ► buttons. More specifically, you can move the currently selected grid of clips (inside Ableton Live’s coloured rectangle) up or down. -
Page 16: Launching Scenes
2.1.2 Launching Scenes Pressing the Scene Launch button (>) launches scenes in Ableton Live. This means that all of the clips in the top row of the pad grid will start together. 2.1.3 Stop, Solo, Mute While in Session mode, it is possible to switch the functionality of the bottom 8 pads so that they no longer launch clips. -
Page 17: Record
Mute (Yellow) – Pressing pads will Mute the corresponding tracks. The pads will dimly glow for muted tracks, leaving pads for unmuted tracks at their original brightness and colour. Clips (Multi) – the fourth press (after toggling through Stop, Solo and Mute) changes the function of bottom pads back to the default Session mode, where the bottom row of pads will again represent clips. -
Page 18: Arm/ Select (61 & 49 Key Models Only)
2.1.9 Arm/ Select (61 & 49 Key Models Only) The “Arm/ Select” button (highlighted in red below) is used to set the functionality of the 8 “Fader Buttons’” (highlighted below in blue) to either arm tracks, enabling recording; or to select a track. While set to Arm the buttons light up red when a track is armed for recording and dim red when not. -
Page 19: Using Ableton Live's Mixer
When using Ableton’s Drum Racks, Drum mode will – apart from triggering sounds – select the associated Drum Rack pad within a Drum Rack. This means that on release, the last played Drum Rack pad lights up white and Ableton Live shows the selected Drum Rack pad on the screen. 2.3 Using Ableton Live’s Mixer The 8 Pots and 8 Faders (49 &... -
Page 20: Faders (49 & 61 Key Models Only)
2.3.1.3 Sends Mode - This Mode allows you to control Track Sends values using the pots. To select this mode, hold the Shift button and press the Sends pad. On the first press the pots will be assigned to Send A, on the second press they will be assigned to Send B. Note: a mode cannot be assigned to both the pots and the faders at the same time. -
Page 21: Device Select
If the Track contains an Effect or Instrument Rack then the assigned faders or pots will sync to the first rack’s 8 Macro Controls. The image below shows an Instrument Rack preset called ‘Percussion 1’. In this example your Launchkey’s 8 pots control a variety of important parameters including sample volumes, stretch and start times as well as the Dry/Wet values of Delay and Reverb effects. -
Page 22: Device Lock
The▲▼ arrow buttons can be used to navigate through the devices. The ▲ button going left and ▼ button moving to the right. The pads allow you to choose which page of controls the area is controlling. The screen displays which device is selected and the parameter being controlled. 2.4.2 Device Lock The “Device Lock”... -
Page 23: Transport Functions
2.5 Transport Functions The MIDI Buttons shown below provide key functionality for performing and recording with Ableton Live. 2.5.1 Play - Pressing this button will initiate playback of the track. 2.5.2 Stop - Pressing this button will stop playback of the track. 2.5.3 Record - Pressing this button triggers Session Record while in Session Mode. -
Page 24: Standalone Features
3.0 Standalone Features 3.1 Grid The Grid is made up of the 2x8 velocity sensitive pads. The standalone functions of the pads when Launchkey are detailed below. 3.1.1 Drum Mode Hold Shift and press the Drum Mode pad (second from bottom left) to enter Drum Mode. Whilst in this mode the velocity sensitive pads output MIDI notes from C1 to D#2 and will be lit blue. -
Page 25: User Chord Mode
The first and last pad of each row light up more brightly than the middle pads to indicate root chord position. To navigate between pages of chords use the ▲▼ navigation buttons. On the first page the top row of pads are lit blue and contain triads, the bottom row of pads contains 7ths and is lit a darker blue. - Page 26 To assign a chord to a pad simply press and hold the pad and press the notes that you want to assign from the keyboard. Up to 6 notes can be assigned to each pad and can be input with individual pushes of the keys, meaning you do not need to hold down all the notes at once so long as the pad is being held.
-
Page 27: Fixed Chord
The ▲▼ buttons can be used to transpose the chord bank in semitones between -12 and +12, any changes will be displayed on the screen. 3.2.3 Fixed Chord Fixed Chord lets you play a chord shape and then transpose it by pressing other keys. To set a chord press and hold the Fixed Chord button. -
Page 28: Scale Mode
Press and hold the Fixed Chord button, then press and release C, then E, and finally G (a C Major chord). The unit stores this as the ‘fixed chord’. Release the Fixed Chord button. Major chords will now sound on whatever key you press. For example, you can now press F to hear an F Major chord (shown below), or Ab to hear an Ab Major chord, etc. -
Page 29: Custom Modes
The Launchkey knobs, pads and faders (49 and 61 key models only) can be configured to send custom messages using Novation Components. These custom message configurations are referred to as Custom Modes. To access the custom modes press Shift and the Custom Mode Pads/Fader buttons. -
Page 30: Pads
WebMIDI-enabled browser (we recommend Google Chrome or Opera). Alternatively, download the standalone version of Components from your Novation Account page. 3.4.1 Pads Launchkey has 4 pad Custom Modes. To access these Custom Modes just hold Shift and then press any of the four Pad Mode Custom buttons. -
Page 31: Arpeggiator Rotary Pots
3.5.1 Arpeggiator Rotary Pots When you hold the Shift button the rotary pots can transform your arpeggios. Tempo – This knob speeds up or slows down your arpeggio relative to the Rate. When Launchkey is used as a standalone controller, this knob ranges from 60 BPM to 187 BPM. However, when synced with Ableton Live, this knob will have no effect. -
Page 32: Arp Rates
Up – Here notes are played in ascending order (i.e. rising in pitch). If notes are added, the number of notes in the sequence will grow but remain in ascending order. For example, you may start by holding down a first note - E3 - then quickly add two more notes - C3 and G3. The resulting arpeggio will be C3, E3 and G3. -
Page 33: Arp Octaves
below 1/4, 1/8, 1/16, or 1/32. Additionally, you can toggle triplet rhythms on/off for each of the above musical values by pressing the key below ‘Triplet’. This turns your arpeggio notes into quarter, eighth, sixteenth and thirty- second note triplets. 3.5.4 Arp Octaves These 4 keys specify across how many octaves your arpeggio will repeat. -
Page 34: Latch
3.5.6 Latch Latch lets you use the Arpeggiator without holding down keys. Any notes you press and release concurrently will form a new arpeggio pattern which the arpeggiator ‘latches’ onto. The arpeggiator then continues to play as if you never released the keys. When you press a new key, the previous arpeggio erases and a new one forms. -
Page 35: Octave Buttons
3.6 Octave Buttons Pressing the Octave buttons will increment and decrement the keyboard octave by 1. The available octaves range from C-2 to C8. Shift pressing the Octave buttons will transpose the keyboard by up or down by 1 semitone. To reset the keyboard octave to 0 press the Octave +/- buttons at the same time. -
Page 36: Pot Pickup
3.8 Pot Pickup Pot Pickup can be turned on from the settings menu. When Pot Pickup is turned on your Launchkey will save the states of the various pages for the Pots and Faders. The control will only output MIDI when the control has been moved to the position of the saved state. -
Page 37: Working With Other Daws
To set up Launchkey with for use with Logic Pro you will need to download the necessary drivers, to do this follow the following steps: • Follow the link to the Novation Customer Portal novationmusic.com • Register Launchkey [MK3] • Go to My Hardware > Launchkey [MK3] > Drivers •... -
Page 38: Session Mode
If this does not happen you will need to manually choose your Launchkey as a ‘Control Surface’ via the following path: Logic Pro X > Control Surfaces > Setup. Once in the Setup window, choose ‘Install’ from the ‘New’ menu. This, in turn, will open the ‘Install’ window. Scroll to the Novation Launchkey and click ‘Add’. -
Page 39: Pots (Knobs)
Pressing a red pad will arm that track for recording and it will glow a brighter red. When a track is muted the corresponding pad will become brighter. Record/ Solo mode - As above, the top row of pads toggles the record arm on the relevant track, the bottom row of pads will be lit blue and toggles the track solo. -
Page 40: Faders (49 & 61 Key Models Only)
Volume Mode - Links the pots to the volume control of a project’s tracks, including send tracks (buses). When any pot is moved, the changed parameter and its current value is displayed on the screen. Pan Mode - Links pots to control the pans for the relevant tracks, including send (buses). When any pot is moved, the changed parameter and its current value is displayed on the screen. -
Page 41: Arm/ Select (61 & 49 Key Models Only)
4.1.4 Arm/ Select (61 & 49 Key Models Only) The ‘Arm/ Select’ button is used to set the functionality of the 8 ‘Track Buttons’ to either arm tracks, enabling recording; or to select a track. While set to Arm the buttons light up red when a track is armed for recording and dim red when not. -
Page 42: Reason
Reason > Preferences > Control surfaces. Make sure “Use with Reason” is checked for the Novation Launchkey MK3 device. Close the window. Now if you hold the Shift button on the Launchkey the pads should look like this:... -
Page 43: Transport Control
4.2.2 Transport Control • Quantise - Toggles quantise On/Off, quantising incoming MIDI • Click - toggles the metronome click • Undo - pressing this will trigger the undo function • Play & Stop - pressing these buttons will initiate playback of the track •... -
Page 44: Working With Hui (Pro Tools, Cubase, Studio One Etc.)
4.3 Working with HUI (Pro Tools, Cubase, Studio One etc.) ‘HUI’ (Human User Interface Protocol) allows the Launchkey to act like a Mackie HUI device and therefore work with DAWs that provide HUI support. DAWs that support HUI include Steinberg Cubase, Avid Pro Tools, PreSonus Studio One among others. -
Page 45: Faders And Fader Buttons (49 & 61 Key Models Only)
4.3.5 Faders and Fader Buttons (49 & 61 Key Models Only) The faders always control track volumes for the selected bank of tracks. The Arm/Select button toggles between arming tracks (default) and selecting tracks. When in select mode the Fader buttons are lit dim white and in arm mode red. When a track is selected and active the Fader button will be lit brightly. -
Page 46: Custom Modes And Components
5.0 Custom Modes and Components Custom modes allow you to create unique MIDI templates for each control area. These templates can be created, and sent to the Launchkey from Novation Components.
Need help?
Do you have a question about the Launchkey Series and is the answer not in the manual?
Questions and answers