Table of Contents
Advertisement
You have purchased one of the highest
quality electric bicycles available today. It is
important
you
read
understand your new electric bicycle. All
riders
including
bicycle riders should read this manual. This
manual explains the functions of your new
electric bicycle and details on performing
basic maintenance. All riders must read the
section on throttling due to the nature of how
to power the bicycle forward. Please take the
time to register your new G Plus Stride R
electric bicycle for the warranty to take effect.
this
manual
experienced
traditional
to
USER GUIDE
Some of the content of this manual may differ from
your bicycle depending on the options of the bicycle
and what your dealer provided.
© 2012 PRODECO TECHNOLOGIES. All rights
reserved.
PRODECO
PRODECO TECHNOLOGIES logo are trademarks of
PRODECO TECHNOLOGIES. Printed in USA.
TECHNOLOGIES
and
the
Advertisement
Table of Contents

Related Manuals for Prodeco Technologies G Stride R


Summary of Contents for Prodeco Technologies G Stride R
- Page 1 All riders must read the and what your dealer provided. section on throttling due to the nature of how to power the bicycle forward. Please take the © 2012 PRODECO TECHNOLOGIES. All rights time to register your new G Plus Stride R reserved. PRODECO...
-
Page 2: Table Of Contents
Table of Contents Chapter 1: Introduction ……………………………………………………………………………………………….. 4 About this manual ………………………………………………………………………………………………….. 4 Important notices …………………………………………………………………………………………………… 4 General warning ……………………………………………………………………………………………………. 5 A special note to parents ………………………………………………………………………………………….. 5 Chapter 2: Getting Started …………………………………………………………………………………………… 6 Unpacking your box ……………………………………………………………………………………………….. 6 Folding pedals …….. ……………………………………………………………………………………………… 6 Familiarize yourself with your bicycle’s parts ……………………………………………………………………... - Page 3 2 year limited warranty …………………………………..………………………..………………………………. 40 Registering your bike ……..…………………….………..………………………..………………………………. 41 Serial numbers and where to find them ………………..………………………..………………………………. 41 Registration card …………………..……………………..………………………..………………………………. 41 Part replacement procedure …………...………………..………………………..………………………………. 42 Contacting Prodeco Technologies ……………………..…………….…………..………………………………. 42 Chapter 11: Specifications …………………….………………………………...…………………………………… 43 ...
-
Page 4: Chapter 1: Introduction
Chapter 1: Introduction Prodeco Technologies thanks you for your purchase of your new G Plus Stride R. Your bicycle is a high quality and environmentally friendly light electric vehicle. This manual will serve to provide you with the information needed to operate, maintain and enjoy it safely. -
Page 5: General Warning
A special note to parents The Prodeco Technologies G Plus Stride R is intended for use by adult riders only. Many state laws require electric bicycle riders to be a minimum age of 16 with some states having minimum ages set as low as 10 years old and other states up to 18 years old (at the time of the writing of this manual). -
Page 6: Chapter 2: Getting Started
Chapter 2: Getting Started CAUTION: If you have purchased the bicycle by mail order or through a sales channel whereas your new G Plus Stride R is still in the box, it is recommended you read Chapter 3 “Basic Instructions” section g “Before your first ride”... -
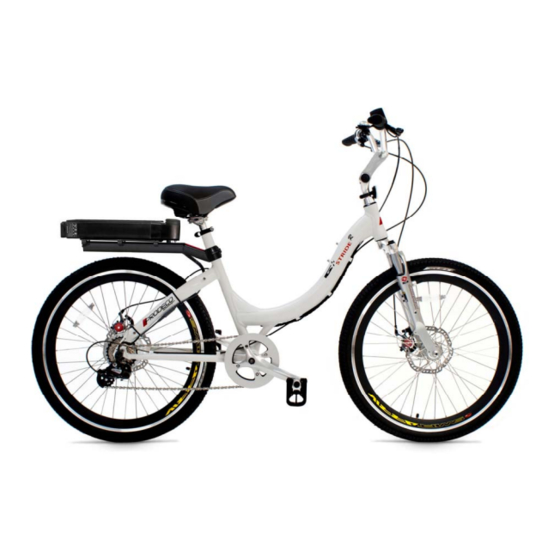
Page 7: Familiarize Yourself With Your Bicycle's Parts
c) Familiarize yourself with your bicycle’s parts... -
Page 8: Contents Of The Box
G Plus Stride R electric bicycle Prodeco Vented Oversized saddle (attached to the alloy seat post) Prodeco Technologies 36V 9Ah LiFEPO4 removable battery 36V LiFEPO4 charger Charger power cable ... -
Page 9: Adjusting The Saddle
3) Is the saddle at the right height? To check, see Chapter 5 “Perfect Fit and Ride” section a “Stand over height”. 4) Are saddle and seat post securely clamped? A correctly tightened saddle will allow no saddle movement in any direction. See Chapter 3 “Basic Instructions” section b “Adjusting the saddle” for details. Are the stem and handlebars at the right height for you? To check, see Chapter 5 “Perfect and Ride”... -
Page 10: C. Installing And Adjusting The Handlebar Stem
you must loosen the rear and front barrel nut and bolt set which connects the saddle rails to the saddle mounting clamp located at the top of the seat post. Loosen both bolts by rotating 2 times counter clockwise each. This should allow for sufficient looseness to slide the saddle rails in either direction on the saddle mounting clamp. -
Page 11: Installing And Adjusting The Handlebar Stem
WARNING: The handlebar controls will be rotated upwards upon adjusting stem higher. Loosen the 4 stem binder bolts and rotate the handlebar downwards to a preferred riding position. Tighten stem binder bolts to 90lbs*in. CAUTION: The handlebar stem quill bolt and rotation adjustment bolt must be checked for tightness to ensure the handlebar stem will not accidentally slide into the steering tube or the handlebar does not turn the wheel or the stem rise falls upon riding. - Page 12 "other circumstances" provision. Prodeco Technologies only offers electric bicycles that fall under the category of “weighing under 100 pounds and a top speed of less than 20 miles per hour”. According to the DOT and NHSTA, Prodeco electric bicycles meet the exception of Motorized Vehicles and therefore can be ridden on non-motorized trails and bike paths permitting state and local laws.
-
Page 13: Safety First
(c) To further protect the safety of consumers who ride low-speed electric bicycles, the Commission may promulgate new or amended requirements applicable to such vehicles as necessary and appropriate. (d) This section shall supersede any State law or requirement with respect to low speed electric bicycles to the extent that such State law or requirement is more stringent than the Federal law or requirements referred to in subsection (a). -
Page 14: Before Your First Motorized Ride
Quick Releases: Make sure seat post, rear axle & frame quick release levers are properly adjusted and all are in the locked position. Handlebar and saddle alignment: Make sure the saddle and handlebar stem are parallel to the bike’s center line, clamped and bolts tightened enough so that you can’t twist them out of alignment. -
Page 15: Using Your Throttle
Using your throttle The variable throttle included with your G Plus Stride R was designed to allow you the ability to choose the speed to ride at and determine the amount of torque off the line. Similar to an automobile; the pressing of the throttle mimics the depressing of the accelerator. -
Page 16: Shifting Gears
m. Shifting gears The shifting of gears is required to change the ratio of the rotation of pedaling to allow more or less torque and lower or higher speeds according to one complete rotation of the crank set. If requiring more torque, you will shift to a larger rear sprocket for a higher rotation of pedaling to a lower speed of the rear wheel. -
Page 17: Chapter 4: Safety
Insert the charger’s power cord into a wall outlet. The charger’s LED light will light RED while the charger is charging the battery. The charger’s LED light will light GREEN upon the battery being fully charged. There is also a battery indicator for checking a full charge. -
Page 18: Riding Safety
Tighten and/or adjust loose parts. Periodically inspect frame, fork, spindles and other components for cracking. Parts should be adjusted to manufacturer's torque specifications. Inflate tires to recommended pressure, and replace worn tires. Lightly oil and clean moving parts. Keep oil off rubber. ... -
Page 19: Wet Weather Riding
When adding accessories to your bicycle you must check to confirm they do not lower the safety value of your bicycle. Prodeco Technologies offers authorized accessories for your bicycle which have been approved not to lower the safety value. Ask your authorized dealer or contact us if you are not sure about adding an accessory to your bicycle and the possibility of lowering your bicycle’s overall safety. -
Page 20: The Basics
Prodeco Technologies G Plus Stride R’s frame measurement will differ from traditional bicycle frames due to the seat tube being longer than a traditional bicycle. -
Page 21: Control Position Adjustments
d. Control position adjustments The G Plus Stride R includes a thumb variable throttle with an LED battery indicator on the right side and a 7 Speed twist shifter on the left side of the handlebar. There is also a thumb sliding lever bell on the left side of the handlebar. -
Page 22: Suspension Fork Adjustment
Suspension fork adjustment The G Plus Stride R uses a dual pre- load adjustable suspension fork. The fork’s dual adjustment offers either a softer of firmer ride for smoothing out the bumps in your path. The pre-load can be adjusted according to your weight and liking. -
Page 23: Chapter 6: Tire, Tube, Wheel Or Axle Repair
Chapter 6: Tire, Tube, Wheel and Axle Repair The G Plus Stride R was designed for ease of servicing. Repairs are no more difficult than on a traditional bicycle. Any neighborhood bicycle shop should be able to repair a flat, change a tire or replace a wheel. Please review the following chapter on how to remove and replace the front and rear wheel of your G Plus Stride R. -
Page 24: Removing And Installing The Front Wheel
c. Removing and installing the front wheel The front wheel on the G Plus Stride R can be removed or installed without tools. A quick release skewer through a hollow axle is utilized for easy and quick wheel removal. A quick release skewer is a rod that has a threaded acorn nut on one end and a cam lever assembly on the other end. -
Page 25: Replacing A Tube Or Tire
Once tightened, close the quick release lever with force to clamp and lock the axle into the dropouts. The force must be strong enough for the axle not to become loose later. It should take some effort to close the lever but not so much that you are straining or feel you are damaging the quick release. You should not be able to open the quick release lever with 1 finger. - Page 26 Bicycle tires are available in many designs and specifications, ranging from general-purpose designs to tires designed to perform best under very specific weather or terrain conditions. If, once you’ve gained experience with your new bicycle, you feel that a different tire might better suit your riding needs; your dealer can help you select the most appropriate design.
- Page 27 Remove the inner tubes air valve cover. Pull back the tire bead away from the rim. You will see the tube and the inside of the tire. If it requires too high pressure to pull back the tire bead, there may be still air in the tube. Check to confirm all the air is out of the tube.
-
Page 28: Chapter 7: Maintenance And Replacement
Where the tube valve is, slide the second wall and bead of the tire into the edge of time rim. Follow pushing the tire wall and bead into the inside edge of the rim. You will get to an area of only a few inches left and you will need to apply pressure to push the tire side wall and bead behind the edge of the rim. -
Page 29: Brake Adjustments
Both front and rear brake systems are easy to adjust with multiple adjusting points. Please follow the instructions below on how to adjust your brakes. If you are unsure as to a component or installation procedure, please contact your local Prodeco Technologies authorized dealer. CAUTION: The braking performance may perform less than 100% at first until the pads are broken-in and can achieve their normal braking performance. - Page 30 Next, check to confirm the cable is tight. To check if the cable is tight, squeeze the front brake lever and see if the disc brake caliper arm responds instantly when squeezing. If only squeezing the lever ¼”, the brake caliper arm should move instantly. If not, the cable is loose and needs adjusting first. ...
-
Page 31: Brake Pad Replacement
Avid BB5 disc brakes and can be found or ordered from almost any neighborhood bicycle shop or you can contact your Authorized Prodeco Technologies dealer. The pads are always available at no charge through Prodeco Technologies directly. -
Page 32: Derailleur Adjustments
e. Derailleur adjustment If the chain of your bicycle falls off at the largest COG/sprocket or the chain is having problems remaining on the correct gear, you may need to adjust your derailleur. There are a multiple ways to adjust your derailleur but for a simple adjustment on the changing of gears, follow these instructions. -
Page 33: Wheel Check
Folding Mechanisms: The folding hinge components on the frame and handlebar stem should each be lubricated with a drop of lubricant. Any other type of lubrication or greasing of bearings should be performed by an authorized Prodeco Technologies dealer. h. Crankset The crankset of your G Plus Stride R is a multi-piece system which includes a bottom bracket, crank arms, chainring, chainring bolts, chain guard and chain. -
Page 34: Pedals
Headset Cartridge bearing headsets are only utilized on all Prodeco Technologies bicycles. These are maintenance free systems and should not be serviced by anyone other than a knowledgeable bicycle repair person. The headset on your bicycle is a double nut threaded system with an alloy cover. -
Page 35: Torque Specifications For Common Parts
Torque specifications for common parts Nuts and bolts for your bicycle are set to standard torque settings at the factory. Over time of use and shipping, settings could change and nut or bolt could become loose. Below is a chart on the torque settings in Lb per Inch for the common parts of the G Plus Stride R. -
Page 36: Installing And Latching The Battery
To remove the battery, follow these instructions: Locate the key ignition on the battery base and turn the key in a counter clockwise rotation to the “UNLOCK” position. You must push the key in to turn from the “OFF” position to the “UNLOCK” position. -
Page 37: Storing The Battery
The battery includes a battery indicator also to check for charging. The indicator can be found under the left side battery handle. Press the indicator button to display the battery’s energy storage Once the battery is charged, you should discontinue charging and remove the charger. ... -
Page 38: Battery Replacement
The motor under warranty is covered as a complete wheel including spokes and rim. If the motor fails, simply remove the motor as explained in Chapter 6 and send the motor to Prodeco Technologies or the closest Authorized service center for a replacement. This motor can also be purchased separately. Check Chapter 11: Parts and Components List for the part number and cost. -
Page 39: Wiring Harness
battery completely from the bicycle. There is only one way to connect and disconnect the controller from the bicycle. No two connections are the same. c. Wiring harness Your bicycle uses a wiring harness. Most e-bikes today have each component being wired directly to the controller. If a motor had to removed, the wire would have to be completely fished out from the controller. -
Page 40: Chapter 10: Warranty Service And Repair
Since the bicycle is a mechanical item, there is the possibility of an issue arising. Prodeco Technologies includes one of the best warranties in the industry if there is an issue and this is a 2 year Front to Back warranty with no pro-rating. -
Page 41: Registering Your Bike
It is required you register your bicycle within 2 weeks from the date of purchase. You must save your receipt of purchase. To register your bicycle, you can fill out the form on the Prodeco Technologies website at www.prodecotech.com or you can fill out the registration card in the next section below and scan it to service@prodecotech.com, or fax it to 954.974.6729 or mail it to:... -
Page 42: Part Replacement Procedure
Part replacement procedure In the rare occurrence of a part becoming defective, Prodeco Technologies tries to make part replacement as painless as possible. Simply contact Prodeco Technologies service department and explain the problem. A representative will assist you with getting the part at issue replaced quickly. You can also bring your bicycle to a local authorized dealer and they can assist you with the problem. -
Page 43: Chapter 11: Specifications
Chapter 11: Specifications Specifications Frame: Folding Aircraft Grade T6 Aluminum Alloy Finish: Gloss Arctic White w/ Clear Coat Protection Fork: Alloy 40mm Travel Suspension w/ Dual Pre-Load Adjust Motor: Prodeco 300W HO Brushless Gear Drive w/ Disc Mount Battery: Prodeco LiFEPO4 38.4V 9Ah Removable v12.1 Power: Thumb Throttle Control Headset:... -
Page 44: Chapter 12: Parts
Fork - Suspension Aluminum - V141 - 26" Rim Size - Zoom - 145mm 1 1/8" Threaded Steerer - Silver Gloss PT.FO.26.V141.145.SG $59.95 Frame - Aluminum - V12 - 26" Rim Size - Prodeco Technologies Stride 300 - White Gloss PT.FR.STR.R.V12.WG $119.95 Freewheel - 13-28T - Shimano HG 37 - 7 Speed - Silver &...
Need help?
Do you have a question about the G Stride R and is the answer not in the manual?
Questions and answers
I have the Stride 500 e bike got a new replacement battery or may be rebuilt. After installing the battery turn the key and nothing, no lights on the throttle no power to the rear wheel. Any suggestions?
If the Prodeco Technologies Stride 500 e-bike shows no power after installing a new or rebuilt battery, it is likely not a battery issue, as LiFEPO4 batteries rarely fail within the first two years. The issue may be related to another component of the bicycle. You should contact your local authorized dealer or Prodeco Technologies directly by phone, email, or in person to diagnose the problem.
This answer is automatically generated