Table of Contents
Advertisement
You have purchased one of the highest
quality electric bicycles available today. It is
important
you
read
understand your new electric bicycle. All
riders
including
bicycle riders should read this manual. This
manual explains the functions of your new
electric bicycle and details on performing
basic maintenance. All riders must read the
section on throttling due to the nature of how
to power the bicycle forward. Please take the
time to register your new G Plus Mariner 7
electric bicycle for the warranty to take effect.
this
manual
experienced
traditional
to
USER GUIDE
Some of the content of this manual may differ from
your bicycle depending on the options of the bicycle
and what your dealer provided.
© 2012 PRODECO TECHNOLOGIES. All rights
reserved.
PRODECO
PRODECO TECHNOLOGIES logo are trademarks of
PRODECO TECHNOLOGIES. Printed in USA.
36V
TECHNOLOGIES
and
the
Advertisement
Table of Contents

Related Manuals for Prodeco Technologies G Plus Mariner 7


Summary of Contents for Prodeco Technologies G Plus Mariner 7
- Page 1 Please take the © 2012 PRODECO TECHNOLOGIES. All rights reserved. PRODECO TECHNOLOGIES time to register your new G Plus Mariner 7 PRODECO TECHNOLOGIES logo are trademarks of electric bicycle for the warranty to take effect. PRODECO TECHNOLOGIES. Printed in USA.
-
Page 2: Table Of Contents
Folding and unfolding ……………………………………………………………………………………………… 6 Familiarize yourself with your bicycle’s parts …………………………………………………………………… 8 Contents of the box ………………………………………………………………………………………………... 8 A guideline of your G Plus Mariner 7 tool set ………………………………………………………………….. 9 Registering your new bike ………………………………………………………………………………………… 9 Chapter 3: Basic Instructions ……………………………………………………………………………………….. 8 Bicycle fit ……………………………………………………………………………………………………………. - Page 3 Registering your bike ……..…………………….………..………………………..………………………………. 39 Serial numbers and where to find them ………………..………………………..………………………………. 39 Registration card …………………..……………………..………………………..………………………………. 39 Part replacement procedure …………...………………..………………………..………………………………. 40 Contacting Prodeco Technologies ……………………..…………….…………..………………………………. 40 11) Chapter 11: Parts and Components List ……………………………………...…………………………………… 41 12) Chapter 12: Specifications ……………………………………………………………………………………...……. 42...
-
Page 4: Chapter 1: Introduction
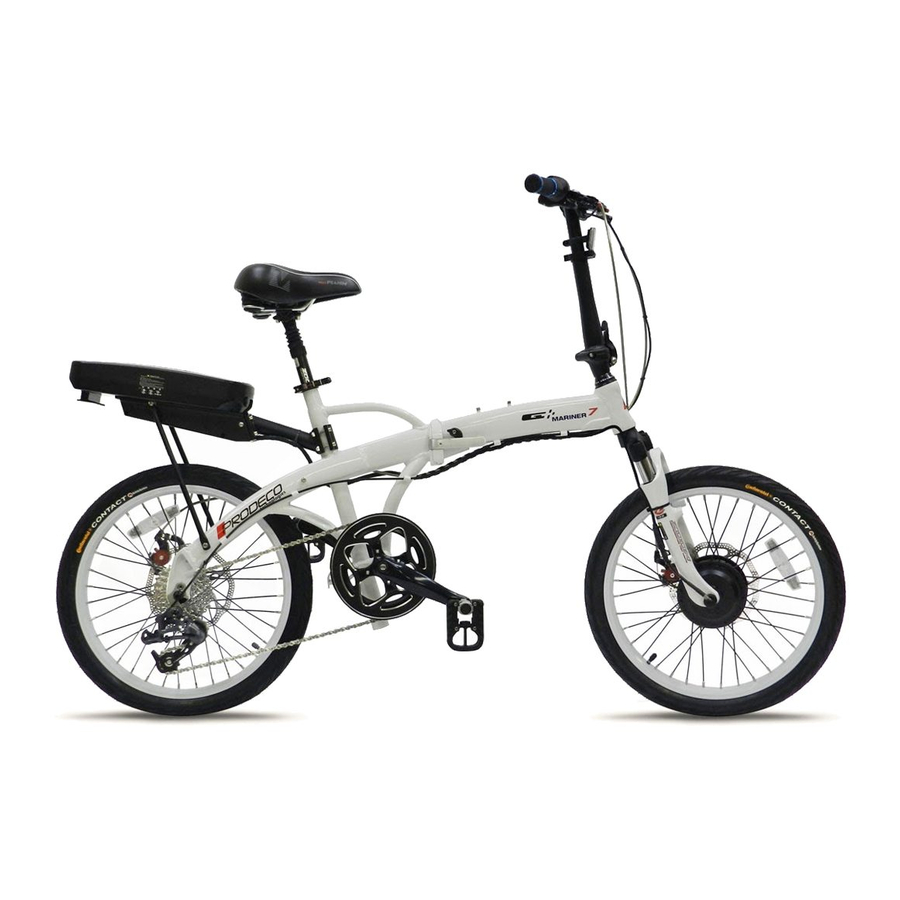
Chapter 1: Introduction Prodeco Technologies thanks you for your purchase of your new G Plus Mariner 7. Your bicycle is a high quality and environmentally friendly light electric vehicle. This manual will serve to provide you with the information needed to operate, maintain and enjoy it safely. -
Page 5: General Warning
Your G Plus Mariner 7 can be ridden as a standard bicycle, it is strongly recommended that you do also assist with pedaling upon riding which can greatly increase the distance between battery charges. When riding under power, you can enhance distance in between charges by holding the throttle at 10% below full throttle. -
Page 6: Chapter 2: Getting Started
Unpacking your box Your G Plus Mariner 7 arrives fully assembled in it’s box other than need for the insertion of the seat post and handlebar stem. You can learn on how to insert the seat post and adjust for your height in Chapter 3 “Basic Instructions”... -
Page 8: Familiarize Yourself With Your Bicycle's Parts
Familiarize yourself with your bicycle’s parts d. Contents of the box Check the contents of your box. Your new G Plus Mariner 7 should include the following items in the box or your dealer should have included these items with your purchase: ... -
Page 9: A Guideline Of Your G Plus Mariner 7 Tool Set
Please review Chapter 10 “Warranty Service and Repair” section c “Registering your bicycle” on registering your G Plus Mariner 7. You can register by either filling out the online registration form or by sending us the registration card found in Chapter 10 “Warranty Service and Repair” section d “Registration card”. -
Page 10: Adjusting The Saddle
The latter two require the use of the multi-use tool included with the purchase of your G Plus Mariner 7. Please review the following details on adjusting your saddle. -
Page 11: Adjusting The Handlebar
The G Plus Mariner includes a high quality aluminum alloy suspension seat post. The pre-load firmness of the suspension travel can be adjusted (you will need to use the 6mm hex key included with your G Plus multi- piece tool kit). To adjust the firmness, remove the seat post as explained in the above section. Located at the base and underside of the seat post is an adjusting cap. -
Page 12: Your Local Electric Bicycle And Bicycle Laws
Your local electric bicycle and bicycle laws Your new G Plus Mariner 7 was designed to follow the federal guidelines to establish the G Plus Mariner 7 as a traditional pedal power bicycle within most USA states and to be allowed to ride in bicycle pathways. Electric bicycle laws however change often and you are responsible to confirm legal status of the riding of your electric bicycle in bicycle pathways. -
Page 13: Safety First
Safety first It is important you follow your local bicycle laws but also it is important you ride safely. Below are examples of understanding how to ride your new G Plus Mariner 7 safely. Always wear an approved helmet when riding your bike, and follow the helmet manufacturer’s instructions for fit, use and care of your helmet. -
Page 14: Before Your First Motorized Ride
Using your throttle The variable throttle included with your G Plus Mariner 7 was designed to allow you the ability to choose the speed to ride at and determine the amount of torque off the line. -
Page 15: Using Your Brakes
Pedaling your G Plus Mariner 7 is the same as pedaling a traditional bicycle. It is recommended you add pedaling to the power of the bicycle to enhance the distance per charge. The G Plus Mariner 7 is a 7 speed bicycle and has the ratio of a 44T front chain ring (sprocket) against a 11-28T rear cassette which is designed to offer an easy pedaling pace at any speed from 1 MPH to 16 MPH. -
Page 16: Safe Riding In Various Conditions
Charging your battery The G Plus Mariner 7’s battery system is the safest and latest technology in Lithium Ion battery cells and was designed to be easily charged. Chapter 8 offers a detailed explanation on battery management but the following information is a basic guide in charging your battery. -
Page 17: Riding Safety
Assure Bicycle Readiness: Ensure Proper Size and Function of Bicycle - Make sure the bicycle fits you: Stand over the top of the G Plus Mariner 7 bicycle – there should be minimum 3 inches of clearance from the frame bar. Seat height — as previously mentioned, with the ball of your foot on the pedal, the fully extended leg should have a slight bend. -
Page 18: Wet Weather Riding
When adding accessories to your bicycle you must check to confirm they do not lower the safety value of your bicycle. Prodeco Technologies offers authorized accessories for your bicycle which have been approved not to lower the safety value. Ask your authorized dealer or contact us if you are not sure about adding an accessory to... -
Page 19: Chapter 5: Perfect Fit And Ride
21” road bike frame. The G Plus Mariner 7’s has a high seat tube angle. With the high angle seat tube, as a tall rider raises their saddle to accommodate their longer legs, the saddle will pull back offering a longer distance to the steering tube. For fine detailed adjusting, the narrow seat post saddle clamp allows the saddle to be moved back or forward an additional 7.5mm each way. -
Page 20: Control Position Adjustments
Below is a chart recommending the adjustment of the saddle height and steering length for your size if you will choose to also pedal your G Plus Mariner 7. This chart is only a recommendation and you should choose the most comfortable position for your style of riding and size. -
Page 21: Brake Lever Height Adjustments
Reach adjustment is accomplished by rotating the reach adjusting bolt on the inside of the brake lever assembly (you will need to use the 2mm hex key included with your G Plus Mariner 7 multi-piece tool kit). Using the 2mm hex key, turn the reach bolt clockwise by a ½... -
Page 22: Suspension Fork Adjustment
Chapter 6: Tire, Tube, Wheel and Axle Repair The G Plus Mariner 7 was designed for ease of servicing. Repairs are no more difficult than on a traditional bicycle. Any neighborhood bicycle shop should be able to repair a flat, change a tire or replace a wheel. Please review the following chapter on how to remove and replace the front and rear wheel of your G Plus Mariner 7. -
Page 23: Installing The Front Motor Wheel
Removing and installing the rear wheel The rear wheel on the G Plus Mariner 7 can be removed or installed without tools. A quick release skewer through a hollow axle is utilized for easy and quick wheel removal. A quick release skewer is a rod that has a threaded acorn nut on one end and a cam lever assembly on the other end. - Page 24 When installing the wheel, it is basically opposite of the above “removing the wheel’. Follow the below instructions on installing the wheel: Pull or push the rear derailleur lower pulley with chain out of the way of the drop outs. ...
-
Page 25: Replacing A Tube Or Tire
There are primarily two kinds of bicycle tube valves: The Schraeder Valve and the Presta Valve. The bicycle pump you use must have the fitting appropriate to the valve stems on your bicycle. The G Plus Mariner 7 uses Schraeder valves. The Schraeder valve is like the valve on a car tire. - Page 26 Let all the air out from the tube of the wheel having the replacement. Remove the wheel as described in detail in the previous sections. Remove the inner tubes air valve cover. Pull back the tire bead away from the rim. You will see the tube and the inside of the tire. If it requires too high pressure to pull back the tire bead, there may be still air in the tube.
-
Page 27: Chapter 7: Maintenance And Replacement
Keeping your bike clean Your new G Plus Mariner 7 is an outdoor friendly electric bicycle but should be kept clean and free from dirt. Dirt on and around seals and drive train components can cause premature wear and dirt on paint and part finishes can cause premature aging. - Page 28 DSK-715 Tool Free Caliper Adjustments The brake pads will be worn during braking, which means the clearance between the two pads will be greater and the braking feeling will be worse. The brake cable can also stretch and the cable will need to be tightened from time to time.
-
Page 29: Brake Pad Replacement
Brake pad replacement The G Plus Mariner 7 uses a Promax DSK-715 Bearing Caliper Front & Rear Disc Brake system. The disc brake pads are compatible with Avid BB5 disc brakes and can be found or ordered from almost any neighborhood bicycle shop or you can contact your Authorized Prodeco Technologies dealer. -
Page 30: Derailleur Adjustments
You will need to turn the brake pad adjustment knob counter clockwise fully allowing room for pads to be changed. Remove the retainer spring and slide the old pads out one at a time. Use the pad arms to push the pads out. -
Page 31: Wheel Check
Lubricating A common area of maintenance with all bicycles is lubrication. Your G Plus Mariner 7 was designed to be virtually maintenance free by depending on the amount of riding and the environment, your bicycle should be lubricated from time to time. -
Page 32: Crankset
Pedals The G Plus Mariner 7 uses folding pedals to require a slimmer space when folded. Each pedal has 2 tabs on the outside edges of the pedal’s nylon cage. To fold the pedals, squeeze the tabs and pull the pedal outwards with a slight force. -
Page 33: Torque Specifications For Common Parts
About your battery The Li-ion battery system of the G Plus Mariner 7 is the latest technology with a LiFEPO4 chemistry. This battery is maintenance free with no serviceable parts. You must never open the battery as this will void the warranty. Each battery has a specific serial number and barcode which can be found on the underside of the battery. -
Page 34: Installing And Locking The Battery
To remove the battery, follow these instructions: Locate the key ignition on the battery base and turn the key in a counter clockwise rotation to the “UNLOCK” position. You must push the key in to turn from the “OFF” position to the “UNLOCK” position. -
Page 35: Storing The Battery
Storing the battery The Li-ion battery the G Plus Mariner 7 utilizes is the safest and latest technology in Li-ion battery cells. It is recommended depending on where you store your bicycle that you do not keep the battery in extremely hot conditions. -
Page 36: Battery Replacement
HUB motor The HUB motor utilized on your G Plus Mariner 7 is one of the most advanced e-bike HUB motors developed today. It is a high efficiency, high torque brushless mini motor only weighing 7.5 LBS with a minimal 5” in diameter. -
Page 37: Wiring Harness
If a motor had to removed, the wire would have to be completely fished out from the controller. The connector would also have to be removed. To simply the design, the G Plus Mariner 7 has a wiring harness with connectors at both ends. -
Page 38: Chapter 10: Warranty Service And Repair
Since the bicycle is a mechanical item, there is the possibility of an issue arising. Prodeco Technologies includes one of the best warranties in the industry if there is an issue and this is a 2 year Front to Back warranty with no pro-rating. -
Page 39: Registering Your Bike
It is required you register your bicycle within 2 weeks from the date of purchase. You must save your receipt of purchase. To register your bicycle, you can fill out the form on the Prodeco Technologies website at www.prodecotech.com or you can fill out the registration card in the next section below and scan it to service@prodecotech.com, or fax it to 954.974.6729 or mail it to:... -
Page 40: Part Replacement Procedure
Part replacement procedure In the rare occurrence of a part becoming defective, Prodeco Technologies tries to make part replacement as painless as possible. Simply contact Prodeco Technologies service department and explain the problem. A representative will assist you with getting the part at issue replaced quickly. You can also bring your bicycle to a local authorized dealer and they can assist you with the problem. -
Page 41: Chapter 11: Parts And Components List
Fork - Suspension Aluminum - V190 - 20" Rim Size - Zoom - 121mm 1 1/8" Threaded Steerer - White Gloss PT.FO.20.V190.121.WG $49.95 Frame - Folding Aluminum - V12 - 20" Rim Size - Prodeco Technologies Mariner 7 - White Gloss PT.FR.MAR7.V12.WG $119.95 Freewheel - 13-28T - Shimano HG 37 - 7 Speed - Silver &... -
Page 42: Chapter 12: Specifications
Seat Post: Zoom Suspension and Machined Aluminum 27.2” x 350MM Seat Post Bracket: Zoom Double Barrel Bolt Infinite Adjust Saddle: Prodeco Technologies GEL Sport 11” x 7” Reflectors: Cateye White Front & Wheels w/ Red Rear Speed: 17-18 MPH Range:...
Need help?
Do you have a question about the G Plus Mariner 7 and is the answer not in the manual?
Questions and answers