Table of Contents

Related Manuals for Bercomac Berco 700255-1


Summary of Contents for Bercomac Berco 700255-1
- Page 1 OWNER’S MANUAL Model Number 700255-1 Berco Compact Two Stage 40" Snowblower LAWN AND YARD TRACTORS * ASSEMBLY * REPAIR PARTS * OPERATION * MAINTENANCE CAUTION: READ & FOLLOW ALL SAFETY RULES & INSTRUCTIONS BEFORE OPERATING YOUR EQUIPMENT 103282 E-08...
- Page 2 WARRANTY LIMITED ONE YEAR ON BERCO TRACTOR ATTACHMENTS For one year from date of purchase, Bercomac Limitée will repair or replace free of charge at Bercomac's option, any parts which are defective as a result of defective materials or faulty workmanship. COMMERCIAL OR RENTAL USE: Warranty on Berco attachments used for commercial or rental purposes is limited to 90 days.
-
Page 3: Table Of Contents
TABLE OF CONTENTS Page INTRODUCTION ............................SAFETY PRECAUTIONS ......................... SAFETY DECALS ............................. ASSEMBLY Step 1: Snowblower Preparation ....................Step 2: Snowblower Installation ....................OPERATION Snowblower Operation ......................... Controls ............................Snow Removal ..........................Snow Removal Methods ......................MAINTENANCE Maintenance ..........................Adjustments ..........................Lubrication ........................... -
Page 4: Introduction
INTRODUCTION TO THE PURCHASER This new attachment was carefully designed to give years of dependable service. This manual has been provided to assist in the safe operation and servicing of your attachment. NOTE: All photographs and illustrations in the manual may not necessarily depict the actual models or attachment, but are intended for reference only and are based on the latest product information available at the time of publication. -
Page 5: Safety Precautions
SAFETY PRECAUTIONS Careful operation is your best insurance against an accident. Read this section carefully before operating the tractor and snowblower. All operators, no matter how experienced they may be, should read this and other manuals related to the tractor and snowblower before operating. It is the owner's legal obligation to instruct all operators in safe operation of the snowblower. - Page 6 SAFETY PRECAUTIONS 8. Do not run the engine indoors, except when MAINTENANCE AND STORAGE starting the engine and for transporting the snowblower in or out of the building. Do not 1. Check shear bolts, engine mounting bolts, and operate or let motor run in a storage area without other bolts at frequent intervals for proper tightness ventilation because gas contains carbon monoxide to be sure the snowblower is in safe working...
-
Page 7: Safety Decals
SAFETY DECALS REPLACE IF DECALS ARE DAMAGED SEE PARTS BREAKDOWN FOR DECAL LOCATION Decal # 102125 Decal # 102126 Decal # 102127 Decal # 102815... -
Page 8: Assembly
ASSEMBLY STEP 1 SNOWBLOWER PREPARATION: Remove the belt guard (item 1) from the snowblower. Remove the bolt (item 2) securing the tension lever. Install the male quick hitch (item 3) to the snowblower and the tension lever with the bolt previously removed. - Page 9 ASSEMBLY Place a 7/16" flatwasher (item 2) on the rotation worm shaft (item 1). Install the rotation worm in the rotation support (item Secure with a 7/16" dia. flatwasher (item 4) and a 2.5 mm. hair pin (item 5). Install rotation worm...
-
Page 10: Step 2: Snowblower Installation
ASSEMBLY STEP 2 SNOWBLOWER INSTALLATION: Refer parts breakdown section parts identification. WARNING TO PREVENT INJURIES: Stop the motor. Apply parking brake. Remove the ignition key. Disconnect the wire from the spark plug(s) and keep away from spark plug(s) to prevent accidental starting. -
Page 11: Verify Skid Shoe Adjustment
ASSEMBLY VERIFY BELT ROUTING: -Lower the snowblower to the ground and let it run for a few seconds under supervision. -Disengage the snowblower and stop the engine. -Remove the belt guard. -Check the belts to make sure they are well inserted in the pulleys and that they have not flipped on their sides on the pulleys and that they do not touch the belt guides. -
Page 12: Operation
OPERATION SNOWBLOWER OPERATION WARNING a) Make sure the snowblower is clear of snow -Do not attempt to clear plugged chute, auger or before engaging the snowblower. fan of snow while tractor engine is running. -Disengage snowblower. b) Make sure that the auger and impeller operate -Lower snowblower onto ground. -
Page 13: Snow Removal Methods
OPERATION SNOW REMOVAL METHODS A definite pattern of operation is required to thoroughly clear the snow area. These patterns will avoid blowing snow in unwanted places as well as eliminating a second removal of snow. Where it is possible to throw the snow to the left and If the snow can only be thrown to one side of the right (see above), as in a long driveway, it is driveway or sidewalk (see above), start on the opposite... -
Page 14: Maintenance
MAINTENANCE CUTTING EDGE MAINTENANCE WARNING Verify from time to time the wearing on the cutting TO PREVENT INJURIES: edge to make sure you do not wear out the base of Stop the motor. the snowblower’s chassis. This cutting edge is Apply parking brake. -
Page 15: Belt Replacement
MAINTENANCE BELT REPLACEMENT BELT REPLACEMENT a) Lower the snowblower to the ground. DRIVE MECHANISM BELT b) Install the V-belt as illustrated below. c) Put tension on the belt by pulling up the tension a) Remove the snowblower’s belt guard and release arm. -
Page 16: Dismounting
DISMOUNTING SNOWBLOWER DISMOUNTING WARNING TO PREVENT INJURIES: Stop the motor. Apply parking brakes. Remove the ignition key. Disconnect the wire from the spark plug(s) and keep away from spark plug(s) to prevent accidental starting. CAUTION The belt tension arm is spring loaded & needs to be held firmly while displacing to prevent injury a) Remove the hair pin and the handle for the chute rotation. -
Page 17: Troubleshooting
TROUBLESHOOTING PROBLEM POSSIBLE CAUSES CORRECTIVE ACTION Auger stops turning. Nylon shear pin is probably broken. Replace shear pin (for identification, see parts list "Snowblower"). The reduction chain is broken or the Remove both chain guards. Inspect connecting link is unlocked. &... - Page 18 TROUBLESHOOTING PROBLEM POSSIBLE CAUSES CORRECTIVE ACTION Snowblower digs into ground. Ground is not frozen or too soft. Adjust skid shoes lower so they may better support the snowblower. If problem persists, change skid shoes for heavy duty skid shoes (option #700243) which cover more surface and prevents snowblower from digging.
-
Page 19: Torque Specification Table
TORQUE SPECIFICATION TABLE GENERAL TORQUE SPECIFICATION TABLE USE THE FOLLOWING TORQUES WHEN SPECIAL TORQUES ARE NOT GIVEN NOTE: These values apply to fasteners as received from supplier, dry or when lubricated with normal oil. They do not apply if special graphited or moly disulphide greases or other extreme pressure lubricants are used. This applies to both UNF and UNC threads. -
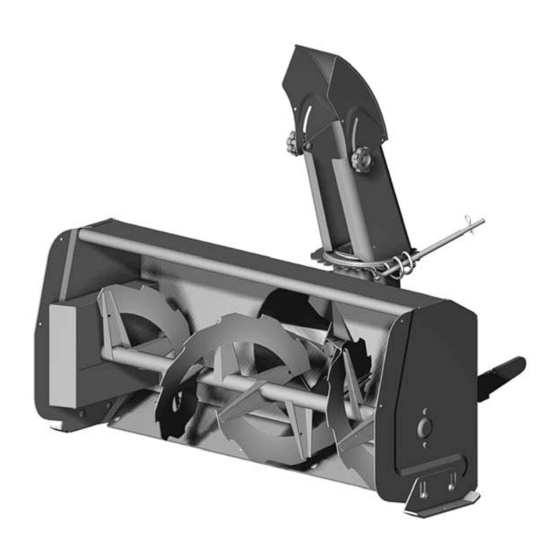
Page 20: Chute With Rotation System
PARTS BREAKDOWN / NOMENCLATURE DES PIÈCES CHUTE WITH ROTATION SYSTEM / GOULOTTE AVEC SYSTÈME DE ROTATION... - Page 21 PARTS LIST / LISTE DES PIÈCES REF. DESCRIPTION DESCRIPTION PART # RÉF. QTÉ PIÈCE # Rotation ring Coussinet de rotation 102756 Chute Goulotte 102748 Knob Bouton 102020 Carriage bolt 5/16" n.c. x 3/4" Boulon à carrosserie 5/16" n.c. x 3/4" Nylon flat washer 7/16"...
-
Page 22: Snowblower
PARTS BREAKDOWN / NOMENCLATURE DES PIÈCES SNOWBLOWER / SOUFFLEUSE... - Page 23 PARTS LIST / LISTE DES PIÈCES REF. PART # DESCRIPTION DESCRIPTION RÉF. QTÉ PIÈCE # Frame Châssis 103000 Bearing Roulement à billes 102757 Bearing Roulement à billes 102758 Éventail 102743 Retaining ring Bague de retenue 102760 Main drive pulley inc. 102784 Poulie d'entraîn.
- Page 24 PARTS LIST / LISTE DES PIÈCES REF. PART # DESCRIPTION DESCRIPTION RÉF. QTÉ PIÈCE # Tapping screw 1/4" n.c. x 1/2" Vis taraudeuse 1/4" n.c. x 1/2" Flat pulley Poulie plate 102765 Hex. bolt 3/8" n.c. x 1 1/2" Boulon hex. 3/8" n.c. 1 1/2" Spring Ressort 102861...
-
Page 25: Options & Attachments
OPTIONS & ATTACHMENTS ROTARY BROOM #700286 with nylon brush COUNTERWEIGHT /#700316 with polypropylene brush. #700240 Universal rear weights Fits on same subframe as UTILITY BLADE #700266 #700246 Rear weights Electrolux snowblower or utility blade. Required for safety and traction. Requires an adaptor. Mounts on the same subframe as the Counter-balances weight of Debris collector available as an...
Need help?
Do you have a question about the Berco 700255-1 and is the answer not in the manual?
Questions and answers