Table of Contents
Advertisement
Quick Links
This Gigabit Ethernet SFP media converter is a plug-and-play device. Connect the supplied AC
to DC power adaptor to the receptacle on the rear panel of the Gigabit Ethernet media converter,
and then attach the plug into a standard AC outlet with a voltage range from 100 to 240V AC.
DIP Switch
DIP
Up (Default Setting)
switch
Left-hand
The fiber port auto detects
side
full and half duplex
Right-hand
Disable LFS
side
Signamax™ Connectivity Systems
The 1000BaseT and 1000BaseSX/LX Connectors
Hardened Managed Ethernet Switch
The
Connection
The following lists the pinouts of the
1000BaseT port.
The 1000BaseSX/LX
Connection
The SFP socket accepts standard Gigabit
Ethernet Small Form-factor Pluggable (SFP)
modules of various types and spectra.
The Port Status LEDs
ription
DIP
switch
enable/disable and fiber auto/force mode.
Down
Forces the fiber port to full
duplex mode
Enable LFS
1000BaseT
065-7714HSFPTB
Model -
User's Guide
configuration
Hardened Managed Ethernet Switch
for
Link
Fault
1
LFS:
Link fault signaling
function
Signaling
Advertisement
Table of Contents

Related Manuals for SignaMax 065-7714HSFPTB


Summary of Contents for SignaMax 065-7714HSFPTB
-
Page 1: Dip Switch
Right-hand Disable LFS Enable LFS LFS: side Link fault signaling function Signamax™ Connectivity Systems The 1000BaseT and 1000BaseSX/LX Connectors Hardened Managed Ethernet Switch 1000BaseT Connection The following lists the pinouts of the 065-7714HSFPTB 1000BaseT port. Model -... -
Page 2: Quick Start Guide
Hardened Managed Ethernet Switch Quick Start Guide This quick start guide describes how to install and use the Hardened Managed Ethernet Switch. This is the switch of choice for harsh environments constrained by space. Physical Description The Port Status LEDs and Power Inputs State Indication 10/100BaseTX... - Page 3 DC-1824-60W; DC-1824-75W; DC-1824-120W Options B- DC Jack power supply ※Signamax strongly recommends the use of a terminal block power supply; however, a jack for power is also provided. Please see the pinout chart below for use when wiring a power jack for this equipment: Output No.
-
Page 4: Functional Description
Hardened Managed Ethernet Switch Functional Description Meets NEMA TS1/TS2 Environmental requirements such temperature, shock, and vibration for traffic control equipment. Meets EN61000-6-2 EMC Generic Standard Immunity for industrial environment. Manageable via SNMP, Web-based, Telnet, and RS-232 console port. Support 802.3/802.3u/802.3ab/802.3z/802.3x. Auto-negotiation: 10/100/1000Mbps, full/half-duplex;... -
Page 5: Console Configuration
Hardened Managed Ethernet Switch Console Configuration Connect to the switch console: Connect the DB9 null-modem or cross over cable to the RS-232 serial port of the device and the RS-232 serial port of the terminal or computer running the terminal emulation application. Direct access to the administration console is achieved by directly connecting a terminal or a equipped with... - Page 6 Hardened Managed Ethernet Switch At the “switch_a>” prompt just type in “enable” and press <Enter> to logon to Privileged Exec Mode (or Enable Mode). And the “switch_a#” prompt will show on the screen. Logon to Configure Mode (Configure Terminal Mode): At the “switch_a#”...
-
Page 7: Web Configuration
Hardened Managed Ethernet Switch Web Configuration Login the switch: Specify the default IP address (192.168.1.10) of the switch in the web browser. A login window will be shown as below: Enter the factory default login ID: root. Enter the factory default password (no password). Then click on the “Login”... -
Page 8: Preface
Hardened Managed Ethernet Switch Preface This manual describes how to install and use the Hardened Managed Ethernet Switch. This switch introduced here is designed to deliver full scalability with SNMP/RMON web-based management functions by providing: To get the most out of this manual, you should have an understanding of Ethernet networking concepts. -
Page 9: Table Of Contents
Hardened Managed Ethernet Switch Table of Content DIP Switch .................. 1 The 1000BaseT and 1000BaseSX/LX Connectors..... 1 The Port Status LEDs ..............1 Description ................. 1 Quick Start Guide ........................2 Physical Description ............2 The Port Status LEDs and Power Inputs ........2 Functional Description ............ - Page 10 Hardened Managed Ethernet Switch Connecting to Your Network.......... 20 Cable Type & Length ............... 20 Cabling ..................20 Switch Management ......................21 Management Access Overview ........21 Administration Console (CLI)........21 Direct Access................22 Modem Access ................. 22 Web Management............23 SNMP-Based Network Management ......
- Page 11 Hardened Managed Ethernet Switch Administration Console........... 72 Exec Mode (View Mode) ............73 Privileged Exec Mode (Enable Mode) ........76 Configure Mode (Configure Terminal Mode) ......80 System ................84 Port..................88 Switching ................92 Trunking................96 STP..................99 VLAN................108 QoS..................
-
Page 12: Product Overview
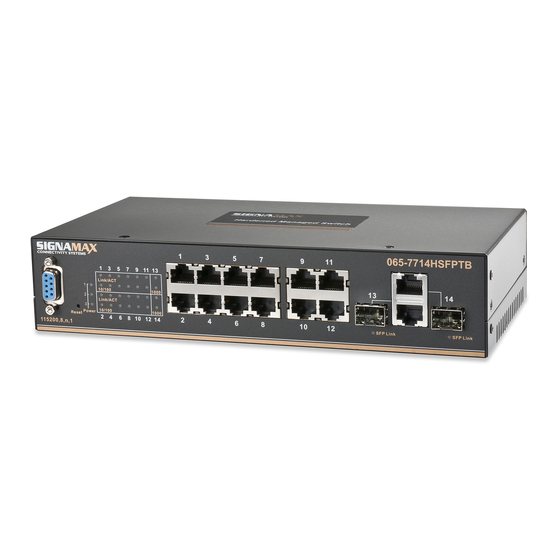
Hardened Managed Ethernet Switch Product Overview Hardened Managed Ethernet Switch Front View Package Contents When you unpack the product package, you shall find the items listed below. Please inspect the contents, and report any apparent damage or missing items immediately to your authorized reseller. -
Page 13: Product Highlights
Hardened Managed Ethernet Switch Product Highlights Basic Features Complies with NEMA TS1 & TS2 Environmental requirements for Traffic control equipment Complies with EN61000-6-2 EMC Generic standard immunity for Industrial environment Supports 8192 MAC addresses Provides 2M bits memory buffer Auto-negotiation for speed and duplexity on all TX ports Auto-MDIX on all TX ports Full wire-speed forwarding rate Store-and-forward mechanism... -
Page 14: Management Support
Hardened Managed Ethernet Switch Management Support VLAN Port-based VLAN IEEE802.1Q tagged VLAN TRUNKING IEEE802.3ad Link Aggregation Control Protocol MAC-based Trunking with automatic link fail-over PORT-SECURITY Per-port programmable MAC address locking Up to 24 Static Secure MAC addresses per port PORT-MIRRORING Port-mirroring QOS (IEEE802.1p Quality of Service) 4 priority queues... -
Page 15: Front Panel Display
Hardened Managed Ethernet Switch Front Panel Display P OWER This LED comes on when the switch is properly connected to power and turned on. P ort Status LEDs The LEDs are located at the left side of the front panel, displaying status for each respective port. -
Page 16: Physical Ports
Hardened Managed Ethernet Switch Physical Ports The Hardened Managed Ethernet Switch provides: 12-port 10/100BaseTX + 2-port SFP/RJ-45 combo Gigabit Hardened Managed Ethernet Switch CONNECTIVITY SC connectors on 1000SX/LX ports RJ-45 connectors on TX ports MODE SELECTION 10BaseT full-duplex mode 10BaseT half-duplex mode 100BaseTX full-duplex mode 100BaseTX half-duplex mode 1000BaseT/SX/LX full-duplex mode... -
Page 17: Switch Management
Hardened Managed Ethernet Switch Switch Management Web-based browser interface The switch also boasts a point-and-click browser-based interface that lets user access full switch configuration and functionality from a Netscape or Internet Explorer browser. Administration console via RS-232 serial port (CLI) The switch provides an onboard serial port, which allows the switch to be configured via a directly connected terminal. -
Page 18: Installation
Hardened Managed Ethernet Switch Installation This chapter gives step-by-step instructions about how to install the switch: Selecting a Site for the Switch As with any electric device, you should place the switch where it will not be subjected to extreme temperatures, humidity, or electromagnetic interference. -
Page 19: Connecting To Your Network
Hardened Managed Ethernet Switch Connecting to Your Network Cable Type & Length It is necessary to follow the cable specifications below when connecting the switch to your network. Use appropriate cables that meet your speed and cabling requirements. Cable Specifications Speed Connector Port Speed... -
Page 20: Switch Management
Hardened Managed Ethernet Switch Switch Management This chapter explains the methods that you can use to configure management access to the switch. It describes the types of management applications and the communication and management protocols that deliver data between your management device (workstation or personal computer) and the system. -
Page 21: Direct Access
Hardened Managed Ethernet Switch There are two ways to use this management method: direct access or modem access. The following sections describe these methods. Direct Access Direct access to the administration console is achieved by directly connecting a terminal or a PC equipped with a terminal-emulation program (such as HyperTerminal) to the switch console port. -
Page 22: Web Management
Hardened Managed Ethernet Switch Web Management The switch provides a browser interface that lets you configure and manage the switch remotely. After you set up your IP address for the switch, you can access the switch’s web interface applications directly in your web browser by entering the IP address of the switch. -
Page 23: Protocols
Hardened Managed Ethernet Switch Protocols The switch supports the following protocols: VIRTUAL TERMINAL PROTOCOLS, SUCH AS TELNET A virtual terminal protocol is a software program, such as Telnet, that allows you to establish a management session from a Macintosh, a PC, or a UNIX workstation. -
Page 24: Web-Based Browser Management
Hardened Managed Ethernet Switch Web-Based Browser Management The switch provides a web-based browser interface for configuring and managing the switch. This interface allows you to access the switch using a preferred web browser. This chapter describes how to configure the switch using its web-based browser interface. -
Page 25: Snmp & Rmon Management
Hardened Managed Ethernet Switch SNMP & RMON Management This chapter describes the switch’s Simple Network Management Protocol (SNMP) and Remote Monitoring (RMON) capabilities. Overview RMON is an abbreviation for the Remote Monitoring MIB (Management Information Base). RMON is a system defined by the Internet Engineering Task Force (IETF) document RFC 1757, which defines how networks can be monitored remotely. -
Page 26: Rmon Mib (Rfc 1757) And Bridge Mib (Rfc 1493)27
Hardened Managed Ethernet Switch - Setting MIB variables according to the SNMP SET frame message. - Generating an SNMP TRAP frame message to the Network Management Station if the threshold of a certain MIB counter is reached or if other trap conditions (such as the following) are met: WARM START COLD START... -
Page 27: Rmon Groups Supported
Hardened Managed Ethernet Switch RMON Groups Supported The switch supports the following RMON MIB groups defined in RFC 1757: - RMON Statistics Group – maintains utilization and error statistics for the switch port being monitored. - RMON History Group – gathers and stores periodic statistical samples from the previous Statistics Group. -
Page 28: Bridge Groups Supported
Hardened Managed Ethernet Switch Bridge Groups Supported The switch supports the following four groups of Bridge MIB (RFC 1493): - The dot1dBase Group – a mandatory group that contains the objects applicable to all types of bridges. - The dot1dStp Group – contains objects that denote the bridge’s state with respect to the Spanning Tree Protocol. -
Page 29: Web-Based Browser Management
Hardened Managed Ethernet Switch Web-Based Browser Management The switch provides a web-based browser interface for configuring and managing the switch. This interface allows you to access the switch using a preferred web browser. This chapter describes how to configure the switch using its web-based browser interface. -
Page 30: Understanding The Browser Interface
Hardened Managed Ethernet Switch Understanding the Browser Interface The web browser interface provides eight groups of point-and-click buttons at the left field of the screen for configuring and managing the switch. SYSTEM System/password, IP Address, Save configuration, Firmware upgrade, Reboot, Logout PORT Configuration, Port Status, Rate Control, RMON Statistics, Per port vlan activities SWITCHING... - Page 31 Hardened Managed Ethernet Switch System System Name/password System Name: Click in “System Name” text box. Type a system name if it is blank, or replace the current system name with a new one. Updating setting: Click “Updating setting” button to update your settings. Password: Click in “Password”...
- Page 32 Hardened Managed Ethernet Switch IP Address IP Address: Click in “IP Address” text box and type a new address to change the IP Address. IP Subnet Mask: Click in “IP Subnet Mask” text box and type a new address to change the IP Subnet Mask.
-
Page 33: Save Configuration
Hardened Managed Ethernet Switch Save configuration Load config from TFTP server: Click in “TFTP Server” text box and type the TFTP server IP address from where the file will be obtained. Click in “FILE” text box and type the name of the file that will be obtained. Click “Load”... -
Page 34: Firmware Upgrade
Hardened Managed Ethernet Switch Firmware upgrade Filename: Click in “Filename” text box and type the name of the file that you intend to upgrade it to the switch. TFTP server IP: Click in “TFTP server IP” text box and type the TFTP server IP address from where the file will be obtained. - Page 35 Hardened Managed Ethernet Switch Reboot Reboot: Click “Reboot” button to restart the switch. Logout Logout: Click “Logout” button to logout of the switch.
- Page 36 Hardened Managed Ethernet Switch Port Configuration Admin Setting: Click “Admin Setting” drop-down menu to choose “Link down” or “Link up” from the “Admin Setting” drop-down list to disable or enable Admin Setting for the port. Speed: Click “Speed” drop-down menu to change the line speed and duplex settings from the “Speed”...
- Page 37 Hardened Managed Ethernet Switch Port Status View the Link Status, Speed, Duplex, and Flow control status for all ports.
- Page 38 Hardened Managed Ethernet Switch Rate Control Ingress: Click in “Ingress” text box and type a new Rate to change the Ingress Rate Control for the port. Rate Values: 64kbps, 128kbps, 192kbps, … , 1.792mbps; 2mbps, 3mbps, 4mbps, … , 100mbps; 104mbps, 112mbps, 120mbps, … , 1000mbps. Egress: Click in “Egress”...
- Page 39 Hardened Managed Ethernet Switch RMON Statistics Click Port 1 ~ Port 14 to view corresponding RMON Statistics.
- Page 40 Hardened Managed Ethernet Switch Per port VLAN activities Click Port 1 ~ Port 14 to view corresponding VLAN activities.
- Page 41 Hardened Managed Ethernet Switch SWITCHING Bridging Aging Time (seconds): Click the text box and type a decimal number as Bridging Aging Time in seconds. Update setting: Click “update setting” button when you finished Aging Time settings. Threshold level (0-100): Click in “Level” text box and type a decimal number for the port. Need to choose “Broadcast”...
- Page 42 Hardened Managed Ethernet Switch Static MAC entry Static-MAC-Entry Forward: Add MAC address: Click in “Add MAC address” text box and type a locked forwarding MAC address for the port. VLAN ID: Click “VLAN ID” drop-down menu and choose a VLAN ID from the “VLAN ID” drop-down list.
-
Page 43: Port Mirroring
Hardened Managed Ethernet Switch Port Mirroring Mirror From: Choose Mirror From port from Port 1 ~ Port 14. Mirror To: Click “Mirror To” drop-down menu to Choose Mirror To port (Port 1 ~ Port 14) from “Mirror To” drop-down list. Mirror Mode: Click “Mirror Mode”... -
Page 44: Trunking
Hardened Managed Ethernet Switch Trunking Port Trunking Static Channel Group: Trunk 1: Click Port 1 ~ Port 12 to assign ports to Trunk 1. (Maximum 4 ports in Trunk 1.) Trunk 2: Click Port 1 ~ Port 12 to assign ports to Trunk 2. (Maximum 4 ports in Trunk 2.) LACP Group: Trunk 1: Click Port 1 ~ Port 12 to assign ports to Trunk 1. - Page 45 Hardened Managed Ethernet Switch LACP Trunking Port Status: The Trunk Type, Admin Key, LACP Mode, LACP Port Priority, and LACP Timeout status of Port 1 ~ Port 14. Trunk Configuration: Port: Click “Port” drop-down menu to choose Port 1 ~ Port 14 from “Port” drop-down list. Trunk Type: Click “Trunk Type”...
- Page 46 Hardened Managed Ethernet Switch LACP System Priority (Set 0 for Default): Click in “LACP System Priority” text box and type a decimal number between 1 and 65535. The default value is 32678. This is used in determining the system responsible for resolving conflicts in the choice of aggregation groups.
-
Page 47: Stp
Hardened Managed Ethernet Switch Global Configuration Spanning Tree Protocol: Click “Spanning Tree Protocol” drop-down menu to Choose “Enable” or “Disable” from “Spanning Tree Protocol” drop-down list to enable or disable Spanning Tree Protocol. Bridge Priority (0..61440): Click in “Bridge Priority” text box and type a decimal number between 0 and 61440. - Page 48 Hardened Managed Ethernet Switch RSTP Port Setting STP Version: Click “STP Version” drop-down menu to choose “RSTP” from “STP Version” drop-down list. Port: Click “Port” drop-down menu to Choose Port 1 ~ Port 14 from “Port” drop-down list. Priority(Granularity 16): Click in “Priority” text box and enter a value between 0 and 240 to set the priority for the port.
- Page 49 Hardened Managed Ethernet Switch...
- Page 50 Hardened Managed Ethernet Switch MSTP Properties STP Version: Click “STP Version” drop-down menu to choose “MSTP” from “STP Version” drop-down list. Region Name: Click in “Region Name” text box to create an MST region and specify a name to it. MST bridges of a region form different spanning trees for different VLANs. By default, each MST bridge starts with the region name as its bridge address.
- Page 51 Hardened Managed Ethernet Switch MSTP Instance Setting VLAN Instance Configuration...
- Page 52 Hardened Managed Ethernet Switch VLAN Instance Configuration: Click “VLAN Instance Configuration” button. The “VLAN Instance Configuration” window appears. VLAN ID: Click “VLAN ID” drop-down menu to choose VLAN from “VLAN ID” drop-down list to simultaneously add multiple VLANs for the corresponding instance of a bridge. Instance ID (1..15): Click in “Instance ID”...
- Page 53 Hardened Managed Ethernet Switch...
- Page 54 Hardened Managed Ethernet Switch MSTP Port Setting Port Instance Configuration Instance ID: Click “Instance ID” drop-down menu to choose instance ID from “Instance ID” drop-down list. Click Port 1 ~ Port 14 to assign ports to the corresponding instance ID. Update setting: Click “Update setting”...
- Page 55 Hardened Managed Ethernet Switch Recover-Ring(tm) capability Ring state Click “Ring state” drop-down menu from “Ring state” drop-down list to choose “Enable” or “Disable” to enable or disable Ring state. Update setting: Click “Update setting” button when you finished Ring state setting. Set ring port Ring port 1: Click “Ring port 1”...
-
Page 56: Vlan
Hardened Managed Ethernet Switch VLAN VLAN Mode Setting VLAN Mode Setting: Click “VLAN Mode Setting” drop-down menu to Choose “Tag-based VLAN” or “Port-based VLAN” from “VLAN Mode Setting” drop-down list. Update Setting: Click “Update Setting” button when you finished VLAN Mode Setting. - Page 57 Hardened Managed Ethernet Switch 802.1Q Port Setting VLAN Port Setting: Click “VLAN Port Setting”. The “VLAN Port Setting” window appears. Mode: Click “Mode” drop-down menu to Choose “Access”, “Trunk”, or “Hybrid” from “Mode” drop-down list for the port. The port will be Tag port if you choose “Trunk” Mode for the port.
- Page 58 Hardened Managed Ethernet Switch...
- Page 59 Hardened Managed Ethernet Switch 802.1Q VLAN setting Add VLAN: VLAN setting: Click “VLAN setting”. The “VLAN Setting” window appears. Add VLAN: Click “Add VLAN” button to create a new VLAN from “VLAN Setting” window. VLAN ID(2-4094): Click in the “VLAN ID” textbox and specify a new VLAN ID number from 2 ~ 4094.
- Page 60 Hardened Managed Ethernet Switch...
-
Page 61: Port Based Vlan
Hardened Managed Ethernet Switch Port Based VLAN VLAN: Choose the port to be added to or deleted from the VLAN. Select all: Click “select all” button to choose Port 1 ~ Port 14 all to be added to the VLAN. Delete all: Click “delete all”... -
Page 62: Qos
Hardened Managed Ethernet Switch Global Configuration QoS: Click “QoS” drop-down menu from “QoS” drop-down list to choose “Enable” or “Disable” to enable or disable QoS. Trust: Enable or disable the switch port to trust the CoS (Class of Service) labels of all traffic received on that port. - Page 63 Hardened Managed Ethernet Switch 802.1p priority Priority: Click “Priority” drop-down menu from “Priority” drop-down list to choose 0 ~ 3 for VLAN Priority 0 ~ 7. Submit: Click “Submit” button when you finished 802.1p priority.
- Page 64 Hardened Managed Ethernet Switch DSCP Priority: Click “Priority” drop-down menu from “Priority” drop-down list to choose 0 ~ 3 for DSCP Priority 0 ~ 63. Submit: Click “Submit” button when you finished DSCP.
-
Page 65: Snmp
Hardened Managed Ethernet Switch SNMP SNMP General Setting SNMP Status: Click “SNMP Status” drop-down menu from “SNMP Status” drop-down list to choose “Enable” or “Disable” to enable or disable SNMP. Description: Click in the “Description” textbox and specify a new description for SNMP. Location: Click in the “Location”... - Page 66 Hardened Managed Ethernet Switch to choose “Enable” or “Disable” to enable or disable link up trap. Authentication Failure Trap: Click “Authentication Failure Trap” drop-down menu from “Authentication Failure Trap” drop-down list to choose “Enable” or “Disable” to enable or disable authentication failure trap. Topology Change Trap: Click “Topology Change Trap”...
- Page 67 Hardened Managed Ethernet Switch SNMP v3 Add User: Add User: Click “Add User” button. The “SNMP V3 Setting” window appears. SNMP Version: Click “SNMP Version” drop-down menu from “SNMP Version” drop-down list to choose “SNMPv3 No-Auth”, “SNMPv3 Auth-MD5”, “SNMPv3 Auth-SHA”, “SNMPv3 Priv Auth-MD5”, or “SNMPv3 Priv Auth-SHA”.
- Page 68 Hardened Managed Ethernet Switch Password” textbox and specify an authentication password. SNMPv3 Auth-SHA: Add a user using SNMP v3 with authentication. Click in the “Auth. Password” textbox and specify an authentication password. SNMPv3 Priv Auth-MD5: Add a user using SNMP v3 with authentication and privacy. Click in the “Auth.
-
Page 69: Other Protocols
Hardened Managed Ethernet Switch Other Protocols GVRP GVRP Global Setting: GVRP: Click “GVRP” drop-down menu from “GVRP” drop-down list to choose “Enable” or “Disable” to enable or disable GVRP (GARP VLAN Registration Protocol). Dynamic VLAN creation: Click “Dynamic VLAN creation” drop-down menu from “Dynamic VLAN creation”... -
Page 70: Igmp Snooping
Hardened Managed Ethernet Switch declare GVRP VLANs when in the STP blocking state. GVRP registration: Click “GVRP registration” drop-down menu from “GVRP registration” drop-down list to choose “Enable” or “Disable” to enable or disable GVRP registration to the port. Configuring an IEEE802.1Q trunk port in registration mode allows dynamic creation (if dynamic VLAN creation is enabled), registration, and deregistration of VLANs on the trunk port. - Page 71 Hardened Managed Ethernet Switch Report suppression: Click “report suppression” drop-down menu from “report suppression” drop-down list to choose “Enable” or “Disable” for the switch. Use this command to enable report suppression for IGMP version 1 and version 2. Report suppression does not apply to IGMP version 3, and is turned off by default for IGMP versionn1 and IGMP version 2 reports.
-
Page 72: Command Line Console Management
Hardened Managed Ethernet Switch Command Line Console Management The switch provides a command line console interface for configuration purposes. The switch can be configured either locally through its RS-232 port or remotely via a Telnet session. For the later, you must specify an IP address for the switch first. -
Page 73: Exec Mode (View Mode)
Hardened Managed Ethernet Switch Exec Mode (View Mode) Logon to Exec Mode (View Mode) At the switch_a login: prompt just type in “root” and press <Enter> to logon to Exec Mode (or View Mode). switch_a login: root... - Page 74 Hardened Managed Ethernet Switch Basic commands Exec Mode (or View Mode) is the base mode from where users can perform basic commands like: clear, debug, disable, enable, exit, help, logout, no, quit, show, terminal The CLI contains a text-based help facility. Access this help by typing in the full or partial command string then typing a question mark “?”.
- Page 75 Hardened Managed Ethernet Switch Login timed out The login session to Exec Mode (or View Mode) has timed out due to an extended period of inactivity (60 seconds) to indicate authentication attempt timed out. And the switch_a login: prompt will show on the screen. Logon back to Exec Mode (View Mode) At the switch_a login: prompt just type in “root”...
- Page 76 Hardened Managed Ethernet Switch switch_a login: root Exit from Exec Mode (View Mode) At the switch_a> prompt just type in “exit” and press <Enter> to exit from Exec Mode (or View Mode). switch_a>exit...
-
Page 77: Privileged Exec Mode (Enable Mode)
Hardened Managed Ethernet Switch Privileged Exec Mode (Enable Mode) Logon to Privileged Exec Mode (Enable Mode) At the switch_a> prompt just type in “enable” and press <Enter> to logon to Privileged Exec Mode (or Enable Mode). And the switch_a# prompt will show on the screen. switch_a>enable Commands Privileged Exec Mode (or Enable Mode) allows users to run commands as following. - Page 78 Hardened Managed Ethernet Switch At the switch_a# prompt just type in the full or partial command string then typing a question mark “?” to display the command keywords or parameters along with a short description. switch_a#show ?
- Page 79 Hardened Managed Ethernet Switch Login timed out The login session to Privileged Exec Mode (or Enable Mode) has timed out due to an extended period of inactivity (60 seconds) to indicate authentication attempt timed out. And the switch_a login: prompt will show on the screen. Logon back to Exec Mode (View Mode) At the switch_a login: prompt just type in “root”...
- Page 80 Hardened Managed Ethernet Switch switch_a login: root Exit from Privileged Exec Mode (or Enable Mode) At the switch_a# prompt just type in “exit” and press <Enter> to exit from Privileged Exec Mode (or Enable Mode). switch_a#exit...
-
Page 81: Configure Mode (Configure Terminal Mode)
Hardened Managed Ethernet Switch Configure Mode (Configure Terminal Mode) Logon to Configure Mode (Configure Terminal Mode) At the switch_a# prompt just type in “configure terminal” and press <Enter> to logon to Configure Mode (or Configure Terminal Mode). And the switch_a(config)# prompt will show on the screen. - Page 82 Hardened Managed Ethernet Switch At the switch_a(config)# prompt just type in the full or partial command string then typing a question mark “?” to display the command keywords or parameters along with a short description. switch_a(config)#show ?
- Page 83 Hardened Managed Ethernet Switch Login timed out The login session to Configure Mode (or Configure Terminal Mode) has timed out due to an extended period of inactivity (60 seconds) to indicate authentication attempt timed out. And the switch_a login: prompt will show on the screen. Logon back to Exec Mode (View Mode) At the switch_a login: prompt just type in “root”...
- Page 84 Hardened Managed Ethernet Switch Exit from Configure Mode (or Configure Terminal Mode) At the switch_a(config)# prompt just type in “exit” and press <Enter> to exit from Configure Mode (or Configure Terminal Mode). switch_a(config)#exit...
-
Page 85: System
Hardened Managed Ethernet Switch System System Name/password, IP Address, Save configuration, Firmware upgrade, Reboot, Logout. System Name/password System Name: Command Mode: Configure mode Logon to Configure Mode (Configure Terminal Mode). The switch_a(config)# prompt will show on the screen. switch_a(config)# Usage: Use hostname command to set or change the network server name. - Page 86 Hardened Managed Ethernet Switch IP Address IP Address/IP Subnet Mask: Command Mode: Interface mode Logon to Configure Mode (Configure Terminal Mode). Then logon to Interface mode. vlan1.1 means vlan 1. The switch_a(config-if)# prompt will show on the screen. switch_a(config)#interface vlan1.1 switch_a(config-if)# Usage: Use ip address command to set the IP address of an interface.
- Page 87 Hardened Managed Ethernet Switch Command Syntax: install image IP-ADDRESS WORD IP-ADDRESS specifies the IP address of tftp server. WORD specifies the file name to be loaded to switch. Example: The following example specifies loading configuration file (file name: WORD) from tftp server (IP address: 192.168.1.20) to switch: switch_a#install image 192.168.1.20 WORD switch_a#...
- Page 88 Hardened Managed Ethernet Switch Command Syntax: restore default Example: The following example restores default setting of the switch: switch_a#restore default switch_a# Auto Save: Command Mode: Configure mode Logon to Configure Mode (Configure Terminal Mode). The switch_a(config)# prompt will show on the screen. switch_a(config)# Usage: Use this command to enable auto save configuration function.
- Page 89 Hardened Managed Ethernet Switch Use install image command to upgrade firmware from tftp server to switch. Command Syntax: install image IP-ADDRESS WORD IP-ADDRESS specifies the IP address of tftp server. WORD specifies the file name to be upgraded to switch. Example: The following example specifies upgrading firmware (file name: WORD) from tftp server (IP address: 192.168.1.20) to switch:...
-
Page 90: Port
Hardened Managed Ethernet Switch Port Configuration, Port Status, Rate Control, RMON Statistics, Per port VLAN activities. Configuration Admin Setting: Command Mode: Interface mode Logon to Configure Mode (Configure Terminal Mode). Then logon to Interface mode. fe1 means port 1. The switch_a(config-if)# prompt will show on the screen. switch_a(config)#interface fe1 switch_a(config-if)# Usage:... -
Page 91: Port Status
Hardened Managed Ethernet Switch The switch_a(config-if)# prompt will show on the screen. switch_a(config)#interface fe1 switch_a(config-if)# Usage: Use flowcontrol on command to enable flow control, and configure the flow control mode for the port. Use the no flowcontrol to disable this function. Command Syntax: flowcontrol on no flowcontrol... -
Page 92: Rmon Statistics
Hardened Managed Ethernet Switch <1-10000000000 bits> (usable units: k, m, g) <1-999>k|m for 1 to 999 kilo bits or mega bits. 1g for 1 giga bits. Example: The following example shows the use of rate-control ingress VALUE (10 mega bits) to the interface fe1 (port 1): switch_a(config)#interface fe1 switch_a(config-if)#rate-control ingress 10m... -
Page 93: Switching
Hardened Managed Ethernet Switch Switching Bridging, Static MAC entry, Port Mirroring Bridging Aging Time (seconds): Command Mode: Configure mode Logon to Configure Mode (Configure Terminal Mode). The switch_a(config)# prompt will show on the screen. switch_a(config)# Usage: Use this command to specify an ageing-out time for a learned MAC address. The learned MAC address will persist till this specified time. - Page 94 Hardened Managed Ethernet Switch Logon to Configure Mode (Configure Terminal Mode). Then logon to Interface mode. fe1 means port 1. The switch_a(config-if)# prompt will show on the screen. switch_a(config)#interface fe1 switch_a(config-if)# Usage: Use storm-control broadcast enable command to enable broadcast traffic. Use no storm-control broadcast command to disable broadcast traffic.
- Page 95 Hardened Managed Ethernet Switch no storm-control dlf dlf destination lookup failure Example: The following example shows setting storm-control dlf enable to the interface fe1 (port 1): switch_a(config)#interface fe1 switch_a(config-if)#storm-control dlf enable switch_a(config-if)# Static MAC entry Static-MAC-Entry Forward: Command Mode: Configure mode Logon to Configure Mode (Configure Terminal Mode).
- Page 96 Hardened Managed Ethernet Switch Port Mirroring Command Mode: Interface mode Logon to Configure Mode (Configure Terminal Mode). Then logon to Interface mode. fe1 means port 1. The switch_a(config-if)# prompt will show on the screen. switch_a(config)#interface fe1 switch_a(config-if)# Usage: Use this command to define a mirror source port and its direction. Use the no parameter with this command to disable port mirroring by the destination port on the specified source port.
-
Page 97: Trunking
Hardened Managed Ethernet Switch Trunking Port Trunking, LACP Trunking Port Trunking Command Mode: Interface mode Logon to Configure Mode (Configure Terminal Mode). Then logon to Interface mode. fe1 means port 1. The switch_a(config-if)# prompt will show on the screen. switch_a(config)#interface fe1 switch_a(config-if)# Usage: Use static-channel-group command to create a static aggregator, or add a member port to an... - Page 98 Hardened Managed Ethernet Switch LACP Port Priority (Set 0 for None): Command Mode: Interface mode Logon to Configure Mode (Configure Terminal Mode). Then logon to Interface mode. fe1 means port 1. The switch_a(config-if)# prompt will show on the screen. switch_a(config)#interface fe1 switch_a(config-if)# Usage: Set the priority of a channel.
- Page 99 Hardened Managed Ethernet Switch Use this command to set the system priority of a local system. This is used in determining the system responsible for resolving conflicts in the choice of aggregation groups. Note: Lower numerical values have higher priorities. Use the no parameter with this command to reset the system priority of the local system to the default value (32768).
-
Page 100: Stp
Hardened Managed Ethernet Switch Global Configuration, RSTP Port Setting, MSTP Properties, MSTP Instance Setting, MSTP Port Setting, Recover-Ring(tm) capability Global Configuration STP Version: Command Mode: Configure mode Logon to Configure Mode (Configure Terminal Mode). The switch_a(config)# prompt will show on the screen. switch_a(config)# Usage: Use this command to choose the Spanning Tree protocol, Rapid Spanning Tree protocol, or... - Page 101 Hardened Managed Ethernet Switch Usage: Use this command to enable the Rapid Spanning Tree protocol on a bridge. Use the no form of the command to disable the Rapid Spanning Tree protocol on a bridge. Command Syntax: bridge GROUP rapid-spanning-tree enable no bridge GROUP rapid-spanning-tree enable BRIDGE-FORWARD GROUP <1-1>...
- Page 102 Hardened Managed Ethernet Switch Hello Time (sec) (1..9): Command Mode: Configure mode Logon to Configure Mode (Configure Terminal Mode). The switch_a(config)# prompt will show on the screen. switch_a(config)# Usage: Use this command to set the hello-time, the time in seconds after which (if this bridge is the root bridge) all the bridges in a bridged LAN exchange Bridge Protocol Data Units (BPDUs).
- Page 103 Hardened Managed Ethernet Switch FORWARD_DELAY <4-30> the forwarding time delay in seconds. Example: The following example sets the forward-time FORWARD_DELAY (30) of bridge GROUP (1): switch_a(config)#bridge 1 forward-time 30 switch_a(config)# RSTP Port Setting Priority(Granularity 16): Command Mode: Interface mode Logon to Configure Mode (Configure Terminal Mode). Then logon to Interface mode.
- Page 104 Hardened Managed Ethernet Switch Point to Point Link: Command Mode: Interface mode Logon to Configure Mode (Configure Terminal Mode). Then logon to Interface mode. fe1 means port 1. The switch_a(config-if)# prompt will show on the screen. switch_a(config)#interface fe1 switch_a(config-if)# Usage: Use spanning-tree link-type command to set the link type of a port to enable or disable rapid transition.
- Page 105 Hardened Managed Ethernet Switch Usage: Use spanning-tree edgeport command to set a port as an edge-port and to enable rapid transitions. Use the no spanning-tree edgeport command to set a port to its default state (not an edge-port) and to disable rapid transitions. Command Syntax: (no) spanning-tree edgeport Example:...
- Page 106 Hardened Managed Ethernet Switch REVISION_NUM <0-255> Revision number. Example: The following example specifies a revision number (25) of MST configuration in bridge GROUP (1): switch_a(config)#spanning-tree mst configuration switch_a(config-mst)#bridge 1 revision 25 switch_a(config-mst)# Max Hops: Command Mode: Configure mode Logon to Configure Mode (Configure Terminal Mode). The switch_a(config)# prompt will show on the screen.
- Page 107 Hardened Managed Ethernet Switch switch_a(config-mst)#bridge 1 instance 1 VLAN 10, 20 switch_a(config-mst)# Bridge Instance Priority: Command Mode: Configure mode Logon to Configure Mode (Configure Terminal Mode). The switch_a(config)# prompt will show on the screen. switch_a(config)# Usage: Use this command to set the bridge priority for an MST instance to the value specified. Use the no parameter with this command to restore the default value of the bridge priority.
- Page 108 Hardened Managed Ethernet Switch Then logon to Interface mode. fe1 means port 1. The switch_a(config-if)# prompt will show on the screen. switch_a(config)#interface fe1 switch_a(config-if)# Usage: Use this command to set the port priority for a bridge group. The Multiple Spanning Tree Protocol uses port priority as a tiebreaker to determine which port should forward frames for a particular instance on a LAN, or which port should be the root port for an instance.
- Page 109 Hardened Managed Ethernet Switch switch_a(config)# Usage: Use this command to enable Ring state. Use the no parameter with this command to disable Ring state. Command Syntax: bridge GROUP ring enable no bridge GROUP ring enable bridge-forward GROUP <1-1> Specify the bridge-group ID. Example: The following example enables Ring state in bridge GROUP (1): switch_a(config)#bridge 1 ring enable...
-
Page 110: Vlan
Hardened Managed Ethernet Switch VLAN VLAN setting, VLAN Port Setting 802.1Q VLAN setting VLAN Database: Command Mode: Configure mode Logon to Configure Mode (Configure Terminal Mode). The switch_a(config)# prompt will show on the screen. switch_a(config)# Usage: Use VLAN database command to enter the VLAN configuration mode. Command Syntax: VLAN database Example:... - Page 111 Hardened Managed Ethernet Switch The switch_a(config-if)# prompt will show on the screen. switch_a(config)#interface fe1 switch_a(config-if)# Usage: Use switchport mode access command to set the switching characteristics of the Layer-2 interface to access mode, and classify untagged frames only. Use the no switchport access command to reset the mode of the Layer-2 interface to access (default).
- Page 112 Hardened Managed Ethernet Switch Use switchport mode trunk command to set the switching characteristics of the Layer-2 interface as trunk, and specify only tagged frames. Use the no switchport trunk command to reset the mode of the Layer-2 interface to access (default).
- Page 113 Hardened Managed Ethernet Switch Then logon to Interface mode. fe1 means port 1. The switch_a(config-if)# prompt will show on the screen. switch_a(config)#interface fe1 switch_a(config-if)# Usage: Use this command to set the switching characteristics of the Layer-2 interface to trunk. The all parameter indicates that any VLAN ID is part of its port’s member set.
-
Page 114: Qos
Hardened Managed Ethernet Switch Global Configuration, 802.1p priority, DSCP Global Configuration QoS: Command Mode: Configure mode Logon to Configure Mode (Configure Terminal Mode). The switch_a(config)# prompt will show on the screen. switch_a(config)# Usage: Use mls qos enable command to globally enable QoS. Use the no mls qos command to globally disable QoS. - Page 115 Hardened Managed Ethernet Switch The following example enables the egress expedite queue on the switch: switch_a(config)#priority-queue out switch_a(config)# Weighted Round Robin: Command Mode: Configure mode Logon to Configure Mode (Configure Terminal Mode). The switch_a(config)# prompt will show on the screen. switch_a(config)# Usage: Use wrr-queue bandwidth command to specify the bandwidth ratios of the transmit queues.
- Page 116 Hardened Managed Ethernet Switch Example: The following example shows mapping DSCP values 0 to 3 to queue 1 on the switch: switch_a(config)#mls qos map dscp-queue 0 1 2 3 to 1 switch_a(config)#...
-
Page 117: Snmp
Hardened Managed Ethernet Switch SNMP SNMP v1/v2c, SNMP v3, SNMP General Setting SNMP v1/v2c Get Community Name: Command Mode: Configure mode Logon to Configure Mode (Configure Terminal Mode). The switch_a(config)# prompt will show on the screen. switch_a(config)# Usage: Use snmp-server community get command to specify and no snmp-server community get command to remove get community name for SNMP. - Page 118 Hardened Managed Ethernet Switch (no) snmp-server v3-user USERNAME (ro|rw) noauth USERNAME Specify a user name. ro read-only access mode rw read-write access mode Example: The following example adds a user (myuser) using snmp v3 with read-only access mode and without authentication: switch_a(config)#snmp-server v3-user myuser ro noauth switch_a(config)# SNMPv3 Auth-MD5, SNMPv3 Auth-SHA:...
- Page 119 Hardened Managed Ethernet Switch The following example adds a user (myuser) using snmp v3 with read-write access mode, MD5 authentication (mypassword), and encryption pass phrase (mypassphrase): switch_a(config)#snmp-server v3-user myuser priv mypassword mypassphrase switch_a(config)# SNMP General Setting SNMP Status: Command Mode: Configure mode Logon to Configure Mode (Configure Terminal Mode).
- Page 120 Hardened Managed Ethernet Switch snmp-server location LOCATION no snmp-server location LOCATION The location for SNMP. Example: The following example specifies location (location) for SNMP: switch_a(config)#snmp-server location location switch_a(config)# Contact: Command Mode: Configure mode Logon to Configure Mode (Configure Terminal Mode). The switch_a(config)# prompt will show on the screen.
- Page 121 Hardened Managed Ethernet Switch Usage: Use this command to specify trap host IP address for SNMP. Use the no parameter with this command to remove trap host IP address for SNMP. Command Syntax: snmp-server trap-ipaddress <1-5> IP-ADDRESS no snmp-server trap-ipaddress <1-5> <1-5>...
- Page 122 Hardened Managed Ethernet Switch Usage: Use snmp-server trap-type enable linkDown command to enable link down trap for SNMP. Use the no snmp-server trap-type enable linkDown command to disable link down trap for SNMP. Command Syntax: (no) snmp-server trap-type enable linkDown Example: The following example enables link down trap for SNMP: switch_a(config)#snmp-server trap-type enable linkDown...
- Page 123 Hardened Managed Ethernet Switch Usage: Use snmp-server trap-type enable topologyChange command to enable topology change trap for SNMP. Use the no snmp-server trap-type enable topologyChange command to disable topology change trap for SNMP. Command Syntax: (no) snmp-server trap-type enable topologyChange Example: The following example enables topology change trap for SNMP: switch_a(config)#snmp-server trap-type enable topologyChange...
-
Page 124: Other Protocols
Hardened Managed Ethernet Switch Other Protocols GVRP, IGMP Snooping GVRP GVRP: Command Mode: Configure mode Logon to Configure Mode (Configure Terminal Mode). The switch_a(config)# prompt will show on the screen. switch_a(config)# Usage: Use set gvrp enable bridge command to enable (set) and set gvrp disable bridge command to disable (reset) GVRP globally for the bridge instance. - Page 125 Hardened Managed Ethernet Switch Command Syntax: set port gvrp enable all/IFNAME set port gvrp disable all/IFNAME all All ports added to recently configured bridge. IFNAME The name of the interface. Example: The following example enables GVRP on the interface fe1 (port 1): switch_a(config)#set port gvrp enable fe1 switch_a(config)# Per port setting:...
- Page 126 Hardened Managed Ethernet Switch switch_a(config)#set gvrp registration fixed fe1 switch_a(config)# IGMP Snooping IGMP mode: Querier: Command Mode: Interface mode Logon to Configure Mode (Configure Terminal Mode). Then logon to Interface mode. vlan1.1 means VLAN 1. The switch_a(config-if)# prompt will show on the screen. switch_a(config)#interface vlan1.1 switch_a(config-if)# Usage:...
- Page 127 Hardened Managed Ethernet Switch IGMP version: Command Mode: Interface mode Logon to Configure Mode (Configure Terminal Mode). Then logon to Interface mode. fe1 means port 1. The switch_a(config-if)# prompt will show on the screen. switch_a(config)#interface fe1 switch_a(config-if)# Usage: Use ip igmp version command to set the current IGMP protocol version on an interface. To return to the default version, use the no ip igmp version command.
- Page 128 Hardened Managed Ethernet Switch 2.Usage: Use ip igmp query-interval command to configure the frequency of sending IGMP host query messages. To return to the default frequency, use the no ip igmp query-interval command. 3.Command Syntax: ip igmp query-interval INTERVAL no ip igmp query-interval INTERVAL <1-18000>...
- Page 129 Hardened Managed Ethernet Switch (no) ip igmp snooping mrouter interface IFNAME IFNAME Specify the name of the interface Example: The following example shows interface fe1 (port 1) statically configured to be a multicast router interface on vlan1.1: switch_a(config)#interface vlan1.1 switch_a(config-if)#ip igmp snooping mrouter interface fe1 IGMP passive snooping: Report suppression: Command Mode: Interface mode...
-
Page 130: Specifications
Hardened Managed Ethernet Switch Specifications Applicable Standards IEEE 802.3 10BaseT IEEE 802.3u 100BaseTX IEEE 802.3ab 1000BaseT IEEE 802.3z 1000BaseSX/LX Switching Method Store-and-Forward Forwarding Rate 10BaseT 10 / 20Mbps half / full-duplex 100BaseTX 100 / 200Mbps half / full-duplex 1000BaseT 200Mbps full-duplex 1000BaseSX/LX 2000Mbps full-duplex 2000Mbps full-duplex... - Page 131 Hardened Managed Ethernet Switch EN61000-4-6 (Induced RFI Standards) EN61000-4-8 (Magnetic Field Standards) EN61000-4-11 (Voltage Dips Standards) Environmental Test IEC60068-2-6 Fc (Vibration Resistance) Compliance IEC60068-2-27 Ea (Shock) IEC60068-2-32 Ed (Free Fall) NEMA TS1/2 Environmental requirements for traffic control equipment...
-
Page 132: Appendix
Hardened Managed Ethernet Switch Appendix B9 DCE pin assignment Pin no. Name RS232 Signal name Data Carrier detect Received data Transmit data Signal ground Data set Ready Clear to send... -
Page 133: Contact Information
Hardened Managed Ethernet Switch Contact Information SIGNAMAX™ CONNECTIVITY SYSTEMS An AESP Company 16295 N.W. 13h Avenue Miami, Florida 33169, U.S.A. Phone: 305-944-7710 Fax: 305-652-8489 Sales: 800-446-2377 Tech. Support: 800-446-2377, ext. 201 Http://www.signamax.com E-mail: info@signamax.com...
Need help?
Do you have a question about the 065-7714HSFPTB and is the answer not in the manual?
Questions and answers