
Related Manuals for Drive Medical Phoenix S35010


Summary of Contents for Drive Medical Phoenix S35010
- Page 1 PHOENIX SCOOTER S S 3 3 5 5 0 0 1 1 0 0 S S 3 3 5 5 0 0 1 1 5 5 OWNER’S MANUAL www.ActiveForever.com...
-
Page 2: Safety Notice
BATTERY CHARGING AND CARE……………………………………..6.1 Charging the battery 6.2 Battery 6.3 Replacing batteries INSPECTION AND MAINTENANCE……………………………………..… 7.1 Inspection 7.2 Regular checking record 7.3 Battery and tire 7.4 Storage 7.5 Moving about 7.6 Disassembly 7.7 Assembly TROUBLESHOOTING ……………………………..……………..………… 25 SPECIFICATION …………….……………………………………..……… WARRANTY…………………………………………………………………..27 www.ActiveForever.com... - Page 3 ! As designs change some illustrations and pictures in the manual may not correspond to the vehicle that you purchased. We reserve the right to make design modifications. Our Scooters have been designed and manufactured to provide a comfortable and secure yet affordable solution for some mobility requirements. www.ActiveForever.com...
- Page 4 ! The maximum weight that can be carried is 300lbs (136kg) (including occupant and any goods). Refer to “MAX LOAD WEIGHT” in “9. SPECIFICATION” ! Maximum loading weight for basket is 7 lb (3kg). Please carry out daily inspections. Refer to the section entitled “DAILY CHECKING” www.ActiveForever.com...
-
Page 5: While Driving
! Please slow down when driving on roads with inclines. ! Do not make sudden turns when driving on gravel roads or ramps. ! Always lean forward when climbing a steep gradient. ! Do not travel on gradients exceeding those stated on the diagram overleaf. www.ActiveForever.com... - Page 6 Be aware that adding accessories or components, or modifying the powered scooter, may make it more susceptible to interference from radio wave sources. (Note: There is no easy way to evaluate their effect on powered scooter.) Report all incidents of unintended movement or brake release to the powered scooter manufacturer, www.ActiveForever.com...
-
Page 7: Electromagnetic Interference (Emi) From Radio Wave Sources
Note: Some mobile telephones and similar transmit signal while they are ON, even when not being used; 2. Medium-range mobile transceivers, such as those used in police cars, fire trucks, ambulances and taxis. These usually have the antenna mounted on the outside of the scooter. www.ActiveForever.com... - Page 8 1. 20 Volts per meter ( V/m) is a generally achievable and useful immunity level against EMI ( the higher the level, the greater the protection); 2. This product has an immunity level of 20 V/m without any accessories and connected to it. www.ActiveForever.com...
-
Page 9: Parts Description
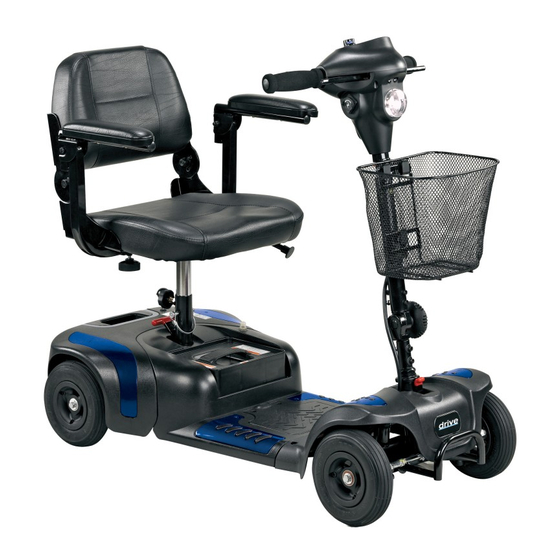
P A R T S I N T R O D U C T I O N PARTS DESCRIPTION . Control panel 2. Basket 3. Charger Socket 4. Tiller Adjustment Knob 5. Seat 6. Seat Rotation Lever 7. Battery Pack 8. Freewheel Lever 9. Anti-tip wheels 10. Seat Post Knob 11. Seat Height Adjustment Pin www.ActiveForever.com... -
Page 10: Control Panel
Horn Button Press the horn button to sound the horn. Release the button to stop the horn. Braking Electro-magnetic brake: Release the speed control lever completely, and the electromagnetic brake will be activated automatically, and the scooter will stop. www.ActiveForever.com... - Page 11 When the breaker trips , the entire electrical system of your scooter shuts down. Allow a minute or two for your scooter’s electronics to “rest”. Push in the reset button to reset the main circuit breaker. O P E R A T I O N www.ActiveForever.com...
- Page 12 3. Adjust the upper seat post to the desired seat height. 4. Move the upper seat post so that there is a hole to insert the locking pin. 5. Insert the pin lock and replace seat replace seat. Pin lock www.ActiveForever.com...
- Page 13 The tiller can be adjusted in to many different positions to suit each driver. 1. Loosen the knob to adjust the tiller to positions you want. (Fig. 4.3) 2. Once decide the position, tighten the knob to secure the tiller.( Fig.4.4) Adjustment knob Fig. 4.3 Fig. 4.4 www.ActiveForever.com...
- Page 14 ! ! Warning Please hold the tiller before loosening the tiller adjustment knob. Before lifting or driving the scooter make certain the tiller adjustment knob is fully tightened. Never attempt to adjust the tiller while the scooter is motion. www.ActiveForever.com...
- Page 15 1. The stopping distance will vary with your forward / reverse speed. Therefore please begin braking as early as you can. 2. When parking your scooter, be sure to park on flat ground and then turn the power to “OFF” before you dismount. www.ActiveForever.com...
-
Page 16: Charging The Battery
8. Turn off the charger, disconnect the power cord and the round plug from charger socket on the battery pack. " Attention ! While returning the battery pack to the battery pack cavity of shroud, beware of finger or hands. www.ActiveForever.com... - Page 17 Batteries (Inside the Pack) 1. The S35010 / S35015 is powered by two sealed lead-acid deep-cycle batteries. 2. The batteries supplied with the scooter are 12 V 12ah batteries. 3. Size : 5.94” x 3.89” x 3.74” (Width x Height x Thickness)
-
Page 18: Replacing Batteries
4. Place new batteries inside the pack. 5. Connect the red cable to the positive (+) battery terminal and black cable to the negative (-) on the other battery. 6. Connect the fused cable between the two batteries and close the battery pack.. www.ActiveForever.com... - Page 19 3. Battery efficiency will vary with outside conditions; the driving distances will be shorter in the winter. If the vehicle is not used for a long time, please charge the battery at least every week. 4. Replace both batteries together. www.ActiveForever.com...
-
Page 20: Regular Checking Record
Levels Harness Connections Test run Discharge test Forwards Wheels and Tires Reverse Wear Emergency stop Pressure Left turn Bearings Right turn Wheel nuts Slope test Motors Over obstacles Wiring List Items repaired Noise Connections Brake Brushes Chassis Condition Steering www.ActiveForever.com... -
Page 21: Battery, Fuse And Tire
When storing for a long time, please charge the battery to full power and then disconnect the battery terminal. For details inquire to your dealer. 7 . I N S P E C T I O N A N D M A I N T E N A N C E www.ActiveForever.com... -
Page 22: Moving About
Refer to the section below. 7.6 DISASSEMBLING THE SCOOTER The S35010 / S35015 can be disassembled into four pieces, the seat (weight 13.2 lb. / 6 kg), the front section (weight 29.5 lb. / 13.4 kg), the rear section (23.4 lb. / 10.6 kg) and battery pack (weight 21.5 lb. -
Page 23: Assembling The Scooter
Always unplug the rear section electrical connector before separating the two sections. 7.7 ASSEMBLING THE SCOOTER # Suggestion The assembly process is essentially the disassembly process in reverse. First study the text and photographs in the disassembly procedure before re-assembling the scooter. www.ActiveForever.com... - Page 24 7 . I N S P E C T I O N A N D M A I N T E N A N C E 1. Position the front and rear sections of S35010 / S35015. 2. Align the lower curved locking brackets of the front section with the corresponding pegs on the front of the rear section.
-
Page 25: Troubleshooting
• Tiller adjustment knob • Tighten tiller loose loose adjustment knob Involuntary horn • There is an electrical • Ensure the control lever sounds error with the scooter is released and switch the scooter on and off recharge batteries www.ActiveForever.com... - Page 26 9 . S P E C I F I C A T I O N S P E C I F I C AT I O N S Model S35010 S35015 Dimension (L x W x H mm) 37.8” x 18.9” x 34.6”...
-
Page 27: Warranty
The manufacturer reserves the right to alter without notices any weights, measurements or other technical data shown in this manual. All figures, measurements and capacities shown in this manual are approximate and do not constitute specifications DRIVE authorized Service Agent Name Address Postcode www.ActiveForever.com... - Page 28 To ensure the correct after sales service and warranty service support , please write down the vehicle identification number that is stuck on the back right-hand side of the frame. Model S35010 / S35015 Motor serial # Key # ………………………………………………………………………………………………………………………………...
- Page 29 !!!!!!!!!!!!!!!!!!!!!!!!!!!!!!!!!!!!! www.ActiveForever.com...
Need help?
Do you have a question about the Phoenix S35010 and is the answer not in the manual?
Questions and answers