Table of Contents
Advertisement
Quick Links
Advertisement
Table of Contents

Subscribe to Our Youtube Channel
Related Manuals for SMART Board Board 600i2


Summary of Contents for SMART Board Board 600i2
- Page 1 Configuration and User’s Guide SMART Board™ 600i2 Interactive Whiteboard System...
- Page 2 SMART Technologies ULC. Information in this manual is subject to change without notice and does not represent a commitment on the part of SMART.
-
Page 3: Important Information
Support website. NOTE: If you own a SMART product other than a SMART Board™ 600i2 interactive whiteboard system, refer to the installation guide that came with your product for relevant warnings and maintenance instructions. In this document, “SMART Board 600i2 interactive whiteboard system” refers to the SMART Board 600 series interactive whiteboard and its Unifi™... -
Page 4: Safety Warnings
(or allow children to stare) directly into the projector’s beam of light. • Do not stand (or allow children to stand) on a chair to touch the surface of your SMART Board product. Rather, wall-mount the product at the appropriate height or use a SMART height-adjustable floor stand. - Page 5 Use gloves when touching the lamp. Do not touch the lamp with your fingers. • Use only the SB20 replacement lamp (SMART Part No. 01-00247). • Never replace the lamp assembly with a previously used lamp assembly.
- Page 6 • The 600i2 interactive whiteboard system does not have speakers. Consult your authorized SMART reseller to determine your audio output options. • If you have peripheral devices that do not use a 4-pin mini-DIN connectors or an RCA composite video jack, or if your device has an audio connection that does not use RCA jacks, you might need to purchase third-party adapters.
-
Page 7: Other Precautions
Transporting the SMART Board 600i2 Interactive Whiteboard System If you need to ship any part of your SMART Board 600i2 interactive whiteboard system, repack it with the original packaging. If the original packaging is no longer available, you may purchase replacement packaging from your authorized SMART reseller. - Page 8 Important Information 99-00850-21 B0...
-
Page 9: Table Of Contents
Optional Accessories ............................. 4 Before Installing Your 600i2 Interactive Whiteboard System Environmental Requirements......................... 7 Before Installing Your SMART Board 600i2 Interactive Whiteboard System ..........8 After Installing Your 600i2 Interactive Whiteboard System ................10 Connecting Your 600i2 Interactive Whiteboard System Installing SMART Notebook Software ...................... -
Page 10: Table Of Contents
Regulatory Compliance Waste Electrical and Electronic Equipment Regulations................55 Restriction of Certain Hazardous Substances (RoHS) Directives..............56 Customer Support Online Information and Support ........................57 Training ................................57 Technical Support............................57 Shipping and Repair Status..........................57 General Inquiries............................57 Registration ..............................57 Warranty...............................58 Index viii Table of Contents 99-00850-21 B0... -
Page 11: About Your 600I2 Interactive Whiteboard System
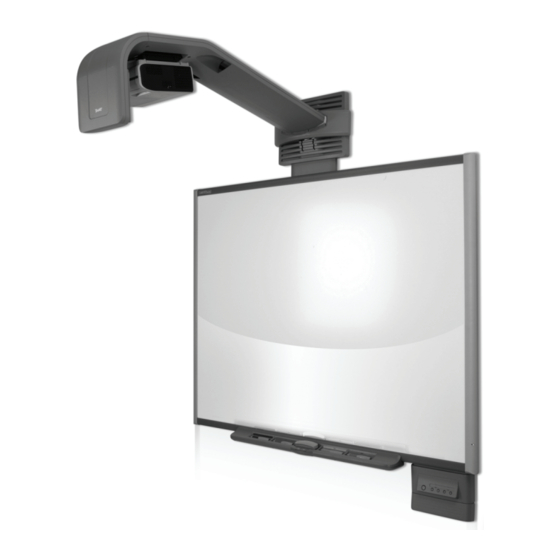
About Your 600i2 Interactive Whiteboard System In This Chapter The SMART Board 600i2 interactive whiteboard system combines the SMART Unifi 45 wall mounted short-throw projector with a SMART Board 600 series interactive whiteboard. These topics describe the components and accessories you can use with your SMART Board 600i2 interactive whiteboard system. -
Page 12: Smart Board 600I2 Interactive Whiteboard System Features
The SMART Board 600 series interactive whiteboard includes many features of other SMART Board interactive whiteboards, such as a resistive touch screen and a pen tray. The SMART Board 600 series performs best with the Unifi 45 projector because of its exceptional color performance and input response. -
Page 13: Standard Accessories
Unifi 45 Projector System Features The Unifi 45 projector system includes a short-throw projector for use with SMART Board 600 series interactive whiteboards, an extended control panel (ECP) and a sturdy support system for classroom environments. The features of the projector system include: •... -
Page 14: Optional Accessories
Optional Accessories For more information on optional accessories, contact your authorized SMART reseller. Height Adjustable Wall Mount (HAWM-600i2) Your interactive whiteboard system installed on a HAWM-600i2 can be lowered to young students’ reaching range and raised for teachers or taller students. - Page 15 Cat 5 USB Extender (CAT5-XT) Use the SMART Cat 5 USB extender to extend your interactive whiteboard’s USB connection up to 120' (36.6 m) using RJ45 Cat 5 cable (not included). The extender includes two 6' (1.8 m) USB cables to connect your computer and your...
- Page 16 About Your 600i2 Interactive Whiteboard System 99-00850-21 B0...
-
Page 17: Before Installing Your 600I2 Interactive Whiteboard System
SMART Board 600i2 interactive whiteboard systems can operate in a temperature range of 41°F to 95°F (5°C to 35°C) from sea level to an altitude up to 6000' (0 m to 1829 m) and in a temperature range of 41°F to 86°F (5°C to 30°C) from 6000' to 9800' (1829 m to 2987 m). -
Page 18: Before Installing Your Smart Board 600I2 Interactive Whiteboard System
Before Installing Your SMART Board 600i2 Interactive Whiteboard System Choose a location for your SMART Board 600i2 interactive whiteboard system that’s far from a bright light source, such as windows or overhead lighting. Bright light sources can cause distracting shadows on the interactive whiteboard and can reduce the contrast of the projected image. - Page 19 Dimensions on the template recommend a distance from the floor that is suitable for adults of average height. Although you should consider the general height of your user community when you choose a position for the interactive whiteboard, consult your local regulations before mounting the unit. •...
-
Page 20: After Installing Your 600I2 Interactive Whiteboard System
Vertical keystone errors can occur when you mount the Unifi 45 projector and the SMART Board 600 series interactive whiteboard on an uneven surface or a wall that has obstructions. - Page 21 Horizontal keystone errors can occur when you mount the Unifi 45 projector too far from the SMART Board 600 series interactive whiteboard’s vertical center, when you mount the projector and the interactive whiteboard on an uneven surface, or if the board is slightly closer to the projector on one side than the other.
- Page 22 To adjust the mirror’s depth and vertical angle for alignment NOTE: This procedure sets the mirror to a neutral position. However, further adjustments will be required. Remove the boom’s front cover. Boom Front Cover You can now access the adjustment screws. Hex Screw 3 Thumbscrew 1 Thumbscrew 2...
- Page 23 Using the included hex key, adjust hex screw 3 to adjust the mirror’s depth for your model of interactive whiteboard. Model 660: 5/8” (15 mm) Model 680: 5/8” (15 mm) Adjust thumbscrew 1 to center the mirror’s vertical angle. Angle Too High Angle Too Low Make sure that the mirror isn’t angled too low or too high.
- Page 24 To adjust the horizontal angle for alignment Adjust thumbscrew 2 to center the mirror’s horizontal angle. NOTE: These images show the mirror from below. Make sure that the mirror isn’t angled too far left or too far right. Angle Too Far Right Angle Too Far Left Before Installing Your 600i2 Interactive Whiteboard System 99-00850-21 B0...
- Page 25 Focusing and Aligning the Image To focus and align the image, project either a computer image or the projector’s SMART Technologies logo onto your SMART Board interactive whiteboard. To display the SMART Technologies logo If you don’t have a computer connected and you don’t see the SMART Technologies logo, perform the following steps to display the logo.
- Page 26 • Complete the procedures on the preceding pages before performing this alignment procedure. Move your SMART Board interactive whiteboard left or right to center the image horizontally on the interactive whiteboard. Adjust the thumbscrew on top of the projector until the image is horizontal.
- Page 27 Adjust the center hex screw at the projector boom’s base to adjust the vertical keystone until the left and right side of the image are parallel. Projector Boom Center Hex Screw NOTE: When you adjust the center hex screw, the top of the image moves up and down slightly and the bottom of the image’s width changes.
- Page 28 Securing the Pen Tray and Interactive Whiteboard Because the pen tray that comes with your SMART Board interactive whiteboard is detachable, you may want to safeguard it—and the interactive whiteboard at the same time—by anchoring it with a security cable (not included).
- Page 29 To lock the pen tray to the interactive whiteboard Underneath the pen tray, there is a Kensington® security slot that accommodates a security cable, such as a Kensington® lock. Security Slot Loop the security cable behind the pen tray brackets before you screw them to the wall, and then thread the lock end of the cable through the loop end of the cable.
- Page 30 Before Installing Your 600i2 Interactive Whiteboard System 99-00850-21 B0...
-
Page 31: Connecting Your 600I2 Interactive Whiteboard System
You can now pick up a pen tray pen and write on the interactive screen in digital ink and capture your notes into any Ink Aware application. For a list of Aware applications, click on the SMART Board icon in the notification area (Windows computers) or dock (Mac computers), click Control Panel, and Ink Aware application settings. -
Page 32: Connecting Your Computer To The Interactive Whiteboard System
If you’re using an audio cable from your computer, SMART Audio Mixer on your projector, connect your audio cable with a Device 3.5 mm plug to the other input jack on the SMART audio mixer device. 3.5 mm Connect the other end of your VGA cable to your computer’s video output connector. - Page 33 Your interactive whiteboard system does not include speakers. To hear sound, you need to IMPORTANT connect an audio system to the projector’s audio output. Consult your authorized SMART reseller to determine your audio output options. 99-00850-21 B0...
- Page 34 To connect a DVD player, VCR, document camera, digital camera or other visual or audio-visual peripherals to the SMART Board interactive whiteboard system, you must connect your peripheral’s video and audio outputs to the ECP. You can have up to three peripheral devices and a host computer connected at one time.
-
Page 35: Using Your 600I2 Interactive Whiteboard System
Make sure that you turn on your projector using the master Power switch (on the side of the projector nearest to the interactive whiteboard). This will turn on your SMART Board 600i2 interactive whiteboard system, which will not operate fully unless you turn this switch to the on position. Don’t turn this switch off unless maintenance work is being done, your system won’t be used for a long period of time, or you have been instructed to do so by an... -
Page 36: Using Your Interactive Whiteboard
Flip the projector’s master Power switch (on the side of the projector nearest to the interactive whiteboard) to turn on the SMART Board 600i2 interactive whiteboard system. You can view the LAMP, ON/STANDBY and TEMP status indicators on the projector’s underside to determine the projector status and to troubleshoot unexpected behavior. -
Page 37: Adjusting Your Projector Settings
Menu Options MENU HEADING IMAGE ADJUSTMENT POSITION ADJUSTMENT SETTING DISPLAY Contrast Phase Screen Size Brightness Frequency Language Support Menu Options Color H-Position Background Tint V-Position Icon Sharpness Clamp Pulse 1 Start-up Screen Picture Mode Clamp Pulse 2 User Logo Advanced MENU HEADING DEFAULT DEFAULT... - Page 38 Swedish, Turkish, Polish, Norwegian, Finnish, Czech, Hungarian, Greek, Danish, Dutch, Romanian, Japanese, modern Chinese, traditional Chinese and Korean. Background This option sets the background: Logo (displays the SMART Technologies logo), Blue (displays a blue screen) or None (displays no background). Icon This option turns the icon display On or Off.
- Page 39 Blackboard mode is a quick adjustment setting for the display color temperature of the projector. The default setting is Off. SMART recommends that you keep this setting when using your Unifi 45 projector with your interactive whiteboard system. Do not adjust this option unless advised to do so by a certified SMART Technical Support Specialist.
- Page 40 Lamp Power To reduce energy usage and to extend lamp life, select the Standard setting. For brighter projection at higher power draw and decreased lamp life, select the High setting. Reset All This option resets all your projector settings to their factory defaults. Do not adjust this option unless you want to reset all applied settings, or unless you are advised to do so by a certified SSMART Technical Support Specialist.
-
Page 41: Maintaining Your 600I2 Interactive Whiteboard System
Maintaining Your 600i2 Interactive Whiteboard System In This Chapter This chapter includes methods to prevent damage to, and to properly clean your SMART Board 600i2 interactive whiteboard system. Follow the additional instructions and recommendations see your Installation and User’s Guide... -
Page 42: Cleaning The Pen Tray
• Don’t allow glass cleaner to flow into the crack between the lower frame and the writing surface, or into the pen tray recesses. • Use isopropyl alcohol for stubborn stains and ghosting. To remove marks made with a permanent marker, use a cleaner such as the Sanford EXPO Dry Erase Board Doctor. -
Page 43: Cleaning The Unifi 45 Projector
• If the projector is mounted on the boom, the manufacturer recommends contacting your WARNING authorized SMART reseller when the lamp must be exchanged • Uncovering the lamp while the projector is mounted on an arm might lead to a product damage or personal injury from falling pieces of glass if the lamp is broken. - Page 44 • Wear protective eyewear while changing the lamp. Failure to do so can cause injury or loss of eyesight if the lamp shatters or bursts. • Use only the SB20 replacement lamp (SMART Part No. 01-00247). • The lamp used in the Unifi 45 projector contains mercury. Recycle or dispose of it as hazardous waste, in accordance with local regulations.
- Page 45 To replace the lamp Loosen the two screws on the outer lamp cover with a Phillips® No. 2 screwdriver. These screws do not come all the way out of the outer lamp. Raise the outer lamp cover using a flat screwdriver or your finger.
- Page 46 Loosen the three lamp locking screws. These screws cannot be removed. Rotate the handle on the old lamp so that it faces upwards. Press on the tab and pull up with the handle on the old lamp. Release the tab. Recycle or dispose of the old lamp according to your local waste authority.
- Page 47 Remove the new lamp from all of its packaging. Remove the plastic labeling on the lamp handle. Press the tab, put the new lamp into the lamp slot and push it all the way down. Release the tab. Tighten the lamp locking screws until the new lamp is secure.
- Page 48 To re-attach the projector plate assembly on the projector boom after lamp replacement Attach the projector plate to the projector using the three screws that you removed when you disassembled the projector. Put the projector plate assembly back on the projector boom by attaching the projector plate hinge channel to the corresponding flange hook on the projector boom.
- Page 49 To reset the lamp timer Press the power button on the ECP or remote control twice to put the projector back into Standby mode. The power button light on the ECP turns solid amber when the system is in Standby. Press and hold the up button on the remote control for approximately 10 seconds.
- Page 50 Maintaining Your 600i2 Interactive Whiteboard System 99-00850-21 B0...
-
Page 51: Troubleshooting Your 600I2 Interactive Whiteboard System
Troubleshooting Your 600i2 Interactive Whiteboard System In This Chapter This chapter deals with basic troubleshooting issues for your SMART Board 600i2 interactive whiteboard system that you can easily solve. For more complex issues or issues not mentioned in this section, please contact your... - Page 52 Indicator Light Sequence Projector Status LAMP ON/STANDBY TEMP Your projector is in standby mode. • The lamp is off. • Your projector is waiting for input from you or for an internal command. Solid Orange TEMP • Your projector is turning on. LAMP ON/STANDBY •...
- Page 53 Turn off the master power switch, and then unplug the power cord. See Replacing Your Unifi 45 Projector Lamp (document 129338) on the Solid Flashing SMART Technical Support website to replace the lamp cover. Orange 99-00850-21 B0 Troubleshooting Your 600i2 Interactive Whiteboard System...
- Page 54 See Replacing Your Unifi 45 Projector Lamp (document 129338) on the SMART Technical Support website to replace the lamp. If your projector still doesn’t turn on, turn off the master power switch, unplug the power cord, and then contact your...
- Page 55 If you see this indicator light sequence, the icon appears and your projector turns off during use, your projector is overheating internally. Turn off the master power switch, unplug the power cord, and then contact your authorized SMART reseller Solid Flashing Green LAMP...
- Page 56 Interactive Whiteboard Indicators and Controls The SMART Board 600 series interactive whiteboard includes the following indicators and controls: • The ready light LED • The pen tray LEDs and buttons • The controller module’s reset button The ready light LED is in the lower-right part of the interactive whiteboard’s frame. The ready light indicates the operational state of the controller module.
-
Page 57: Remote Management Of Your 600I2 Interactive Whiteboard System
In This Chapter This chapter has detailed instructions on how to set up your computer or your room control system to manage your SMART Board 600i2 interactive whiteboard system settings. • Programming Commands for Managing Your 600i2 Interactive Whiteboard System Settings –... - Page 58 Pin Configuration on the ECP RS-232 Connector The following table provides the pin configuration on the ECP. This pin configuration follows a three-wire connection, so that a straight-through male to female RS-232 serial cable connects to the ECP serial interface in the following arrangement.
-
Page 59: Command Inventory
In the On state, a five second delay occurs after every input source change. The program doesn’t process commands during this delay. • In the On state, if the current input source doesn’t send a signal, a black screen with the SMART Technologies logo—a “Command Failed” message appears when you type contrast and brightness commands. - Page 60 • Press ENTER after typing each command. • Cycling power to the projector repeatedly can lock or damage the interactive whiteboard CAUTION system. Allow at least 15 minutes for cooling before sending the ON command after turning off the system. •...
- Page 61 To allow the ECP to sequence the commands Type on, and then press ENTER. Type set input vga1, and then press ENTER. To control the sequence programmatically Send Command: Wait for Response Send Command: get powerstate Wait for Response Response: powerstate = on Send Command: set input vga1...
- Page 62 Query Commands Command Result Response (On-Screen) Displays the ECP’s firmware FW version = # get fwver version* Displays the ECP’s bootloader Bootloader version = # get bootver version* Displays the projector’s input* Input = # get input Displays the projector’s power state Power state = # get powerstate (Idle, Powering, On...
- Page 63 Set Commands Response Command Result (On-Screen) Selects the VGA1 projector input Input = vga1 set input vga1 Selects the VGA2 projector input Input = vga2 set input vga2 Selects the composite projector Input = composite set input composite input Selects the S-video projector input Input = s-video set input s-video Increases the brightness by a value...
- Page 64 Remote Management of Your 600i2 Interactive Whiteboard System 99-00850-21 B0...
-
Page 65: Regulatory Compliance
WEEE recycling agency for recycling and disposal advice. Your SMART product required the extraction and use of natural resources for its production. It may contain hazardous substances. By disposing of electrical and electronic equipment appropriately, you lower the impact of these substances upon health and the environment and reduce the pressure on natural resources. -
Page 66: Restriction Of Certain Hazardous Substances (Rohs) Directives
Covered Electronics Devices Some US states classify monitors as Covered Electronic Devices and regulate their disposal. SMART Technologies meets the requirements of the Covered Electronic Devices for applicable products. China’s EIP Regulations China regulates products that are classified as EIP (Electronic Information Products). SMART Technologies products fall under this classification and meet the requirements for China’s EIP. -
Page 67: Customer Support
Technical Support If you experience difficulty with your SMART product, please contact your local reseller before contacting SMART Technical Support. Your local reseller can resolve most issues without delay. NOTE: To locate your local reseller, visit www2.smarttech.com/st/en-US/Where+to+Buy. -
Page 68: Warranty
Warranty Product warranty is governed by the terms and conditions of SMART’s “Limited Equipment Warranty” that shipped with the SMART product at the time of purchase. Customer Support 99-00850-21 B0... - Page 69 Index Adjusting Cables Advanced image adjustment options, 28 Harness cable (ECP), 3 Default settings, 29 Optional accessories, 5 Auto input search, 29 Cautions Beep, 29 Dust, 8 Blackboard mode, 29 Electrostatic discharge, 8 Fan mode, 29 Environment, 7 Keystone, 29 Humidity, 7 Lamp power, 30 Water and fluid resistance, 7...
- Page 70 Status display, 30 Menu, 27 Transporting, v Mirror cleaning, 33 Where to install, 8 Starting up your system, 25 Status information about your SMART Board 600i2 interactive whiteboard system, 30 Notebook software, 21 System warning lights, 41 Pen tray Troubleshooting...
- Page 71 After completing installation, 25 Image adjustment options, 27 Master power switch, 25 Selecting an input, 25 Starting up your SMART Board 600i2 interactive whiteboard system, 25 Using the remote control, 26 Using your interactive whiteboard, 26 Using your Unifi 45 projector, 26...
- Page 72 Index 99-00850-21 B0...
- Page 74 SMART Technologies 3636 Research Road NW Calgary, AB T2L 1Y1 CANADA www.smarttech.com/support www.smarttech.com/contactsupport Support +1.403.228.5940 Toll Free 1.866.518.6791 (U.S./Canada) 99-00850-21 REV B0...
Need help?
Do you have a question about the Board 600i2 and is the answer not in the manual?
Questions and answers