Table of Contents
Advertisement
Advertisement
Table of Contents

Related Manuals for Western Digital My Net N900 Central


Summary of Contents for Western Digital My Net N900 Central
- Page 1 ™ My Net N900 Central HD Dual-Band Storage Router User Manual...
- Page 2 001 +80085584253 Hong Kong/Singapore/Thailand 001/0033/0061 +80085584253 Japan Europe 00 +80085584253 Finland 990/999 +80085584253 Middle East 0031.880062100 Africa 0031.880062100 South Africa 09 +80085584253 Go to http://support.wdc.com/contact for a list of additional phone support numbers by region. MY NET N900 CENTRAL USER MANUAL...
-
Page 3: Table Of Contents
Table of Contents ® Service and Support ....... . ii Important User Information . - Page 4 Performing Advanced Tasks ....58 Enabling Guest Access ....... . . 58 Setting Up Parental Controls .
-
Page 5: Important User Information
Power supply cords should be routed so that they are not likely to be walked on or pinched by items placed upon them or against them. Do not overload wall outlets. For additional safety information, refer to www.wdc.com. MY NET N900 CENTRAL USER MANUAL... -
Page 6: Recording Your Wd Product Information
Your WD product includes 30 days of free technical support during the applicable warranty period for your product. The 30-day period commences on the date of your first telephone contact with WD technical support. Register your WD product online at http://register.wdc.com MY NET N900 CENTRAL USER MANUAL... -
Page 7: Product Overview
PRODUCT OVERVIEW Product Overview Thank you for purchasing the My Net N900 Central. This user manual provides step-by-step instructions for installing and using your new router. For the latest WD product information and news, visit our website at www.wdc.com. This chapter contains the following topics:... - Page 8 Enables you to connect a printer to a USB port and print from any computer within your network. Internal storage – The My Net N900 Central router models provide 1 TB or 2 TB of internal storage.
-
Page 9: Package Contents
Note: My Net N900 Central is compatible with Apple Time Machine™ to back up ® computers. Package Contents In addition to your My Net N900 Central, the package contains: Network (Ethernet) cable AC Power adapter Setup CD containing setup software (Windows only), additional software, and product documentation... -
Page 10: Components
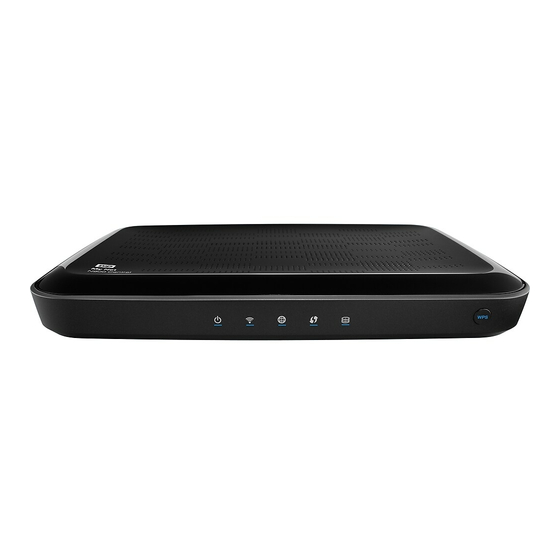
Units sold in those locations have a fixed power plug. Refer to the illustrations below. US/JA/TW EU/KO US/JA/TW EU/KO Installing Installing Removing Removing Components Front Panel Power LED Internet LED Internal Storage Wi-Fi Protected Setup (WPS) button Wireless LED Wi-Fi Protected Setup LED MY NET N900 CENTRAL USER MANUAL... - Page 11 Blinks to indicate network activity of that Ethernet port. Internet port Link LED (Green) On when a cable connects the port to the modem. Activity LED (Yellow) Blinks to indicate network activity on that port. MY NET N900 CENTRAL USER MANUAL...
- Page 12 PRODUCT OVERVIEW Bottom (not shown) Component Description Reset button To reset your My Net N900 Central router to factory defaults, press and hold the Reset button until the power LED begins blinking (about 10 seconds). MY NET N900 CENTRAL USER MANUAL...
-
Page 13: Getting Started
Installing WD Software from the CD (Optional) Installing the Router on the Network Two methods install the My Net N900 Central router on your network: Setup CD – The Easy Setup utility for Windows discovers and installs the router on the network. - Page 14 5. Continue to “Setting up a New Router” below. Setting up a New Router Set up a new router 1. On the Choose your setup option screen, click . A screen showing a connected router appears: MY NET N900 CENTRAL USER MANUAL...
- Page 15 The default connection type is PPPoE. Click Next. Note: See “Advanced WAN (Internet) Category” on page 38 for more information about connection types. To proceed without setting up your Internet connection, click Skip. MY NET N900 CENTRAL USER MANUAL...
- Page 16 Firmware” on page 69 and “Installing WD Software from the CD (Optional)” on page 18. b. To use or configure the router without selecting the other options, clear the check boxes and click Next. MY NET N900 CENTRAL USER MANUAL...
-
Page 17: Using A Browser For Setup (Windows Or Mac)
21 Using a Browser for Setup (Windows or Mac) To connect a Mac computer to a My Net N900 Central router you must use a browser. Note: Windows users can set up the router using a browser instead of Easy Setup. -
Page 18: Connecting To The Router Wirelessly
2. From the list of wireless networks on the computer’s or device’s screen, select the WesternDigital network and connect. By default there is no password. Continue to “Configuring a New Router” on page 15. MY NET N900 CENTRAL USER MANUAL... - Page 19 3. Click Continue to display the first Connect to Internet screen. 4. Make sure that your router is connected properly and click Confirm. 5. If both connections are confirmed, click Next. Continue to step 7. MY NET N900 CENTRAL USER MANUAL...
- Page 20 Note: To configure your router, continue with “Basic Settings and Tasks” on page 7. When the Set up Wireless screen displays, you can change the Network Name and Password for more protection. (See “Configuring Wireless Settings” on page 26 for more information.) MY NET N900 CENTRAL USER MANUAL...
- Page 21 Note: If you made changes, you will have to connect your computer or wireless device to the new network. 9. Click OK. The My Dashboard home screen displays. Note: To configure your router, continue with “Basic Settings and Tasks” on page MY NET N900 CENTRAL USER MANUAL...
-
Page 22: Installing Wd Software From The Cd (Optional)
“Using WD Quick View (Windows or Mac)” on page 65 WD Print Share “Installing and Using WD Print Share” on page 77 My Net View “Accessing My Net View (Windows)” on page 76 WD SmartWare WD SmartWare online Help MY NET N900 CENTRAL USER MANUAL... - Page 23 2. Click Continue to display the Standard Install on “Macintosh HD” screen. You have the following options: To change the location of the applications, click Change Install Location. To customize the installation, click Customize and select the applications you want to install. MY NET N900 CENTRAL USER MANUAL...
- Page 24 Note: For information about WD Quick View, see “Using WD Quick View (Windows or Mac)” on page 65. For information about WD Print Share, see “Installing and Using WD Print Share” on page 77. MY NET N900 CENTRAL USER MANUAL...
-
Page 25: Basic Settings And Tasks
Adding a Wi-Fi Device Setting up Remote Access Opening My Dashboard After Setup To open the My Net N900 Central router dashboard after initial configuration: 1. Enter http://wdrouter or http://192.168.1.1 in the address field of your browser. The Welcome screen displays: 2. -
Page 26: Understanding My Dashboard
Settings Internet connections, wireless page 36 connections, storage, devices, system administration, security, and the local network (LAN). Alert Click to display recent alerts about new firmware and network issues and shortcuts to important settings. MY NET N900 CENTRAL USER MANUAL... - Page 27 Password Password for accessing the 5 GHz network. Attached Storage Status of a storage device connected to the router’s USB port. Internal Hard Drive Status of the router’s internal drive. MY NET N900 CENTRAL USER MANUAL...
-
Page 28: Connecting To The Internet
Connecting to the Internet To check or troubleshoot your Internet connection: Connect to Internet 1. Click the icon to display a diagram showing you how to connect the router cables. MY NET N900 CENTRAL USER MANUAL... - Page 29 To proceed without setting up your Internet connection, click Skip. In either case, the My Dashboard home screen displays. Note: If the Internet connection does not succeed, see “Advanced WAN (Internet) Category” on page 38 for information about the Internet Setup screen.) MY NET N900 CENTRAL USER MANUAL...
-
Page 30: Configuring Wireless Settings
2. View or modify the required wireless settings for the 2.4 GHz network and the 5 GHz network. Setting Description Network Name Name given to the wireless network. Password Password for accessing the wireless network. 3. Click Save. MY NET N900 CENTRAL USER MANUAL... -
Page 31: Setting Up Storage
USB port. 1. Click the Set Up Storage icon to display the first screen of the storage wizard. 2. Click Next to display a list of connected storage devices and the internal hard drive. MY NET N900 CENTRAL USER MANUAL... - Page 32 9. On the Step 4 screen, do one of the following: Click Back to select another storage device from the list. Repeat steps 3-8 for each device. Click Finish. The My Dashboard home screen appears. MY NET N900 CENTRAL USER MANUAL...
-
Page 33: Adding A Wi-Fi Device
Enter the wireless device’s WPS PIN code. Method 2: Device PIN: c. Method 3: Router PIN: If prompted by your wireless device, enter the WPS PIN shown on the screen into your wireless device. MY NET N900 CENTRAL USER MANUAL... - Page 34 The Wi-Fi network SSID of the wireless network you want to use The password for the wireless network you selected Note: By default there is no password. If a password was configured during setup, that password displays in the field. Password 3. Click Close. MY NET N900 CENTRAL USER MANUAL...
-
Page 35: Setting Up Remote Access
1. Click the Remote Access icon. The Set up WD 2go Remote Access screen displays: Adding Mobile Access 1. Click Add Mobile Access to display the Step 1: Download App screen. 2. Download the WD Photos and/or WD 2go apps from your app store. MY NET N900 CENTRAL USER MANUAL... - Page 36 4. Open the WD app on your mobile device:, 5. Select your router, and enter the activation code as prompted. Click Activate. Finish 6. On the router My Dashboard screen that displays the activation code, click MY NET N900 CENTRAL USER MANUAL...
- Page 37 2. Enter the email address and full name of the user for whom you are setting up an account and click Next. 3. When the screen indicates that the email has been sent, click Finish. 4. Check your email for further instructions on accessing your stored files and data. MY NET N900 CENTRAL USER MANUAL...
- Page 38 5. In a browser, sign in to https://www.wd2go.com/ using the associated email address and password (see page 31). 6. Click Submit to display the My WD Devices screen. 7. Click View Shares to display the router’s share(s). MY NET N900 CENTRAL USER MANUAL...
- Page 39 BASIC SETTINGS AND TASKS 8. Click + Open in Explorer to view the content of the share Note: Mac users follow a similar procedure in Finder. For further information, please see the online FAQs. MY NET N900 CENTRAL USER MANUAL...
-
Page 40: Advanced Settings
My Dashboard screen. When a “basic” icon has a small Advanced Settings icon to its upper left, you are configuring that function’s advanced settings. For example, the icon for Internet Settings looks like this: MY NET N900 CENTRAL USER MANUAL... -
Page 41: Typical Advanced Settings Screen
ADVANCED SETTINGS Typical Advanced Settings Screen Advanced Settings Categories Close button Tabs Close Note: To close an Advanced Settings screen, click the button at the top of the screen. The My Dashboard home screen displays. MY NET N900 CENTRAL USER MANUAL... -
Page 42: Advanced Wan (Internet) Category
Indicates whether the router has established a physical link to the modem. Primary DNS Server/Secondary DNS The primary and secondary DNS Server addresses are Server configured and maintained by your ISP. Contact your ISP for this information. MY NET N900 CENTRAL USER MANUAL... - Page 43 DNS server when using DHCP, it will override your ISPs DNS server. The secondary DNS Server is the one that will be used if the primary DNS server is not reachable. This entry is optional. MY NET N900 CENTRAL USER MANUAL...
- Page 44 The IPv6 address of the gateway device to which your router is connected. LAN IPv6 Link-Local Address The LAN link-local IPv6 address of your router that is assigned automatically. Name (if any) Name of the computer associated with the IPv6 address. MY NET N900 CENTRAL USER MANUAL...
- Page 45 The host name (domain name) you configured/ purchased from your DDNS service provider. Password (Key)/Verify Password (Key) Password required for accessing your DDNS account. For DynDNS.org, this is your account password. For TZO, this is your account key. MY NET N900 CENTRAL USER MANUAL...
- Page 46 802.11 n+ac only. Network Name (SSID) Name given to the wireless network. Password Password for accessing the wireless network. For some Enterprise modes, additional fields display: • Radius Server IP Address • Port • Shared Secret MY NET N900 CENTRAL USER MANUAL...
- Page 47 WMM QoS is forced to On (grayed out) when the Network mode set includes when the Network mode set includes 802.11ac. If you select any mode not including 802.11n or 802.11ac, you have the option of turning WMM QoS Off. MY NET N900 CENTRAL USER MANUAL...
-
Page 48: Advanced Lan Category
PIN or reset it to the default value. Guest Access Screen Purpose: Allow visitors access to the 2.4 GHz and 5 GHz wireless bands. For information on setting up guest access, see “Enabling Guest Access” on page 58. Advanced LAN Category MY NET N900 CENTRAL USER MANUAL... - Page 49 Enable the server that provides an IP address to the LAN-side computers dynamically. Local Domain Name You can append a local domain name to your clients' Internet requests to avoid entering the complete address of commonly used Internet domains. MY NET N900 CENTRAL USER MANUAL...
- Page 50 Uses the File Transfer protocol (FTP) to exchange files over the network. iTunes Allows streaming of music to other devices in the network that have iTunes. Password Enter the password of the person being granted access to the private share and FTP service. MY NET N900 CENTRAL USER MANUAL...
- Page 51 AFP (Apple Filing Protocol Screen) Purpose: Enable the AFP server for sharing files using Mac operating systems. Enable AFP Server To enable the AFP server, toggle to On. Required for Apple Time Machine support. MY NET N900 CENTRAL USER MANUAL...
-
Page 52: Security Settings Category
Protocol that will be applied in the firewall rule. Available options are TCP, UDP, ICMP, and TCP+UDP. Source Local network (LAN) or Internet (WAN). Source IP Range Range of IP addresses where the traffic initiates. MY NET N900 CENTRAL USER MANUAL... - Page 53 Turn MAC Filtering ON and ALLOW computers listed to access the network. Parental Controls Screen Purpose: Control Internet access to specific websites and access periods. (See “Setting Up Parental Controls” on page 59.) MY NET N900 CENTRAL USER MANUAL...
-
Page 54: Remote Access Category
Connected – Connection is now established to a registered mobile device or a registered web access account. Failed – Router could not establish a remote access connection with the mobile device or web access account. Check your Internet connection. MY NET N900 CENTRAL USER MANUAL... - Page 55 Once you activate mobile access on your device, the name of the device or associated email address displays along with the mobile application being used. Trash can icon To remove mobile access for the device, click the icon to its right. MY NET N900 CENTRAL USER MANUAL...
-
Page 56: Additional Features Category
Purpose: Open a single port or a range of ports in your router and redirect data. Applies only to traffic coming from the Internet. For information on port forwarding, see “Enabling Port Forwarding” on page 74. MY NET N900 CENTRAL USER MANUAL... - Page 57 The default value is 1-Highest. Protocol Internet protocol for transferring data. Select TCP or UDP. Remote IP Range Remote IP address range of the service on the Internet the rule applies to. MY NET N900 CENTRAL USER MANUAL...
- Page 58 QoS prioritizes all Internet traffic based on this setting. Enhanced WMM Screen (My Net N900 Router) Purpose: Wi-Fi Multimedia (WMM) refers to QoS (Quality of Service) over Wi-Fi. QoS enables Wi-Fi access points to prioritize traffic and optimizes how different applications share network resources.
-
Page 59: Admin Category
Purpose: Configure, update, and maintain the correct time on the router manually or automatically by NTP (Network Time Protocol). Adding User Defined NTP Enter the name of NTP server of your choice and click Add. Server MY NET N900 CENTRAL USER MANUAL... - Page 60 The result of whether your router can reach the specified host name or IP address. Host Name or IP Address Enter the host name or IP address of a computer you want to locate on the network. Click Ping. MY NET N900 CENTRAL USER MANUAL...
- Page 61 Wi-Fi access point, allowing you to expand your existing wireless network without replacing your router. For information about changing to AP mode, see “Using the Router as an Access Point” on page MY NET N900 CENTRAL USER MANUAL...
-
Page 62: Performing Advanced Tasks
PERFORMING ADVANCED TASKS Performing Advanced Tasks This chapter describes the most important tasks the administrator performs in setting up and maintaining the My Net N900 Central router. It includes the following topics: Enabling Guest Access Setting Up Parental Controls Changing the Administrator Password Accessing Files on the Router or an Attached USB Drive Updating the Router’s Firmware... -
Page 63: Setting Up Parental Controls
You need to register the router to activate Parental Control service for your router. To set up parental controls: 1. On the Advanced Settings screen, click the Security icon to display the Security/Parental Controls screen. 2. Click the Parental Controls tab. MY NET N900 CENTRAL USER MANUAL... - Page 64 Follow the instructions in the email to confirm your registration of Parental Controls. Parental Controls are activated about fifteen minutes after you confirm your registration. 7. On the Policy Management screen, enter your password and click Login. MY NET N900 CENTRAL USER MANUAL...
- Page 65 11. Click the WD Internet Parental Controls Policy Management link in the middle of the page to launch the Device List View screen. Managing Parental Controls The Device List View screen enables you to manage parental controls on a master, device, and time range level. MY NET N900 CENTRAL USER MANUAL...
- Page 66 1. On the Devices List View screen (see page 61), below Master Setting, click Safe/Block. The Safe/Block List displays. MY NET N900 CENTRAL USER MANUAL...
- Page 67 2. Select the Time Range and the Filtering Level it should apply to. By default, the screen shows a 24-hour range (12 A.M. - 12 A.M.); you can adjust the range to your preferences. For example, you may want to block all web access from (8 A.M.- 5 P.M.). MY NET N900 CENTRAL USER MANUAL...
-
Page 68: Changing The Administrator Password
Changing the Administrator Password It is a good practice to change the administrator password for accessing and managing the router. 1. On the Advanced Settings screen, click the Administrator icon to display the Admin/Administrator screen. MY NET N900 CENTRAL USER MANUAL... -
Page 69: Accessing Files On The Router Or An Attached Usb Drive
1. Right-or left-click the WD Quick View icon in the system tray to display a menu. 2. Move the pointer over or click to select your My Net N900 Central router and display a submenu. The internal storage and USB shares display in Windows Explorer:... - Page 70 1. Click the icon in the menu bar to display a menu, and move WD Quick View the pointer over the name of your My Net N900 Central router to display a submenu. 2. Select Open 3. If you are prompted for a username and password, enter the username and password that you created when you set up external storage.
- Page 71 PERFORMING ADVANCED TASKS 5. In Finder, the My Net N900 Central router displays below Shared. The Public folder of the internal storage and the name of your USB device display in the right pane: 6. To view the contents of the drives, double-click the Public folder or the name of your storage device.
- Page 72 4. If you are prompted for a username and password, enter the username and password that you created when you set up external storage. If a password was not created, select or enter guest. Click Connect. MY NET N900 CENTRAL USER MANUAL...
-
Page 73: Updating The Router's Firmware
2. On the router screen, browse to the firmware file you saved and click Open. The file name displays in the browser field on the router screen. 3. Click Upload. A message says how long the upload will take. Please wait while the firmware update is taking place. MY NET N900 CENTRAL USER MANUAL... -
Page 74: Restoring The Router To Factory Defaults
You can reboot the router two ways. If you are physically close to it, just press the On/Off button on the router. If you cannot easily press the button: 1. On the Advanced Settings screen, click the Administrator icon. 2. Click the System tab. MY NET N900 CENTRAL USER MANUAL... -
Page 75: Using The Router As An Access Point
3. Scroll to the bottom of the screen and click Reboot. Using the Router as an Access Point You can use your My Net N900 Central router as an extender or access point (AP). Extender mode can: Add wireless coverage to a home network without wireless coverage. - Page 76 Note: The IP address of your extender is the static IP you assigned or the DHCP IP address assigned by your main router. Setting up the DHCP Server on the My Net N900 Central Router You can use your router as a DHCP server that assigns IP addresses to other components of your network.
- Page 77 2. Click Add/Update. The device information populates the device table below. 3. To update a device, select it in the table and click the Edit icon. Edit the information and click Add/Update. MY NET N900 CENTRAL USER MANUAL...
-
Page 78: Configuring Upnp
(NAT), port forwarding allows their information to come through. To create port forwarding rules: 1. On the Advanced Settings screen, click the Additional Settings icon. 2. Click the Port Forwarding tab. MY NET N900 CENTRAL USER MANUAL... - Page 79 Enter the port(s) on the LAN client to which you want to forward data. The port is automatically populated when you pick an application from the drop-down list. 4. Click Save at the top or bottom of the page. MY NET N900 CENTRAL USER MANUAL...
-
Page 80: Accessing My Net View (Windows)
To access My Net View: 1. Double-click the My Net View icon on your Desktop. The My Net View Welcome page displays. 2. Click Diagnose, and use the online Help (?) to guide you through the diagnostic procedures. MY NET N900 CENTRAL USER MANUAL... -
Page 81: Installing And Using Wd Print Share
INSTALLING AND USING WD PRINT SHARE Installing and Using WD Print Share 1 3 4 4 5 7 Your My Net N900 Central router can share a printer, a multi-function printer, or a scanner with computers on your network. This chapter contains the following topics:... -
Page 82: Installing Wd Print Share (Mac)
2. In Finder, double-click WD Print Share under Devices: 3. Follow the installation wizard to install WD Print Share. 4. When the installation is done, click the WD Print Share icon on the desktop to display the WD Print Share Control Center. MY NET N900 CENTRAL USER MANUAL... -
Page 83: Using The Wd Print Share Control Center
Connect manually connects the device to your computer for the timeout duration set in Tool > Set Timeout in the menu. Note: Only the connected computer will be able to print until the computer releases the connection. MY NET N900 CENTRAL USER MANUAL... - Page 84 2. Click Scan. You are prompted to select a scanner interface. A scanner user interface appears on the screen. 3. Choose options and click Scan to scan your picture or document. 4. After scanning is done, click Close. MY NET N900 CENTRAL USER MANUAL...
-
Page 85: Troubleshooting
Turn off your router, and set it aside for 15 to 20 minutes until it cools down. Turn your router back on to resume operation. If the problem persists, contact Technical Support at http://support.wdc.com. MY NET N900 CENTRAL USER MANUAL... -
Page 86: Regulatory And Warranty Information
For operation within 5.15 ~ 5.25 GHz frequency range, it is restricted to indoor environment. This device meets all the other requirements specified in Part 15E, Section 15.407 of the FCC Rules. MY NET N900 CENTRAL USER MANUAL... -
Page 87: Safety Compliance
Approuvé pour les Etats-Unis et le Canada. CAN/CSA-C22.2 No. 60950-1, UL 60950-1: Sûreté d'équipement de technologie de l'information. This device is only for use with the compatible UL Listed AC adapter. Cet appareil n'est destiné qu'a` des adaptateur compatibles marqués "UL Listed". MY NET N900 CENTRAL USER MANUAL... - Page 88 (1999/5/EG), der Niederspannungsrichtlinie (2006/95/EG) und der Richtlinie (2005/32/EG) des Europäischen Parlaments. Eine „Konformitätserklärung“ gemäß den anwendbaren Richtlinien wurde abgegeben und kann bei Western Digital Europe eingesehen werden. Le symbole CE sur l'appareil indique la conformité de cet appareil avec les directives applicables du Conseil de l'Union Européenne, dont les directives EMC (2004/108/EC),...
- Page 89 (council directives) for EU, inkludert EMC-direktiv (2004/108/EF), (1999/5/EF), Lavspenningsdirektiv (2006/95/EF) og EuP-direktiv (2005/32/EF). En "Samsvarserklæring" i henhold til gjeldende direktiver har blitt opprettet og er i Western Digital Europas arkiver. CE-merkintä osoittaa tämän järjestelmän yhdenmukaisuuden sovellettavissa olevien Euroopan yhteisön neuvoston direktiivien kanssa, mukaan lukien EMC-direktiivi (2004/108/EC), (1999/5/EC), alijännitedirektiivi (2006/95/EC) sekä...
-
Page 90: Warranty Information (All Regions Except Australia/New Zealand)
(serial number required) via http://support.wdc.com. WD shall have no liability for lost data regardless of the cause, recovery of lost data, or data contained in any Product placed in its possession. MY NET N900 CENTRAL USER MANUAL... -
Page 91: Warranty Information (Australia/New Zealand Only)
Product or refund the cost of the Product to you. You are responsible for any expenses associated with a claim under this warranty. The benefits provided to you under this warranty are in MY NET N900 CENTRAL USER MANUAL... -
Page 92: Gnu General Public License ("Gpl")
Modification of or tampering with the Software, including but not limited to any Open Source Software, is solely at your own risk. Western Digital is not responsible for any such modification or tampering. Western Digital will not support any product in which you have or have attempted to modify the Software supplied by Western Digital. -
Page 93: Appendix: Technical Specifications
Input voltage: 100V to 240V AC Input frequency: 50 to 60 Hz Output voltage: 12V DC, 3A Power supply: 36W Temperature Operating temperature: 5 to 35 C (41 to 95 Non-operating temperature: -20 to 65 C (-4 to 149 MY NET N900 CENTRAL USER MANUAL... -
Page 94: Index
My Net Setup software for Mac computers device and client tables 46 device mode 57 My Net View diagnostics (Windows) device not WPS enabled, connecting 29 DHCP server setup 72 network diagnostics 4 settings 45 diagnosing network problems (Windows) MY NET N900 CENTRAL USER MANUAL... - Page 95 Device Mode 57 operating precautions 1 DHCP Server Settings 45 DMZ 49 package contents 5 Dynamic DNS 41 parental controls 4 Enhanced WMM (My Net N900) 54 port forwarding 52 FasTrack Plus QoS 53 ports Firewall 48 Ethernet 3 Firmware Update 56...
- Page 96 79 WD Quick View accessing stored files 65 description 4 WD SmartWare 5 Wi-Fi Protected Security (WPS) 4 wireless adding devices 29 settings 26 setup 14 WPS LED 7 WPS-enabled device, connecting 29 MY NET N900 CENTRAL USER MANUAL...
- Page 97 Western Digital, WD and the WD logo are registered trademarks in the U.S. and other countries; My Net is a registered trademark of Western Digital Technologies, Inc. Adobe and Adobe Reader and the included Adobe Reader logo are either registered trademarks or trademarks of Adobe Systems Incorporated in the United States and/or other countries.
Need help?
Do you have a question about the My Net N900 Central and is the answer not in the manual?
Questions and answers