Table of Contents
Advertisement
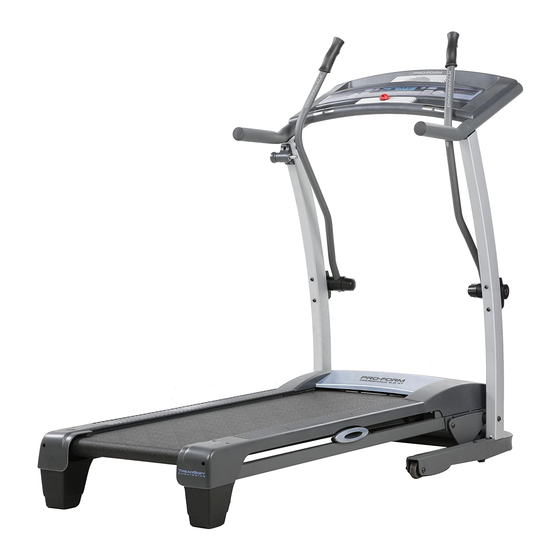
Model No. PFTL66806.0
USER'S MANUAL
Serial No.
Serial Number
Decal
QUESTIONS?
As a manufacturer, we are com-
mitted to providing complete cus-
tomer satisfaction. If you have
questions, or if parts are missing,
PLEASE DO NOT CONTACT THE
STORE; please contact
Customer Care.
IMPORTANT: You must note the
product model number and
serial number (see the drawing
above) before contacting us:
CALL TOLL-FREE:
1-888-533-1333
Mon.–Fri. 6 a.m.–6 p.m. MST
Sat. 8 a.m.–4 p.m. MST
ON THE WEB:
www.proformservice.com
CAUTION
Visit our website at
Read all precautions and instruc-
tions in this manual before using
www.proform.com
this equipment. Save this manual
new products, prizes,
for future reference.
fitness tips, and much more!
Advertisement
Table of Contents

Subscribe to Our Youtube Channel
Related Manuals for Pro-Form CROSSWALK 3.0 XT


Summary of Contents for Pro-Form CROSSWALK 3.0 XT
- Page 1 Model No. PFTL66806.0 USER'S MANUAL Serial No. Serial Number Decal QUESTIONS? As a manufacturer, we are com- mitted to providing complete cus- tomer satisfaction. If you have questions, or if parts are missing, PLEASE DO NOT CONTACT THE STORE; please contact Customer Care.
-
Page 2: Table Of Contents
TABLE OF CONTENTS IMPORTANT PRECAUTIONS ..............3 BEFORE YOU BEGIN . -
Page 3: Important Precautions
IMPORTANT PRECAUTIONS WARNING: To reduce the risk of burns, fire, electric shock, or injury to persons, read the following important precautions and information before operating the treadmill. 1. It is the responsibility of the owner to ensure page 12. To purchase a surge suppressor, see that all users of this treadmill are adequately your local PROFORM dealer or call the toll- informed of all warnings and precautions. - Page 4 20. Do not attempt to raise, lower, or move the DANGER: Always unplug the power treadmill until it is properly assembled. (See cord immediately after use, before cleaning ASSEMBLY on page 6, and HOW TO FOLD the treadmill, and before performing the AND MOVE THE TREADMILL on page 21.) maintenance and adjustment procedures de- You must be able to safely lift 45 pounds (20...
-
Page 5: Before You Begin
And when you’re not exercising, the unique To avoid a registration fee for any service needed CROSSWALK 3.0 XT treadmill can be folded up, re- under warranty, you must register the treadmill at quiring less than half the floor space of other treadmills. -
Page 6: Assembly
Screw (90)–2 1/2” Screw (119)–1 3/4” Tek Screw (58)–8 1/2" Screw (83)–8 ASSEMBLY 1 1/2" Screw (66)–4 To hire an authorized service technician to assemble the treadmill, call toll-free 1-800-445-2480. Assembly requires two persons. Set the treadmill in a cleared area and remove the packing materials; do not dispose of the packing materials until assembly is completed. -
Page 7: Square Hole In The Location Shown
2. Identify the Right Upright (39), which has a square hole in the location shown. Orient the Right Upright (39) and the Base (37) as shown. Attach the Right Upright to the Base with two Upright Bolts (4) and two Upright Star Washers (6);... - Page 8 5. See the left inset drawing. Identify the two Frame Spacers (71). Open the included packet of grease, and apply grease to both sides of both Frame Spacers. Then, identify the outer side of each Frame Spacer. While a second person lifts the Frame (36) slightly, hold a Frame Spacer (71) between the Right Upright (39) and the Lift Frame (41), with the outer side of the Frame Spacer facing the...
- Page 9 7. Gently pull the Upright Wire (69) to remove any excess from the Right Upright (39). 8. Route the Upright Wire (69) through one of the Handrails (40). Attach the Handrail to the Right Upright (39) with two Handrail Bolts (9) and two Handrail Star Washers (11).
- Page 10 10. Insert the connectors and the excess wire into Front View the Console Base (67) as you set the Console Base on the Handrails (40). Make sure that no wires are pinched, and start two Console Bolts (2) with 1/4" Star Washers (8) into the Handrails (40) and the Console Base (67).
- Page 11 13. Carefully raise the Left Upright (38) and Right Upright (not shown). Attach the Latch Housing (91) to the Left Upright (38) with two 3/4” Screws (3). Make sure that Knob the large hole in the Latch Housing is on the side shown.
-
Page 12: Operation And Adjustment
OPERATION AND ADJUSTMENT THE PRE-LUBRICATED WALKING BELT tric shock. This product is equipped with a cord having an equipment-grounding conductor and a grounding plug. Plug the power cord into a surge suppressor, Your treadmill features a walking belt coated with high- performance lubricant. - Page 13 CONSOLE DIAGRAM Clip FEATURES OF THE CONSOLE exercises require the use of dumbbells and an inflat- able exercise ball (not included). To purchase dumb- The revolutionary treadmill console offers a selection bells or an exercise ball, call the toll-free telephone number on the front cover of this manual.
- Page 14 HOW TO TURN ON THE POWER If the Start button or the Speed increase button is pressed, the walking belt Plug in the power cord (see page 12). will begin to move at 1 mph. As you exercise, change the speed of the Locate the reset/off walking belt as desired by pressing the Speed in- circuit breaker near...
- Page 15 In the man- Before using the ual mode, handgrip pulse the upper sensor, remove part of the the sheets of display can clear plastic from also show the metal con- Contacts the elapsed tacts. In addition, time, the distance that you have walked or run, the make sure that speed of the walking belt, the approximate number your hands are...
- Page 16 When only HOW TO USE A CROSS TRAINER PROGRAM three sec- onds remain in the first Insert the key into the console. segment of Current Segment the program, See HOW TO TURN ON THE POWER on page both the Current Segment column and the column to the right will flash and a series of tones will sound.
- Page 17 The program will continue in this way until the last Perform the first strength exercise when segment ends. The walking belt will then slow to a prompted. stop. When the Follow your progress with the display. first strength exercise segment be- See step 5 on pages 14 and 15.
- Page 18 If the speed or incline setting for the current seg- Press the Start button to start the program. ment is too high or too low, you can manually override the setting by pressing the Speed and A moment after the button is pressed, the tread- Incline buttons.
- Page 19 THE INFORMATION MODE of the display will show the total number of hours that the treadmill has been operated. In addition, an “E” for The console features an information mode that keeps English miles or an “M” for metric kilometers will appear track of treadmill usage information.
- Page 20 HOW TO USE THE UPPER BODY ARMS THE OPTIONAL CHEST PULSE SENSOR As you walk on the treadmill, you can hold the An optional chest pulse sensor offers hands-free oper- handrails or use the upper body arms. To exercise ation as it tracks your heart rate during your workouts. your arms, shoulders, and back for a total body work- To purchase the optional chest pulse sensor, call out, move the upper body arms forward and back as...
-
Page 21: How To Fold And Move The Treadmill
HOW TO FOLD AND MOVE THE TREADMILL HOW TO FOLD THE TREADMILL FOR STORAGE Before folding the treadmill, adjust the incline to the lowest position. If this is not done, the treadmill may be per- manently damaged. Next, unplug the power cord. CAUTION: You must be able to safely lift 45 pounds (20 kg) to raise, lower, or move the treadmill. -
Page 22: Troubleshooting
TROUBLESHOOTING Most treadmill problems can be solved by following the steps below. Find the symptom that applies, and follow the steps listed. If further assistance is needed, please see the front cover of this manual. PROBLEM: The power does not turn on SOLUTION: a. -
Page 23: Outer
PROBLEM: The walking belt slows when walked on SOLUTION: a. Use only a single-outlet surge suppressor that meets all of the specifications described on page 12. b. If the walking belt is overtightened, treadmill perfor- mance may decrease and the walking belt may be- come damaged. -
Page 24: Conditioning Guidelines
CONDITIONING GUIDELINES is to burn fat, adjust the speed and incline of the tread- WARNING: mill until your heart rate is near the lowest number in Before beginning this your training zone. or any exercise program, consult your physi- cian. This is especially important for individu- For maximum fat burning, adjust the speed and incline als over the age of 35 or individuals with pre- of the treadmill until your heart rate is near the middle... -
Page 25: Inner
SUGGESTED STRETCHES The correct form for several basic stretches is shown at the right. Move slowly as you stretch—never bounce. 1. Toe Touch Stretch Stand with your knees bent slightly and slowly bend forward from your hips. Allow your back and shoulders to relax as you reach down toward your toes as far as possible. -
Page 26: Part List
PART LIST—Model No. PFTL66806.0 R0807A Key No. Qty. Description Key No. Qty. Description Frame Bolt Belly Pan Console Bolt Frame Pivot Spacer 3/4” Screw Base Pad Wheel Bolt/Upright Bolt Power Cord Grommet 3/8” Jam Nut Handrail Endcap Upright Star Washer Left Foot Rail Upright Washer Right Foot Rail... - Page 27 Key No. Qty. Description Key No. Qty. Description Upper Body Arm Insert 14” Blue Wire, 2F Right Upper Body Arm w/Grip 4” Black Wire, M/F Resistance Assembly 8” Green Wire, F/Ring Base Endcap 4” Red Wire, M/F Isolator Screw User’s Manual Rear Roller Bracket Screw Filter Wire #These parts are not illustrated.
-
Page 28: Exploded Drawing
EXPLODED DRAWING A—Model No. PFTL66806.0 R0807A... - Page 29 EXPLODED DRAWING B—Model No. PFTL66806.0 R0807A...
- Page 30 EXPLODED DRAWING C—Model No. PFTL66806.0 R0807A...
- Page 31 EXPLODED DRAWING D—Model No. PFTL66806.0 R0807A...
-
Page 32: Ordering Replacement Parts
• the MODEL NUMBER of the product (PFTL66806.0) • the NAME of the product (PROFORM CROSSWALK 3.0 XT treadmill) • the SERIAL NUMBER of the product (see the front cover of this manual) • the KEY NUMBER and DESCRIPTION of the desired part(s) (see the PART LIST and the EXPLODED...
Need help?
Do you have a question about the CROSSWALK 3.0 XT and is the answer not in the manual?
Questions and answers