Table of Contents
Advertisement
Advertisement
Table of Contents

Related Manuals for Sunrise Medical Sapphire 2


Summary of Contents for Sunrise Medical Sapphire 2
- Page 1 ® ® SAPPHIRE 2 4 Wheel Scooter Owner’s Manual...
-
Page 2: How To Use This Manual
How to use this manual How to use this manual Sunrise Medical Limited want you to get the best out of your scooter. This Owner’s Manual will familiarise you with the scooter and its features. It contains guidance on everyday usage and general care in addition to information on the high quality standards which we adhere to and details about the warranty. - Page 3 Contents Introduction page 1 General Warnings page 2 Quick Start Guide page 3 - 4 Features page 5 Getting On and Off your Scooter page 6 Tiller Control Functions page 7 - 8 Freewheel Mechanism page 9 Seat Removal and Adjustment page 10 Tiller Adjustment and Battery Removal page 11...
- Page 4 Should you require any further assistance then please contact your local dealer. CUSTOMER SERVICES SUNRISE MEDICAL LIMITED SUNRISE BUSINESS PARK HIGH STREET WOLLASTON WEST MIDLANDS DY8 4PS ENGLAND Intern.
-
Page 5: General Warnings
GENERAL WARNINGS DO NOT OPERATE THE SCOOTER BEFORE READING AND UNDERSTANDING THIS INSTRUCTION MANUAL. IF YOU ARE IN DOUBT ABOUT THE MEANING OF THESE INSTRUCTIONS, OR ANY OF THE CAUTIONS AND WARNINGS, PLEASE CONSULT YOUR HEALTHCARE PROFESSIONAL, DEALER OR RELEVANT TECHNICAL PERSONNEL. FAILURE TO FULLY UNDERSTAND THE SCOOTER OPERATION MAY RESULT IN AN UNEXPECTED RESPONSE FROM THE EQUIPMENT WHICH CAN IN TURN LEAD TO POSSIBLE INJURY OR DAMAGE. -
Page 6: Battery Charging
Quick Start Guide Assembly When lifting always keep the back straight, bend the knees and use the lifting handles provided. Ensure your rear drive unit is locked in position by checking the rear docking handle (back light bracket) is fully engaged. Set the tiller by holding the Tiller Adjustment Lever clockwise while moving the tiller upwards. -
Page 7: Control Functions
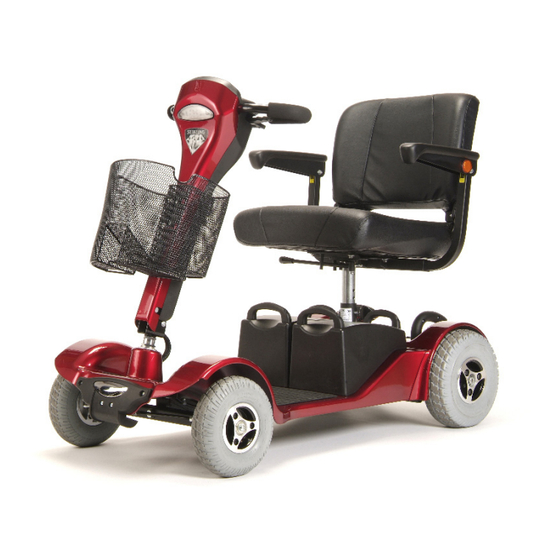
Quick Start Guide Control Functions Your scooter is equipped with the following features that can be found on the tiller fascia panel: On/ Off Switch, Battery Gauge, Battery Charging Socket, Speed Control “Min to Max”, Front / Rear Light, Horn and Directional Control Levers. If you have previously used or owned a scooter before you MUST still read the Owners Manual carefully to fully understand the controls and safety warnings. - Page 8 Features TILLER FASCIA WIDTH ADJUSTABLE PANEL ARMRESTS Page 7 - 8 Page 10 SEATING Page 10 LIGHTS Page 7 - 8 ADJUSTABLE TILLER Page 11 FREEWHEEL LEVER Page 9 BASKET Page 14 BATTERIES Page 12 - 13 & 20-22 TYRES Page 19 and 30 Fig.
-
Page 9: Getting On And Off Your Scooter
Getting On and Off your Scooter Getting on to your scooter Photo 6.1 1. Ensure that the key switch is turned to the off position (Photo 6.1). 2. Push forward the seat swivel lever located under the seat on the right-hand side and rotate the seat to face you (Photo 6.2). -
Page 10: Tiller Control Functions
Tiller Control Functions Hand Controls All of the drive controls for the scooter are to be found on the Tiller Control Box (Photo 7.1). The Preset Speed Knob Turning this knob to the left, “MIN”, reduces your available maximum speed. Turning it to the right, “MAX”, increases the available maximum speed. -
Page 11: Throttle Lever
Tiller Control Functions Throttle Lever The throttle lever offers finger-tip control of your scooter. It controls the speed as well as forward and reverse motion. To move the scooter in a FORWARD motion PULL the lever with the RIGHT HAND or PUSH the lever with the LEFT THUMB (Photo 8.1). -
Page 12: Freewheel Mechanism
Freewheel Mechanism Freewheel mechanism A freewheel device disengages the power drive Photo 9.1 to allow manual operation (i.e. the scooter can be pushed at a walking pace). The freewheel is selected by pushing BACKWARD the lever that is located on the left hand side of the scooter rear panel. -
Page 13: Seat Removal And Adjustment
Seat Removal and Adjustment Removing the Seat Photo 10.1 Please note that these instructions are to be used as a guide only. 1. Lift armrests upwards for ease of access (Photo 10.1) . 2. Stand behind the seat and fold the backrest down Photo 10.2 (Photo 10.2). -
Page 14: Tiller Adjustment And Battery Removal
Tiller Adjustment and Battery Removal Tiller Adjustment Photo 11.1 The scooter features an infinitely adjustable tiller which allows you to lock the tiller in the most comfortable driving position. This feature also lets you fold the tiller down fully, for transportation and stowage. The tiller adjusting lever is located on the driver’s side of the tiller. -
Page 15: Batteries And Charging
Batteries and Charging Off-Board Battery Charger Photo 12.1 Your scooter is supplied with an off-board charging facility (Photo 12.1). Please note that only chargers with a capacity of minimum 3.0 Amps and maximum of 6.0 Amps supplied by your local authorised dealer should be used. 1. - Page 16 Batteries and Charging The off-board charger must be kept dry in temperatures between -25°C and 40°C and not be subjected to mechanical damage. In all cases, the charger must only be repaired by an authorised dealer. WARNING ! NO SMOKING OR NAKED FLAMES WHEN CHARGING BATTERIES. DO NOT TOUCH BATTERY PACK TERMINALS WITH METAL OBJECTS.
- Page 17 Transportation Transportation Photo 14.1 Your scooter may be disassembled quickly and simply for transportation. 1. Engage the drive unit by pushing the freewheel lever forwards to stop the scooter from moving during docking and transportation. 2. Lift off the front basket. 3.
-
Page 18: Guidance For Safe Operation And Use
Guidance for Safe Operation and Use Basic Driving Caution! It is advisable during the first few sessions of operating your scooter that the area around you is clear of obstacles and pedestrians. Before operating your scooter, ensure the seat height and position has been adjusted to your satisfaction and the tiller angle has been set for optimum safety and comfort. -
Page 19: Hill Climbing
Guidance for Safe Operation and Use Hill climbing Photo 16.1 This scooter has been tested to climb an incline of no more than 10° with a maximum user weight of up to 150kg (330 lbs) (Photo 16.1). Do not attempt to climb inclines in excess of this. -
Page 20: Switching Off
Guidance for Safe Operation and Use Braking Photo 17.1 To bring the scooter to a standstill simply let go of the throttle control lever (Photo 17.1). Remember to keep both of your hands on the handlebars whilst the scooter is braking. Two types of braking are used. -
Page 21: Turning Corners
Guidance for Safe Operation and Use Crossing roads Photo 18.1 Your scooter is not capable of mounting and dismounting kerbs and other obstacles in excess of 3” (76mm) (Photo 18.1). Always use pedestrian crossings or drop downs. Be aware that some drop downs may be entrances to driveways. - Page 22 Guidance for Safe Operation and Use Tyres Photo 19.1 Your scooter has pneumatic tyres all round. It is good practice to inspect the tyres for damage or wear regularly. The maximum inflation pressure is 35 P.S.I. (2.40 Bar) and this should never be exceeded.
-
Page 23: Battery And Charging Information
Battery and Charging Information General information Batteries are the power source for almost Please do not dispose of batteries all of the modern mobility products in normal waste, always recycle in accordance with local laws. available today. The design of batteries used in mobility products is significantly different from the batteries used to start Maintenance free... - Page 24 Battery and Charging Information Battery pack care plan 8. The batteries need to be checked 1. Only use the approved battery regularly for signs of damage. If any charger compatible with the vehicle to damage is apparent, contact your be charged. local mobility dealer immediately.
- Page 25 Battery and Charging Information The range of your vehicle Most manufacturers of mobility products state the range of their vehicles either in the sales literature or within the Owner’s Manual. The range stated sometimes differs from manufacturer to manufacturer even though the battery size is the same.
-
Page 26: General Warnings
GENERAL WARNINGS PERSONAL & OPERATIONAL GUIDELINES Drive profiles should only be adjusted by healthcare professionals and approved agents/dealers, who are totally conversant with the process. They must also fully understand the user’s capabilities and the user’s ability to operate the scooter safely. Incorrect settings may cause injury or damage to the user, bystanders, the scooter and/ or nearby property. - Page 27 GENERAL WARNINGS PERSONAL & OPERATIONAL GUIDELINES DO NOT mount or dismount your mobility scooter without first withdrawing the ignition key. This will ensure that the power is off and the scooter cannot move unexpectedly. DO NOT leave the ignition key in your scooter whilst it is unattended. Children or inexperienced people may attempt to drive your scooter which may result in damage or personal injury.
- Page 28 GENERAL WARNINGS PERSONAL & OPERATIONAL GUIDELINES DO NOT operate the scooter without ensuring that the Tiller is properly adjusted and secured. After making any adjustment to the Tiller position you must check that the Tiller is locked and secured into position BEFORE driving. To check, gently push and pull the Tiller to make sure it is secured.
- Page 29 GENERAL WARNINGS PERSONAL & OPERATIONAL GUIDELINES Direct exposure to rain, sea spray or moisture could cause the mobility scooter to malfunction electrically and mechanically and may cause rusting. Maximum User Weight Limitations. SAPPHIRE² = 150Kg (330lbs). Front basket = 4.5Kg (10lbs). DISPOSAL The symbol above means that in accordance with local laws and regulations your product should be disposed of separately from household waste.
-
Page 30: Emc (Emi) Warnings
EMC (EMI) WARNINGS CAUTION: IT IS VERY IMPORTANT THAT YOU READ THIS INFORMATION REGARDING THE POSSIBLE EFFECTS OF ELECTRO MAGNETIC CONTAMINATION, (EMC) ON YOUR MOBILITY SCOOTER. SOMETIMES THIS EFFECT IS ALSO KNOWN AS ELECTRO MAGNETIC INTERFERENCE (EMI). EMC (EMI) FROM RADIO-WAVE SOURCES. Mobility scooters may be susceptible to EMC, which is interference from electromagnetic energy (EM) emitted from sources such as radio stations, TV stations, amateur (HAM) radio transmitters, two way radios and mobile phones. - Page 31 EMC (EMI) WARNINGS Mobility scooter electromagnetic contamination (EMC). EM energy rapidly intensifies the closer one moves to the transmitting antenna, the source. Because of this it is possible to bring strong EM fields unintentionally close to your mobility scooter’s control system. Mobile hand-held radio type transceivers are of particular concern.
-
Page 32: Specifications
Specifications MEASUREMENTS ARE FOR GUIDANCE ONLY. SMALL DIFFERENCES MAY OCCUR PARAMETER SAPPHIRE² LENGTH 121 cms (47.5”) REAR WIDTH 59 cms (23”) MAX. USER WEIGHT 150 kg (330 lbs) BATTERY CAPACITY 35 Ah MAX SAFE SLOPE 14 degrees at 113 kg (250 lbs) 10 degrees at 150 kg (330 lbs) TURN RADIUS 70 cms (28”) -
Page 33: Routine Maintenance
Routine maintenance The following table gives an indication as to when routine maintenance checks should be made. There is no service manual available. Maintenance, fault finding and servicing should be carried out by an authorised dealer unless otherwise indicated. The checks below can be carried out by the user Battery charge check (Fig. -
Page 34: Service History
Service history This section is designed to assist you in keeping a record of any service and repairs to your scooter. Should you decide to sell or exchange your vehicle in the future, this will prove most helpful to you. Your Service Agent will also benefit from a documented record and this manual should accompany the scooter when service or repair work is carried out. -
Page 35: Troubleshooting Guide
Trouble Shooting Guide Trouble Shooting Guide SYMPTON POSSIBLE CAUSE SOLUTION Shortened range Batteries not charged for Charge batteries for eight long enough hours or more Batteries weak and Replace battery pack cannot hold charge Battery pack not charging Battery pack fault Replace battery pack Charge fault Replace charger... - Page 36 Trouble Shooting Guide Your scooter is fitted with a self diagnostic controller that will give a sequence of audible beeps when an error is detected to help you, or the authorised service agent, determine the drive electronics fault. Should you switch on the scooter and hear the beeps note the number of beeps, separated by a short delay between each sequence, and refer to the table below.
-
Page 37: Warranty Condition
Sunrise Medical Limited recommend that you do not undertake maintenance tasks other than those explained in this manual. Your local authorised Sunrise Medical service agent is fully trained by Sunrise Medical to carry out detailed maintenance as and when required. Use only genuine Sunrise Medical replacement parts. - Page 38 Class B Scooters are sufficiently compact and manouervrable, for some indoor environments and capable of negotiating some outdoor obstacles. They are intended for use in the home, office, public places and similar locations where there are pavements, pedestrian paths or floors that have hard and firm surfaces.
- Page 39 Sunrise Medical Limited Sunrise Business Park, High Street, Wollaston, West Midlands DY8 4PS England Tel 01384 44 66 22 Fax 01384 44 66 44 Iss 2 E-Mail: sunmail@sunmed.co.uk 06 04 2010 www.sunrisemedical.com © 2010 Sunrise Medical Iss 2...
Need help?
Do you have a question about the Sapphire 2 and is the answer not in the manual?
Questions and answers