
Related Manuals for LG LE5008 Series


Summary of Contents for LG LE5008 Series
- Page 1 OWNER’S MANUAL Hybrid Digital Video Recorder Please read this manual carefully before operating your set and retain it for future reference. MODELS LE5016/LE5008 Series LE4016/LE4008 Series P/NO : MFL60560470 1005 (V1.0)
-
Page 2: Safety Information
Safety Information Safety Information Warning: Do not install this equipment in a confined space such as CAUTION a bookcase or similar unit. Warning: Wiring methods shall be in accordance with the National Electric Code, ANSI/NFPA 70. RISK OF ELECTRIC SHOCK DO NOT OPEN Warning: This is a class A product. -
Page 3: Important Safety Instructions
INSTRUCTIONS requirements and other relevant provisions of Directive 2004/108/EC, 2006/95/EC, and 2009/125/ European representative : 1. Read these instructions. LG Electronics Service Europe B.V. Veluwezoom 15, 2. Keep these instructions. 1327 3. Heed all warnings. AE Almere. The Netherlands (Tel : +31-(0)36-547-8888) 4. - Page 4 ‘damaged’ while playing a recording stored inside the system’s HDD, it must be replaced with a new one. Ask for an engineer’s assistance for HDD replacement from your dealer. LG Electronics is not responsible for deleted data caused by user mishandling.
- Page 5 In order to maintain stable system performance, have your system checked regularly by the service center. LG Electronics is not held responsible for system breakdown caused by user mishandling. There is a risk of explosion if a battery is replaced by an incorrect type. Dispose of used batteries according to the instructions.
-
Page 6: Table Of Contents
Contents Contents Configuration menu System settings Properties Network Network Streaming DDNS Date/Time Safety Information Controller Update IMPORTANT SAFETY INSTRUCTIONS Backup Device settings Preparation Camera IP Camera Introduction ATM/POS Features Storage Accessories Display settings Front Panel Rear Panel Sequence Remote Control Channel Composition Video Adjustment Installation... - Page 7 LG Network Client Program Introduction Recommended PC Requirements Before install the program Getting Started Install the LG Network Client on your PC Starting the LG Network Client LG Network Client Overview Operation and settings Register the Site Name or Group Name...
-
Page 8: Preparation
• E-SATA storage interface. Up to 480 IPS @ 704x480, LE5016 Series • Two-way audio. Up to 240 IPS @ 704x480, LE5008 Series • Text Input for ATM and POS device. NTSC Up to 480 IPS @ 352x240, LE4016 Series •... -
Page 9: Front Panel
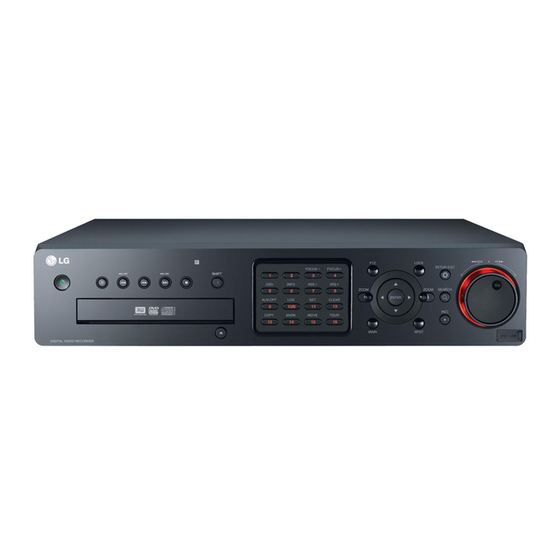
Preparation Front Panel Front of the LE5016/LE4016 series f g h i j o p q o r Front of the LE5008/LE4008 series f g h i j o p q o r 1 (Power): Turns DVR on or off. Press and hold for more than 2 seconds to turn on or off. Indicator •... - Page 10 Preparation • Sub-functions Button number Function Description FOCUS - Adjusts focus position. / FOCUS + Accesses or removes the System Control Bar (OSD). INFO Displays or removes system information. IRIS - / IRIS + Adjust iris position. Cancels alarm activation and returns the system to the condition before the alarm was ALM.OFF activated.
-
Page 11: Rear Panel
Preparation Rear Panel Rear of the LE5016/LE4016 series d e f g h i j k l m n o p q Rear of the LE5008/LE4008 series b n k p d e f g h i j l m VIDEO INPUT: Connect the camera’s video output to these BNC connectors. LOOP OUT: The signal from VIDEO INPUT connector is looped out to this connector. -
Page 12: Remote Control
Preparation Remote Control Button Description Turns DVR on or off. POWER (1) LOCK Displays the lock menu to change user type or disable system operation. Set the appropriate DVR system ID to operate via the IR Remote Controller when using the multiple DVR. Press the ID button then press the number button within 2 seconds to select the system ID of the DVR. -
Page 13: Installation
Installation Installation Connections Precautions • Depending on the camera and other equipment there are various ways to connect the unit. Please refer to the camera manual or manuals for other devices as necessary for additional connection information. • Be sure to switch off the camera before installation and connection. Basic Connection Overview Connect the coaxial-type cameras Connect the Monitor, DVR, VCR, or others. -
Page 14: Connecting Camera
Installation Connecting Camera VGA Monitor connection Connect the VGA jacks on the rear of the unit to the corresponding Connect the video output of your camera to the unit, using a input jacks on the TV or monitor using the VGA cable. standard 75 Ω... -
Page 15: Connecting Usb Device
Installation Connecting USB device Connecting ATM/POS Connect the ATM/POS unit to the ATM/POS port. USB device connection ATM/POS device connection USB Memory device Insert the memory device into the USB port. The system NOTE automatically recognizes the device. Using a USB memory device •... -
Page 16: Connecting Network
Installation Connecting Network Connecting the PTZ device Connecting the PTZ serial communication lines to the You can control and monitor the system via network. With RS-485 terminal. the remote control (monitoring), you can change the system configuration or monitors the image via network. After the PTZ device connection installation, check the network settings for the remote control and monitoring work. -
Page 17: Connecting Alarm Input And Alarm Output
Installation Connecting LKD1000 controller Sensor input connection Connecting the LKD1000 controller to control the DVR. (Refer to the manuals of the LKD1000 controller for more details.). The LKD1000 controller have to be connected to the 2 (DATA 2) port as shown illustration. -
Page 18: Hdd Installation
Installation HDD INSTALLATION Alarm Output Connect the alarm device to the alarm output. Alarm signal output at an event occurrence. Note for Hard Disk Drive Alarm output connection The internal hard disk drive (HDD) is a fragile piece of equipment. Please follow the guidelines below when using the DVR to protect against possible HDD failure. -
Page 19: Replacing The Hard Disk Drive
8. Assemble the top case. 9. Fix the screws. 1. Turn on the unit. System booting will commence. The LG logo 10. When you turn the power of the unit on, the new HDD is image will be displayed on the main monitor during the system detected and formatted automatically. -
Page 20: General Explanation Of The Live Screen On The Main Monitor
Installation General Explanation of the Live f System Control Bar Screen on the Main Monitor Displays the current date and time. Main Monitor Screen Displays the setup menu. a b c d Displays the search menu. Displays the PTZ remote control window. Displays the screen division selection window for the main monitor. -
Page 21: Selecting The Main Monitor Screen Mode
Installation Selecting the Main Monitor screen mode You can capture and save the current image in JPEG file format. You should You can select the live screen mode to display a full, 4-split, 6-split, connect the external device to save the 8-split, 9-split or 16-split screens on the main monitor. -
Page 22: Selecting The Spot Monitor Screen Mode
Installation Selecting the Spot Monitor screen mode PTZ Camera Control You can select the live screen mode to full or 4-split screens on the You can control the cameras connected via the data port of RS-485 spot monitor. terminal. You must set the configuration between the PTZ camera and the DVR. - Page 23 Installation To Register Preset Positions Setup for PTZ Cameras You can adapt the camera to your requirements by setting up the 1. Move the camera to a point you wish by using the respective items in menus. buttons. 1. Click the icon.
-
Page 24: Viewing System Information
Installation Viewing System Information NOTE To view system information: Refer to the following system log list. 1. Press the INFO button or click the icon in the system Log Message control bar. The system information window is displayed on the main monitor. -
Page 25: Export The Recorded Data
Installation Export the recorded data NOTE This unit can manually copy recorded images and audio from built- in HDD to the external recording devices. • Check the export device before you proceed. • You can also use the COPY button on the front panel for 1. -
Page 26: Configuration Menu
Installation Configuration menu Setting the Menu Using the Front Panel Buttons or Remote Control Buttons Remote Front Panel Description Control The features and options of the DVR are configured through the menu. The operations of this unit can be set via a menu displayed Use these buttons to select the on the main monitor. -
Page 27: System Settings
Installation System settings Network Properties • DHCP: Select this option when a DHCP server is installed on the network to allow IP address assignment. With this setting, the IP address is assigned automatically. • IP Address: Enter the IP address. •... -
Page 28: Network Streaming
Installation Network Streaming • Host Name: Enter the host name you want to use. You can not use the “www”, “mail”, “http”, “ftp”, “com”, “lg”, “lge”, “lgddns”, “lgeddns”, “ddns” for host name. • Registered Host: The registered host name appears. -
Page 29: Ntp
Installation Update • NTP: Marks up, if you want to synchronize the DVR’s date and The update feature allows you to upgrade DVR software and add/ time with those of the time server called NTP (Network Time upgrade PTZ protocols. In this case, the current DVR settings are not Protocol) Specify the NTP server’s name. -
Page 30: Backup
Installation Backup 3. Select the backup device. 4. Enter the date and/or time to start backup on the schedule start option. 5. Enter the day of week and/or time on the Time Range Start option. 6. Enter the day of week and/or time on the Time Range End option. -
Page 31: Device Settings
Installation Device settings NOTE • The disc burning is carried out by a single session closed format. Camera • If you use the CD/DVD writer device for backup, it is making ISO image and then writing the backup data to the CD/DVD. •... -
Page 32: Ip Camera
The Supported IP camera specifications. Specification Description Vendor LG, AXIS Recording mode Continuous, Instant Video Codec H.264 Baseline Profile Audio recording and playback Not support Resolution CIF, Half D1(2CIF), D1(4CIF) Stream Master-0 only for LG camera Not support Sensor/Motion input Not support... -
Page 33: Storage
Installation Display settings Storage • Overwrite: ALL: Overwrite recording is possible when the normal partition and event partition of HDD have fully recorded. NORMAL PARTITION: Overwrite recording is possible for • Channel Name: Mark up to display or remove the channel name normal partition of HDD when the normal partition of HDD in the channel window. -
Page 34: Channel Composition
Installation Record settings Channel Composition Schedule A schedule recording can be activated at preset times, in a repeating pattern on selected weekdays. The DVR can record according to a schedule set by the user. It can also record manually regardless of date and time. - Page 35 Installation • Sky blue (Continuous+Sensor+Motion+Text event recording): Recording starts automatically from the preset time. When the sensor alarm signal has input, motion has been detected or the text input occurs within a designated time, change the continuous recording mode to occurred event recording mode and recording starts automatically.
-
Page 36: Copying The Recording Schedule
Installation Normal Checking the Special Day Schedule List 1. Press [ZOOM -] when the [SP] button is selected. Settings concerning normal recording. The special day scheduled list appears. 2. Select a special day title on the list and press ENTER. The title color turns orange. -
Page 37: Motion
Installation Text • Quality: Selects the recording picture quality • Frame Rate: Selects the frame rate. The frame rate is the number Settings concerning text recording. of recorded frames per second. According to resolution, the frame rate is set automatically. •... -
Page 38: Ip Camera
• If you want to set the Frame Rate manually for each recoding picture of the camera in that position appears on the monitor. setting menu, refer to the below. LE5016/LE5008 Series Motion Resolution Frame Rate 352*240... -
Page 39: Atm/Pos Data Format
Installation ENTER: Selects or cancels the motion detection area at the NOTE current cell position. Press ESC to exit the settings. ATM/POS Recording Information. Option setting ATM/POS Recording Action NOTE Recording is started automatically • You can select the motion detection area by using the mouse. When the Transaction when the Transaction start data is To select the area: Drag &... -
Page 40: Mail
Installation Emergency • Sensor On: Sends an e-mail when a sensor has occurred. • Motion Detection: Sends an e-mail when a motion detection has occurred. • Text In: Sends an e-mail when a text input is detected. • Admin Password Changed: Sends an e-mail when the administrator password has changed. -
Page 41: Buzzer
Setup, Search/Play, Export, PTZ, Power Off, Instant Record: Set the authority for the selected group. Marks up the option to activate it. • Main Channel/Spot Channel: Selects the channel to allow the operation for the group user. The LG logo is displayed on the covert channel(s). - Page 42 Installation User You can set the user name for the selected User ID. 1. Select [User ID] from the drop-down list. 2. Enter the user name of the selected user ID. 3. Select the user group from the drop-down list. 4.
-
Page 43: Operation
Operation Operation Instant Recording NOTE • External recording devices can be used as copy areas for images recorded on the hard disk. It is impossible to record Images from a camera will be recorded on the built-in hard disk. images on the external recording devices directly. Ensure all the cameras are connected and that time and date have •... -
Page 44: Instant Playback 81 Specifications
Operation Instant Playback 8. Press SETUP/ESC to exit the[Date/Time] menu. Using the calendar icon to select the date 1. Select calendar icon then press ENTER. It is possible to play a recorded image without stopping recording. 2. Select year or month column then press ENTER. 1. -
Page 45: Bookmark Search
Operation ATM/POS Search 7. Select the [Search] icon then press ENTER. The event list menu appears. Search the recorded text information by ATM/POS device. 8. Select the recording data on the event list then press bB (Play) This function is available with backup data of the internal or external button, click [Play] or double click the selected data to start HDD only. -
Page 46: Export Search
Operation Export Search Search an exported data from the external device or internal DVD-ROM device. If you want to use this function, you have to connect the external device or insert the CD/DVD disc with exported data otherwise the warning message will be displayed. Check the export device before you proceed. -
Page 47: Functions Available During Playback
Operation Functions Available During Playback Button Function System Control Remote Control Front panel Stop playback. Pause playback. Jump to the beginning of the current data that was recorded on the same date. (press the button for more than 2 seconds.) Jump to the last 1 minute of the current data that was recorded on the same date. -
Page 48: Lg Network Client Program
2. Enter the password. (Note that the default client password are Memory 512 MB or above RAM “000000”.) 3. Click the [OK] button and then the LG Network Client window is Graphics Card 128 MB or above Video RAM (Use latest displayed. -
Page 49: Lg Network Client Overview
LG Network Client Program LG Network Client Overview File End Backup Use to stop and exit the backup Search search function. Selected Menu Tab Software Update Use to upgrade DVR software or add/ Live window upgrade PTZ protocols. Tool Bar Menu Bar 1. - Page 50 Displays the Connection List split mode). Choose the screen division Information windows. Add, Edit or Delete the site mode. name or group name in LG Network Client. Division E-Map Displays the E-Map pop-up windows. View all the channels in sequence. You...
-
Page 51: Operation And Settings
If you use the multi DVR with Broadband router, you must set the TCP/ The first time LG Network Client is started, you should register a site IP port number for each DVR. name to control it by the LG Network Client program. The computer running LG Network Client program must be on the same network 5. -
Page 52: Disconnect The Site Name Or Group Name
LG Network Client Program Disconnect the site name or group name NOTE 1. Select the required site name or group name. • Configuration of camera view is set the first time only. This 2. Click the right mouse button on the site name or group name. - Page 53 LG Network Client Program Instant playback Pan/Tilt/Zoom Tab It is possible to play a recorded image without stopping recording. You can control the PTZ cameras via the network. 1. Select the [Camera View] tab in the live mode. 1. Select the PTZ camera channel window in the camera view mode.
- Page 54 LG Network Client Program To Register Preset Positions Log View Tab 1. Move the camera to a point you wish. You can see the system log list of selected site name. 2. Click the [SET] icon. 1. Select the [Log View] tab.
-
Page 55: Using The Search Function
LG Network Client Program Delete the favorite Event Search Tab Search a recorded picture by date and event type. 1. Select the registered favorite name and click the right mouse button. 2. Select the [Delete Favorite] option. The selected favorite name is deleted. -
Page 56: Using The Remote Setup Function
LG Network Client Program ATM/POS Search Tab Date/Time Search the recorded text information by ATM/POS device. • Date Format: Select the date display format. This function is available with backup data of the internal or external • Time Format: Select the time display format. - Page 57 LG Network Client Program Device settings • Full Warning: When the HDD has overflowed a warning message is displayed. • Auto Delete: Set the auto delete date. If you set the auto delete date, the recorded data will be deleted except the data within the selected date period of time.
- Page 58 LG Network Client Program Motion Settings when the sensor alarm is occurs within a designated time. • Sensitivity: Set the sensitivity level for the created motion • M (Motion event recording): Recording starts automatically detection area. when motion is detected within a designated time.
- Page 59 LG Network Client Program Schedule channel copy settings • Relay Output: Select the alarm (relay) output number for the RELAY-OUT terminal for the output alarm (relay) signal. 1. Select the day. • Preset: Select the preset number. When the input is 2.
- Page 60 LG Network Client Program Mail Emergency 1. Click the [Setup] button. 1. Click the [Setup] button. 2. Set the below options. 2. Set the below options. • Notification: Marks up to notify the unit operating • Notification: Marks up to notify the emergency agent about information according to notification settings by e-mail.
-
Page 61: Using The Export Function
Record: Set the authority for the selected group. Marks up the option to activate it. • Main Channel/Spot Channel: Selects the channel to allow the operation for the group user. The LG logo is displayed on the covert channel(s). User 1. Select the [User ID] from the drop-down list. -
Page 62: Using The E-Map Function
LG Network Client Program Add the Map NOTE 1. Click the [Add E-Map] button. The Add E-Map window is displayed. • The exported data file name is made automatically as the 2. Click the [...] button in the [E-Map path] option. -
Page 63: Additional Programs
LG Network Client Program Additional Programs To activate the Emergency Agent program 1. Run the [LG Emergency Agent] program. The Emergency icon is displayed in the system tray. 2. Whenever a notification function occurs, a message box is displayed on the bottom right of the screen. -
Page 64: Export Viewer Program
Video Information window. To play the exported data Playback control buttons. 1. Run the LG Export Viewer program on the PC or in the Export Viewer folder of the external USB device. Watermark setting window. If you insert the exported data CD or DVD disc, the export viewer program run automatically. -
Page 65: Web Viewer Program
You can capture and save the current 3. Click the [OK] button to exit. image in JPEG file format. The initial save folder is “C:\LG Exported Files”. If you want to change the storage folder, set the [Save Path] option on the WebViewer Control Properties Window. -
Page 66: Troubleshooting
Check there is no problem with the video cable connection from the camera to the LG DVR system. Turn off the DVR system and turn it on again. Check the recording mode in the record setting menu. - Page 67 Troubleshooting Symptoms Resolutions Check the audio recording option is correctly set for the camera you wish to record audio. Audio data recorded with Check the speaker and audio (line input) on the rear of system are connected correctly. video data is not playing. Check the connected speaker is working properly.
- Page 68 Troubleshooting Symptoms Resolutions E-mail reception failed without SMTP server setting. • Make sure the network is correctly set. • Make sure the mail address is input correctly. • Check the spam mail setting of the inputted mail address. (If you set the spam mail, some mails are deleted automatically or classified in the spam mail box) •...
-
Page 69: Appendix
Appendix Appendix Recommended Devices Recommended USB Memory list Maker Model Name Capacity LG Electronics XTICK Mini Slide / Slide 1 G/2 G/4 G IOCELL CellDisk Swing 1 G/2 G/4 G/8 G Sony MicroVault 1 G/2 G/4 G S100 / M100 / V210W... -
Page 70: Supported Function List For Device
Appendix Supported function list for device Device Instant backup Schedule backup Export Configuration Import/Export CD/DVD USB memory USB HDD E-SATA HDD NOTE If you use a USB memory stick or USB HDD for configuration import/export you must disconnect the other external USB devices. Supported PTZ Camera list Pan/Tilt Zoom... -
Page 71: Time Zones
Appendix Time zones Timezone Timezone name Timezone Abbreviation Eniwetok, Kwajalein -12:00 Midway Island, Samoa -11:00 Hawaii -10:00 Alaska -09:00 -08:00 Pacific Time (US and Canada); Tajuana -08:00 -07:00 Mountain Time (US and Canada), Chihuahua, La Paz, -07:00 -06:00 Mazatlan, Arizona Central Time (US and Canada), Saskatchewan, Guadalajara, Mexico City, Monterrey, -06:00 -05:00... -
Page 72: Factory Default Configuration Settings
Appendix Factory Default Configuration Settings Factory 1st level 2nd level 3rd level Default Setting Default setting System DVR Name NULL Language The option depends on the model. Button Beep Properties Video Format NTSC or PAL Configuration Import Configuration Export Factory Default DHCP IP Address NULL... - Page 73 Appendix Date (2010.01.01) Time Current Time Date Format YYYY/MM/DD Time Format 12 HR Date/Time Time Zone The option depends on the model. Daylight Saving Daylight Saving Start JAN, 1st, SUN, 00 Daylight Saving End JAN, 1st, SUN, 00 Server PUBLIC SERVER Private Time Server NULL Sync.
- Page 74 Appendix Channel CH 01 Port NONE Control ID Protocol LG_MULTIX Baud Rate 9600 PTZ Test Channel IP 01 Vendor NONE Model Name NULL Host Name NULL IP Camera User Name NULL Password NULL Port Test Interface Device NONE Camera CH 01 Baud rate 9600 ATM/POS...
- Page 75 Appendix Record Schedule List Ch Copy Day Copy Resolution 352X240 (NTSC)/352X288 (PAL) Normal Quality STANDARD Frame Rate 30 (NTSC)/25 (PAL) Resolution 352X240 (NTSC)/352X288 (PAL) Quality STANDARD Sensor Frame Rate 30 (NTSC)/25 (PAL) Prealarm Postalarm 10SEC Resolution 352X240 (NTSC)/352X288 (PAL) Quality STANDARD Motion Frame Rate...
- Page 76 Appendix Resolution 352X240 (NTSC)/352X288 (PAL) Instant/Panic Quality STANDARD Frame Rate 30 (NTSC)/25 (PAL) Resolution 352X240 (NTSC)/352X288 (PAL) IP Camera Quality STANDARD Frame Rate 30 (NTSC)/25 (PAL) Event Sensor Type N.O. Sensor Camera 01 to 16 Relay Output NONE Preset NONE Channel CH 01 Sensitivity...
- Page 77 Appendix Notification SMTP Server NULL SMTP Port User Name NULL Password NULL Mail Mail Address 1 NULL Mail Address 2 NULL Mail Address 3 NULL E-mail Test Notification Emergency Host name NULL Port 9002 Relay Off ALARM ACKNOWLEDGE Output System Alarm Out NONE Sensor Motion...
- Page 78 Appendix Recording Time Table (250GB HDD) Recording Time(Hr) Resolution Quality Video(NTSC/PAL) Video + Audio(NTSC/PAL) (NTSC/PAL) (NTSC/PAL) 16ch 16ch 30/25 1022/800 511/400 838/683 461/368 15/12.5 1188/1142 594/571 947/917 527/509 10/8 1508/1416 754/708 1139/1086 649/615 LOWEST 7.5/6 1573/1588 787/794 1176/1185 673/679 2095/1658 1047/829 1445/1223 855/704...
- Page 79 Appendix 30/25 563/425 281/212 502/389 265/203 15/12.5 764/602 382/301 657/533 353/283 10/8 899/771 449/385 753/661 410/356 LOWEST 7.5/6 949/888 474/444 788/746 431/405 1175/925 587/463 938/772 522/421 1235/980 617/490 976/810 545/443 1553/1337 777/669 1165/1039 666/585 30/25 469/330 235/165 426/308 223/159 15/12.5 625/465 312/233 551/423...
- Page 80 Appendix 30/25 302/236 151/118 284/224 146/115 15/12.5 430/337 215/169 394/315 206/163 10/8 470/435 235/217 427/398 224/208 LOWEST 7.5/6 573/516 287/258 511/465 270/245 712/536 356/268 618/481 331/254 876/683 438/342 738/596 401/318 1250/999 625/500 986/823 551/451 30/25 236/169 118/84 225/163 115/83 15/12.5 322/237 161/118 301/225...
-
Page 81: Specifications
Appendix Specifications LE5008 Series LE5016 Series Model LE4008 Series LE4016 Series Input Loop Through Video Composite Output Spot Input Audio Output Input Alarm Output Pre-Alarm Recording Up to 60 seconds Up to 240 IPS @ 704x480 Up to 480 IPS @ 704x480... - Page 82 Appendix Power AC Free 100~240 V, 50/60 Hz Power Consumption Maximum 80 W (with 4 HDD) Dimension (WxDxH) 430 mm x 430 mm x 96 mm Net Weight (without HDD) 6.85 kg 6.97 kg Operation Temp. / Humidity 0 ºC to 40 ºC / 0 %RH to 80 %RH...
- Page 84 AB28...
Need help?
Do you have a question about the LE5008 Series and is the answer not in the manual?
Questions and answers