Advertisement
Advertisement
Table of Contents

Related Manuals for Audio Technica AT-LP120 USB


Summary of Contents for Audio Technica AT-LP120 USB
- Page 1 AUDIO TECHNICA AT-LP120 USB DIRECT DRIVE SYSTEM User Manual...
- Page 2 About this item ● Experience the high-fidelity audio of vinyl ● Direct-drive, DC servo motor with selectable 33/45/78 RPM speeds. Damped base construction for reduced low-frequency feedback coloration. ● Fully manual operation featuring adjustable dynamic anti-skate control, variable pitch control with quartz speed lock, and balanced S-shaped tonearm with hydraulically damped lift control and lockable rest.
-
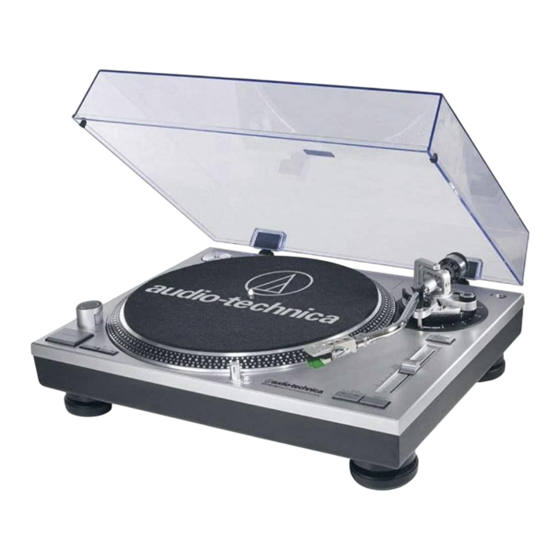
Page 3: Part Names And Functions
Part names and functions Top view diagram 1) 45-RPM adapter (shown in receptacle) Adapts 7" records with large center holes to fixed center spindle. 2) Strobe dots (on platter edge) Operate in conjunction with stroboscopic light located under the power dial to provide visual indication of accurate platter speeds. - Page 4 Part names and functions 3) Spindle 4) Platter Cast aluminum platter mounts directly to center spindle/motor shaft. 5) Felt mat 6) Power dial Controls power to the unit. 7) START/STOP button Engages and disengages the motor/platter. 8) Platter speed buttons Select 33 or 45 RPM platter speed.
- Page 5 Part names and functions 10) Quartz button Turns the pitch function on and off. When the quartz is activated the platter will hold the RPMs at 0% pitch, regardless of the pitch slider position and tempo range control settings. 11) Pitch selection indicator Shows red for standard or locked RPM setting.
- Page 6 Part names and functions Front and rear view diagram 1) Dust cover 2) Feet Adjust the level of the product. 3) Pre-amplifier selector switch If using an amplifier with a PHONO input jack, set this switch to the PHONO position. If connecting to the AUX jack of an amplifier, set this switch to the LINE position.
- Page 7 Part names and functions Tonearm 1) Counterweight Balances the tonearm and adjusts to provide the proper tracking force. 2) Tracking force gauge ring Use to adjust the tracking force. 3) Tonearm lift Moves the tonearm vertically to and from the face of the record. 4) Tonearm rest with clamp Use the clamp to secure the tonearm so that it does not move.
- Page 8 Preparation for use Placing the platter This product requires some assembly before using it for the first time. Do not connect the AC adapter until assembly is complete. Set the platter on the spindle. ● To avoid damaging the spindle when seating the platter, align the positions of the spindle and the platter's hole, and then slowly seat the platter.
-
Page 9: Assembling The Tonearm
Assembling the tonearm 1) Remove the cable tie used to secure the tonearm at the time of delivery. Use the clamp to temporarily secure the tonearm to the tonearm rest. 2) Insert the headshell into the tonearm. Hold the right and left edges of the headshell so that you do not damage the stylus or cut the cartridge’s wires. - Page 10 Assembling the tonearm With the tracking force gauge ring facing forward, attach the counterweight to the back of the tonearm, and slowly turn it counterclockwise (to the left).
-
Page 11: Setting Tonearm Balance
Setting tonearm balance 1) Remove the cartridge protector. 2) While lightly holding the headshell to prevent the tonearm from moving, unlatch the clamp. • The tonearm is tilted because the balance has yet to be adjusted... - Page 12 Setting tonearm balance While still lightly holding the headshell, turn the counterweight to adjust the tonearm’s balance. Adjust the balance so that the tonearm is level when you release the headshell.
- Page 13 Connecting to computers with USB input...
- Page 14 Setting tonearm balance Follow the settings for the pre-amplifier selector switch to connect the included USB cable to the USB input of your computer. The included USB cable connects the product to your computer without need for special drivers. Audacity (refer to http://www.audacityteam.org for details) and other compatible third-party recording software packages are available, allowing you to record from the product to your computer.
-
Page 15: Playing A Record
Playing a record Remove the cartridge protector. If the tonearm is fixed to the tonearm rest, unlatch the clamp. Turn the power dial to the ON position. The speed selector and strobe illuminator will light up. If desired, plug in the stylus target light for illumination of the stylus tip position on the record. - Page 16 Playing a record Place the record on the platter so that the center hole aligns with the spindle If playing a 45 RPM record, attach the 45 RPM adapter (see the diagram tothe right below).
- Page 17 Playing a record Press the START/STOP button.The platter begins to rotate. Figure 1. Raise the tonearm by lifting the tonearm lift control lever to the UP position. Figure 2. Raise the tonearm by lifting the tonearm lift control lever to the UP position. Figure 3.
- Page 18 Dimensions...
- Page 19 Manuals.plus ● Does the Audio Technica LP120 have a built in preamp? But in addition to the USB output, the turntable also comes with a detachable dual RCA output cable and is equipped with a built-in selectable phono preamp so you can connect directly to your home stereo, whether it has a dedicated phono input or not.
- Page 20 ● Is Audio-Technica AT-LP120 good? This Audio Technica AT-LP120 USB Direct-Drive Professional Turntable is hands-down the best record player we reviewed in its price category. It might seem a bit expensive at first glance, but it is worth every penny. If you're a professional DJ, that is.
Need help?
Do you have a question about the AT-LP120 USB and is the answer not in the manual?
Questions and answers