NetComm LIBERTY SERIES User Manual
Liberty series 3g wireless n300 voip router
Hide thumbs
Also See for LIBERTY SERIES:
- User manual (63 pages) ,
- Quick start manual (16 pages) ,
- Technical specifications and features (2 pages)
Table of Contents
Advertisement
Quick Links
Download this manual
See also:
User Manual
Advertisement
Table of Contents

Related Manuals for NetComm LIBERTY SERIES


Summary of Contents for NetComm LIBERTY SERIES
- Page 1 NETCOMM LIBERTY™ SERIES 3G Wireless N300 VoIP Router...
-
Page 2: Hardware Installation
Please note: You can also connect an Ethernet cable from your ADSL/Cable modem’s LAN port to your 3G18WV’s WAN port for fixed line connections. 3. Connect the power adapter to the power socket on the back of the NetComm 3G18WV. -
Page 3: Connecting To The Router
Laptop 1. Connect the yellow Ethernet cable provided to one of the ports labelled “LAN1-LAN4” on the back of the NetComm 3G18WV. 2. Connect the other end of the Ethernet cable to your computer or to another Ethernet-enabled device like a gaming console, a TV or a home cinema system. - Page 4 1. Using your wireless device, scan the wireless networks in your area and select the network called NetComm Wireless, then click connect. Please note: If you changed the wireless network name during set-up, select the new name 2.
-
Page 5: Connecting The Router To The Internet
Connecting the Router to the Internet After completing the hardware installation, you will need to enter the necessary settings to be able to connect to your applicable service provider. This is done with an easy to use wizard that will guide you through the set-up process. 1. - Page 6 3. Follow the instructions to: • Change the admin password so only you can access the routers settings. • Select your time zone. • Choose whether you want your WAN connection to auto detect or if you would like to set it up manually. •...
- Page 7 4. Once finished, click on Apply Settings and allow the router approximately one minute to complete the configuration. 5. Click on Finish to restart the router. If you are connected successfully to 3G Mobile Broadband, the 3G LED will be lit. You can also check on the status of your connection by clicking ”Status”...
- Page 8 List of Mobile Broadband Service Providers and APNs: Mobile Service Provider APN - Access Point Name AUSTRALIA Telstra Telstra.internet Telstra.pcpack Telstra.datapack Telstra.extranet Optus – Postpaid connect Optus – Prepaid preconnect Three – Postpaid 3netaccess Three – Prepaid 3services Vodafone – Postpaid vfinternet.au Vodafone –...
- Page 9 3G USB Modem 3G Tower DECT Phone The NetComm 3G18WV allows you to make VoIP calls over the Internet by simply plugging a standard analogue telephone into the router and using a VoIP Service Provider (VSP). Before you get started making a call, make sure you’ve checked the following: 1.
-
Page 10: How To Receive A Call
For more detail on how to configure VoIP and other router settings, please refer to the Online User Manual, which can be downloaded in PDF format from the website: http://www.netcomm.com.au/3G18WV Note: Please refer to your VoIP service provider for required settings and activation of your VoIP phone service and information about the call charges that apply. - Page 11 Congratulations! You have successfully completed the set-up process and should now be connected to the Internet.
-
Page 12: Troubleshooting
I cannot connect via 3G • Make sure that you are using a compatible 3G USB modem. Check http://www.netcomm.com.au/support/3g-modem-compatibility-list for the most recent 3G compatibility list. • Try manually entering the information required to connect via 3G such as APN, User Name and Password. -
Page 13: Front Panel
Front Panel The router has been designed to be placed on a desktop. All of the cables exit from the rear for better organization. The LED indicator display is visible on the front of the router to provide you with information about network activity and device status. See below for an explanation of each of the indicator lights. -
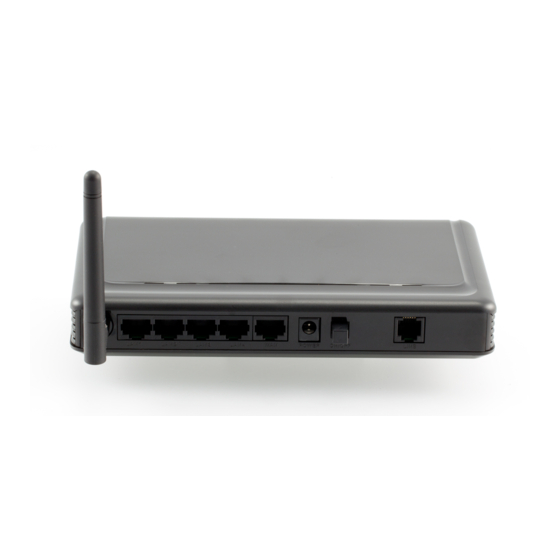
Page 14: Rear Panel
Rear Panel Attach the antenna here. The antenna attaches in a clockwise direction. Port Description RJ-45 WAN Ethernet port for fixed-line connection (ADSL/Cable/Satellite) LAN 1 RJ-45 LAN port for wired Ethernet clients (computers, laptops, etc) LAN 2 RJ-45 LAN port for wired Ethernet clients (computers, laptops, etc) LAN 3 RJ-45 LAN port for wired Ethernet clients (computers, laptops, etc) LAN 4...
Need help?
Do you have a question about the LIBERTY SERIES and is the answer not in the manual?
Questions and answers