Advertisement
Advertisement
Table of Contents

Related Manuals for Honda H1000 Series


Summary of Contents for Honda H1000 Series
- Page 3 All information in this publication is based on the latest H3000 Series product information available at the time of printing. Although there are physical dfiferences between the H1000 and H3000 Series riders, the installation and operation of the mulching kit are the same. American Honda Motor Co., Inc.
-
Page 5: Dealer Installation Instructions
The installation of this kit must be performed by an authorized Honda riding mower dealer. These instructions are provided for dealer use. FOLLOW THESE INSTRUCTIONS CAREFULLY. Proper installation of this kit is essential for safe, reliable operation. Poor operation is a major cause of customer dissatisfaction. Your customer expects this kit to be correctly installed, adjusted, and ready to use. - Page 6 DEALER INSTALLATION INSTRUCTIONS MULCHING KIT CONTENTS Mulching Blade Swirl Guide A Swirl Guide B Cover Plate 6 x 4 0 m m Flange Bolts (2) 6 x 5 5 m m Flange Bolt (1) 8 x 3 5 m m Flange Bolts (2) 6 mm Flat Washers (6)
- Page 7 3. Temporarily install the cover plate on the mower deck, using 8 mm lock nuts. COVER PLATE 4. Hold swirl guide B against the cover plate. Insert a pencil through the holes in swirl guide B to mark drilling points on the cover plate. Remove the cover plate from the mower deck.
- Page 8 DEALER INSTALLATION INSTRUCTIONS 7. Install a 6 x 40 mm flange bolt, 6 mm washers, and a 6 mm lock nut in the first hole, as shown. Tighten the 6 mm nut and bolt to a torque value of ft-lb (1 .O kg-m). To assure a good fit, mower deck holes must be drilled in sequence, and swirl guide A must be secured with nuts and bolts before drilling...
- Page 9 12. Install the mulching blade, using the original blade holder and hardware. Be sure the blade is positioned right side up (outer edges turn toward the mower deck). If the blade is installed upside down, it cannot cut properly. The blade bolts are specially designed for this application and must not be replaced with any other bolts.
- Page 10 2. SAFETY SAFETY LABEL LOCATIONS (H3000 SERIES) Read all safety instructions before operating the riding mower. AVOID PREVENT BRAKE FAILURE DISENGAGE PARKING BRAKE WHEN BUZZER SOUNDS CONTINUOUSLY A DELAYED ENGINE CUTOFF WILL STOP THE ENGINE IF PARKING BRAKE OPERATOR OPERATION ON PUBLIC STREETS OR HIGHWAYS MOWER CAN THROW OBJECTS: BURNS...
-
Page 11: Safety Label Locations
Keep hands and feet away from mower deck rn Stop engine before leaving operator's position. rn Do not allow childmn to ride They can fall or be thrown Read 'Child Safety' in the Owner's (H1000 SERIES) cause the mower to tip Manual carefully. -
Page 12: Mowing And Mulching Recommendations
3. MOWING AND MULCHING RECOMMENDATIONS GRASS CUlTlNG BASICS Cutting Height A cutting height setting of 1-1/2 or 2 inches is appropriate for most lawns during cool weather. A higher cut may be needed to protect the lawn during hot summer months. Consult a local nursery or lawn and garden center for advice about specific types of grasses and growing conditions in your area. - Page 13 MULCHING Mulching cuts grass clippings and fallen leaves into fine particles that fall through the turf and decompose quickly. This returns nutrients to the soil and reduces'the need for raking, bagging, and disposal. For best mulching results, mow the lawn frequently, cutting In growing season, you will probably need to mow the lawn twice a week.
-
Page 14: Side-Discharge Mowing
3. MOWING AND MULCHING RECOMMENDATIONS SIDE-DISCHARGE MOWING Side-discharge mowing should be considered where grass has grown too tall to mulch easily. Side-discharge mowing will leave grass clippings on top of the mowed areas and may need to be removed by raking. Heavy clumps of clippings should always be removed; grass must remain uncovered to grow properly. - Page 15 BAGGING Bagging should be considered for areas where you want the lawn to be clear of loose particles, such as around swimming pools, and for less frequently mowed areas, where grass has grown too tall to mulch easily. For bagging, you must remove the mower deck cover plate and swirl guide B, then install the bagging kit.
- Page 16 3. MOWING AND MULCHING RECOMMENDATIONS Install the bag support assembly on the left and right struts, while inserting the center strut pin in the the hitch plate hole. Grasp the upper chute by the chute handle. Raise the upper and middle chutes, then slide the middle chute over the lower chute.
-
Page 17: Parts List
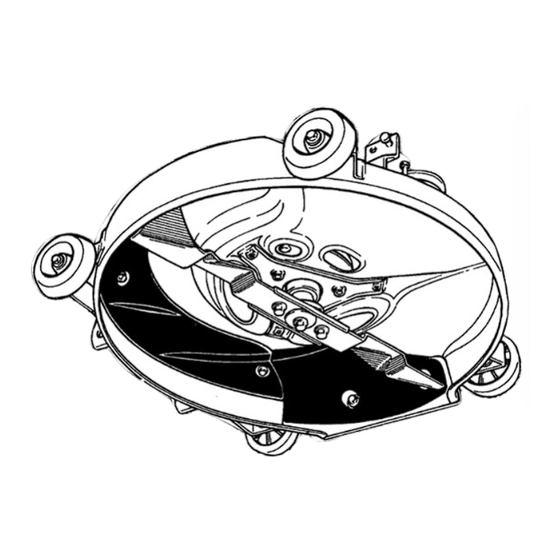
MULCHING KIT: Part Number 06764-763-ROO LOCK NUT (4) 901 15-659-003 COVER PLATE 76264-763-MOO SWIRL GUIDE B 76268-763-RW MULCHING BLADE 72511-763-RW FLAT 901 02-763-RW 4. PARTS LIST SWIRL GUIDE A H3000 Series Model Shown... -
Page 18: Owner Satisfaction
5. WARRANTY SERVICE OWNER SATISFACTION Your satisfaction and good will are important to your dealer and to us. All Honda warranty details are explained in the Distributor’s Limited Warranty. Normally any problems concerning the product will be handled by your dealer’s service department. If you have a warranty problem that has not been handled to your satisfaction, we suggest you take the following action: Discuss your problem with a member of the dealership management. - Page 20 t . -...
Need help?
Do you have a question about the H1000 Series and is the answer not in the manual?
Questions and answers