Honda FR600 Owner's Manual
Honda tiller owner's manual
Hide thumbs
Also See for FR600:
- Owner's manual (52 pages) ,
- Owner's manual (54 pages) ,
- Owner's manual (46 pages)

Related Manuals for Honda FR600


Summary of Contents for Honda FR600
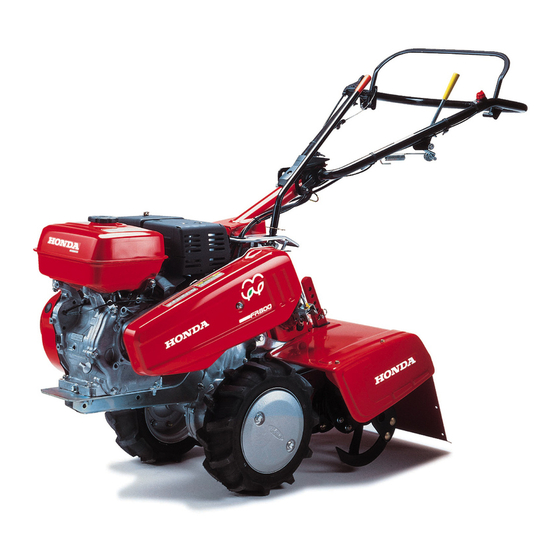
- Page 1 Owner’s Manual !!!!I I III I I I I I I I I I I I 01992 American Honda Motor Co., Inc. - TILLER FR600 / FRSOO !!I! !JW! I I I 11 All Rights Reserved...
- Page 2 engine exhaust from this product contains chemicals known to the State defects or other reproductive harm.
- Page 3 Thank you for purchasing This manual describes operation Honda FR600 and FR800. All information in this publication information available at the time of printing. The illustrations in this manual are based on: Honda FR800 Honda Motor Co., Ltd. reserves the right to make changes at any time without notice and without incurring any obligation.
-
Page 4: Table Of Contents
Lower chain case oil ... Fuel ... Air cleaner ... Tfreespressure ... THE ENGINE ... 4. ;;T;R$NG Cleanin a flooded engine 5. TILLER OPERATION Handlebar height adjustment.. Tilling depth adjustment Main clutch operation ... Transmission operation Tine clutch operation ... -
Page 5: Safety Label Locations
SAFETY LABEL LOCATIONS These labels warn you of potential hazards that can cause serious inju- Read them carefully. If a label comes off or becomes hard to read, contact your Honda tiller dealer for a replacement. 1. SAFETY INFORMATION... - Page 6 Be sure the drag bar is in place and properly adjusted. condition. the tiller They may tend to lift during footwear. Operating may get caught this tiller when you are tired, ill or under the Operating a tiller in poor order and warning labels in REVERSE, especially...
- Page 7 Child safety Keep children indoors and supervised power equipment quickly and are attracted especially to the tiller and the tilling activity. Never assume children alert and turn the tiller off if children enter the area. Children should never be allowed to operate the tiller, even under adult supervision.
- Page 8 Till across the slope (At equally spaced intervals) down it. Be very careful when changing the direction of the tiller on a slope. Do not use the tiller on a slope of more than IO”. The maximum...
-
Page 9: Component Identification
Frame serial number: Engine seriaJ number: 2. COMPONENT IDENTIFICATION MAIN CLUTCH LEVER THRO-ITLE MI IFFI FP ,..-. . --.. WH‘EEL WEIGHT (FRSOO ONLY) and engine serial numbers ‘ENGINE SERIAL NUMBER FRONT WEIGHT (FR600 ONLY) for your reference. parts, and when making... - Page 10 Engine oil a. Place the tiller on a level surface. b. Remove the oil filler cap and wipe the dipstick clean. c. Insert the dipstick into the oil filler neck, but do not screw it in. d. Check the oil level shown on the dipstick.
- Page 11 8 for recommended Lower chain case oil Place the tiller on level ground and remove the oil level check bolt. Remove the oil filler cap. The oil level should be up to the lower edge of the check bolt hole.
- Page 12 Remove the gas cap and check the fuel level. Refill the tank if the level is low. Fuel tank capacity: FR600: 3.6 Q (0.95 US gal, 0.79 Imp gal) FR800: 6.0 Q (1.59 US gal , 1.32 Imp gal) Gasoline is extremely Use extreme care when handling gasoline.
- Page 13 If spark knock or pin ing occurs at a steady normal load, than persists, see an aut orized Honda tiller dealer. jiiEiq Running the engine with persistent engine damage. NOTE: Running engine considered misuse, and the Distributor’s cover parts damaged by misuse.
- Page 14 Air cleaner Remove the cover and inspect the elements; (see page 30 1. [NOTlCE( Operating the engine cause rapid engine wear. Tire pressure Excessive tire pressure traction, underinflation result in abnormal or accelerated tire wear. best keep the tires inflated to: 118kPa(1.20kgf/cm2,17psi) Tines Inspect the tines, and replace them...
-
Page 15: Starting The Engine
Start the engine outdoors. confined, or even partially enclosed, the air can become contaminated with a dangerous amount of exhaust gas. Exhaust contains poisonous odorless gas. Breathing may lead to death. To keep exhaust adequate ventilation. l.Turn the fuel valve position. - Page 16 4. Move throttle position marked with a dot (0 ). 5. Make sure main disengaged and the transmission is in neutral; then pull the starter rope briskly to start the engine. [NOTE] Do not allow starter snap back against Return it gently to prevent to the starter.
- Page 17 Clearing a flooded engine If the engine won’t start after you have operated times, the engine may be flooded with excess fuel. Use the following procedure to clear and start a flooded engine: 1. Turn the engine switch to the OFF position.
-
Page 18: Handlebar Height Adjustment
BEFORE ADJUSTING OFF. Handlebar height adjustment Before adjusting the handlebar, place the tiller on firm level ground to prevent the handle from collapsrng accidentally. adjust handlebar loosen the adjuster knob, se ect appropriate holes handle column bracket, and tighten the knob. - Page 19 Release main kJ:e operating the gear shift Select speeds; 1 or 2 for tilling, or 3 for propelltng the tiller to and from the work area. Select neutral (N) to move the tiller when engine running.
-
Page 20: Tine Clutch Operation
; the tines will not rotate when the main clutch is operated. Engage the tine clutch with the transmission Do not engage the tine clutch with the transmission tines and wheels must both be driven for good tilling control. -
Page 21: Operation
High altitude operation At high altitude, the standard rich. Performance will decrease, and fuel consumption very rich mixture may also foul the spark plug and cause hard starting. High altitude performance to the carburetor. If you always operate your engine at altitudes above 1,800 meters (6,000 feet), have your dealer perform this carburetor modification. -
Page 22: Stopping The Engine
1. Release the main clutch lever. 2. Move the throttle lever to the idle position. 3. Turn the engine switch to the OFF position. When the tiller is not in use, turn the fuel valve to the OFF position prevent the possibility flooding, possibility of fuel leakage. - Page 23 If a suitable loading ramp is not available, two people should lift the tiller on and off the vehicle, while holding the tiller level. Position the tiller so the tines and wheels vehicle. Tie the tiller down with rope or straps, and block the wheels. Keep the tie-down governor linkage, carburetor, system...
-
Page 24: Maintenance
Improper maintenance, operation, can cause a malfunction or killed. Always follow the inspection schedules in this owner’s manual. To help you properly care for your tiller, the following maintenance schedule, maintenance procedures that are more difficult, professionals and are normally other qualified mechanic. -
Page 25: Maintenance Safety
Keep cigarettes, from all fuel-related Remember that your servicing dealer knows your tiller best and is fully equipped to maintain and repair it. To ensure the best quality Honda parts or their equivalents safety precautions... - Page 26 Emission Control System Source of Emissions combustion process nitrogen, and hydrocarbons. nitrogen is very important react to form photochemical monoxide does not react in the same way, but it is toxic. Honda utilizes lean carburetor emissions carbon hydrocarbons. The U.S. and California Clean Air Acts EPA and California regulations written instructions...
- Page 27 Problems That May Affect Emissions If you are aware of any of the following inspected and repaired by your servicing dealer. Hard starting or stalling after starting. Rough idle. Misfiring or backfiring under load. Afterburning (backfiring). Black exhaust smoke or high fuel consumption. symptoms, have your engine...
- Page 28 Replacement Parts The emission control systems on your Honda engine were designed, built, certified to conform regulations. recommend whenever have replacement parts are manufactured original parts, so you can be confident of replacement parts that are not of the original may impair the effectiveness A manufacturer of an aftermarket...
-
Page 29: Maintenance Sche Cr Ule
(3)For professional commercial intervals. FIRST MONTH EACH inter- Every 2 years (2) by an authorized Honda tiller dealer, proficient. Refer to the Honda shop manual. use, log hours of operation to determine 0’ unless you have proper maintenance... -
Page 30: Engine Oil Than E
Engine oil change FR600: 0.6 0 (0.6 US qt ,0.5 Imp qt) OIL CAPACITY: FR800: 1.1 0 (1.2 US qt, 1.0 Imp qt) Drain the oil while warm to assure rapid and complete draining. 1. Place a suitable container of the tiller to catch the used oil. -
Page 31: Transmission Oi 9 Change
Transmission oil change OIL CAPACITY: 2.4 0 (2.5 US qt ,2.1 Imp qt) Drain the oil while warm to assure rapid and complete draining. 1. Place a suitable container the transmission to catch the used oil. 2. Remove the oil filler cap and the drain bolt to drain the used oil. -
Page 32: Air Cleaner Service
Air cleaner service A dirty air filter will restrict air flow to the carburetor, performance. If you operate the tiller in very dusty areas, clean the air filter more often than specified in the MAINTENANCE [NOTlCEI Operating the engine cause rapid engine wear. -
Page 33: Fastener Tightness Check
Fastener tightness check Check to be sure all the fasteners are tight. If not, retighten them. Tightening points are as follows: Upper chain case to rotary case Transmission to rotary frame Rotary cover to rotary frame Swing base to transmission PAPER ELEMENT AIR CLEANER HOUSING... -
Page 34: Spark Plug Service
Spark plug service Recommended spark plug: peiq Spark plugs of the wrong dimensions damage. For good performance, free of deposits. 1. Locate the 13/16 inch spark plug wrench, pin and lock pin provided shown (FR800 ONLY). 2. Clean any dirt from around the spark plug base. -
Page 35: Spark Arrester Maintenance (Optional Equipment)
Spark arrester maintenance The spark arrester must be serviced functioning as designed. Touching the engine or exhaust Let the engine cool before servicing. 1. Remove the two 8 mm nuts @ and remove the muffler from the cyl- inder. 2. Remove the three 4 mm screws @ from the exhaust and remove the deflector. -
Page 36: Sediment Cup Cleaning
Wipe up any spilled fuel. Main clutch cable adjustment Correct main clutch ment is important for tiller mance and drive belt service Misadjustment can cause drive belt slippage with resultant loss of pow- er and premature belt wear. -
Page 37: Tine Clucth Cable Adjustment
Tine clutch cable adjustment 1. With the tine clutch lever in the DISENGAGE position, free play at the tip of the lever. Free play should be: 0 - 1.0 mm (O-1/25 Just enough to ensure cable does tension position. 2. If adjustment is necessary, loosen lock nuts... -
Page 38: Drive Belt Adjustment
FR600: 65-70 mm (2.6-2.8 FRSOO: 52-57 mm (2.0-2.2in) ENGINE STAY MOUNTING BOLT &lf+NE MOUNTING... -
Page 39: Upper Chain Adjustment
Upper chain adjustment l.Remove the primary cover. 2.Check chain slack between the sprockets; It should be: 5.0- 15.0 mm (0.20-0.59 adiust tension, tensioner adjusting move the tensioner up or down ,as necessary. 3. Grease the chain. Tine replacement Use genuine Honda replacement gloves to protect your hands. -
Page 40: Storage
9. STORAGE Preparation for storage When the tiller will not be used for one month or longer, proper stor- age preparation will help to prevent rust and corrosion, it easier to start the engine when the tiller is removed from storage. -
Page 41: Fuel Stabilizer
For storage of two months or longer, perform these additional When transporting the tiller, turn the fuel valve OFF and keep the tiller level to prevent fuel spillage. Fuel vapor or spilled fuel may ignite. Before storing the unit for an extended period;... - Page 42 c. Replace the sediment cup and tighten securely. d.Drain the carburetor by removing the drain knob. Drain the gasoline into a suitable container.Replace 5.Change the engine oil (page 28 1. 6. Lubricate the prston and cylinder. a.Remove the spark plug (page 32 1. b.Pour a tablespoon of clean engine oil into the cylinder.
-
Page 43: Rstoragemoval From Stora Storage
Gasoline is extremely careful to avoid open flames or sparks. Avoid storing the tiller where it will be exposed to high humidity dust. Place the tiller with its tines result in fuel leakage. - Page 44 To avoid fire hazards, do not allow sparks near the plug hole. e. If there is no spark, replace the plug. If OK, try to start the engine according to the instructions. 6. If the engine still does not start, take the tiller to an authorized dealer. performing...
-
Page 45: Specifications
Tune-up Specification ITEM Spark plug gap Valve clearance Other specification NOTE: Specifications vary change without notice. 11. SPECIFICATIONS 1,460 mm (57.5 in) 1,240 mm (48.8 in) SPECIFICATION 0.70-0.80mt-n 10.028-0.031inl IN: 0.15 f 0.22 mm cold EX: 0.20 f 0.02 mm cold No other adiustments according to the types,... -
Page 46: Warranty Service Information
(770) 497-6400 When you write or call, please give us this information: Model and serial number (see page 7 ) Name of dealer who sold the tiller to you Name and address of dealer who services your tiller Date of purchase... - Page 48 .1.. . ;. ‘..: I I I I I I I I I...
Need help?
Do you have a question about the FR600 and is the answer not in the manual?
Questions and answers