Table of Contents
Advertisement
Available languages
Available languages
Quick Links
Model / Modelo / Modèle: NAPA 85-435
Automatic Battery Charger / Cargador de batería
automático / Chargeur de batterie automatique
Voltage / Tensión / Tension: 12
Amperage / Amperaje / Ampérage: 2, 10
MANUAL dEL USUARiO
GUidE d'UTiLiSATiON
LEA EL MANUAL COMPLETO ANTES DE
LIRE ENTIÈREMENT LE GUIDE AVANT
OWNER'S MANUAL
READ ENTIRE MANUAL BEFORE
USING THIS PRODUCT
UTILIZAR ESTE PRODUCTO
D'UTILISER CE PRODUIT
00-99-000936/0209
Advertisement
Table of Contents

Related Manuals for Napa 85-435


Summary of Contents for Napa 85-435
-
Page 1: Manual Del Usuario
Model / Modelo / Modèle: NAPA 85-435 Automatic Battery Charger / Cargador de batería automático / Chargeur de batterie automatique Voltage / Tensión / Tension: 12 Amperage / Amperaje / Ampérage: 2, 10 OWNER’S MANUAL MANUAL dEL USUARiO GUidE d’UTiLiSATiON... -
Page 3: Table Of Contents
TABLE OF CONTENTS / ÍNDICE / TABLE DES MATIÈRES SECTION / SECCIÓN / PARTIE PAGE / PÀGINA IMPORTANT SAFETY INSTRUCTIONS PERSONAL PRECAUTIONS PREPARING TO CHARGE CHARGER LOCATION DC CONNECTION PRECAUTIONS FOLLOW THESE STEPS WHEN BATTERY IS INSTALLED IN VEHICLE. FOLLOW THESE STEPS WHEN BATTERY IS OUTSIDE VEHICLE. - Page 4 SIGA ESTOS PASOS CUANDO LA BATERÍA SE ENCUENTRE FUERA DEL VEHÍCULO. CARGA DE BATERÍA, CONEXIONES DE CA CARACTERÍSTICAS INSTRUCCIONES DE MONTAJE PANEL DE CONTROL INSTRUCCIONES DE OPERACIÓN CÁLCULO DE TIEMPO DE CARGA INSTRUCCIONES DE MANTENIMIENTO INSTRUCCIONES DE ALMACENAJE LOCALIZACIÓN Y SOLUCIÓN DE PROBLEMAS ANTES DE DEVOLVER A REPARACIONES GARANTÍA LIMITADA CONSIGNES DE SÉCURITÉ...
- Page 5 DIRECTIVES D’ENTREPOSAGE TABLEAU DE DÉPANNAGE AVANT DE L’ENVOYER POUR RÉPARATION GARANTIE LIMITÉE...
-
Page 6: Important Safety Instructions
IMPORTANT: READ AND SAVE THIS SAFETY AND INSTRUCTION MANUAL. IMPORTANT SAFETY INSTRUCTIONS SAVE THESE INSTRUCTIONS – The NAPA 85-435 offers a wide range of features to accommodate your needs. This manual will show you how to use your charger safely and effectively. Please read, understand and follow these instructions and precautions carefully, as this manual contains important safety and operating instructions. -
Page 7: Personal Precautions
TO REDUCE THE RISK OF A BATTERY EXPLOSION, FOLLOW THESE INSTRUCTIONS AND THOSE PUBLISHED BY THE BATTERY MANU- FACTURER AND THE MANUFACTURER OF ANY EQUIPMENT YOU INTEND TO USE IN THE VICINITY OF THE BATTERY. REVIEW THE CAUTIONARY MARKINGS ON THESE PRODUCTS AND ON THE ENGINE. -
Page 8: Charger Location
Clean the battery terminals before charging the battery. During cleaning, keep airborne corrosion from coming into contact with your eyes, nose and mouth. Use baking soda and water to neutralize the battery acid and help eliminate airborne corrosion. Do not touch your eyes, nose or mouth. Add distilled water to each cell until the battery acid reaches the level specified by the battery manufacturer. -
Page 9: Follow These Steps When Battery Is Outside Vehicle
Check the polarity of the battery posts. The POSITIVE (POS, P, +) battery post usually has a larger diameter then the NEGATIVE (NEG, N, -) post. Determine which post of the battery is grounded (connected) to the chas- sis. If the negative post is grounded to the chassis (as in most vehicles), see step 6.5. -
Page 10: Battery Charging - Ac Connections
BATTERY CHARGING – AC CONNECTIONS This battery charger is for use on a nominal 120-volt circuit. DANGER – Never alter AC cord or plug provided – if it does not fit the outlet, have a proper grounded outlet installed by a qualified electrician. Improper connection can result in a risk of an electric shock or electrocu- tion. -
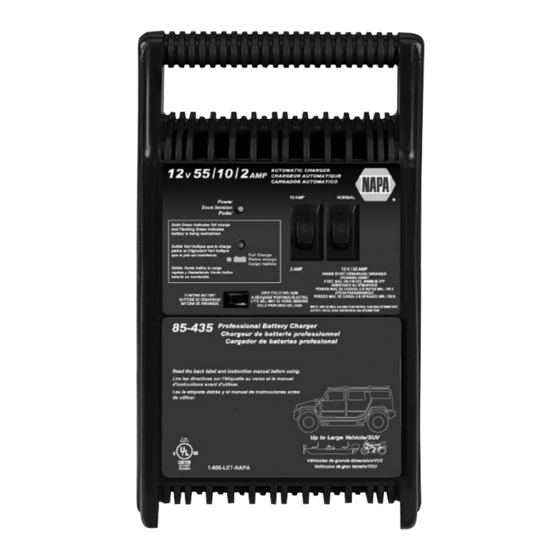
Page 11: Features
FEATURES Charge Rate Selector Switch Charging/Engine Cranking Selector Switch Battery Type Switch Full Charge LED AC Power LED ASSEMBLY INSTRUCTIONS 10.1 This charger comes equipped with cable holders. Insert these into any of the six holes found on the back of the charger. Wrap the cables around these holders for convenient storage. -
Page 12: Battery Type/Charge Rate Selector Switches
Battery Type Switch Use this button to set the type of battery to be charged. • Regular – Set the button to STARTING BATTERY. This battery type is usually used in cars, trucks and motorcycles. These batteries have vent caps and are often marked “Low Maintenance” or “Maintenance-free”. This type of battery is designed to deliver quick bursts of energy (such as starting engines) and have a greater plate count. -
Page 13: Operating Instructions
• 55A Engine Start – Provides 55 amps for cranking an engine with a weak or run down battery. Always use in combination with a battery. OPERATING INSTRUCTIONS Charging Connect the battery following the precautions listed in Sections 6 and Select the appropriate settings for your battery. -
Page 14: Calculating Charge Time
With the charger unplugged from the AC outlet, connect the charger to the battery following the instructions given in Section 6 (FOLLOW THESE STEPS WHEN THE BATTERY IS INSTALLED IN A VEHICLE). Plug the charger AC power cord into the AC outlet. With the charger plugged in and connected to the battery of the ve- hicle, set the charging/engine cranking selector switch to the engine start position. -
Page 15: Maintenance Instructions
Reserve Capacity (RC) is a very important rating. This is the number of minutes a fully charged battery at 80°F will discharge 25 amps until the battery drops below 10.5 volts. An amp hour (AH) is a rating usually found on deep cycle batteries. If a battery is rated at 100 amp hours it should deliver 5 amps for 20 hours, 20 amps for 5 hours, etc. -
Page 16: Troubleshooting
TROUBLESHOOTING PROBLEM POSSIBLE CAUSE REASON/SOLUTION The charger is making an Circuit breaker is cycling. The settings may be wrong. audible clicking sound. Check the charger settings. Battery is defective. Have the battery checked. Shorted battery cables or Circuit breaker cycles when clips. -
Page 17: Before Returning For Repairs
PROBLEM POSSIBLE CAUSE REASON/SOLUTION Charger will not turn on AC outlet is dead. Check for open fuse or when properly connected. circuit breaker supplying AC outlet. Poor electrical connection. Check power cord and extension cord for loose fitting plug. The battery is connected Clips are not making a Check for poor connection and the charger is on, but... - Page 18 Schumacher Electric Corporation (the “Manufacturer”) warrants this bat- tery charger for 2 years from the date of purchase at retail against defec- tive material or workmanship that may occur under normal use and care. If your unit is not free from defective material or workmanship, Manufac- turer’s obligation under this warranty is solely to repair or replace your product with a new or reconditioned unit at the option of the Manufacturer.
-
Page 19: Instrucciones Importantes De Seguridad
IMPORTANTE: LEA Y GUARDE ESTE MANUAL DE INSTRUCCIONES Y SEGURIDAD. INSTRUCCIONES IMPORTANTES DE SEGURIDAD GUARDE ESTAS INSTRUCCIONES: el NAPA 85-435 ofrece una amplia gama de características para satisfacer sus necesidades. Este manual le mostrará cómo utilizar su cargador en forma segura y efectiva. Por... -
Page 20: Precauciones Personales
1.10 Para reducir el riesgo de descarga eléctrica, desenchufe el cargador del tomacorriente antes de intentar llevar a cabo cualquier actividad de mantenimiento o limpieza. El simple apagado de los controles no reducirá este riesgo. ADVERTENCIA: RIESGO DE GASES EXPLOSIVOS. RESULTA PELIGROSO TRABAJAR EN FORMA CERCANA A UNA BATERÍA DE PLOMO. -
Page 21: Preparación Para La Carga
Utilice este cargador solamente para cargar baterías de PLOMO-ÁCIDO. Este cargador no está destinado a suministrar energía a sistemas eléctri- cos de baja tensión más que en una aplicación de un motor de arranque. No utilice este cargador de batería para cargar baterías de pila seca que por lo general se utilizan con artefactos domésticos. -
Page 22: Precauciones De Conexión En Cc
Nunca ubique el cargador directamente por encima de la batería que se carga; los gases de la batería corroerán y dañarán el cargador. No ubique la batería encima del cargador. Nunca permita que el ácido de la batería gotee sobre el cargador al leer el peso específico del electrolito o al cargar la batería. -
Page 23: Siga Estos Pasos Cuando La Batería Se Encuentre Fuera Del Vehículo
En un vehículo con descarga a tierra por borne positivo, conecte el gancho NEGATIVO (NEGRO) del cargador de batería al borne NEGA- TIVO (NEG, N, -) sin descarga a tierra de la batería. Conecte el gancho POSITIVO (ROJO) al chasis del vehículo o al bloque motor alejado de la batería. - Page 24 PELIGRO: nunca altere el cable o enchufe de CA suministrado, si no se ajusta al tomacorriente, haga instalar un tomacorriente adecuado con des- carga a tierra por medio de un electricista capacitado. Una conexión ina- decuada puede provocar un riesgo de descarga eléctrica o electrocución. NOTA: no se recomienda el uso de un enchufe adaptador.
-
Page 25: Características
CARACTERÍSTICAS Botón indicador de carga El interruptor de selección de cargando/ arranque de la moto Botón indicador de Tipo de Batería Luz LED Carga Completa Luz LED de Poder de CA INSTRUCCIONES DE MONTAJE 10.1 Este cargador viene equipado con sujetador de cables. Inserte estos, en cualquiera de los seis orificios localizados en la parte trasera del cargador. - Page 26 Interruptor para establecer diferentes tipos de batería Utilice este botón para establecer el tipo de batería a cargar. • Regular : establezca el botón en STARTING BATTERY. Este tipo de batería generalmente se utiliza en automóviles, camiones y motocicle- tas. Este tipo de baterías cuentan con tapas de ventilación y a menudo se las clasifica como de “Bajo mantenimiento”...
-
Page 27: Instrucciones De Operación
Interruptor de selección de índice de carga Utilice el interruptor de selección de índice de carga para seleccionar el índice de carga o la configuración inicial del motor que necesite. Índice de carga lenta 2A: destinado a la carga de baterías pequeñas tales como aquellas habitualmente utilizadas en tractores para jardín, motos de nieves y motocicletas. - Page 28 NOTA: El cargador automáticamente pasa del Modo de carga al de man- tenimiento según corresponda. El LED FULL CHARGE [cargado] (verde) iniciará el ciclo cuando la batería esté totalmente cargada y se terminará cuando la tensión descienda al nivel predeterminado y el cargador pase al Modo de carga.
-
Page 29: Cálculo De Tiempo De Carga
• Si su vehículo no arranca: No es necesario cargar la batería por completo para arrancar un vehículo. Cuando la carga de la batería es 77% o más, la batería se ha cargado por lo general lo suficiente para que el vehículo arranque y funcione normalmente. Si opera el vehículo continuamente por un largo tiempo (ej. -
Page 30: Instrucciones De Mantenimiento
TAMAÑO/ÍNDICE DE LA BATERÍA ÍNDICE/TIEMPO DE CARGA 2 AMP 10 AMP BATERÍAS Motocicleta, 6 - 12 AH 2 - 3 ¾ horas tractor de jardín, 12 - 32 AH 3 ¾ - 10 horas PEQUEÑAS etc. AUTOS/ 200 - 315 CCA 40 - 60 RC 11 ¼... -
Page 31: Localización Y Solución De Problemas
LOCALIZACIÓN Y SOLUCIÓN DE PROBLEMAS PROBLEM POSSIBLE CAUSE REASON/SOLUTION Se escucha un sonido El disyuntor se resetea. Las configuraciones podrían seco en el cargador ser erróneas. Verifique (“clic”). las configuraciones del cargador. Batería defectuosa. Haga revisar la batería. Cables o ganchos de la El disyuntor se resetea batería en cortocircuito. - Page 32 PROBLEM POSSIBLE CAUSE REASON/SOLUTION Ciclo reducido o sin inicio Consumo mayor a 55 El tiempo de arranque al arrancar el motor. amperios (12V). varía según la cantidad de corriente consumida. Si el arranque consume más de 55 amperios, el tiempo de arranque podría ser menor a 3 segundos.
-
Page 33: Antes De Devolver A Reparaciones
PROBLEM POSSIBLE CAUSE REASON/SOLUTION La corriente medida es El cargador alcanzó su No es un problema, es una mucho menor a la selec- máxima tensión y está situación habitual. cionada. reduciendo la corriente. ANTES DE DEVOLVER A REPARACIONES 17.1 Cuando surja un problema de carga, asegúrese de que la batería puede recibir una carga normal. - Page 34 El Fabricante no presta garantía por lo accesorios utilizados con este producto que no sean los fabricados por Schumacher Electric Corporation y que no estén aprobados para su uso con este producto. La presente Garantía Limitada será nula si el producto se utiliza en forma errónea, se trata de manera inadecuada, es reparado o modificado por personas que nos sean el Fabricante o si esta unidad es revendida a través de un vendedor minorista no autorizado.
-
Page 35: Consignes De Sécurité Importantes
IMPORTANT : LIRE ET CONSERVER CE GUIDE DE CONSIGNES DE SÉCURITÉ ET D’UTILISATION. CONSIGNES DE SÉCURITÉ IMPORTANTES CONSERVER CES CONSIGNES – Le NAPA 85-435 offre un large éventail de caractéristiques pour accommoder vos besoins. Ce guide vous montrera comment utiliser votre chargeur efficacement et en toute sécurité. -
Page 36: Précautions Personnelles
AVERTISSEMENT – RISQUE DE GAZ EXPLOSIFS. TRAVAILLER AU VOISINAGE D’ACCUMULATEUR AU PLOMB EST DANGEREUX. LES BATTERIES PRODUISENT DES GAZ EXPLOSIFS EN MARCHE NORMALE. POUR CETTE RAISON, IL EST DE LA PLUS HAUTE IMPORTANCE QUE VOUS SUIVIEZ LES DIRECTIVES À CHAQUE FOIS QUE VOUS UTILISEZ LE CHARGEUR. POUR RÉDUIRE LE RISQUE D’EXPLOSION DE LA BATTERIE, SUIVEZ CES DIRECTIVES ET CELLES PUBLIÉES PAR LE FABRI- CANT DE LA BATTERIE ET DU FABRICANT DE TOUT AUTRE APPAR-... -
Page 37: Préparation Pour Le Chargement
NE JAMAIS recharger des batteries gelées. 2.10 NE JAMAIS surcharger une batterie. PRÉPARATION POUR LE CHARGEMENT On doit retirer la batterie du véhicule pour la recharger. Toujours retirer le câble de masse en premier. S’assurer que tous les accessoires du véhi- cule sont éteints, pour prévenir de la formation d’étincelles. -
Page 38: Précautions Sur La Connexion C
PRÉCAUTIONS SUR LA CONNEXION C.C. Connectez et déconnectez les pinces CC seulement après avoir réglé les sélecteurs du chargeur sur la position « off » et avoir débranché le cordon CA de la prise murale. Ne permettez jamais aux pinces de se toucher. Attachez les pinces à... -
Page 39: Étapes À Suivre Quand La Batterie Est Installée Hors Du Véhicule
ÉTAPES À SUIVRE QUAND LA BATTERIE EST INSTALLÉE HORS DU VÉHICULE. UNE ÉTINCELLE PRÈS DE BATTERIE PEUT CAUSER SON EXPLO- SION. POUR RÉDUIRE LES RISQUES D’ÉTINCELLE PRÈS DE LA BATTERIE : Vérifiez la polarité des bornes de la batterie. La borne POSITIVE (POS, P, +) de la batterie a généralement un plus grand diamètre que la borne NÉGATIVE (NEG, N, -). - Page 40 Tailles minimum AWG recommandées pour les rallonges de chargeurs de batterie : Taux d’entrée CC, Calibre AWG du cordon – Longueur du cordon, pied Ampères* (mètres) Au moins Mais moins (7.6) (15.2) (30.5) (45.6) *Si le taux d’entrée du chargeur est indiqué en watt plutôt qu’en ampère, le taux correspondant en ampère doit être déterminé...
-
Page 41: Caractéristiques
CARACTÉRISTIQUES Changement de Sélectionneur de Taux de Charge Le Sélecteur de Taux d’ampère Changement de Sélectionneur de Type de Batterie Charge Complet LED DEL pour Courant Alternatif DIRECTIVES DE MONTAGE 10.1 Ce chargeur vient équiper avec les détenteurs câblés. Insérez ceux-ci dans n’importe lequel des six trous trouvés à... - Page 42 Sélecteur de type de batterie Utilisez ce bouton pour sélectionner le type de batterie à recharger. • Classique – Mettre le bouton sur STARTING BATTERY, Ce type de batterie est souvent utilisé dans les voitures, les camions et les motocyclettes. Ces batteries ont des bouchons de remplissage et sont souvent désignées comme «...
-
Page 43: Consignes D'utilisation
TRÈS POUSSÉE et peuvent durer plus longtemps dans un environ- nement chaud. Si on utilise un mauvais chargeur de batterie pour une batterie à éléments gélifiés, un mauvais rendement et une défaillance prématurée en découlera. Commutateur-sélecteur du taux de charge Utilisez le commutateur-sélecteur de taux de charge pour sélectionner, selon vos besoins, le taux de charge ou le réglage démarrage moteur. - Page 44 NOTE : Le chargeur bascule automatiquement du mode Chargement au mode Entretien selon la nécessité. La diode DEL (verte) FULL CHARGE s’allumera par séquence quand la batterie sera en charge complète et s’éteindra quand le voltage descendra au-dessous d’un niveau préfixé et le chargeur passant en mode Chargement.
-
Page 45: Calcul Du Temps De Chargement
• Si votre véhicule ne démarre pas – Il n’est pas nécessaire de re- charger entièrement votre batterie pour démarrer votre véhicule. Quand la batterie a atteint une charge de 77% ou plus, elle a en général été assez chargée pour que le véhicule démarre et fonctionne normale- ment. -
Page 46: Consignes D'entretien
TAILLE DE LA BATTERIE/ TAUX DE CHARGE / CARACTÉRISTIQUES TEMPS DE CHARGEMENT 2 AMP 10 AMP PETITES Motocyclette, 6 - 12 AH 2 - 3 ¾ hrs tondeuse 12 - 32 AH 3 ¾ - 10 hrs BATTERIES à siège, etc. AUTOS/ 200 - 315 CCA 40 - 60 RC... -
Page 47: Tableau De Dépannage
TABLEAU DE DÉPANNAGE PROBLÈME CAUSE POSSIBLE RAISON/SOLUTION On entend le chargeur Le coupe-circuit est en :es paramètres peuvent faire un cliquètement. fonction être mauvais. Vérifiez les paramètres du chargeur. La batterie est défectueuse. Faire vérifier la batterie. Court-circuit des câbles ou Le coupe-circuit se met en des pinces de la batterie. - Page 48 PROBLÈME CAUSE POSSIBLE RAISON/SOLUTION Cycle de démarrage court Consomme plus de 55 Le temps de lancement ou non existant quand on ampères (12V) varie avec le montant de lance le moteur. courant consommé. Si le lancement consomme plus de 55 ampères, le temps de lancement peut être inférieur à...
-
Page 49: Garantie Limitée
AVANT DE L’ENVOYER POUR RÉPARATION 17.1 Quand vous rencontrez un problème de chargement, assurez-vous que la batterie est capable d’accepter une charge normale. Utilisez une bonne batterie pour vérifier une deuxième fois toutes les connexions, la prise de courant CA d’une puissance totale de 120 volts, les pinces du chargeur pour la bonne polarité... - Page 50 Le fabricant ne fait aucune autre garantie, y compris, mais sans y être limité, expresse, implicite ou garanties légales, y compris, mais non de façon limitative, toute garantie implicite de valeur marchande ou de per- tinence pour un usage particulier. De plus, le fabricant ne peut être tenu responsable d’aucun dommage accidentel, spécial ou conséquentiel subi par l’acheteur, l’utilisateur ou autres personnes en relation avec ce produit, y compris, mais sans y être limité, les pertes de revenus ou de profits,...
Need help?
Do you have a question about the 85-435 and is the answer not in the manual?
Questions and answers
My 85-437 NAOA charger dial reads 100% for 4 seconds then briefly drops to a little over 50% for a fraction of a second then reads 100% for four seconds then drops as above …. During the 100% interval the indicator light is green then briefly changes to yellow during these cycles. What does this indicate?
It indicates the charger is switching between Maintenance and Charging modes. When the battery voltage drops below a set level, the charger exits Maintenance mode (green light) and re-enters Charging mode (yellow light), then returns to Maintenance as the battery voltage recovers. This is a normal function.
This answer is automatically generated