Table of Contents
Advertisement
Quick Links
BRUKSANVISNING
BRUGSANVISNING
BRUKSANVISNING
GEBRAUCHSANWEISUNG
INSTRUCTIONS FOR USE
ISTRUZIONI PER L´USO
INSTRUKCJA OBS£UGI
»HC"P"K÷»fl œOÀ‹«Œ¬¿"EÀfl
NÁVOD K POU®ITÍ
HASZNÁLATI UTASÍTÁS
NAVODILA ZA UPORABO
KÄYTTÖOHJEET
MODE D'EMPLOI
8218-2220-71
STIGA
D U O L I N E
S n o w R i s e
SV .... 5
FI ... 12
DA . 19
NO. 26
DE .. 33
EN .. 40
FR ... 47
IT .... 54
PL ... 61
RU.. 69
CS... 78
HU . 85
SL.... 92
Advertisement
Table of Contents

Related Manuals for Stiga DUO LINE


Summary of Contents for Stiga DUO LINE
- Page 1 STIGA D U O L I N E S n o w R i s e BRUKSANVISNING SV ..5 KÄYTTÖOHJEET FI ... 12 BRUGSANVISNING DA . 19 BRUKSANVISNING NO. 26 GEBRAUCHSANWEISUNG DE .. 33 INSTRUCTIONS FOR USE EN .. 40 MODE D’EMPLOI...
- Page 4 4-5 cm...
-
Page 5: Safety Instructions
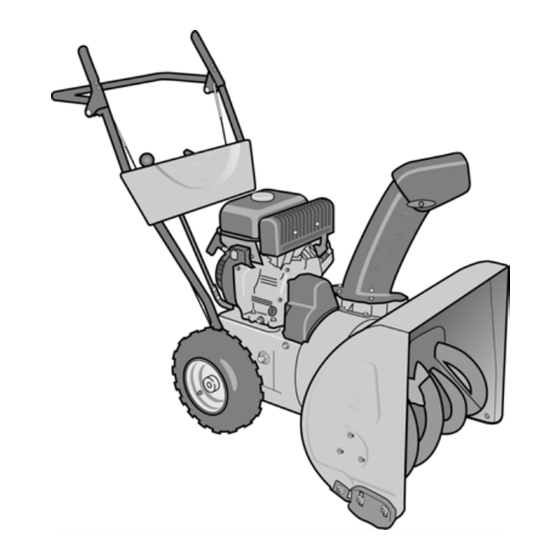
ENGLISH PREPARATIONS 1 SYMBOLS • Check the area to be cleared and remove any loose or foreign objects. The following symbols appear on the machine. They are • Disengage all controls before starting the engine. there to remind you of the care and attention required in use. This is what the symbols mean: •... - Page 6 ENGLISH • Never run the engine indoors except when taking it in and out of its place of storage. In this case ensure the door to 3 ASSEMBLY the storage place is open. Exhaust fumes are toxic. Note: Instructions to the left and right sides start from the •...
- Page 7 ENGLISH GEAR LEVER, SEE FIG. 6 FILLER CAP (8) Assemble the gear lever to the gearbox shaft as follows: For filling with petrol. 1. Set up the machine on the auger housing and set the ger lever (H) in the first gear forwards. See fig. 6. 2.
-
Page 8: Using The Snow Thrower
ENGLISH 4.16 CHUTE DEFLECTOR (9) STARTING THE ENGINE, SEE FIG. 1 Losen the wing nuts and adjust the chute deflector to a Do not touch engine components because they are suitable height. warm during use and up to 30 minutes after use. Low - shorter ejection distance. -
Page 9: Maintenance
ENGLISH Always adjust the shoes so that gravel and stones 5. Fill with new oil: See BEFORE STARTING above for are not fed into the snow thrower. There is a risk type and amount. for personal injury if these are thrown out at high speed. -
Page 10: Troubleshooting
ENGLISH The belts are specially designed for this machine. They must TROUBLE SHOOTING be replaced by new genuine belts provided by your retailer or Problem Possible cause Remedy authorised service station. Engine fails to Engine flooded. Repeated tart When the belts are adjusted or replaced, the control wires must also be adjusted (see below). - Page 11 ENGLISH 7.6.2 Adjusting drive wire 9 IF SOMETHING BREAKS 1. Check the play in the drive lever. The play shall be 40-50 mm. See fig. 14. Authorised service workshops carry out repairs and 2. If adjustment is required, unhook the wire at the lever. guarantee service.
- Page 12 w w w. s t i g a . c o m G G P S w e d e n A B · B o x 1 0 0 6 · S E - 5 7 3 2 8 T R A N Å S...
Need help?
Do you have a question about the DUO LINE and is the answer not in the manual?
Questions and answers