
Related Manuals for Vantec 3


Summary of Contents for Vantec 3
- Page 1 EXTERNAL 2.5” IDE & SATA HARD DRIVE ENCLOSURE U S E R M A N U A L...
-
Page 2: Package Contents
Package Contents: NexStar 3 External 2.5” HDD Enclosure: • Driver CD • User Manual • NexStar 3 External 2.5“ HDD Enclosure • USB/Power Cable • eSATA Cable (NST-260SU only) • SATA-eSATA Adapter Bracket (NST-260SU only) • Screws TRADEMARKS MS-DOS, Microsoft, Windows 95/98/NT/2000/ME/XP are trademarks of Microsoft Corporation. -
Page 3: Table Of Contents
Table of Contents: 1. Introduction ............................pg. 2 2. Specifications/Features NexStar 3 External 2.5” HDD Enclosure ................pg. 3 3. System Requirements ........................pg. 4 4. Parts Layout NexStar 3 External 2.5” HDD Enclosure ................. pg. 5 5. Installation NexStar 3 External 2.5” HDD Enclosure 5.1. -
Page 4: Introduction
The NexStar 3 utilizes USB 2.0, offering speeds up to 480Mbps or SATA with speed up to 3Gbps. The NexStar 3 lets you store your personal data in an enclosure that matches... -
Page 5: Specifications/Features
2. Specifications/Features: NexStar 3 External 2.5” IDE HDD Enclosure (NST-260U2): Specifications: • Interface: IDE to USB 2.0 • Dimensions: 134mm x 80mm x 25mm Features: • Aluminum housing cools down your hard drive • Transfer rates of up to 12Mbps with USB 1.1 •... -
Page 6: System Requirements
3. System Requirements: • Intel Pentium II 350MHz-compatible or Apple G3 processor and greater • Microsoft Windows 98SE/ME/2000/XP or Mac OS 8.6 and greater • USB-equipped system • USB port, internal SATA port, or eSATA port • For USB 2.0 speeds, the system must support USB 2.0 specifications •... -
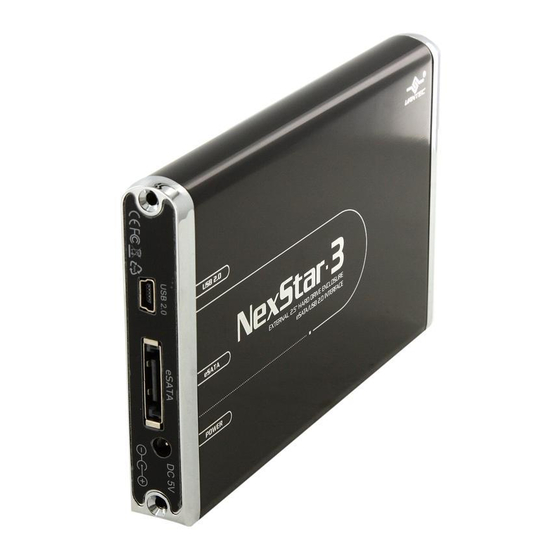
Page 7: Parts Layout
4. Parts Layout: NexStar 3 External 2.5” HDD Enclosure: Hard Drive Caddy NST-260U2 Power Jack LED Light (DC +5V) IDE Connector USB Port NST-260SU Hard Drive Caddy USB Port LED Light eSATA Port SATA/Power Connector Power Jack (DC +5V) Parts Layout... -
Page 8: Installation
5.1. Hardware Installation: Preparing the NexStar 3: 1) Remove the side of the NexStar 3 with the power and USB connection ports. If it has previously been screwed in place, remove the screws first. 2) Carefully slide out hard drive caddy. - Page 9 2) Secure the hard drive to the hard drive caddy by screwing it in place throught he back of the caddy. 3) Insert the hard drive caddy back into the NexStar 3 housing as pictured below. Besure to align the caddy with the guides within the housing.
-
Page 10: Driver Installation
My Computer, be sure to partition your hard drive. Windows 98SE 1) The first time you plug in the NexStar 3 into a USB port of your computer, the [Add New Hardware Wizard] dialog box will appears. - Page 11 Mac OS 8.6: 1) Unplug the NexStar 3 if you currently have it connected. 2) USB Mass Storage Support 1.3.5 must be installed on your system. If it is not, you can download the USB Mass Storage Support 1.3.5 from the Apple Software Updates website: http://www.apple.com/support...
-
Page 12: Disconnecting The Nexstar
NexStar 3 External 2.5” HDD Enclosure: Warning: NEVER remove the NexStar 3 while the hard drive is in use. Doing so may corrupt the data on the hard drive or damage the hard drive, NexStar 3, or computer. Windows 98SE/ME/XP/2000: 1) Make sure all operations using the hard drive within the NexStar 3 have ceased. -
Page 13: Creating A New Partition
2) Under “Storage” on the LEFT pane, select Disk Management 3) Windows should now give you the option to initialize the disk. If not, locate the new drive, right click on the new disk (where it reads "Disk #") and choose Initialize. - Page 14 1. Click Custom Setup. 2. Select the desired partitioning scheme. 3. Open the Type pop-up menu in the Volume Info area and choose Mac OS Extended Format. 4. Resize the volumes if desired. 5. When ready, click OK.
- Page 15 Note: If the hard drive will not mount on your system, format the drive with a FAT32 or NTFS partition first through a PC system. Once formatted, connect the NexStar Enclosure to your Mac and run the Disk Utility tool again. You should now be able to format the drive into a Mac partition and...
-
Page 16: Troubleshooting/Faq
Q. Why is the data on my hard drive corrupted? A. Connecting your hard drive to the NexStar 3 is just like connecting a hard drive to the inside of your computer. The NexStar 3 itself will not corrupt your data. If your data has become corrupt, it is likely caused by the removal of the NexStar 3 while data was still being written to the hard drive. - Page 17 A. You have probably formatted the hard drive in the FAT32 file system. FAT32 limits the file sizes to 4GB maximum. The NTFS file system does not have this limitation. Q. Why does my NexStar 3 work with just one USB connector on some systems, but requires 2 on others? A.
-
Page 18: Warranty
9. Warranty: The NexStar 3 comes with a 1 year limited warranty (90 day parts). If your unit should become defective within that time frame, please go to http://www.vantecusa.com for information on how to receive warranty exchange or repair. Cosmetic defects and missing parts are not covered under this warranty.
Need help?
Do you have a question about the 3 and is the answer not in the manual?
Questions and answers