
Subscribe to Our Youtube Channel
Related Manuals for La Crosse Technology WS-1912


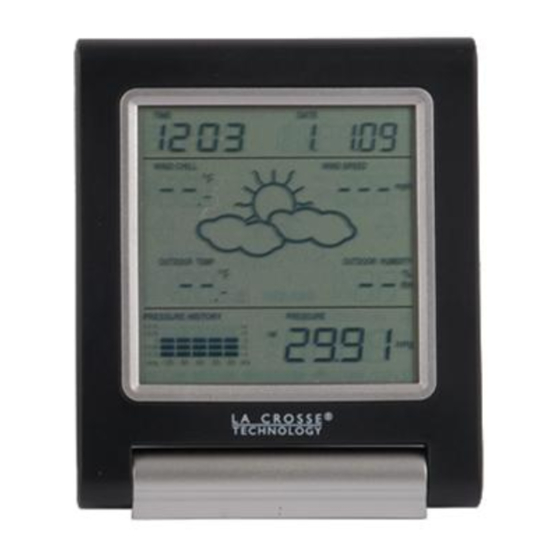
Summary of Contents for La Crosse Technology WS-1912
-
Page 1: Table Of Contents
WS- 1912 WEATHER CENTER Table of Contents Instruction Manual Topic Page Inventory of contents Features Setting up Function keys LCD screen Manual settings Weather forecast and weather tendency Wind speed measurement Rainfall measurement Viewing history data Viewing the MIN/MAX weather data Outdoor transmission 915 MHz reception Positioning Care and maintenance... -
Page 2: Ws-1912 Weather Center
WS-1912 WEATHER CENTER FEATURES: Instruction Manual The Weather Station INTRODUCTION: Congratulations on purchasing this state-of-the-art weather station as an example of Hanging hole excellent design and innovative measuring technique. Featuring time, date, calendar, weather forecast, wind gust and wind speed, indoor/outdoor temperature and outdoor... -
Page 3: Setting Up
LCD contrast selectable SETTING UP: Low battery indicator Storage of 140 sets of history weather data recorded in 3-hour intervals OPTIONAL Wireless transmission at 915 MHz Wireless transmission Transmission range up to 330 feet/100 meters at 915 MHz –... - Page 4 Next, insert the batteries into the Thermo-hygro sensor and Rain sensor (optional - Radio interferences created by cordless phones, PC screens, radios or TV sets can purchased separately) See “How to install and replace the batteries into the in some cases entirely cut off radio communication. Please consider this when Thermo-hygro sensor“...
- Page 5 HOW TO INSTALL AND REPLACE BATTERIES INTO THE RAIN SENSOR HOW TO INSTALL AND REPLACE THE BATTERIES INTO THE THERMO- (OPTIONAL; SOLD SEPERATELY) HYGRO TRANSMITTER The outdoor Thermo-hygro transmitter works with 2 x AA IEC LR6, 1.5V batteries. To install and replace the batteries, please follow the steps below: Uninstall the air flow cover of the transmitter.
-
Page 6: Function Keys
FUNCTION KEYS: HISTORY key Press to display the weather data history records Weather Station: Press to exit manual setting mode The Weather Station has 4 easy-to-use function keys. MIN/MAX key Press to display MIN/MAX records of various weather data ... -
Page 7: Manual Settings
* When the signal from the transmitter/ or rain sensor (optional) is successfully received by the Weather Station, this icon will be switched on. (If not successful, the icon will not be Mode 2: Wind gust, dew point, and rainfall (optional) reading are shown. shown on the LCD). - Page 8 CALENDAR SETTING: "Month. Date." (for 12h time display) LCD CONTRAST SETTING "Date. Month." (for 24h time display) Digit flashing Year The LCD contrast has 8 levels, from "LCD 1" to "LCD8" (default setting is LCD 5): The date default of the Weather Station is 1. 1. of year 2009. The date can be set Press the SET key, the contrast level digit will start flashing.
- Page 9 The wind speed unit can be set as mph (mile per hour), km/h (Kilometer per hour), or m/s The relative air pressure can be manually set to another value within the range of 27.14 to (meter per second). The default unit is mph. 31.90 inHg (919 to 1080 hPa) for a better reference.
-
Page 10: Weather Forecast And Weather Tendency
STORM WARNING THRESHOLD VALUE SETTING WEATHER FORECAST AND WEATHER TENDENCY You may also define a switching sensitivity value for the Storm warning display at a WEATHER FORECASTING ICONS decrease of air pressure from .09 inHg to .27 inHg (3-9 hPa) over 6 hours (Default 0.15 Weather icons in the third section of LCD can be displayed in any of the following inHg (5 hPa)). -
Page 11: Wind Speed Measurement
will not mistake the new location as being a possible change in air-pressure when really it The vertical axis represents the air pressure changes in inHg (+0.12, +0.06, 0, -0.06, -0.12. is due to the slight change of altitude. The “0” represents the current air pressure). The newly measured pressure was compared to the previously recorded pressure reading. -
Page 12: Viewing History Data
The total rainfall and 24 hour rainfall measurement is displayed in the last section of the To view the weather history: LCD (where pressure is normally displayed), in the unit of mm or inch. In normal display, press the HISTORY key. The latest weather record will be shown To View the 24-hour rainfall or the Total rainfall reading: with the date and time of recording. - Page 13 The total rainfall value will be exhibited in whole number (no decimal place) in the MIN dew point temperature history record. Time and date or recording VIEWING THE MAXIMUM/ MINIMUM WEATHER DATA The weather station will record the minimum and maximum value of the various weather data with time and date of recording automatically.
- Page 14 MIN Wind chill temperature with the date and time of recording MAX wind speed with the date and time of recording Time and date Time and date or recording or recording MIN wind chill MAX wind value speed value MAX icon MIN icon MAX Wind chill temperature with the date and time of recording MIN Relative pressure with the date and time of recording...
- Page 15 MAX 24 hour rainfall (optional) with the date and time of recording The 24h rainfall value The total rainfall value is is counted from this counted from this time and time and date date Total rainfall icon 24h rainfall Total rainfall 24 hour amount amount...
-
Page 16: Positioning
Please keep this in mind when placing the transmitter and the rain sensor. You can purchase a La Crosse Technology Extension Cable if you require additional length to properly mount your sensor. The extension cable is 32 feet in length and comes If (1) the outdoor data is not being received within first several minutes after setting up;... - Page 17 The Wind Sensor Vertical The Thermo-hygro Sensor mast Rain Cover Wind -cups Main Unit Wall Bracket Horizontal panel An ideal mounting place for the thermo-hygro sensor would be the outer wall beneath the First, check that the wind-cups can rotate freely before fixing the unit. For correct and extension of a roof, as this will protect the sensor from direct sunlight and other extreme accurate readings, it is important to mount the sensor with the cups on the bottom.
-
Page 18: Care And Maintenance
For best results, the rain sensor should be securely mounted onto a horizontal surface SPECIFICATIONS: about 39.37” (1 meter) above the ground (or higher) and in an open area away from trees Temperature measuring range: or other coverings where rainfall may be reduced causing inaccurate readings. Indoor: 32°... -
Page 19: Warranty Information
Ltd or La Crosse Technology, Ltd’s authorized service center. Weather Center 3 x AA, IEC LR6, 1.5V La Crosse Technology, Ltd will repair or replace this product, at our option and at no charge as stipulated Thermo-hygro transmitter : 2 x AA, IEC LR6, 1.5V... - Page 20 For more information, please visit: www.lacrossetechnology.com/1912 All rights reserved. This handbook must not be reproduced in any form, even in excerpts, or duplicated or processed using electronic, mechanical or chemical procedures without written permission of the publisher. This handbook may contain mistakes and printing errors. The information in this handbook is regularly checked and corrections made in the next issue.
Need help?
Do you have a question about the WS-1912 and is the answer not in the manual?
Questions and answers