Table of Contents
Advertisement
Quick Links
PROFESSIONAL WEATHER CENTER
WS-1516-IT
Instruction Manual
Table of Contents
Topic
Features
LCD Screen
Viewing history data
Viewing the min/ max weather data
Switch On/ Off buzzer
Outdoor transmission 915 MHz reception
PROFESSIONAL WEATHER CENTER
WS-1516-IT
Instruction Manual
Congratulations on purchasing this state-of-the-art Professional Weather Center as an example
of excellent design and innovative technology. Featuring time, date, calendar, weather forecast,
wind direction and speed, rainfall, indoor temperature, outdoor temperature and outdoor humidity,
air pressure and various alarm settings for different weather conditions, this Weather Center will
provide you with extensive weather information and forecast.
INSTANT TRANSMISSION is the state-of-the-art new wireless
This product offers:
transmission technology, exclusively designed and developed
by LA CROSSE TECHNOLOGY. INSTANT TRANSMISSION
offers you an immediate update (every 4.5 seconds!) (6.5
seconds for rain) of all your outdoor data measured from the
transmitters: follow your climatic variations in real-time!
Page
4
7
14
16
19
26
27
32
33
37
38
39
41
50
51
53
1
3
Specification
Warranty Info
FAQ
FEATURES:
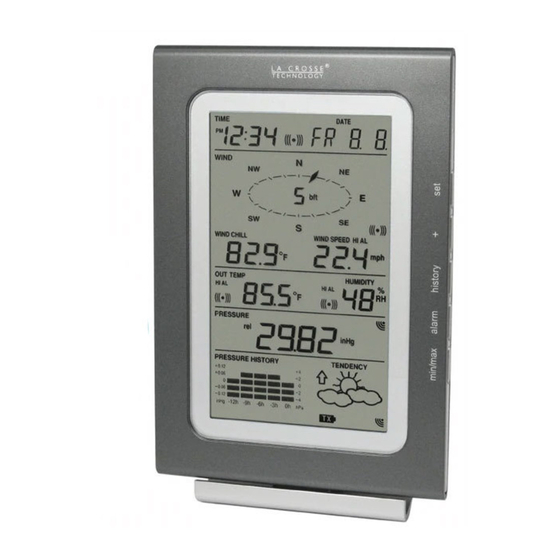
Weather Center
LCD
Time display (manual setting)
12/24 hour time display
Calendar display (weekday, date, month, year)
Time alarm function
57
58
61
63
2
Hanging hole
Battery
compartment
Stand
4
Advertisement
Table of Contents

Related Manuals for La Crosse Technology WS-1516-IT


Summary of Contents for La Crosse Technology WS-1516-IT
- Page 1 This product offers: compartment transmission technology, exclusively designed and developed by LA CROSSE TECHNOLOGY. INSTANT TRANSMISSION offers you an immediate update (every 4.5 seconds!) (6.5 seconds for rain) of all your outdoor data measured from the transmitters: follow your climatic variations in real-time! Stand ...
- Page 2 Weather forecasting function with 3 weather icons and weather tendency indicator Dew point display in ºF/°C Thermo-hygro Sensor Outdoor temperature display in ºF/°C Remote transmission of the outdoor temperature and humidity to the Outdoor Humidity display as RH% Weather Center at 915 MHz ...
- Page 3 Afterwards, the Weather Center will start receiving data from the transmitter. The transmission reception icon will be blinking to indicate that the station is trying to get the thermo-hygro transmitter data. The outdoor temperature, humidity, wind data should then Note : be displayed on the Weather Center.
- Page 4 HOW TO INSTALL AND REPLACE THE BATTERIES INTO THE WEATHER FUNCTION KEYS: CENTER Weather Center: The Weather Center works with 3 x AA, IEC LR6, 1.5V Alkaline The Weather Center has 5 easy-to-use function keys. batteries. When the batteries need to be replaced, the low battery symbol will appear on the LCD.
- Page 5 Time alarm icon * When the signal from the transmitter/ or Rain sensor is successfully received by the Weather Station, this icon will be switched on. (If not successful, the icon will not be shown on the LCD). User can therefore easily see whether the last reception was successful (“ON” icon) or not Calendar, indoor temp., Time display (“OFF”...
- Page 6 The time can be set to view as 12-hour or 24-hour format. The default time-display mode is 12-h. °F/°C TEMPERATURE UNIT SETTING To set to 24-h time display: Flashing Use the + or MIN/MAX key to toggle the value. Confirm with the SET key and enter the CALENDAR SETTING. CALENDAR SETTING: The temperature display can be selected to show temperature data in °F or °C.
- Page 7 STORM WARNING THRESHOLD VALUE SETTING TO EXIT THE MANUAL SETTING MODE You may also define a switching sensitivity value for the Storm warning display at a decrease of To exit the manual setting anytime during the manual setting modes, press the ALARM key (or air pressure from .09 inHg to .27 inHg over 6 hours (Default 0.15 inHg).
- Page 8 Press and hold the SET key for about 2 seconds. The temperature digit will start flashing. Set the Outdoor humidity alarm value (High or Low alarm value): Press the + or MIN/MAX key to set the high outdoor temp alarm value. (Keep holding the In the normal display mode, press the ALARM key 4 times.
- Page 9 (Every time a new average pressure value has been obtained (once per minute), this value is If the Weather Center is moved to another location significantly higher or lower than its initial compared with an internal reference value. If the difference between these values is bigger than standing point (for example from the ground floor to the upper floors of a house), discard the the selected weather tendency sensitivity, the weather-icon changes, either for worse or for weather forecast for the next 48-60 hours, as the Weather Center may mistake the new location...
- Page 10 Text showing wind speed VIEWING THE HISTORY DATA in Beaufort scale The weather station can store up to 140 sets of weather data which are recorded automatically at 3-hour intervals after the weather station is powered up, at the nearest time of 0:00, 03:00, 06:00, Pointer indicates the 09:00, 12:00, 15:00, 18:00 and 21:00.
- Page 11 Min dew point temperature with the date and time of recording Min outdoor humidity with the date and time of recording Max outdoor humidity with the date and time of recording Time and date of recording Time and date of recording MIN dew point value MAX outdoor...
- Page 12 Maximum wind speed with the date and time of recording Maximum Gust with the date and time of recording Time and date Time and date of recording of recording MAX wind speed value MAX wind gust value MAX icon MAX icon Press the ALARM or HISTORY key to return to normal display mode.
- Page 13 Press ALARM or HISTORY key once to return to the normal display mode. The "BUZZER Note: After power up, the time and date and total rainfall are displayed as "- - -". After time is adjusted OFF" icon will no longer be shown. Then the alarm will sound normally. manually, the set time will be shown.
- Page 14 Do not make any repair attempts to the unit. Return them to their original point of purchase LA CROSSE TECHNOLOGY SENSOR EXTENSION CABLE for repair by a qualified engineer. Opening and tampering with the unit may invalidate their When you require additional length to properly mount your sensor, you can use a La Crosse guarantee.
- Page 15 Please contact your local or/and regional authorities to retrieve the addresses of legal La Crosse Technology, Ltd will repair or replace this product, at our option and at no charge as dumping grounds with selective collection. stipulated herein, with new or reconditioned parts or products if found to be defective during the All electronic instruments must from now on be recycled.
- Page 16 --Indoor Temperature Readings In the event of installing or changing batteries in any of the units, all units need to be reset by – Outdoor Temperature/Humidity Readings following the setup procedures. --Wind Readings 1. Remove batteries from the Thermo-hygro (outdoor) sensor, Rain sensor and the --Rain reading Base station (s).
- Page 17 contrast of the LCD, press and release the MIN/MAX button. Press and release the SET button The numeric day will be flashing. Use the PLUS or MIN/MAX button to set the date correctly. once to move to the next menu item. (The unit will determine the Day of the week automatically.) Press and release the SET button once to move to the next menu item.
- Page 18 Base or the Wind sensor? Ham radios, Baby monitors, Cordless Phones, etc can cause loss of Accuracy Test: To test any La Crosse Technology rain gauge, follow these steps: signal or erratic readings. Erase the Total rainfall or make note of this amount.
- Page 19 Weather Center will also record Maximum Wind Speed, Wind Gust, and 24 hour Rain with Time Turning off the Time Alarm: and Date of recording automatically. The time alarm icon ((●)) will appear at the bottom center of the first section of LCD. It means MIN/MAX weather data can be viewed by pressing the MIN/MAX key in normal display mode.
- Page 20 Three possible weather icons will be displayed: Prevention: Be aware of expiration dates. Do not mix old and new batteries. Sunny-indicates that the weather is expected to improve (not that the weather will be sunny). Store batteries at room temperature or allow coming back to room temperature before using. Sun with Clouds-indicates that the weather is expected to be fair (not that the weather will be Remove weak batteries from you device to prevent leakage.
Need help?
Do you have a question about the WS-1516-IT and is the answer not in the manual?
Questions and answers