
Related Manuals for Char-Griller 1414


Summary of Contents for Char-Griller 1414
-
Page 1: Charcoal Grill
Model # 1414 3-in-1 Charcoal Grill Side Fire Box - Page 12 Grill with Full Cart – Page 3 Portable Grill - Page 18 Keep your receipt with this manual for Warranty. OM1414 A.3 ™ & © Char-Griller / A&J Mfg. - Page 2 Call us should you have any questions not addressed in these instructions, or for service information. Have your grills serial number (located on the back of the grill body or on the leg) when calling. OM1414 A.3 ™ & © Char-Griller / A&J Mfg.
- Page 6 Step 6: Attach the GRILL BODY to the Cart/Leg Assembly (Make sure that the damper is on the same side as the wheels) with four 1 3/4” Hex Bolts. (4) 1 3/4” Hex Bolts (4)Hex Nuts Grill Body Hex Bolts Damper Cart/Leg Assembly Hex Nuts OM1414 A.3 ™ & © Char-Griller / A&J Mfg.
- Page 7 Step 8: Attach WIRE HANDLE to the right side of GRILL BODY with two 1/2” HEX BOLTS, two LOCK WASHERS, and two HEX NUTS. (2) 1/2” Hex Bolts (2)Hex Nuts (2)Lock Washers Lock Washers Hex Nuts Hex Bolts WIRE HANDLE Grill Body OM1414 A.3 ™ & © Char-Griller / A&J Mfg.
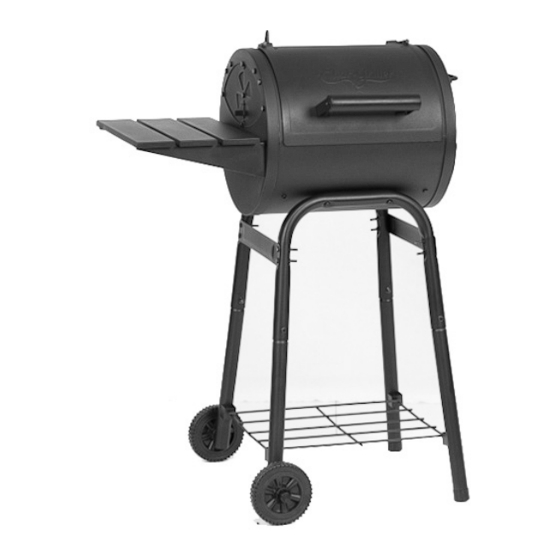
- Page 8 Step 10: Attach SIDE SHELF to left side of Grill BODY with four 1/2” HEX BOLTS and four HEX NUTS. (4) 1/2” Hex Bolts Hex Nuts (4)Hex Nuts Side Shelf Grill Body Hex Bolts OM1414 A.3 ™ & © Char-Griller / A&J Mfg.
- Page 9 Hex Bolt Ash Drawer Step 12: Attach U HANDLE to ASH DRAWER with two LOCK WASHERS and two HEX NUTS. (2)Lock Washers Lock Washers (2)Hex Nuts Hex Nuts Ash Drawer U Handle OM1414 A.3 ™ & © Char-Griller / A&J Mfg.
- Page 10 Hex Nut Flat Washer Grill Body Step 14: Tighten ALL BOLTS and NUTS. Insert a 1/2” BOLT and tighten with a NUT for any open holes in Grill BODY after assembly. OM1414 A.3 ™ & © Char-Griller / A&J Mfg.
- Page 11 Step 15: Place FIRE GRATE onto ASH DRAWER then slides it into GRILL BODY. Fire Grate Grill Body Ash Drawer Step 16: Place COOKING GRATE into GRILL BODY. Grill Body Cooking Grates NO RETURNS ON USED GRILLS. OM1414 A.3 ™ & © Char-Griller / A&J Mfg.
- Page 12 Call us should you have any questions not addressed in these instruc- tions, or for service information. Have your grills serial number (located on the back of the grill body or on the leg) when calling. OM1414 A.3 ™ & © Char-Griller / A&J Mfg.
-
Page 13: Assembly Instructions
Step 2: Attach SFB to main GRILL BODY. With a helper align the SFB in place over the opening on the grill body then attach with six 1/2” BOLTS and NUTS. Hex Nuts (6) 1/2” Hex Bolts (6)Hex Nuts Grill Body Hex Bolts OM1414 A.3 ™ & © Char-Griller / A&J Mfg. - Page 14 Step 4: Attach the WIRE HANDLE to the SFB right side with two 1/2” HEX BOLTS, two LOCK WASHERS, and two HEX NUTS, see below. (2) 1/2” Hex Bolts Wire Handle Hex Nuts (2)Hex Nuts (2)Lock Washer Hex Bolts Lock Washers OM1414 A.3 ™ & © Char-Griller / A&J Mfg.
- Page 15 Step 6: Attach WOOD HANDLE to SFB HOOD with two 1/2” HEX BOLTS, two LOCK WASHERS, and two HEX NUTS. Hex Bolts Wood Handle (2) 1/2” Hex Bolts (2)Hex Nuts Lock Washers (2)Lock Washers Hex Nuts OM1414 A.3 ™ & © Char-Griller / A&J Mfg.
- Page 16 Hex Nuts Ash Drawer U Handle Step 8: Tighten ALL BOLTS and NUTS. Insert a 1/2” BOLT and tighten with a NUT for any open holes in Grill BODY after assembly. OM1414 A.3 ™ & © Char-Griller / A&J Mfg.
- Page 17 Step 10: Place FIRE GRATE onto ASH DRAWER then slides it into SFB. Fire Grate Ash Drawer Step 11: Place COOKING GRATE onto SFB. Cooking Grates NO RETURNS ON USED GRILLS. OM1414 A.3 ™ & © Char-Griller / A&J Mfg.
- Page 18 Call us should you have any questions not addressed in these instruc- tions, or for service information. Have your grills serial number (located on the back of the grill body or on the leg) when calling. OM1414 A.3 ™ & © Char-Griller / A&J Mfg.
- Page 19 Step 1: Attach LEGS to GRILL BODY with four 1/2” HEX BOLTS and four HEX NUTS, see below. (4) 1/2” Hex Bolts (4)Hex Nuts Grill Body Hex Nuts Hex Bolts Legs OM1414 A.3 ™ & © Char-Griller / A&J Mfg.
- Page 20 Step 3: Attach WIRE HANDLE to GRILL BODY with four HEX BOLTS and four HEX NUTS, see below. (4) 1/2” Hex Bolts Hex Bolts (4)Hex Nuts Wire Handle Wire Handle Hex Bolts Hex Nuts OM1414 A.3 ™ & © Char-Griller / A&J Mfg.
- Page 21 Step 5: Attach DAMPER CIRCLE to the ASH DRAWER with 1/2” HEX BOLT, FLAT WASHER, LOCK WASHER, and HEX NUT, see below. Damper Circle Hex Nut Flat Washer (1) 1/2” Hex Bolt (1)Hex Nut (1)Flat Washer (1)Lock Washer Lock Nut Ash Drawer Hex Bolt OM1414 A.3 ™ & © Char-Griller / A&J Mfg.
- Page 22 Step 7: Attach DRAWER LATCH to GRILL BODY right side with 1/2” HEX BOLT and HEX NUT. (1) 1/2” Hex Bolt (1)Hex Nut Hex Nut Drawer Latch Grill Body Hex Bolt OM1414 A.3 ™ & © Char-Griller / A&J Mfg.
- Page 23 Step 9: Place FIRE GRATE onto ASH DRAWER then slides it into GRILL BODY. Grill Body Fire Grate Ash Drawer Step 10: Place COOKING GRATES onto the GRILL BODY. Grill Body Cooking Grates NO RETURNS ON USED GRILLS. OM1414 A.3 ™ & © Char-Griller / A&J Mfg.
-
Page 24: Grill Preparation
11. You may fill unwanted holes with Nuts & Bolts (Not Provided). NOTE: Smoke will escape from areas other than the smokestack. This should not affect your cook- ing. OM1414 A.3 ™ & © Char-Griller / A&J Mfg. - Page 25 (hot) position for 1 min each side before lowering grate and closing lid. *OR SMOKE by placing birds in center of GRID with fire in both ends of FIRE BOX. OM1414 A.3 ™ & © Char-Griller / A&J Mfg.
- Page 26 50 minutes. Turn after 25 minutes (no need to turn if smoked). Squeeze to check for doneness. SWEET CORN IN HUSKS: Trim excess silk from end and soak in cold salted water 1 hour before grilling. Grill 25 minutes – turning several times. OM1414 A.3 ™ & © Char-Griller / A&J Mfg.
- Page 27 Use caution since flames can flare-up when fresh air suddenly comes in contact with fire. When opening the lid, keep hands, face and body safe from hot steam and flame flare-ups. OM1414 A.3 ™ & © Char-Griller / A&J Mfg.
- Page 28 Cook meats medium to well one. THESE WARNINGS APPLY ALSO TO THE "SIDE FIRE BOX" OM1414 A.3 ™ & © Char-Griller / A&J Mfg.
- Page 29 Char-Griller will repair or replace any defective part of its side fire boxes for a period up to one year from the date of purchase.
Need help?
Do you have a question about the 1414 and is the answer not in the manual?
Questions and answers