Table of Contents
Advertisement
Advertisement
Table of Contents

Related Manuals for Handicare Ibis 24


Summary of Contents for Handicare Ibis 24
-
Page 1: User Manual
USER MANUAL IBIS ANUAL WHEELCHAIR 009.00001.111D... - Page 3 Handicare executes a policy of continuous improvement and reserves the right to changes and modifications. The information provided is valid for the product in its standard version. Handicare cannot be held liable for possible damage resulting from specifications of the product deviating from the standard configuration.
-
Page 5: Table Of Contents
Operation ......................19 4.1 Riding with the Ibis ..................19 4.2 Riding......................19 4.2.1 Riding forward and backward with Ibis 12" ........19 4.2.2 Riding forward and backward with Ibis 24" ........20 4.2.3 Turning corners with Ibis 24" ............20 4.2.4 Slopes ....................20 4.2.5 Parking ...................21 4.3 Tilt adjustment seating system..............22... - Page 6 6.2 Wheels......................46 6.3 Cleaning ....................... 46 Technical specification ..................47 7.1 Product specifications................... 47 7.1.1 Ibis 12" ................... 47 7.1.2 Ibis 24" ................... 49 7.2 Approval ....................... 51 7.3 CE declaration ....................51 7.4 Authorized service and technical support ............. 51...
-
Page 7: Preface
Preface Preface Welcome to a growing community of users who use a wheelchair from the Handicare product range. Handicare stands for reliability and innovative technology, which results in easily operated quality products. XXXXXX-010001000-en.doc Delivery Your dealer will deliver the Ibis wheelchair ready for use. -
Page 8: Product Reference
Preface Product reference The product has the following decals and labels: XXXXXX-010004000-en.doc 12" 24" 010004010 See fig. 010004010: Tilt adjustment mechanical Set tilt adjustment Gas spring adjustment backrest (option). Brake bracket Tire pressure back wheels 12" Tire pressure back wheels 24" SADKIB-010004010-en.doc... - Page 9 Preface A. Tilt adjustment seating system To adjust the tilting angle of the seating system, see 'Tilt adjustment seating system'. PICPRO-010004320-en.doc B. Set tilt adjustment To set the tilt adjustment, see 'Set tilt adjustment'. PICPRO-010004330-en.doc C. Gas spring adjustment backrest (option) To adjust the backrest, see 'Gas spring adjustment backrest'.
-
Page 10: Pictograms
Preface Pictograms The following pictograms are used in this manual: XXXXXX-010004020-en.doc Caution Procedures that can result - if they are not executed properly - in damage to the product, the environment, or human injury. PICDOC-010004110-en.doc Attention! Suggestions and advice for conducting the relevant tasks or activities more easily. -
Page 11: Identification Plate
Preface Identification plate See fig. 010007000. On this plate (A) information on the product can be found. See: 'Identification of the product'. SADKIB-010007000-en.doc 010007000 Identification of the product See fig. 010007010. Model Manufacture year Identification number TYPE/TYPE/TYP: User area indoors or outdoors 2000 CT 00004 YEAR/JAAR/JAHR:... -
Page 12: Warranty Stipulations Concerning The Wheelchair
Customer is a Dealer, this Dealer will indemnify Handicare against possible claims from Users or other third parties for faults based on an incorrect or careless use of the Product;... - Page 13 Preface or the battery that is part of the Product. Handicare does not guarantee batteries provided by dealers or purchased by the customer. 4. The warranty conditions as mentioned in above stipulations in any case become null and void if: •...
-
Page 14: Liability Stipulations Concerning The Product
Product for which Handicare is responsible and for damage to another object that is the private property of the user of the Product, as long as said loss is the direct result of a fault in the Product. -
Page 15: General Safety Regulations And Instructions
General safety regulations and instructions 1 General safety regulations and instructions Handicare accepts no liability whatsoever for damage or injury caused by the failure to (strictly) adhere to the safety guidelines and instructions or else due to carelessness during the use and cleaning of the wheelchair and possible accessories. Depending on the specific work circumstances or the accessories used, additional safety instructions may be required. -
Page 16: General Description
General description • Be sure that no items of clothing hang loose. These could be caught between the wheels while riding the wheelchair. When tilting the seating system, parts of the wheelchair could be caught between the wheels or the mechanism. •... -
Page 17: Main Components
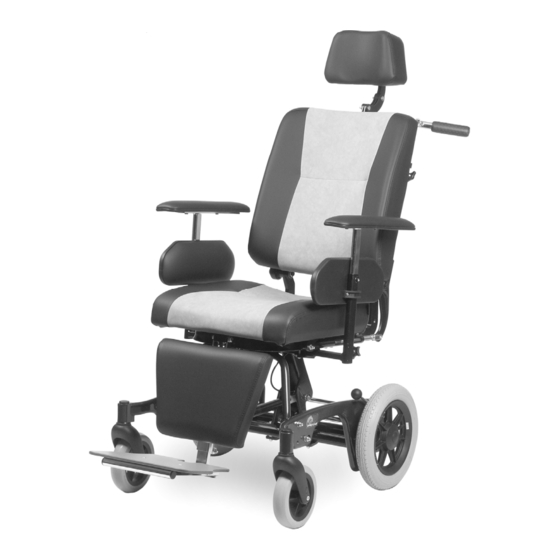
Main components 3 Main components See fig. 010300000. The following main components are, or may be, installed on the wheelchair: Seat This is where the user is seated. Backrest Serves to support the back of the user. Tilting adjustment Handle to have the chair tilted by the assistant. Headrest (option) Serves to support the head. - Page 18 Main components 12" 24" 010300000...
-
Page 19: Operation
Operation 4 Operation XXXXXX-010400000-en.doc Riding with the Ibis To be able to ride the Ibis, this owner's manual describes the following parts. • Inspection before use. • Riding. • Getting in / getting out. • Pushing. • Reducing. SADKIB-010401000-en.doc Inspection before use Before riding the wheelchair, it is important to check the following points: •... -
Page 20: Riding Forward And Backward With Ibis 24
Operation 4.2.2 Riding forward and backward with Ibis 24" • Take the brake off the back wheels. See 'Parking'. • Take the hoops of the back wheels, at both sides, in your hands. • Push the hoops forward or backward with your hands, according to the desired direction. -
Page 21: Parking
Therefore, it does not have to be pushed. But it is necessary to hold on to the pushing handles to apply some brake force, or (in the case of Ibis 24") to adjust the speed of the hoops with both hands, so that the wheelchair cannot start moving downhill at... -
Page 22: Tilt Adjustment Seating System
Operation Make sure that the handles of the brakes are properly folded down, so that they cannot accidentally be applied while riding the wheelchair. If the wheelchair is stopped on a slope, the brake should be applied to prevent moving down the slope. SADKIB-010404070.nl.doc Tilt adjustment seating system See fig. -
Page 23: Set Tilt Adjustment
Operation 4.3.2 Set tilt adjustment See fig. 010409020. The tilt adjustment can be adjusted to the user's weight. By turning the knurled screw (A) inward or outward, the spring tension of the tilting mechanism will change. • For heavier persons, the knurled screw (A) will have to be tightened: by turning it clockwise. -
Page 24: Getting In And Off And Making A Transfer
Operation 4.5.1 Getting in and off and making a transfer See fig. 010405010. Before getting in, getting out, or making a transfer, the brake should be applied to the wheelchair. Getting in: • Apply the brake to the wheelchair. See 'Parking'. -
Page 25: Using The Stepping Button
Operation 4.6.1 Using the stepping button See fig. 010406020. When pushing, the assistant can make use of one of the stepping buttons (left or right) to be able to easily take such obstacles as curbs and doorsteps. • Step on one of the stepping buttons and pull the wheelchair slightly backward, so that the swivel castors are free in the air. -
Page 26: Removing The Seat Cushion
• If applicable, by removing the head-rest (D). See 'Removing the head-rest'. • If applicable, by removing the back wheels (E) (only on Ibis 24"). • By folding up the foot-support (F). See 'Folding up the foot-support'. By replacing the parts that were removed, and by putting the other parts back in their operating positions, the Ibis is ready for immediate use again. -
Page 27: Removing The Arm-Rest
4.7.5 Removing the back wheels (24'') See fig. 010407110. The back wheels of the Ibis 24" have been mounted, complete with bearing system, using a quick-release system in the axle housing of the frame. The back wheels (A) should be removed as follows: •... -
Page 28: Reduced
SADKIB-010407110.nl.doc 4.7.6 Reduced See fig. 010407080. After all of the aforementioned parts have been removed from the wheelchair, all that remains is fig. 010407080. This is the largest part after the reducing operation: Ibis 12" Ibis 24" SADKIB-010407080.nl.doc 010407080... -
Page 29: Transport
• Apply the wheelchair brake. • Handicare recommends that the wheelchair is supplied with a headrest and that this should be used during transportation. • During transportation it is essential that you are secured by a three point lap belt, which is anchored to the vehicle wall and floor rails. -
Page 30: Adjustment Options
5 Adjustment options XXXXXX-010500000-en.doc The Sedeo® seating frame The wheelchair has a unique seating system made by Handicare, known as Sedeo®. Sedeo is the Latin word for: 'I sit'. Functions of the Sedeo® seating system The Sedeo® seating system offers outstanding support for: 1. -
Page 31: Seating Adjustments
Adjustment options Seating adjustments See fig. 010502000. 010502000 The following parts of the seating system can be adjusted: • The depth. See 'Adjusting the seat depth' (A) and 'Position of the seat cushion' (B). • The width (C). See 'Adjusting the seat width'. •... -
Page 32: Position Of Seat Cushion
Adjustment options Tighten the locking bolts on both sides securely. XXXXXX-010502020.nl.doc 5.2.2 Position of seat cushion See fig. 010502050. The seat cushion can be fastened to the frame in three positions. This allows the seat depth to be reduced. The location of the seat cushion can be changed as follows: •... -
Page 33: Adjusting The Seat Angle
Adjustment options Set the side panels equally, in such a way that you feel comfortable and that you have enough support and enough freedom of movement. • Tighten the Allen bolts properly on both sides. XXXXXX-010502030.nl.doc 5.2.4 Adjusting the seat angle See fig. -
Page 34: Single Footplate Settings
Adjustment options Single footplate settings See fig. 010505000. For an optimum support of the legs, the following adjustments can be made to the central leg-support: Lower leg length Depth of leg-support Knee angle SADKIB-010505000.nl.doc 5.4.1 Adjusting the lower leg length 010505000 See fig. -
Page 35: Adjusting The Depth Of The Leg-Support
Adjustment options 5.4.2 Adjusting the depth of the leg-support See fig. 010505020. Depending on the length of the upper legs, the leg-support can be adjusted in terms of depth. The adjustment of the depth of the leg- support should be done as follows: •... -
Page 36: Adjusting The Length Of The Lower-Leg-Rests
Adjustment options 5.5.1 Adjusting the length of the lower-leg-rests See fig. 010504010. The adjustment of the length (L) of the leg- rests should be done as follows: • Loosen the set bolt (A) a few turns with an Allen key with a key width of 4 mm. -
Page 37: Adjusting The Depth Of The Leg-Rest
Adjustment options 5.5.3 Adjusting the depth of the leg-rest See fig. 010504030. Depending on the length of the upper legs, the leg-rests can be adjusted in terms of depth. The adjustment of the depth of the leg-rests should be done as follows: •... -
Page 38: Adjusting The Footplate
Adjustment options The adjustment of the angle of the leg-rests can be done as follows: • Push the handle (B) forward. • The leg rest goes upwards. • Release the handle in the desired position. If the leg support is too high, do the following: •... -
Page 39: Adjusting The Depth Of The Footplate
Adjustment options • Lock the Allen bolt with the locking nut. 5.6.2 Adjusting the depth of the footplate See fig. 010506020. The depth of the footplate can be adjusted in two different positions. For this the left and right footplate should be exchanged. -
Page 40: Adjusting The Height Of The Arm-Rest
Adjustment options 5.7.1 Adjusting the height of the arm-rest See fig. 010508010. The height adjustment can be done as follows: • Loosen set bolt (A) with an Allen key with a key width of 4 mm. • Slide the arm-rest (B) to the desired height. Make sure that the arms are well supported, without the shoulders being pushed... -
Page 41: Adjusting The Height Of The Side Panel
Adjustment options Adjusting the height of the side panel See fig. 010509010. The side panels should provide sufficient support and sufficient freedom of movement so that you can assume a comfortable position in the chair. The side panels can be adjusted in height. The height adjustment can be done as follows: •... -
Page 42: Adjusting The Height Of The Headrest
Adjustment options 5.9.1 Adjusting the height of the headrest See fig. 010510010. The height adjustment can be done as follows: • Loosen the wing nut (A) a few turns. • Slide the headrest (B) to the desired height. • Securely tighten the wing nut again so that the headrest cannot shift. -
Page 43: 5.10 Adjusting The Calf Strap
Adjustment options 5.10 Adjusting the calf strap See fig. 010511000. The calf strap (A) serves to support the calves and is attached to the leg-rests. The calf strap can be removed to make transfer in and out easier. EBAPUM-010511000.nl.doc 010511000 5.11 Adjusting the calf pad (option) See fig. -
Page 44: Adjusting The Angle Of The Calf Pad
Adjustment options 5.11.2 Adjusting the angle of the calf pad See fig. 010512020. The angle of the calf pad can be adjusted as follows: • Loosen nut (A) a few turns with a spanner with a key width of 13 mm. •... -
Page 45: Maintenance
Checking the tire pressure • Monthly Cleaning of the quick-release axles of the wheels. Only for Ibis 24” • Lubricating these quick-release axles with silicone grease (from spray can). Never use any other grease or oil, because these attract dirt. -
Page 46: Wheels
Maintenance Wheels For the proper functioning of the wheelchair it is very important that the tires are at the right tension. Soft tires yield less optimal driving for the wheelchair. It also costs more energy to move the wheelchair forward. Moreover, tire wear when driving on soft tires is unnecessarily great. -
Page 47: Technical Specification
Technical specification 7 Technical specification XXXXXX-010900000-en.doc Product specifications Manufacturer: Handicare XXXXXX-010901000-en.doc 7.1.1 Ibis 12" Model Ibis 12" Maximum user's weight 125 kg (8.7") Description Min. Max. Total length including leg-rest 920 mm (8.7") 1.200 mm (8.7") Total width 630 mm (8.7") 720 mm (8.7") - Page 48 Technical specification Technical data Diameter front wheels 177 mm (8.7") (7" x 1¾") Diameter rear wheels 318 mm (8.7") (12½" x 2¼") Tire pressure rear wheels 250 kPa (2,5 Bar) See fig. 010901010. 010901010 Configuration data Min. Max. Effective sitting width (adjustable) 380 mm (8.7") 525 mm (8.7") Total width...
-
Page 49: Ibis 24
Technical specification 7.1.2 Ibis 24" Model Ibis 24" Maximum user's weight 125 kg (8.7") Description Min. Max. Total length including leg-rest 1.040 mm (8.7") 1.200 mm (8.7") Total width 690 mm (8.7") 790 mm (8.7") Transport length 700 mm (8.7") Transport width 610 mm (8.7") - Page 50 Technical specification See fig. 010901020. 010901020 Configuration data Min. Max. Effective sitting width (adjustable) 380 mm (8.7") 505 mm (8.7") Total width 690 mm (8.7") 790 mm (8.7") Effective sitting depth (adjustable) 440 mm (8.7") 520 mm (8.7") Total length including leg-rest 1.040 mm (8.7") 1.200 mm (8.7") Sitting height from the front...
-
Page 51: Approval
Technical specification Approval The products meet EN 12183 (1999): 1. Requirements and testing methods for static, impact and fatigue strength 2. Climate test according to standard ISO 7176-9 The wheelchair is TNO approved in conformity with the requirements laid down by the KBOH Foundation, admission number R-059511. - Page 52 Dealer;...
Need help?
Do you have a question about the Ibis 24 and is the answer not in the manual?
Questions and answers