Table of Contents
Advertisement
Advertisement
Table of Contents

Related Manuals for Handicare Exigo 10


Summary of Contents for Handicare Exigo 10
-
Page 1: User Manual
Exigo 10 User Manual MB3195-GB... -
Page 2: Introduction
A total width only 18 cm greater than the seat width provides good accessibility through narrow doors and in tight spaces. Exigo 10 is easy to transport in a car or in other vehicles; the chair is only 30 cm wide when folded. -
Page 3: Table Of Contents
Contents Introduction ...................2 Contents ..................3 Parts of the wheelchair ..............4 Assembly and transport ...............5 Using the wheelchair..............6 Fitting a positioning belt ............14 Safety ...................15 Safety in cars ................16 Maintenance ................19 Technical specifications ............23 Labelling ..................24 Guarantee ..................26 MB3195-GB... -
Page 4: Parts Of The Wheelchair
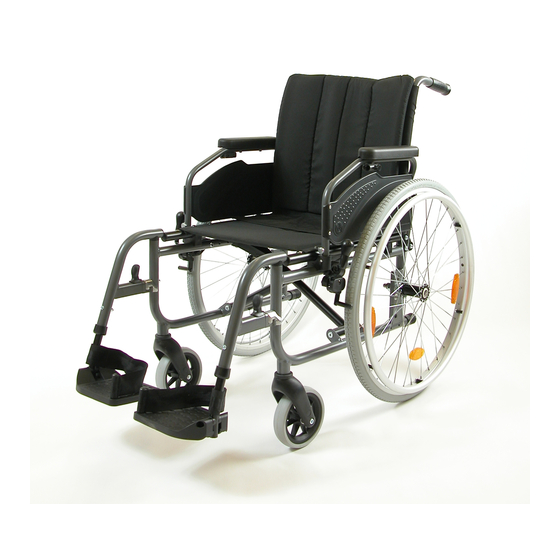
Parts of the wheelchair In order to be able to read and understand this manual it is important that you fa- miliarise yourself with the most common terms that we use for the different parts of the wheelchair. Have a look at fi gure 1 and note the relevant parts on your wheelchair. The equipment on your wheelchair may vary slightly from the fi... -
Page 5: Assembly And Transport
Assembly and transport Assembly Figure 2 The wheelchair is supplied complete as standard. The only thing you need to do is to unfold the chair and, if necessary, fit the leg supports. Figure 2 Unfolding the wheelchair Figure 3 Unfold the wheelchair by pushing down with flat hands on the upholstery next to the seat tubing. -
Page 6: Using The Wheelchair
Using the wheelchair Quick-release hub Figure 5 The wheelchair has a quick-release hub on each of the driving wheels. Depress the button in the centre of the driving wheel to remove or replace the wheel. NB: Check that the wheel is properly fastened by making sure that the button pops out about 5 mm when the wheel bolt is fully in the casing. - Page 7 Using the wheelchair Swinging out/fitting/removing the leg supports Figures 7 The leg supports can be swung in and out or removed to make transfers easier. The leg support is released by turning the handle (7A) inwards or outwards while swinging the leg support. Once the leg support has been swung to the side, it can be lifted up and removed completely if desired.
- Page 8 Using the wheelchair Using the brakes Figure 8 Pull the brake lever towards you to lock the brake. The brakes are only designed to keep the chair stationary. Under no circumstances must they be used as a driving brake. Figure 8 Anti-tip stabiliser Figure 9 The anti-tip stabiliser is deployed by...
- Page 9 Using the wheelchair Transferring into and out of the chair Figures 10, 11 and 12 • Engage the brakes • Swing the leg supports out if necessary • Move yourself to the front of the chair before transferring to another chair, bed, etc.
- Page 10 Using the wheelchair Negotiating obstacles: steps Figures 13 and 14 If the wheelchair is to be lifted up or down steps with the user in the chair, if possible use the recommended lifting points. The lifting points are the pushing handles and leg supports.
-
Page 11: Adjusting The Height Of The Back
Adjusting the wheelchair Adjusting the height of the back of the seat Figure 16 You can adjust the height of the back of the seat using any of the methods described below. Move the wheel up or down If you move the wheel up, you lower the seat height. -
Page 12: Adjusting The Wheelchair
Adjusting the wheelchair Adjusting the height of the front Front castor of the seat Figure 18 wheel fork You can adjust the height of the front of the seat using any of the methods described below. Move the front castor wheel to a higher or lower position in the castor fork Front castor By moving the castor wheel to a higher... - Page 13 Adjusting the wheelchair Adjusting the brakes Figure 19 To move the brakes, undo the screw (19A) located on the inside of the frame at the front of the chair. Move the entire brake assembly along the track to the desired position. The correct distance between the brake block and the wheel is about 2.5 cm.
-
Page 14: Fitting A Positioning Belt
Fitting a positioning belt Fitting the hip belt (accessory) Figures 22, 23 and 24 • Unscrew the screw (22A). Use a 4 mm Allen key. • Fit the hip belt as shown in figure 23. Use the screw you removed. •... -
Page 15: Safety
• Exigo 10 must not be used as a passenger seat in a vehicle. The wheelchair user must be transferred to the vehicle’s passenger seat and must use the vehicle’s safety belt. -
Page 16: Safety In Cars
User restraint system: 3 point shoulder and hip belt. Exigo 10 has marked off four points (Figure 25) that must be used when securing the wheelchair: • The rear tubing of the side frame, above the wheel block. - Page 17 Safety in cars Fastening the seat belt: • The pelvic-belt restraint must be fastened at as steep an angle as possible; between 30° and 75° • The shoulder-belt restraint is fastened over the shoulder and chest • The seat belt is fastened as tightly to the body as possible and must not be twisted •...
- Page 18 Safety in cars d) Both the stomach and chest belts should be used to reduce the risk of head and chest injuries in the event of colliding with parts in the car. e) In order to reduce the risk of injury to the user, tables that are fitted to the wheelchair, which are not designed for crash safety, must be: •...
-
Page 19: Maintenance
Maintenance Maintenance described in this section can be carried out by the user. Other maintenance work should be carried out by qualified personnel at the supplier in your municipality or at the technical aids centre. For information about repairs or servicing, please contact the technical aids centre in your county. -
Page 20: Driving Wheels
Maintenance Screws and nuts Screws and nuts can become loose over time. Therefore, remember to check and if necessary retighten all screws and nuts on a regular basis. A thread- locking product, such as Loctite Blue No. 243, may be used. If self-locking nuts have been removed they lose some of their locking ability and should be replaced. - Page 21 Maintenance Recommended pressure The chair is supplied as standard with solid wheels. Find the indication of the size on the driving wheel or castor wheel, and then read off the recommended maximum pressure in the table. Note that a high pressure makes the chair easier to roll, whereas a low pressure gives a smoother ride.
-
Page 22: Replacing Pneumatic Tyres
Maintenance Replacing pneumatic tyres Figure 27 Pneumatic tyres are an accessory Removing the tyre • Remove the wheel, then deflate the tyre by depressing the little pin in the valve or unscrewing the valve. • Ensure that the edge of the tyre sits well down in the internal depression of the wheel rim (27A). -
Page 23: Technical Specifications
Technical specifications Technical specifications and measurements The wheelchair is supplied as standard in various different seat heights and seat widths. Which height suits the user of the wheelchair depends on two factors: the height of the individual and how the chair will be used. Consult your dealer or nearest technical aids centre if you are uncertain whether you have the correct height and width. -
Page 24: Labelling
Labelling Product name CE mark Seat width Seat depth Max. user weight Climbing angle Anchorage points car Year and month of production Serial number MB3195-GB... - Page 25 Accessories • Amputation blocks • Assistant brake • Front castor wheels • Leg support, adjustable-angle • Backrest, Velcro • Table Fitting instructions are supplied with accessories. Contact your nearest Handicare branch for accessories and spare parts. MB3195-GB...
-
Page 26: Guarantee
All claims, replacement of parts and service to be covered by the limited guarantee described below must be submitted in writing to Handicare within 45 days of the failure in order to be covered by the guarantee. - Page 27 Notes MB3195-GB...
- Page 28 Notes MB3195-GB...
- Page 29 Notes MB3195-GB...
- Page 30 Notes MB3195-GB...
- Page 31 Handicare. Handicare is not responsible, either legally or financially, for any errors or inaccuracies that may appear in this user manual. All products that are mentioned in this user manual are registered trademarks and cannot be used in other contexts without the consent of Handicare.
- Page 32 Manufactured by: Handicare www.handicare.com...
Need help?
Do you have a question about the Exigo 10 and is the answer not in the manual?
Questions and answers