Table of Contents
Advertisement
Available languages
Available languages
Advertisement
Chapters
Table of Contents
Troubleshooting

Related Manuals for Handicare Beatle - Puma


Summary of Contents for Handicare Beatle - Puma
- Page 1 USER MANUAL ANVÄNDARE MANUELLT – P EATLE 9002433B...
- Page 3 English ..................4 Svenska ..................36...
- Page 4 Handicare executes a policy of continuous improvement and reserves the right to changes and modifications. The information provided is valid for the product in its standard version. Handicare cannot be held liable for possible damage resulting from specifications of the product deviating from the standard configuration.
-
Page 5: Table Of Contents
Contents Preface...........................6 This manual ......................6 Service and technical support .................6 Identification plate ....................6 Approval ........................7 CE declaration ......................7 Warranty ........................7 Liability ........................9 Used wheelchairs and the environment ..............9 Safety ........................10 1.1 General safety instructions................10 1.2 Decals and instructions on the wheelchair ............10 1.3 Electronic safety....................10 General description ....................11 2.1 Product description Beatle/Puma..............11... -
Page 6: Preface
(clean) the wheelchair. manufacture and identification number. This manual should be used in This information is provided on the combination with Handicare’s Sedeo identification plate of the product (fig. seating system manual (supplement). 0.2). In case of doubt always contact your dealer. -
Page 7: Approval
Handicare. - specified in NEN-EN 12184. • Customer: The person who directly 3. NEN-EN 12184 Electrically driven obtains a Product from Handicare. wheelchairs, scooters and • Dealer: The person who delivers a associated charging equipment – Product obtained from Handicare to Standards and testing methods, customers or third parties. - Page 8 • The guidelines of Handicare for applies that if the Customer is a the maintenance of the Product Dealer, this Dealer will indemnify...
-
Page 9: Liability
8. Handicare gives no warranty on the possibilities of recycling or repair to or reconditioning of the an environmentally friendly way Product carried out other than... -
Page 10: Safety
Safety Contact your dealer with regard 1 Safety to this. Handicare accepts no liability Electronic safety whatsoever for damage or injury • The standard version of your electric caused by the failure to (strictly) wheelchair has been tested adhere to the safety guidelines and... -
Page 11: General Description
If you use the wheelchair for other for usage under various purposes than those for which it is circumstances, for use indoors and intended, Handicare accepts no liability outdoors. whatsoever for damage or injury The seating on the Beatle / Puma is... -
Page 12: Main Components
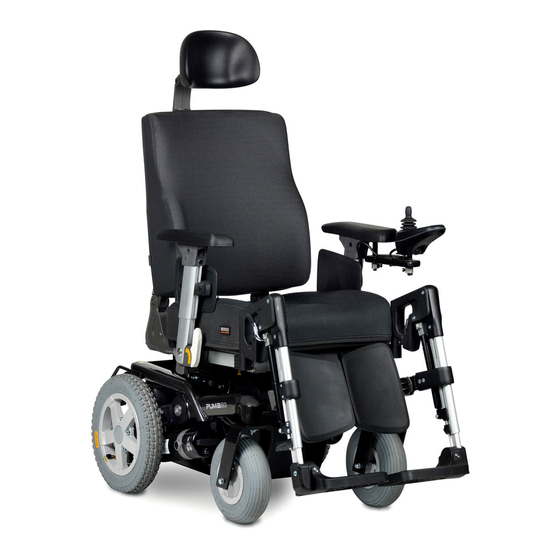
General description Figure 2.1 Main components Seat Controller, type 'Shark' or “DX” Backrest Controller attachment, fixed or swing away. Headrest (option). Free wheel lever Arm-rest Drive wheels Side panel. Swivel castors Leg rest with footrest... -
Page 13: Controller 'Dx
General description Control panel Controller 'DX' The control panel contains the The controller contains the following following functions (see fig. 2.3): main components: Panel pad • Control panel (A in fig. 2.2). On/off key • Joystick (B in fig. 2.2). Speed (drive profile) Charge connection (C in fig. -
Page 14: Controller 'Shark
General description Controller 'SHARK' Shark The controller contains the following components (See fig. 2.4, 2.5 and fig. 2.6): On/off key Joystick Charge connection Horn Battery indicator Speed control Indicators Lightning Warning lights Actuators/adjustment options Figure 2.4 Shark lights Performance adjustments should only be made by professionals conversant with the adjustment process and the operator’s... -
Page 15: Operating Instructions
Operating instructions 3 Operating instructions 3.1 Inspection before use It is important to check the following points before you start driving the wheelchair: If the lights and indicators are • working properly. If the tyres are sufficiently inflated. • If the batteries are charged •... -
Page 16: Freewheel Lever
Operating instructions Freewheel lever Put both freewheel levers (A in fig. 3.3) in the Drive position to be able to drive the wheelchair electrically. To be able to push the wheelchair, put both freewheel levers in the P position. The freewheel levers must be operated by the attendant. -
Page 17: Driving
Operating instructions Driving As a wheelchair user you could be vulnerable in traffic. When travelling in or across a road, keep in mind that other traffic participants may not always notice you. Keep to the applicable traffic regulations. Avoid out-of-the way routes, so that help can be on its way quickly when needed. -
Page 18: Driving Forward And Backward
Operating instructions Driving forward and backward • Switch on the wheelchair • Choose the desired speed value: With key 1, 2, 3 or 4 (A in fig. • 3.6) for controller 'DX'. • Maintain a maximum of 3 indoors or in pedestrian areas. -
Page 19: Improper Use
Operating instructions • Be sure that no items of clothing Improper use hang loose. These could be Follow the instructions with a caution caught between the wheels. symbol and consider suggestions! • When driving on a slope, always Cautions concerning improper use of make sure that all adjustment the product have been included in the options are in the lowest... -
Page 20: Obstacles
Operating instructions 3.10 Obstacles 3.11 Slopes Driving up obstacles 1. Always drive slowly and with 1. Drive straight up to the kerb (fig. awareness on slopes. 3.10). 2. Avoid sudden and jerky 2. Slowly move the joystick forward. movements. Drive up the pavement without 3. - Page 21 Operating instructions Slopes steeper than the maximum Safe slope safe slope. The Puma and Beatle meet the requirements of a class B (indoor/outdoor) wheelchair in The Puma and Beatle are capable of accordance with the European tackling slopes steeper than the standard EN12184.
-
Page 22: Reducing The Size Of Wheelchair
Operating instructions 3.12 Reducing the size of wheelchair Removing the seat 1. Pull up the seat (A in fig. 3.13) in the front. 2. When replacing the seat, the clips (B in fig. 3.13) must click around the frame (C in fig. 3.13) of the chair. -
Page 23: Transport
• The wheelchair should always be transported in a forward facing direction. • Handicare recommends a tie- down system that is tested and approved according to ISO10542 with a max weight suitable for the Puma and Beatle. •... -
Page 24: Electric Adjustments
Operating instructions 3.14 Electric adjustments The Beatle / Puma may be equipped with electric (optional) adjustments, which can be operated from the controller. The following electric adjustments may have been provided: • Seat with electric height adjustment • Seat with electric tilt adjustment •... - Page 25 Operating instructions 4. Press the symbol once more to switch on the function as soon as the desired tilting angle has been reached. Adjusting with ‘Shark’ control: See ‘Seat with electric height adjustment’. Figure 3.18 Seat with electric tilt adjustment The seat part of your wheelchair can be set at an angle that is comfortable for you.
-
Page 26: Adjustment Options
Adjustment options 4 Adjustment options Adjusting with ‘Shark’ control: See ‘Seat with electric height Seat height adjustment adjustment’. The seat height of the Beatle / Puma can be adjusted to five levels in steps of 25 mm by your dealer. Figure 3.20 Leg rest with electrical motor angle adjustment... -
Page 27: Adjustment 'Swing-Away' Controller
Adjustment options Adjustment ‘Swing- away’ controller Height 1. Loosen the bolt (A in fig. 4.3) a few turns with a 3 mm Allen key. 2. Slide the controller with the swing- away mechanism in the desired position. 3. Tighten the bolt securely. Depth 1. -
Page 28: Maintenance
Maintenance 5 Maintenance Maintenance table It is recommended to have your wheelchair serviced by your dealer once a year or, in case of intensive use, every six months. The table below shows the maintenance activities you can perform yourself. Frequency Description Daily Charge the batteries after... -
Page 29: Checking And Inflating The Tyres
Maintenance Inflate the tyres with a foot pump or a Maintenance of the batteries bicycle pump, in combination with the Refer to the battery instructions. reducing nipple included in the delivery. You can also have your tyres inflated at your local petrol station. •... -
Page 30: Troubleshooting
Troubleshooting 6 Troubleshooting Troubleshooting table ‘DX’ Signal Possible cause Remedy ON/OFF light is not on; The plug of the controller Place the plug properly in the the wheelchair does is not properly placed in "power module" (DX BUS). not drive. the ‘power module". -
Page 31: Troubleshooting Table 'Shark
Troubleshooting in fig. 6.1). Use the table below to find Troubleshooting table out the cause and report this ‘Shark’ information to your dealer. If the wheelchair will not function, while the batteries are fully charged, check the following points before contacting your dealer. -
Page 32: Technical Specifications
Technical specifications 7 Technical specifications Manufacturer: Handicare B.V. Address: Vossenbeemd 104 5705 CL Helmond The Netherlands Model: Beatle/Puma Maximum user weight 160 kg (25.2 st) Description Min. Max. D Total length including leg- rest 1050 mm 1100 mm B Total width Beatle... - Page 33 Technical specifications Test data Weight test dummy 160 kg (25.2 st) Operating force Joystick 15 N Swinging away drive box 58 N Electronic switches 13 N Parking brake 58 N Placing charging plug 58 N Batteries Maximum dimensions batteries 290 x 360 x 230 mm (bxdxh) Weight wheelchair without batteries 82 kg (12.9 st) Battery capacity Puma...
- Page 34 Technical specifications Electrical wiring diagram The electrical wiring diagram of the electronic installation is affixed to the interior of the battery box lid, wrapped in a plastic bag. Electrical wiring diagram ‘DX’ ROOD ZWART BLACK ® DX POWER MODULE 0 0 8 . 0 0 0 0 0 . 0 2 1 A R T .
-
Page 35: Connecting The Battery Charger
Technical specifications Connecting the battery charger The joystick’s standard configuration includes a ‘3-pin connection’ (see also figure 7.4). Ensure that the battery charger is properly connected so that the ‘negative pole’ (see figure 7.4 ‘Battery –’) and the ‘inhibit’ (see figure 7.4 ‘Inhibit’) are connected, enabling the system to prevent the wheelchair from moving when the battery is being charged. - Page 36 Informationen i manualen har sammanställts med största möjliga omsorg, men Handicare kan inte hållas ansvarig för eventuella fel i manualen eller kosekvenserna av dessa fel. Handicare ansvarar inte för skador som uppstått efter att verksamheter utförts på produkten av tredje man.
- Page 37 Introduktion Introduktion.........................38 Denna manual.......................38 Markeringar på rullstolen ..................38 Service och teknisk support ..................38 Typplåt ......................38 Godkännande .......................39 CE-deklaration ......................39 Garanti ......................39 Ansvarsskyldighet ....................41 Begagnade rullstolar och miljön ................41 Säkerhet.......................42 1.1 Allmänna säkerhetsinstruktioner ..............42 1.2 Dekaler och instruktioner på rullstolen ............42 1.3 Elsäkerhet .....................42 Allmän beskrivning.....................43 2.1 Produktbeskrivning Beatle/Puma ..............43...
-
Page 38: Introduktion
återförsäljare. Ange alltid rullstolen på ett säkert sätt. Till modellnummer, tillverkningsår och manualen hör också en identifikationsnummer. Denna instruktionsbok om Handicare’s information hittar du på typplåten (bild sittsystem Sedeo. Om du är känner dig 0.2). tveksam eller har några frågor, ta kontakt med din återförsäljare. -
Page 39: Godkännande
2. De i NEN-EN 12184 nämnda levererad av Handicare. kraven ur NEN-EN 12182 Tekniska • Kund: Den person som direkt hjälpmedel för rörelsehindrade – mottar en Produkt från Handicare. Allmänna standarder och • Återförsäljare: Den person som testmetoder, oktober 1997. levererar en Produkt från Handicare 3. - Page 40 Handicare garantiperioden förlänger inte skadeslös vid eventuella krav från garantiperioden. Användare eller tredje man för 8. Handicare ger ingen garanti på felaktigheter som beror på inkorrekt reparationer och eller återställande eller oförsiktig användning av av Produkten som har utförts utan...
-
Page 41: Ansvarsskyldighet
Produktens privata egendom, i de fall nämnda förlust är ett direkt resultat av ett fel på Produkten. 2. Handicare tar inte på sig ansvaret för annat än som angetts under punkt 1. Handicare accepterar i synnerhet inget ansvar för... -
Page 42: Säkerhet
Säkerhet med din återförsäljare när detta 1 Säkerhet ska göras. Handicare tar inte på sig någon Elsäkerhet ansvarsskyldighet för skador eller personskador som förorsakats på Standardversionen av din elektriska • grund av att säkerhetsföreskrifter eller rullstol har testats enligt tillämpliga instruktioner inte har efterföljts eller på... -
Page 43: Allmän Beskrivning
Om du använder rullstolen till andra med styrspakskontroll för användning ändamål än den är tillämpad för är under olika omständigheter, inomhus Handicare inte på något sätt ansvarig och utomhus. för produkt- eller personskador som härrör från denna icke godkända Sätet på Beatle / Puma är säkert användning. -
Page 44: Huvuddelar
Allmän beskrivning Bild 2.1 Huvuddelar Säte Styrenhet, typ ‘Shark’ eller ‘DX’ Ryggstöd Styrenhetsfäste, fixerat eller svängbart Huvudstöd (valfritt) Spak för friläge ’Shark’ Armstöd Drivhjul Sidopanel Svängbara hjul Benstöd med fotstöd... -
Page 45: Styrenhet 'Dx
Allmän beskrivning Kontrollpanel Styrenhet 'DX' Se fig. 010402010. Se fig. 010402000. Kontrollpanelen omfattar följande Styrenheten omfattar följande funktioner (se bild 2.3): huvuddelar: Knappsats • Kontrollpanel (A på bild 2.2) På/Av-knapp Styrspak (B på bild 2.2) • Hastighet • Uppladdningsanslutning (C på bild Batterimätare 2.2), se ’Ladda upp batterier’. -
Page 46: Styrenhet 'Shark
Allmän beskrivning Styrenhet 'SHARK' Shark Styrenheten omfattar följande delar (se bild 2.4, 2.5 och 2.6): På/Av-knapp Styrspak Uppladdningsanslutning Signalhorn Batterinivåmätare Hastighetskontroll Körriktningsvisare Belysning Varningsljus Aktuatorer/inställningsmöjligheter Bild 2.4 Körprogrammen får endast justeras av yrkesmän som är förtrogna med justeringsprocessen och användarens möjligheter. Inkorrekta inställningar kan förorsaka personskador, skador på... -
Page 47: Användning
Användning 3 Användning Inspektion före användning Det är viktigt att kontrollera följande innan du börjar köra med din rullstol: Att ljuset och körriktningsvisarna • fungerar korrekt. Att däcken är tillräckligt uppumpade. • • Att batterierna är tillräckligt uppladdade. De gröna batterilamporna måste lysa. -
Page 48: Elektrisk Rullstol - Spak För Friläge
Användning Elektrisk rullstol – spak för friläge För att kunna köra med den elektriska rullstolen ställer man in båda frilägesspakarna (A på bild 3.3) i körläge (D RIVE För att kunna skjuta rullstolen ställer man in de båda frilägesspakarna i skjutläge –... -
Page 49: Köra
Användning Köra • Som rullstolsanvändare är du sårbar i trafiken. När du kör på eller korsar en väg, tänk på att andra trafikanter kanske inte alltid uppmärksammar dig. Följ alla trafikregler. • Undvik avlägsna eller avsides belägna vägar så att du, om så behövs, snabbt kan få... -
Page 50: Köra Framåt Och Backa
Användning Köra framåt och backa Sätt på rullstolen. • • Välj önskat hastighetsvärde: • Med knapparna 1, 2, 3 eller 4 (A på bild 3.6) för styrenhet ’DX’. • Inomhus eller i områden med fotgängare bör max. hastighet 3 användas. •... -
Page 51: Oegentlig Användning
Användning inställningar samt benstöden 3.8 Oegentlig användning befinner sig i lägsta läge. Observera instruktionerna vid • Fäst inga tunga föremål vid varningssymbolen och följ alla rullstolen utan råd från en rekommendationer! Varning för specialist. Du kan oavsiktligt oegentlig användning av produkten påverka stabiliteten. -
Page 52: Kurvor
Användning 3.11 Sluttningar/backar Kurvor 1. Kör alltid långsamt och • Sväng aldrig med full hastighet. koncentrerat på Minska hastigheten när du sluttningar/backar. svänger. 2. Undvik plötsliga och ryckiga • Använd körriktningsvisarna när rörelser. du svänger. 3. Undvik att byta riktning på sluttningar. - Page 53 Användning bakhjulsdrivna (RWD) rullstolar. Se Att köra uppför sluttningar som är nedanstående tabell. brantare än den maximalt allmänt säkra lutningen kan leda till säkerhetsrisker vad det gäller Testade sluttningar enligt EN12184 stabiliteten. Det kräver stor (Klass B Inomhus/Utomhus) försiktighet och fullständig kontroll Maximal av användaren.
-
Page 54: Fälla Ihop Rullstolen
Användning 3.12 Fälla ihop rullstolen Ta bort sätet 1. Dra upp sätet (A på bild 3.13) framtill. 2. När du sätter tillbaka sätet måste klämmorna (B på bild 3.13) klicka fast runt stolens ram (C på bild 3.13). Kontrollera att sätet klickat fast ordentligt. -
Page 55: Transport
• Du måste alltid få bekräftat av fordonets förare att fordonet är Handicare rekommenderar att lämpligt, försäkrat och utrustat rullstolsanvändare, om möjligt, att transportera en passagerare i använder ett vanligt bilsäte. En rullstol rullstol. -
Page 56: Elektriska Inställningar
Användning 3.14 Elektriska inställningar Beatle / Puma kan (alternativt) utrustas med elektriska inställningar som kan styras från styrenheten. Följande elektriska inställningar kan installeras: • Säte med elektrisk höjdinställning • Säte med elektrisk lutning • Ryggstöd med elektrisk vinkelinställning. Benstöd med elektrisk •... - Page 57 Användning Inställning med 'Shark’-styrning: Se ’Säte med elektrisk höjdinställning’ Bild 3.18 Säte med elektrisk inställning av lutning Bild 3.19 Sätet på din rullstol kan vinklas så att Ryggstöd med elektrisk det passar dig. Med den här vinkelinställning. inställningen kan du vinkla den nedre delen av stolens sittsystem.
-
Page 58: Inställningsalternativ
Inställningsalternativ 4 Inställningsalternativ Inställning av sätets höjd Sätet på din Beatle / Puma kan ställas in av återförsäljaren på fem olika höjder, med 25 mm mellan varje steg. Bild 3.20 Benstöd med elektrisk vinkelinställning Benstöden kan ställas in elektriskt, oberoende av varandra. Elmotorn på varje benstöd kan utan problem lyfta benstödet. -
Page 59: Inställning Av Styrenhetens 'Svänga Undan'-Funktion
Inställningsalternativ Inställning av styrenhetens ’svänga undan’-funktion Höjd 1. Lossa ställskruven (A) ett par varv med en skiftnyckel på 3mm. 2. Skjut styrenheten med 'svänga undan’-mekanismen till önskat läge, 3. Dra åt ställskruven ordentligt. Djup 1. Lossa ställskruven (B på bild 4.3) Bild 4.3 ett par varv med en sexkantsnyckel på... -
Page 60: Underhåll
Underhåll 3. Sätt kontakten till batteriladdaren i 5 Underhåll ett eluttag. Underhållstabell Vi rekommenderar att du låter rullstolen servas av återförsäljaren minst en gång om året, eller om den används ofta, varje halvår. Tabellen nedan visar vilket underhåll du kan utföra själv. -
Page 61: Kontrollera Och Pumpa Upp Däcken
Underhåll Pumpa upp däcken med en fotpump Underhåll av batterierna eller en cykelpump (i kombination med Se instruktionerna till batterierna. bifogade reducernippel). Du kan också pumpa upp däcken på närmaste bensinstation. • Se till att batterierna alltid är Däcktryck drivhjul: •... -
Page 62: Felsökning
Felsökning 6 Felsökning Felsökningstabell ‘DX’ Signal Möjlig orsak Lösning PÅ/AV-lampan är inte Kontakten till styrenheten Sätt i kontakten ordentligt i på; rullstolen kör inte. sitter inte ordentligt i ’elmodulen’ (DX BUS). ’elmodulen’. DX ’elmodulen’ sitter bakom kåpan på utsidan av stolen mot batterifacket. -
Page 63: Felsökningstabell 'Shark
Felsökning Felsökningstabell ‘Shark’ Om rullstolen inte fungerar, trots att batterierna är helt uppladdade, gå igenom följande punkter innan du tar kontakt med din återförsäljare. • Stäng av rullstolen och sätt på den igen. Kontrollera om problemet har lösts. • Kontrollera om alla batteriklämmor sitter fast ordentligt. -
Page 64: Tekniska Specifikationer
Tekniska specifikationer 7 Tekniska specifikationer Tillverkare: Handicare B.V. Adress: Vossenbeemd 104, 5705 CL Helmond, Modell: Beatle/Puma Maxvikt användare 160 kg Beskrivning Min. Max. D Total längd inklusive benstöd 1 050 mm 1 100 mm B Total bredd Beatle 600 mm... - Page 65 Tekniska specifikationer Testdata Vikt testdocka 160 kg Ansättningskraft Styrspak 15 N Svänga iväg styrenhet 58 N Elektroniska brytare 13 N Parkeringsbroms 58 N Sätta i uppladdningskontakten 58 N Batterier Maxmått batterier 290 x 360 x 230 mm (b x d x h) Rullstolens vikt utan batterier 82 kg Batterikapacitet Puma...
- Page 66 Tekniska specifikationer Elektriskt kopplingsschema Det elektriska kopplingsschemat för den elektroniska installationen sitter på insidan av locket till batterifacket. Elektriskt kopplingsschema ’DX’ ROOD ZWART BLACK ® DX POWER MODULE A R T . N R . : 0 0 8 . 0 0 0 0 0 . 0 2 1 010902010 Bild 7.2 Elektriskt kopplingsschema ‘Shark’...
- Page 67 Tekniska specifikationer Anslutning batteriuppladdare Styrspaken har en standardkonfiguration som har en ‘3-stiftsanslutning' (se också bild 7.4). Se till att batteriladdaren ansluts korrekt så att den negativa polen (se bild 7.4 ‘Battery –’) och ‘säkerhetsstiftet’ (även kallat ‘inhibit’, se bild 7.4, ‘Inhibit’) ansluts så att systemet förhindrar att rullstolen kan köra medan batteriet laddas upp.
- Page 68 Dealer:...
Need help?
Do you have a question about the Beatle - Puma and is the answer not in the manual?
Questions and answers