Chicco Polly Swing Up Owner's Manual
Hide thumbs
Also See for Polly Swing Up:
- Instructions for use manual (64 pages) ,
- Instructions for use manual (68 pages)

Related Manuals for Chicco Polly Swing Up


Summary of Contents for Chicco Polly Swing Up
- Page 1 Polly ® Swing Up Owner's Manual Manual del propietario • Manuel du propriétaire IS0044.3 ESF ©2011 CHICCO USA, INC. 04/11...
- Page 2 • Do not use accessories that are not weighs over 30 lbs (13.6 kgs). approved by Chicco. • Use only in most reclined seating • Make sure that the seat cover is position until infant can hold head always fitted correctly on the seat up unassisted.
- Page 3 WARNING Failure to follow all warnings and instructions may result in serious injury or death. For your child's safety, read the labels and owner's manual before using the product. Your child’s safety is very important to us, so we urge you to take the following precautions when using this product: Battery Installation and Guidance •...
- Page 4 • Use solo en la posición totalmente • No utilice accesorios que no están reclinada hasta que el niño pueda autorizados por Chicco. sostener su cabeza levantada sin • Asegúrese de que la cubierta ayuda. del asiento esté correctamente •...
- Page 5 ADVERTENCIA El incumplimiento de todas las advertencias e instrucciones puede ocasionar lesiones graves o la muerte. Para preservar la seguridad de su hijo, lea las etiquetas y el manual de propietario antes de utilizar el producto. La seguridad de su hijo es muy importante para nosotros, por lo tanto le recomendamos que tome las siguientes precauciones cuando utilice este producto: •...
- Page 6 • Ne pas utiliser d’accessoires non jusqu’à ce que le bébé puisse se approuvés par Chicco. tenir la tête sans aide. • S’assurer que la housse de siège est • Ne pas placer cette balançoire sur toujours bien fixée au siège et au...
- Page 7 MISE EN GARDE Ne pas suivre tous les avertissements et les instructions pourrait mener à de graves blessures ou à la mort. Pour la sécurité de votre enfant, lire les étiquettes et le manuel du propriétaire avant d'utiliser le produit. La sécurité de votre enfant est très importante pour nous, alors nous vous demandons de suivre les précautions suivantes en utilisant ce produit.
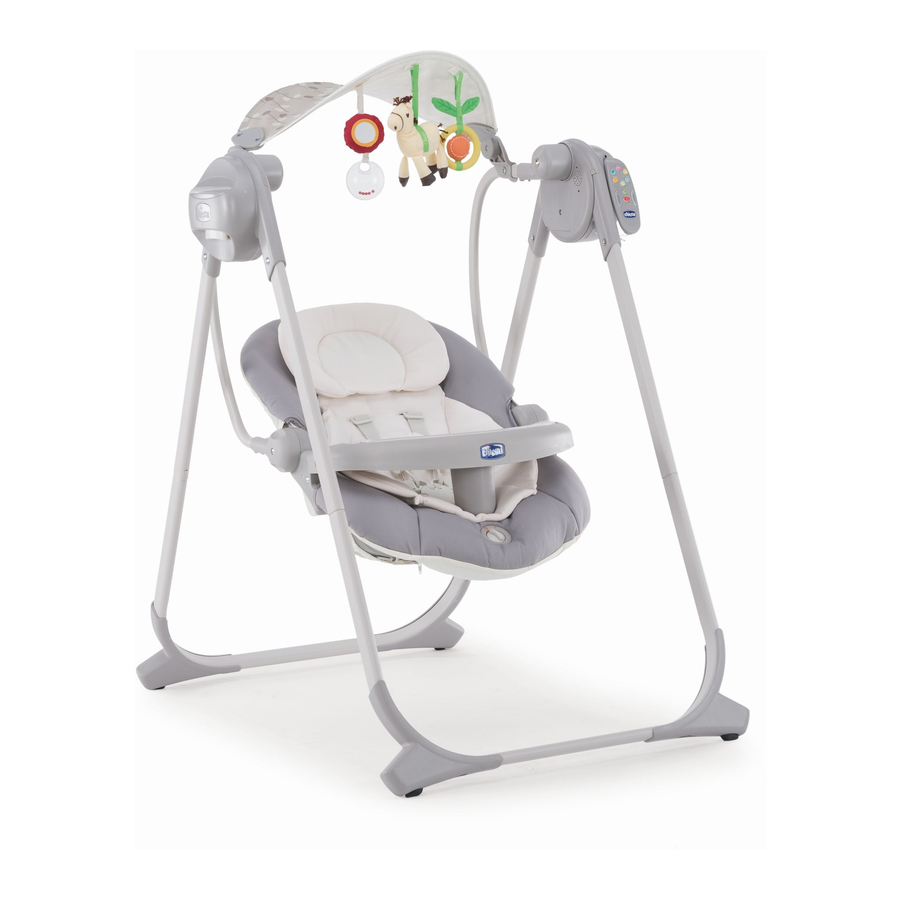
- Page 8 Components Componentes Composants A. - Top Tube of the Seat with shoulder harness straps A. - Tubo superior del asiento con cinturones para hombros A. - Tube supérieur du siège avec courroies d’épaules du harnais B. - Swing Tubes B. - Tubos del columpio Attachment Posts B.
- Page 9 Components Componentes Composants D. - Side Frame D. - Estructura lateral D. - Cadre latéral E. - Front and Rear Legs E. - Patas traseras y delanteras E. - Pattes avant et arrière F. - Seat F. - Asiento F. - Siège...
- Page 10 Components Componentes Composants G. - Dual Tray G. - Bandeja doble G. - Plateau double H. - Infant Insert (a. head, b. body) H. - Portabebés (a. cabeza, b. cuerpo) H. - Support pour bébé (a. tête, b. corps) I - Remote Control I.
- Page 11 Components Componentes Composants J. - Toy Bar J. - Barra de juguetes J. - Barre à jouets K. - Toys K. - Juguetes K. - Jouets L. Shoulder Pads L. Almohadillas para el hombro L. Coussins d’épaules...
- Page 12 How to Assemble the Swing Cómo ensamblar el columpio Comment assembler la balançoire 1. Grasp the Front and Rear Legs (E), and insert them into the (C) and (D) Side Frame tubes, as shown. When the legs are assembled correctly, the locking buttons will click into place on the Side Frame tubes.
- Page 13 How to Assemble the Swing Cómo ensamblar el columpio Comment assembler la balançoire 2. Press the Side Frame release buttons and open the frame by pulling the swing's legs apart with your foot. The seat can now be fitted. 2. Presione los botones de desbloqueo de las estructuras laterales y separe las patas del columpio con su pie para abrir la estructura.
- Page 14 How to Assemble the Swing Cómo ensamblar el columpio Comment assembler la balançoire 3. Un-hook all 4 of the elastic rings from the plastic hooks on the bottom of the Seat (F). Open the zipper on the back of the fabric backrest as far as possible.
- Page 15 How to Assemble the Swing Cómo ensamblar el columpio Comment assembler la balançoire 4. Slide the Top Tube of the Seat with Harness Straps (A) into the open tube ends inside the backrest, as shown. You will hear “CLICK!” the locking buttons click into place. “CLICK!”...
- Page 16 How to Assemble the Swing Cómo ensamblar el columpio Comment assembler la balançoire 5A. Thread the harness straps through the slots in the backrest. 5A. Pase los cinturones para hombros por las ranuras en el respaldo. 5A. Enfiler les courroies du harnais dans les fentes du dossier.
- Page 17 How to Assemble the Swing Cómo ensamblar el columpio Comment assembler la balançoire WARNING ADVERTENCIA MISE EN GARDE Check that the seat pad is Asegúrese de que la S’assurer que le coussin de siège fitted correctly before using almohadilla del asiento esté est bien installé...
- Page 18 How to Assemble the Swing Cómo ensamblar el columpio Comment assembler la balançoire Attachment Posts 7. Insert the round-shaped end of the Swing Postes de sujeción Tubes (B) into the seat frame at the side of the Poteaux de fixation Seat.
- Page 19 How to Assemble the Swing Cómo ensamblar el columpio Comment assembler la balançoire 8. To assemble the seat on the frame, slide the oval-shaped ends of the Swing Tubes into the open tube ends on the Side Frame. When you hear the locking buttons click into place, the seat is fitted correctly.
- Page 20 How to Assemble the Swing Cómo ensamblar el columpio Comment assembler la balançoire 9. Make sure the shoulder straps are at the appropriate height position and the waist belt is pulled through the seat fabric. 9. Asegúrese de que los cinturones para hombros estén a la altura adecuada y de que el cinturón inferior se haya extraído de la tela del asiento.
- Page 21 How to Assemble the Swing Cómo ensamblar el columpio Comment assembler la balançoire 10. Slide the Shoulder Pads (L) onto the shoulder harness straps as shown. 10. Deslice las almohadillas para el hombro (L) sobre los cinturones para hombros como se muestra en la figura.
- Page 22 How to Assemble the Swing Cómo ensamblar el columpio Comment assembler la balançoire 11A. Attach the shoulder harness to the waist belt clip. Hold the waist belt clip stationary and line up the arrows on the shoulder harness clip and waist belt clip. Push the shoulder harness clip down into the waist belt clip (twisting motion), it will click into place.
- Page 23 How to Assemble the Swing Cómo ensamblar el columpio Comment assembler la balançoire 11B. Insert the waist belt clip into the crotch strap buckle, it will click into place. 11B. Inserte el gancho del cinturón inferior en la hebilla de la correa de la entrepierna, se fijará...
- Page 24 How to Assemble the Swing Cómo ensamblar el columpio Comment assembler la balançoire The swing can be used with a Infant Insert (H). 12. To attach the head (a.) section of the Infant Insert: Thread the hook and loop straps through the top openings in the seat back.
- Page 25 How to Assemble the Swing Cómo ensamblar el columpio Comment assembler la balançoire 13. To attach the body (b) section of the Infant Insert: Place the body of the Infant Insert against the seat back. Check to make sure the shoulder harness straps go over the top. Thread both waist belt straps through slots in the bottom (as shown).
- Page 26 How to Assemble the Swing Cómo ensamblar el columpio Comment assembler la balançoire WARNING ADVERTENCIA MISE EN GARDE Prevent serious injury or death Evite lesiones graves o la Pour éviter les blessures graves from infants falling or being muerte del niño si éste cae o ou la mort des bébés qui tomb- strangled in straps.
- Page 27 How to Assemble the Swing Cómo ensamblar el columpio Comment assembler la balançoire 15. To release and/or move the tray out of the way. Slide the button forward on either side and pull up on the tray. 15. Para desbloquear o quitar la bandeja. Deslice el botón hacia delantero en ambos lados y tire la bandeja hacia arriba.
- Page 28 How to Assemble the Swing Cómo ensamblar el columpio Comment assembler la balançoire 16. Remove the tray insert by pulling up on the side tabs. 16. Tire las lengüetas laterales hacia arriba para quitar el enganche de la bandeja. 16. Retirer l’intérieur du plateau en soulevant les languettes latérales.
- Page 29 How to Assemble the Swing Cómo ensamblar el columpio Comment assembler la balançoire 17. To attach the Toy (L) to the Toy Bar (K) slide each toy strap through the loops and press together the hook and loop tabs. 17. Para colocar el juguete (L) en la barra de juguetes (K), deslice la correa de cada juguete a través de los bucles y presione el gancho contra las lengüetas de los bucles.
- Page 30 How to Assemble the Swing Cómo ensamblar el columpio Comment assembler la balançoire 18. Standing behind the Swing grasp the Toy Bar with the Toys hanging down and the arch facing forward. Clip the Toy Bar to the attachment posts on the Swing Tubes. The position of the Toy Bar can be adjusted as necessary.
- Page 31 How to Remove the Toy Bar Cómo para quitar la barra de juguetes Comment pour retirer la barre à jouets WARNING ADVERTENCIA MISE EN GARDE Never use the Toy Bar to carry Nunca utilice la barra de Ne jamais utiliser la barre à or move the swing.
- Page 32 How to Adjust the Recline Cómo ajustar el respaldo Comment ajuster l’inclinaison ADVERTENCIA MISE EN GARDE WARNING Use solo en la posición Utiliser uniquement dans la Use only in most reclined totalmente reclinada hasta position du siège la plus inclinée seating position until infant que el niño pueda sostener su jusqu’à...
- Page 33 How to Use the Electronic Hub Cómo utilizar el dispositivo electrónico Comment utiliser le module électronique ADVERTENCIA MISE EN GARDE WARNING Ne pas utiliser ensemble des No mezcle diferentes tipos Do not mix different battery piles de différents types ou de pilas, ni pilas nuevas con types or old and new batteries.
- Page 34 How to Operate the Swing Cómo operación el columpio Fonctionnement de la balançoire 22. There is a “Swing Mode” power button located in the remote control storage compartment on the front of the swing housing. Note: This button is covered by the remote control when the remote control is attached to the swing housing.
- Page 35 How to Use Remote Control Cómo utilizar el control remoto Comment utiliser la télécommande WARNING ADVERTENCIA MISE EN GARDE Do not mix different battery No mezcle diferentes tipos Ne pas utiliser ensemble des types or old and new batteries. de pilas, ni pilas nuevas con piles de différents types ou Make sure batteries are inserted pilas usadas.
- Page 36 How to Use Remote Control Cómo utilizar el control remoto Comment utiliser la télécommande A. Swing Mode Power: Press the button to turn the swing mode ON or OFF. B. Swing Speed: Press “+” to increase the swing speed. Press “-“ to decrease the swing speed.
- Page 37 How to Use Remote Control Cómo utilizar el control remoto Comment utiliser la télécommande A. Encendido del modo para mecer: Presione A. Activation du mode de balancement : el botón para ENCENDER o APAGAR el appuyer sur la touche pour activer ou modo.
- Page 38 How to Use the Swing Vibration Cómo utilizar la vibración del columpio Comment utiliser le balancement avec vibration WARNING ADVERTENCIA MISE EN GARDE Do not mix different battery No mezcle diferentes tipos Ne pas utiliser ensemble des types or old and new batteries. de pilas, ni pilas nuevas con piles de différents types ou Make sure batteries are inserted...
- Page 39 How to Use the Swing Vibration Cómo utilizar la vibración del columpio Comment utiliser le balancement avec vibration 26. The vibration block has an on/off switch located on the front of the seat. The "O" indicates off and the "I" indicates on. 26.
- Page 40 Troubleshooting Resolución de problemas Dépannage 27. If the Swing is not swinging properly check to make sure: 1) The batteries are still working – Try replacing with new batteries. 2) The batteries are inserted properly and that the polarity (+/-) matches the markings on the product.
- Page 41 How to Close the Swing Cómo colocar cierre de le columpio Comment fermer la balançoire The Swing can be folded up to store or transport it. 28. Press the Side Frame release buttons and close the frame by placing your foot on the Rear legs and pulling/tipping the Front legs towards you.
-
Page 42: Fitting And/Or Replacing Batteries
Fitting and/or Replacing Batteries Colocación y sustitución de pilas Installation et remplacement des piles WARNING The Remote requires 2 x AAA 1.5 Volt alkaline type batteries, the Swing requires 4 x C 1.5 Volt alkaline type batteries , Vibration unit requires 1 x D 1.5 Volt alkaline type batteries (not included). - Page 43 Fitting and/or Replacing Batteries Colocación y sustitución de pilas Installation et remplacement des piles ADVERTENCIA El control remoto requiere 2 pilas alcalinas AAA de 1.5voltios, el columpio requiere 4 pilas alcalinas C de 1.5voltios, la unidad de vibración requiere 1 pila alcalina D de 1.5voltios (no incluidas).
- Page 44 Fitting and/or Replacing Batteries Colocación y sustitución de pilas Installation et remplacement des piles MISE EN GARDE La télécommande fonctionne avec 2 piles alcalines AAA de 1,5 volts, la balançoire fonctionne avec 4 piles alcalines C de 1,5 volts, le module vibratoire fonctionne avec 1 pile alcaline D de 1,5 volts (non comprises).
- Page 45 Periodically inspect the swing to check for broken, torn or missing parts: If this is the case, do not use it. Replace or repair the parts as needed. Use only Chicco replacement parts. To avoid friction that may prevent the correct operation of the Swing, ensure that all the movable plastic parts placed along the metal frame are clean of dust and dirt.
- Page 46 Reemplace o repare las piezas en caso de que sea necesario. Sólo utilice piezas de repuesto de Chicco. Para evitar que la fricción impida el correcto funcionamiento del columpio, asegúrese de que todas las piezas plásticas móviles que se encuentren en la estructura de metal estén libres de polvo, suciedad o arena.
- Page 47 : en leur présence, ne pas utiliser le produit. Remplacer ou réparer ces pièces au besoin. Utiliser uniquement des pièces de rechange Chicco. Afin d’éviter la friction susceptible de nuire au fonctionnement de la balançoire, s’assurer que toutes les pièces mobiles en plastique sont libres de toute trace de poussière, terre ou sable.
- Page 48 Si vous avez des questions ou commentaires, au sujet de ce produit, ou si certaines pièces sont manquantes, veuillez ne pas retourner ce produit au magasin. Communiquez avec nous de l'une des façons suivantes : (800)-667-4111 www.chicco.com 2260, rue Guénette Saint-Laurent (Québec) H4R 2M7 Canada...
- Page 50 www.chiccousa.com...
Need help?
Do you have a question about the Polly Swing Up and is the answer not in the manual?
Questions and answers
Still not swinging properly
The Chicco Polly Swing Up may not be swinging properly due to the following reasons:
1. The batteries may not be working and need replacement.
2. The batteries may be inserted incorrectly, and the polarity (+/-) should match the product markings.
3. The child's weight may not be appropriate for the swing.
4. The child may be leaning forward, affecting the swing's movement.
This answer is automatically generated