Medion Navigation Unit Operating Instructions Manual
Hide thumbs
Also See for Navigation Unit:
- Operating instructions manual (104 pages) ,
- Manual (56 pages) ,
- Operating instructions manual (64 pages)
Table of Contents
Advertisement
Quick Links
Notes on these Operating Instructions
We have structured these Operating Instructions for the installation so that you will
be able to look up the necessary subject-related information by means of the Con-
tents List at any time.
Note
You will find comprehensive Operating Instructions for navigation on
relevant CDs/DVDs and at the online help of the device.
Read the section "Frequently Asked Questions" to obtain answers to questions that
are often addressed to our customer service.
Document Your Navigation Unit
It is important to document the details of your Navigation Unit purchase in the
event you need warranty service. The serial number can be found on the back of
the device:
Serial Number
Date of Purchase
Place of Purchase
Quality
In selecting the components we have aimed for a high level of functionality, simple
handling, safety and reliability. A well-balanced hardware and software design
allows us to offer you a technologically advanced navigation system that will give
great satisfaction in both work and leisure use.
Service
Our individual customer care is there to support you when you have questions or
problems. Please get in touch – we look forward to helping you. This manual con-
tains a special section on Customer Service starting on page 54.
......................................
......................................
......................................
Advertisement
Table of Contents

Related Manuals for Medion Navigation Unit


Summary of Contents for Medion Navigation Unit
- Page 1 Document Your Navigation Unit It is important to document the details of your Navigation Unit purchase in the event you need warranty service. The serial number can be found on the back of...
-
Page 2: Table Of Contents
Contents Safety and Maintenance................1 Safety Instructions ....................1 Data Security .......................1 Operating Environment ..................2 Repair ........................2 Ambient Temperature..................2 Electromagnetic Compatibility................3 Connection......................4 Power Supply through Car Adapter ..............4 Power Supply through AC adapter (optional)...........4 Cabling ........................4 Information about the Regulatory Compliance according to R&TTE ....5 Battery Operation ....................5 Maintenance......................5 Care of the Display....................6... - Page 3 General Operating Instructions ............19 Switching On/Off the Device ................19 Working with Memory Cards ................20 Inserting Memory Cards .................20 Removing Memory Cards ................20 Accessing Memory Cards................21 Data Exchange via Card Reader...............21 Resetting the Navigation System ................22 Soft Reset......................22 Hard Reset ......................22 Navigation ....................23 Safety Instructions for Navigation ..............23 General Instructions ..................23...
- Page 4 Video Player (optional) ................44 Main Screen Overview ..................44 Selecting and playing video................44 Travelguide (optional) .................46 AlarmClock (Wakeup function) (optional)...........47 Overview of the Main Screen ................47 Description of the Interfaces ................48 Setting the System Time .................49 Selecting an Alarm Signal ................49 Setting the Volume ..................50 Snooze Function.....................51 Ending the AlarmClock Application ..............52...
- Page 5 Specifications..................65 Copying this manual ................65 Model Overview ..................66 Conditions of Warranty for the United Kingdom ........67 Index.....................73 ® ® Copyright © 2007, version 23/08/07. All rights reserved. Microsoft , MS-DOS , and Windows ® are registered trademarks of Microsoft Corporation in the U.S. and other countries. Pentium a registered trademark of Intel Corporation.
-
Page 7: Safety And Maintenance
Safety and Maintenance Safety Instructions Please read this section carefully and follow all the instructions given. This will help ensure reliable operation and extend the service life for your appliance. Keep the packaging and the user instructions for future reference or inquiries at a later date. -
Page 8: Operating Environment
Operating Environment Failure to follow these instructions may lead to damage to your appliance. The guarantee will be excluded in such cases. • Keep your navigation System and all connected devices away from mois- ture and avoid dust, heat and direct sunlight, especially in the car. •... -
Page 9: Electromagnetic Compatibility
Electromagnetic Compatibility • When connecting additional or other components the “Electromagnetic Compatibility Directive” (EMC) must be adhered to. Please also note that only screened cable (maximum 10ft) should be used with this appliance. • For optimal performance, maintain a distance of at least 10 ft. from sources of high-frequency and magnetic interference (televisions, loudspeaker sys- tems, mobile telephones etc. -
Page 10: Connection
Connection When connecting your appliance be sure to correctly observe the following instruc- tions: Power Supply through Car Adapter • The car adapter should only be connected to the lighter socket of a car (car battery = DC 12V , truck battery = DC 24V !). -
Page 11: Information About The Regulatory Compliance According To R&Tte
The company declares that this device is in compliance with the essential require- ments and other relevant provisions of Directive 1999/5/EC. Complete declarations of conformity are available under www.medion.com/conformity. Battery Operation Your appliance is operated with a removable battery. In order to prolong the life... -
Page 12: Care Of The Display
Care of the Display • Avoid scratching the display surface as this is easily damaged. It is strongly recommended to use a display protection mylar to avoid scratches. Please ask your nearest dealer for this accessory. The foil on the display at delivery is purely for protection during transpor- tation! •... -
Page 13: Transport
Transport If you wish to transport the appliance follow the instructions below: • Following transport of the appliance wait until the unit has acclimatized before using it. • In the case of wide fluctuations in temperature or humidity condensation or moisture may form inside the appliance and this can cause an electrical short-circuit. -
Page 14: Supplied Items
Supplied Items Please check the integrity and completeness of the supplied items and, if it is not complete, forward us any possible claims within 14 days from the purchase date. The purchase package includes: • Navigation system • Power cable for cigarette lighter •... -
Page 15: Views
Views Front Components Ref Component Description Microphone For the free speech facility (only for Models 3315 and 3415) Touch Screen Displays the output of your appliance. Tap on the screen with your finger, a stylus or a "blunt" tip to select menu commands or enter data. -
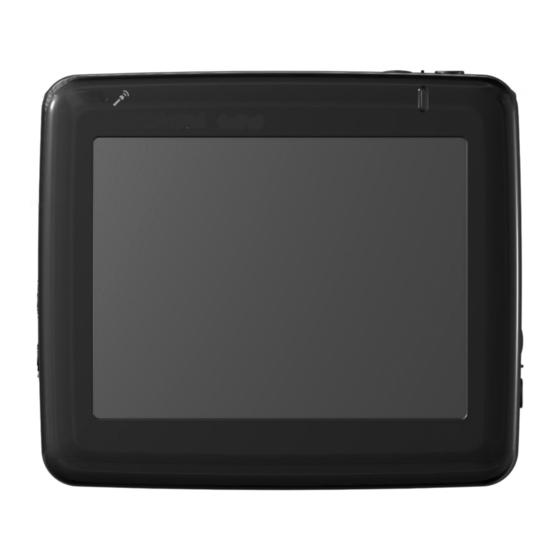
Page 16: Back Components
Back Components Antenne Ref Component Description Stylus Take the pen out of its compartment in order to use it, and replace it after use. The pointer pen is required for operating the touch screen. External Connection for an optional second aerial. aerial connection Loudspeaker Plays back language statements and warnings. -
Page 17: Bottom Components
Bottom Components Ref Component Description Main switch Switches the device completely off (Hard Reset). Top Components Ref Component Description Navigation button Button to the main destination entry menu during navigation. On/Off switch Switches the device on or off (standby mode). Views... -
Page 18: Left Components
Left Components Ref Component Description Earphone Connects to a pair of stereo headphones (3.5 mm). connector Using this appliance at full volume for extended periods of time may cause damage to the hearing ca- pacity of the listener. TMC Connector You also have the possibility to connect a TMC dipole antenna here (only for Models E3215 and E3415) Mini-USB-... -
Page 19: Right Components
Right Components Ref Component Description Reset opening Restarts your appliance (Soft Reset, see page 22). Volume + Increase the volume Volume - Decrease the volume SD/MMC Slot Accepts an optional SD (Secure Digital) or MMC (MultiMediaCard) card for removable storage. Views... -
Page 20: Initial Set-Up
Initial Set-up The following guides you step by step through the initial Set-up of the navigation system. Firstly, remove the foil from the display. I. Charging the Battery Attention! It can be necessary to recharge the battery for some time initially be- fore it is possible to run through the initial installation, according to the state of charging of the battery installed. -
Page 21: Ii. Power Supply
II. Power Supply Car Adapter (similar picture) 1. Plug the jack ( ) of the connection cable into the corresponding receptor at the bottom of your navigation system. 2. Insert the power adapter ( ) into the cigarette lighter socket and ensure, that it will not lose contact while driving. -
Page 22: Ac Adapter (Optional)
AC Adapter (optional) Adapter plug (similar picture) 1. Push the adapter connector into the guide on the back of the AC adapter. Press the push button at the same time, so that the adapter plug can en- gage. 2. Plug the cable of the mains adapter ( ) into the mini-USB connection on the lower side of the navigation system. -
Page 23: Iii. Switching On The Device
III. Switching on the Device Switch the main switch to ON. Attention! Always leave the main switch in the ON position, unless you want to carry out a new reinstallation. If the main switch is in the OFF posi- tion, all data will be deleted in the temporary memory. The Navigation System will start the initial installation automatically. -
Page 24: Iv. Installing The Navigation Software
Note Brief pressure on the on/off button will be enough to switch the device on or off, provided that your navigation system is connected to an external source of electricity or is running in battery operation (standby mode). You can adjust the period of operation to suit your needs using the Settings button on the main screen of your device. -
Page 25: General Operating Instructions
General Operating Instructions Switching On/Off the Device Your device will be in its normal operating state after the initial setting up. You can activate and deactivate your device with the On-/Off switch. To start your navigation system press briefly the On-/Off switch Note Your device is delivered in a status in which it will not switch off in- dependently. -
Page 26: Working With Memory Cards
Working with Memory Cards Your navigation system supports MMC and SD memory cards. Inserting Memory Cards Carefully take the optional memory card out of its packing (if included). Take care not to touch or dirty the contacts. Insert the memory card carefully into the card bay with contacts pointing forward. -
Page 27: Accessing Memory Cards
Accessing Memory Cards • The appliance only supports memory cards in the FAT16/32 file format. If you insert a card prepared with a different format (e.g. in cameras, MP3 players), your navigation system may not recognize it and will ask you to format it again. Warning Formatting the memory card irretrievably wipes out all data. -
Page 28: Resetting The Navigation System
Resetting the Navigation System You will have the possibility of resetting your navigation system if it is no longer reacting or working properly. This option restarts the navigation system, without reinstallation being necessary. A reset is often used in order to reorganize the memory. In doing so all programs that are running are interrupted and the working memory is reinitialized. -
Page 29: Navigation
Navigation Safety Instructions for Navigation The bundled product CD/DVD contains a comprehensive instruction manual. General Instructions • Do not manipulate the navigation system while driving to protect yourself and others from accidents! • In the event that you do not understand the voice instruction or if you are in any doubt about what to do at the next intersection, then the map or ar- row display will provide you with a quick orientation. -
Page 30: Notes For Use In A Vehicle
Notes for Use in a Vehicle • Take care that the holder does not present any risk to safety, even in the case of an accident, when installing it. • Take care that the cable does not impede any safety components. •... -
Page 31: Aerial Orientation
Aerial Orientation The aerial must have unrestricted access to the sky to receive GPS satellite signals. Orient the aerial as horizontally as possible for this reason. Try out aerial and instal- lation possibilities in the vehicle in the case of inadequate reception. It may be nec- essary to install an external GPS antenna (see page 59) under certain circumstances. -
Page 32: Ii. Fixing The Suction Plate
Note If you want to fix the holder to the wind screen, then you can skip steps 1 and 2. Note Your navigation system can also be equipped alternatively with a fle- xible swan-neck car mounting according to the version. 1. -
Page 33: Ii. Attaching The Navigation System
II. Attaching the Navigation System 1. Connect the car adapter (see page 15) and, if necessary, the external GPS ae- rial, to your navigation system and insert the memory card. 2. Place the device below in the centre of the holder and press it gently back- wards until it engages audibly. -
Page 34: Iv. Connecting The Car Adapter
IV. Connecting the Car Adapter (similar picture) Plug the jack ( ) of the connection cable into the corresponding receptor at the bottom of your navigation system (p. 11). Insert the power adapter ( ) into the cigarette lighter socket and ensure, that it will not lose contact while driving. -
Page 35: Iv. Starting The Navigation Software
IV. Starting the Navigation Software Note Your memory card will always have to be inserted into the device during the use of the navigation system, if the card contains (addi- tional) mapping material. It will be necessary to carry out a reset to restart the navigation sys- tem if the memory card has been removed while the system was be- ing used (see page 22). -
Page 36: Information About Monitoring Traffic
Information about Monitoring Traffic The warning function before traffic monitoring points will be deactivated as stan- dard when bringing the system into operation for the first time. The current status of the monitoring can be taken from the colour of the small square in the lower right corner of the display. - Page 37 Traffic monitoring points will be displayed in the 2D map display if the monitoring program has been activated. Acoustic information about a traffic monitoring point will be given by a warning sound approx. 15 seconds before it is reached. Then, another double warning sound will be given approx.
-
Page 38: Handsfree Facility By Means Of Bluetooth (Optional)
Handsfree Facility by means of Blue- tooth (optional) The Bluetooth technology serves to bridge short distances wirelessly. Bluetooth devices transmit data wirelessly, so that other devices that also support this tech- nology can communicate with each other without cables. Both devices will have to be adjusted to each other (pairing), before you will be able to use your navigation system as handsfree equipment with your Bluetooth mobile phone. -
Page 39: Overview Of The Most Important Keys In The Bluetooth Application
Overview of the most important keys in the Bluetooth application Button Description Indicates that the mobile phone is connected to another device. Indicates that the mobile phone is not connected. Making calls / accepting incoming calls Terminate or reject a call Settings Volume settings Microphone settings... -
Page 40: Pairing The Navigation Device And The Mobile Phone
Pairing the Navigation Device and the Mobile Phone Activate the Bluetooth function on your mobile phone. Each mobile phone uses different paths to do this. Read the instructions of your mobile phone under all circumstances for this reason. Start the Search process in the main screen by a double tap on . - Page 41 Enter a PIN code. Repeat the entering of the PIN code on your mobile phone. Note Steps 5 and 6 must be carried out in the reverse sequence, as appro- priate, according to the mobile phone. The selected mobile phone will have been recognized and the free speaking device through the navigation system will now be available to you.
-
Page 42: Making Calls
Making Calls Tap on in the main Bluetooth screen and enter the number that you wish to call. Start the call with The number entered will be dialed and the conversation will start. You will end the conversation by tapping on Accepting incoming calls Click here to accept a call. -
Page 43: Mp3 Player (Optional)
MP3 Player (optional) Depending on the software equipment your navigation system is equipped with a MP3 Player. Start the MP3 player from the main screen by tapping the ‘MP3 Player’ switch area. Alternatively, the MP3 player can also be started from the navigation software itself. -
Page 44: Select A Title And Move It Into The List Of Favourites
Button Description Stop the playback. Changing the mode of playing: (normal) Normal: Plays all the files in their sequence and stops after the last file. (shuffle) Shuffle: Plays a file selected at random. Repeat: Repeats the current file continuously. (repeat) Repeat all: Plays all the files in their sequence and will restart from the first file, after the last (repeat all) - Page 45 The selected titles will be indicated by a Tap on , in order to confirm your selection. The titles marked will not be moved into the List of Favourites until then. You will remove the marking of the title currently viewed with Tap the file required and select the requisite title, in order to select a title in the sub- directories.
-
Page 46: List Of Favourites
List of Favourites You will reach the List of Favourites by tapping on the You will delete individual titles with and you will delete all titles with Confirm with , in order to take over the new selection into the List of Favourites. English... -
Page 47: Picture Viewer (Optional)
Picture Viewer (optional) Depending on the software equipment your navigation system is equipped with a Picture Viewer. You can view the jpg format images on your memory card on your navigation system, with the Picture Viewer. All the images on the memory card will be available immediately. -
Page 48: Full Image View
Full Image View Ill.: Full image view without service strip Tap in the lower area of the screen in the full image view, in order to activate the service strip: Ill.: Full image view with service strip Button Description Previous picture Turn it clockwise by 90°... - Page 49 The image displayed will be subdivided into 6 fields by tapping on the sym- bol (fade in grid). Ill.: Full image mode with grid Tap on a square in the grid to zoom in on that area of the picture: Ill.: Zoom-in Mode Tap on the centre of the image to go back to viewing the full picture.
-
Page 50: Video Player (Optional)
Video Player (optional) Depending on the software equipment your navigation system is equipped with a Video Player. 1. Start the Video Player from the main screen by tapping the ‘Video Player’ switch area. Main Screen Overview Selecting and playing video Click on , on the main screen to open the file explorer: English... - Page 51 Select the desired video and confirm with Button Description Forward / Backward Increase or decrease the volume. The display in the upper right corner of the screen will show the current level of the volume. File Explorer Play the playback. Pause the playback.
-
Page 52: Travelguide (Optional)
Travelguide (optional) Depending on the software equipment your navigation system is equipped with a Travelguide. The Travelguide will supply general information about the different areas of indi- vidual towns and cities or regions in Europe, such as sights, restaurants, culture and travel information. -
Page 53: Alarmclock (Wakeup Function) (Optional)
AlarmClock (Wake up function) (op- tional) Depending on the software equipment your navigation system is equipped with a an AlarmClock/ Wake up function. Start this function from the main screen by tapping on the ‘AlarmClock’ button. The waking function can work both as a normal when the device is switched off (Standby Mode / Power Saving Mode) and as a reminder during the current naviga- tion. -
Page 54: Description Of The Interfaces
Description of the Interfaces Button Description Current system time Setting-up mode (Setting volumes, system time and alarm) Night mode (Standby mode) Reset/deactivate the waking function Setting the alarm time Delete the entry Confirmation interface Reduce the volume Increase the volume Back to the previous menu Close the application English... -
Page 55: Setting The System Time
Setting the System Time The display of the current time will be located in the upper right corner of the screen. You can adjust it as follows: 1. Tap on in the main screen. The following screen will appear: 2. Tap on to change the time setting. -
Page 56: Setting The Volume
3. The selected alarm signal is marked by a 4. Close the application with Setting the Volume You can adjust the volume of the alarm signal by tapping on the interface. Note The volume configured here only relates to the alarm signal and will not change the volume of the language output of the navigation sys- tem or other functions of the system. -
Page 57: Snooze Function
Snooze Function You will have the possibility of making the waking signal repeat at regular inter- vals by means of the Snooze function, once it has sounded at the alarm time set. Tap on to activate the Snooze function. Current system time Waking time set Fig. -
Page 58: Ending The Alarmclock Application
Ending the AlarmClock Application Tap on in order to deactivate the alarm time set You will find yourself in the Setting-up mode. Tap on in order to leave the application. An alarm time is not set.. English... -
Page 59: Faq
Where can I find more information on the navigation system? Detailed operating instructions for navigation can be found on the corresponding CDs/DVDs, which accompany your navigation system. Also use the additional Help functions that are available with a single touch of a button (usually F1 on the PC), or by selecting the Help option, as additional assistance. -
Page 60: Customer Service
Customer Service Faults and Possible Causes The navigation system no longer reacts or is behaving atypically. • Carry out a reset (see page 22). ® The navigation system is recognized only as a guest by ActiveSync • See information on page 58. The GPS receiver cannot be initialized or found. -
Page 61: Appendix
Appendix Special CleanUp Function The CleanUp function allows the targeted deletion of data, without using a PC. IMPORTANT Please use this function very carefully, because it is possible for data to be deleted that can only be entered again manually afterwards. The CleanUp function is activated when the ‘o’... - Page 62 5. Factoryreset Sets the device back to the delivery status in the case of an intact main installation. 6. Format Flash Formats the internal ‘My Flash Disk’ memory. This formatting can be necessary in the case of a prolonged removal of errors. It will be necessary to recalibrate the screen after the formatting function has been carried out.
-
Page 63: Synchronisation With The Pc
Synchronisation with the PC ® ® I. Installing Microsoft ActiveSync In order to transfer data between your PC and your navigation system you need the ® ® Microsoft ActiveSync program. The cost of the navigation system includes a license for this program which can be found on the CDs/DVDs. -
Page 64: Ii. Connecting With The Pc
II. Connecting with the PC 1. Press the On/Off button to start your navigation system. 2. Connect the USB cable (optional) to your navigation system. 3. Push the USB connector into a free USB port on your computer. 4. The hardware installation assistant will recognize a new appliance and in- stalls a suitable driver which can take some minutes. -
Page 65: Gps (Global Positioning System)
GPS (Global Positioning System) GPS is a satellite-backed system for determining your position. With the help of 24 satellites revolving around the earth, it is possible to determine your position on earth with the accuracy of a few meters. The satellite signals are received by the antenna of the built-in GPS receiver, which must have a "line of sight"... -
Page 66: Tmc (Traffic Message Channel)
TMC (Traffic Message Channel) The Traffic Message Channel (TMC) is a digital radio data service that functions in a similar way to RDS and is used to transmit disruptions to traffic to a suitable reception device. The traffic information is continuously transmitted across FM. The user is less dependent on the half-hourly broadcast traffic information, because the signal is continuously transmitted. -
Page 67: Installing The External Tmc Receiver / Connecting The Tmc Diplole Aerial (Optional)
Installing the External TMC Receiver / Connecting the TMC Diplole Aerial (optional) Installing the External TMC Receiver (for models E3115, E3315) 1. Connect the mini-USB plug to the mini-USB connection of your de- vice. 2. Connect the projecting antenna to the TMC receiver and attach that antenna with the aid of the suckers, at the edge of your windscreen, for... -
Page 68: Additional Card Material
Additional Card Material Your navigation system is already equipped with digitalized map material in the internal memory and/or memory card at the factory. Depending on the configura- tion, additional maps may be included on your your navigation CDs/DVDs. You will be able to transfer these cards to a memory card immediately. -
Page 69: Alternative Installation Of The Navigation Software From A Memory Card
Alternative Installation of the Navigation Software from a Memory Card The software for your navigation system can also be installed directly from a mem- ory card. The pre-installed software may have to be uninstalled beforehand (see special CleanUp function, Page 55). You will be requested to install the navigation software during the initial adjust- ment. -
Page 70: Mounting On (Bicycle) Handlebars (Optional)
Mounting on (Bicycle) Handlebars (optional) You can attach your navigation system to a bicycle as an optional additional fea- ture. A special holder is needed to do this. The installation is explained in the fol- lowing. Screws Hexagon key Clamp Holding plate (similar picture) 1. -
Page 71: Specifications
Specifications Parameter Information Power supply Mains adapter KTEC KSAFB0500100W1UV-1 Input 100-240V~ 50-60Hz Output + 5V 1.0A max. Power supply cable for a cigarette Phihong CLA05D-050A lighter Input 12-24V, 1A max. Output 5V --- 1A Earphones (optional) stereo earphones (3.5 mm) Memory card type MMC and SD Bluetooth (depending on the model) -
Page 72: Model Overview
Model Overview TMC via TMC via integrated external TMC Model Bluetooth receiver receiver (via Mini USB) and dipole aerial E3115 E 3215 E 3315 E 3415 Equipment available Equipment not available English... -
Page 73: Conditions Of Warranty For The United Kingdom
This warranty covers defects relating to workmanship and manufacture in MEDION products. The period during which this warranty is valid and during which claims against the warranty can be made to MEDION must be in accordance with the following terms in order to be considered eligible: •... - Page 74 MEDION for the reasonable costs of postage and packaging before MEDION will return the product to you. If so and you would still like MEDION to repair or replace the product, MEDION may do so but you will be charged MEDION’s standard rates for repair and replacement for this service.
- Page 75 If it is found during repair or assessment that the defect concerned is not covered under warranty, MEDION reserves the right to invoice you for all reasonable costs incurred by MEDION. These costs will be in relation to the return of the product, including reasonable administration costs, plus reasonable costs for materials used and labour provided when repairing or replacing the product.
- Page 76 This warranty will also be considered void if labels or serial numbers of the product or of a component of the product are modified or made illegible. To the extent permitted by law, MEDION shall; only be responsible for losses which are a reasonably foreseeable consequence of the relevant defect in the product;...
- Page 77 MEDION does not guarantee the 100% accuracy of the maps pro- vided with the Navigation device. It may be necessary to delete all data in the product in order to repair the MEDION product. PLEASE MAKE SURE THAT YOU HAVE A BACKUP COPY OF ALL DATA ON THE PRODUCT BEFORE RETURNING THE PRODUCT TO MEDION.
- Page 78 MEDION or its authorised person- nel. • You must take all other necessary steps to enable MEDION or its authorised personnel to carry out your order properly. • You are responsible yourself for connecting and configuring any existing ex- ternal peripheral products after MEDION or its authorised personnel have carried out their repairs.
-
Page 79: Index
Index Ending the application ....52 Interfaces........48 Main screen.......47 Selecting an alarm signal...49 Setting the system time .....49 Setting the volume....50 Snooze function ......51 External GPS antenna ....59 Buttons ........33 Power supply ......15 Making calls ......36 Switching on the device ....17 Pairing........34 Charging the battery ....14 Starting the application .....32... - Page 80 Navigation ........23 Connection .........4 Data security .......1 List of favourites ......40 Operating environment ....2 Select title .........38 Repair..........2 Power supply ......4 Cabling ........4 Battery operation ......5 Maintenance .......5 Attaching the navigation system27 Care of the display ......6 Mounting the car holder ...25 Transport ........7 Safety instructions .....23 Saugnapf befestigen....26...
Need help?
Do you have a question about the Navigation Unit and is the answer not in the manual?
Questions and answers